Brewie

Homebrew Talk - Beer, Wine, Mead, & Cider Brewing Discussion Forum

Help Support Homebrew Talk - Beer, Wine, Mead, & Cider Brewing Discussion Forum:

This site may earn a commission from merchant affiliate links, including eBay, Amazon, and others.
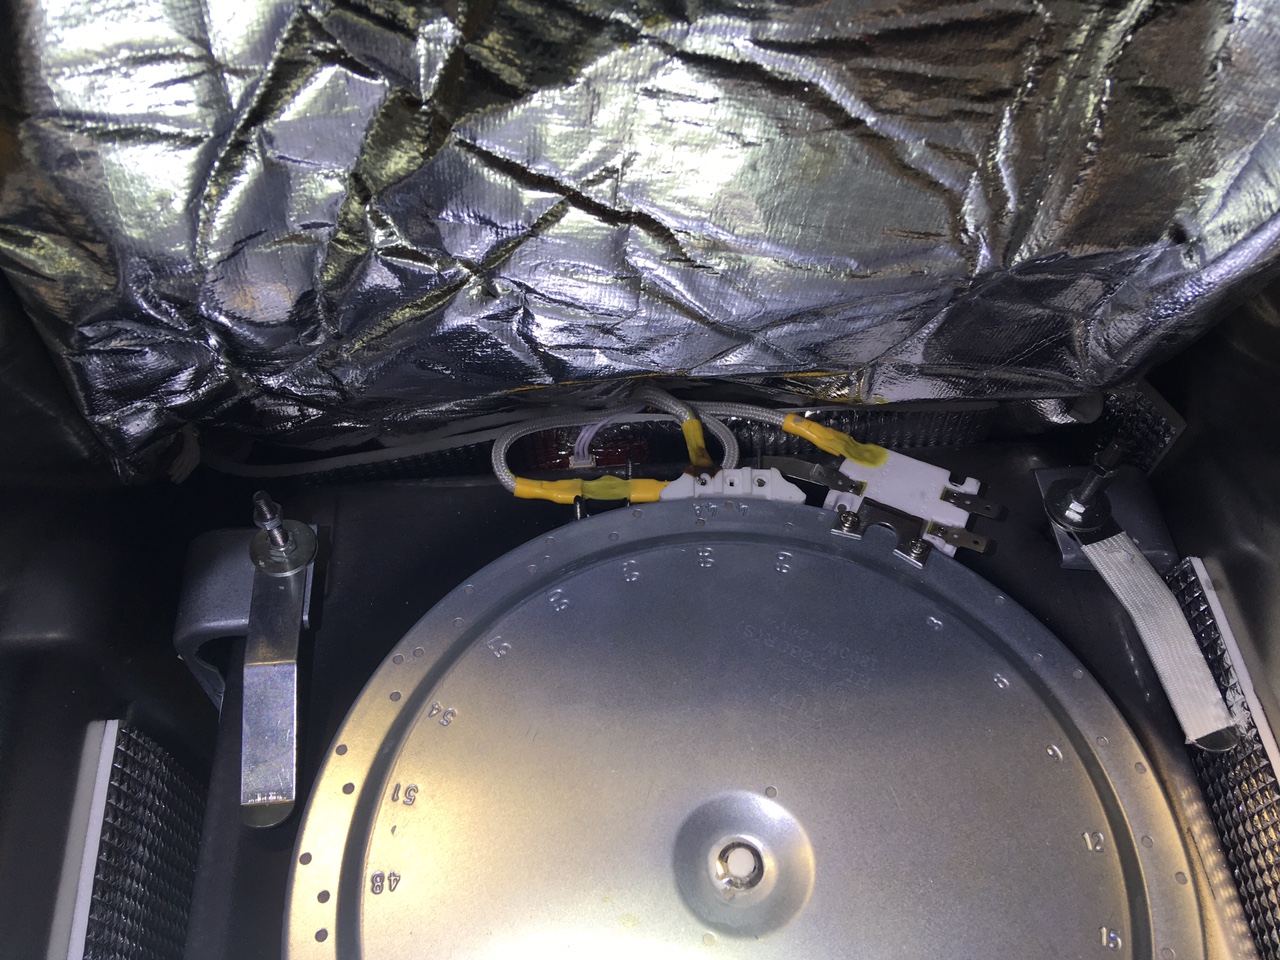
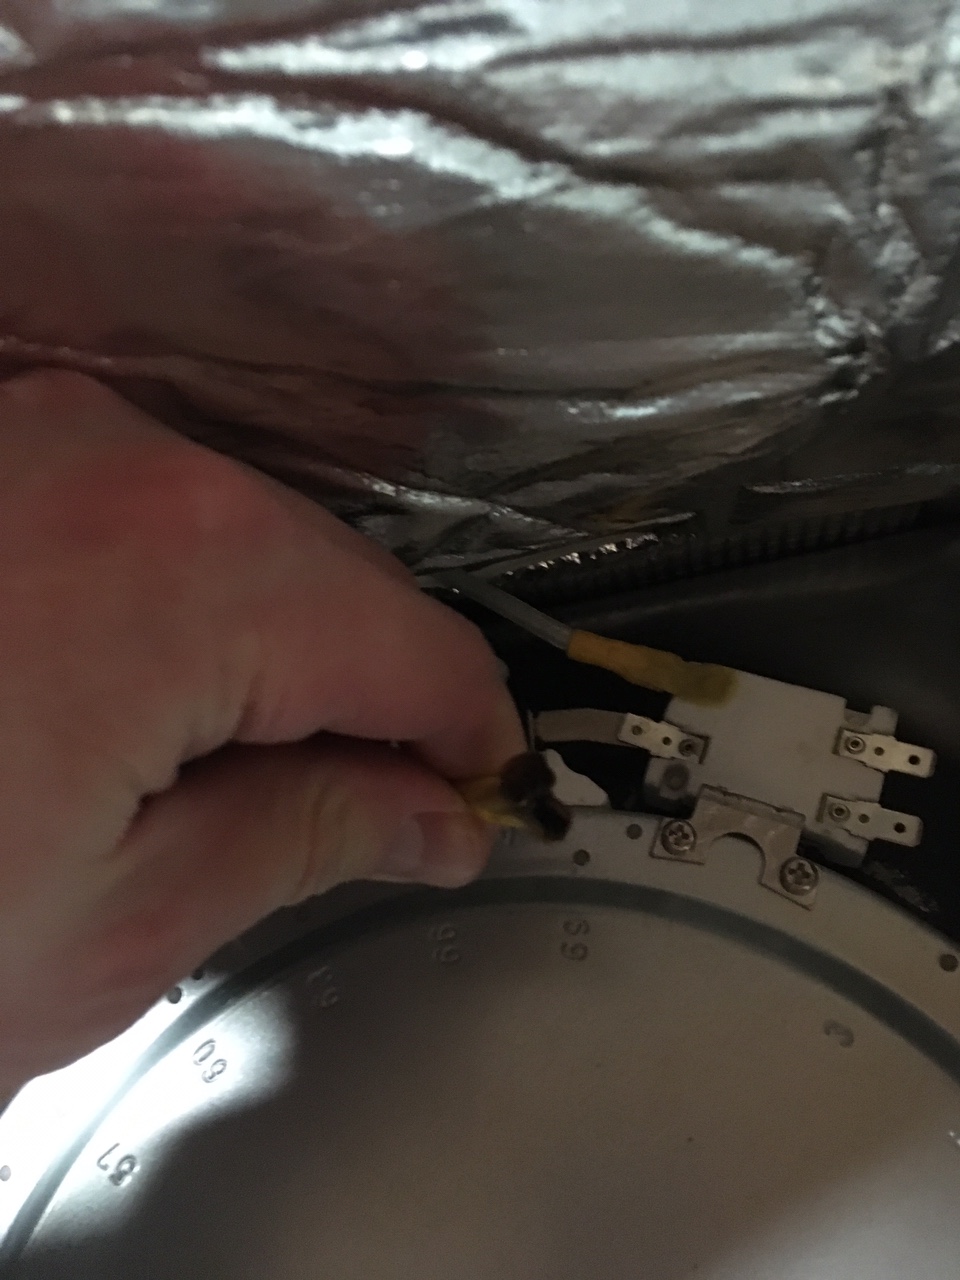
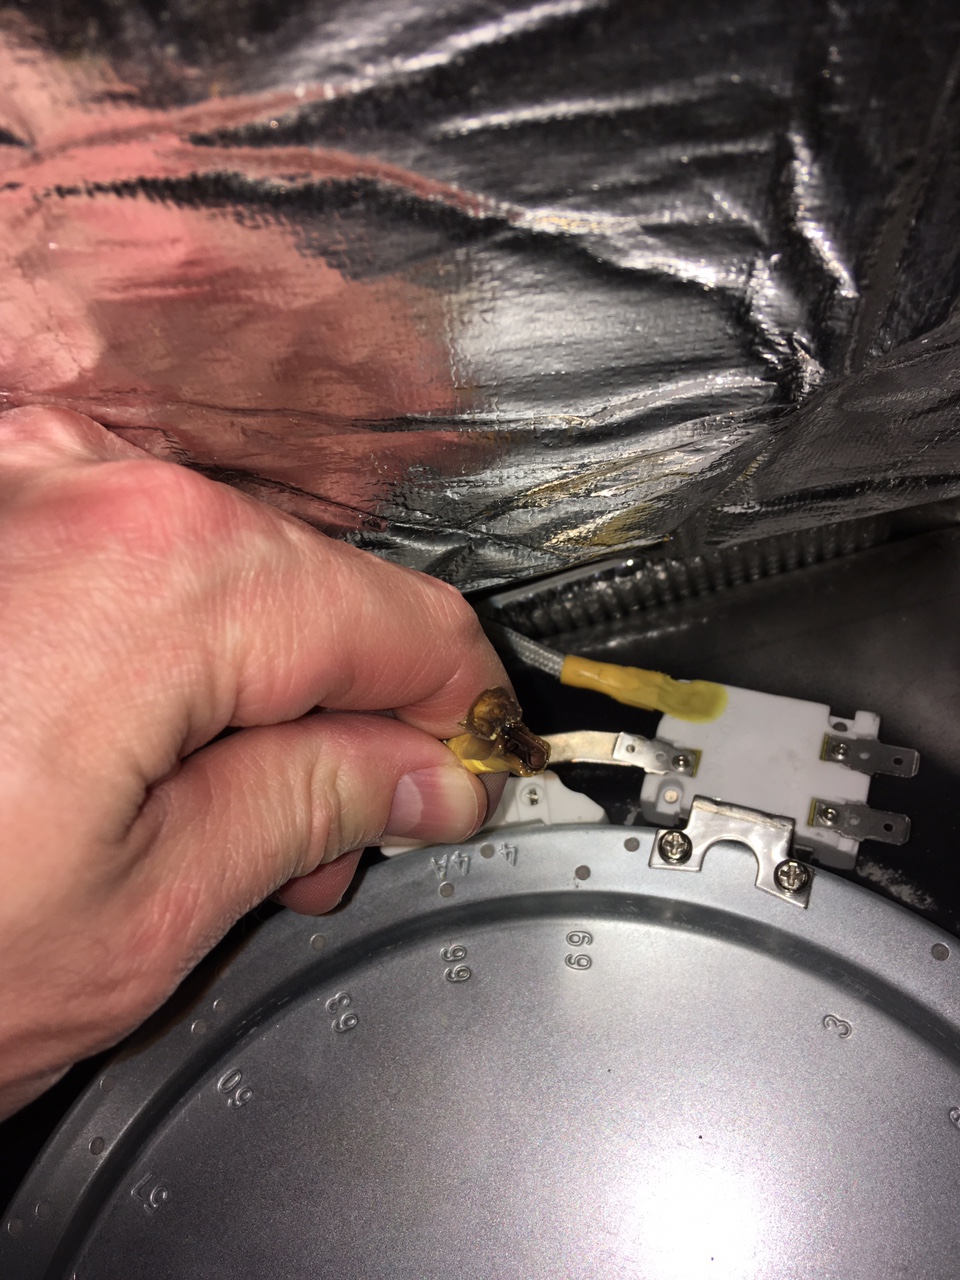
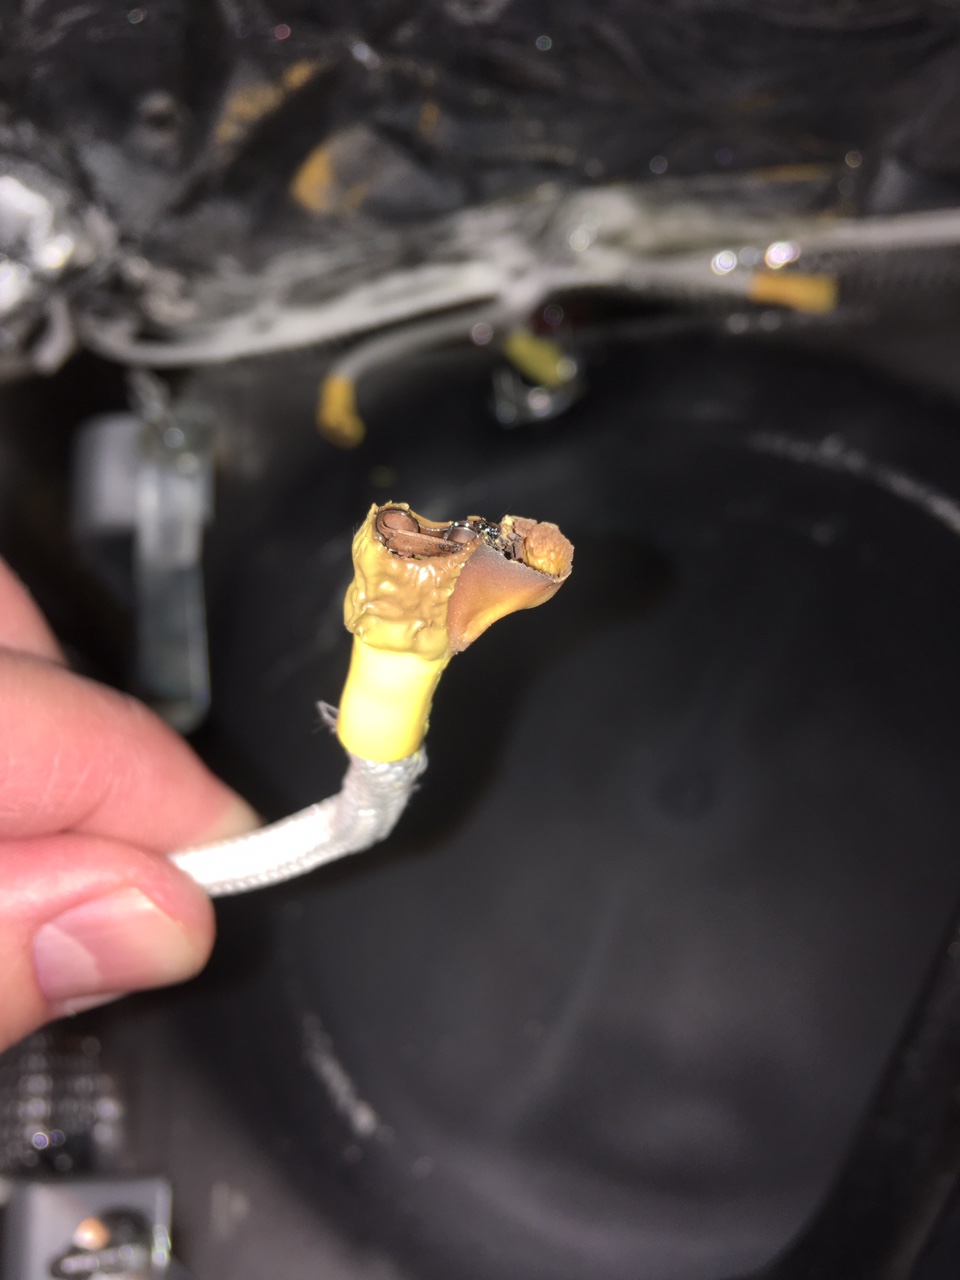
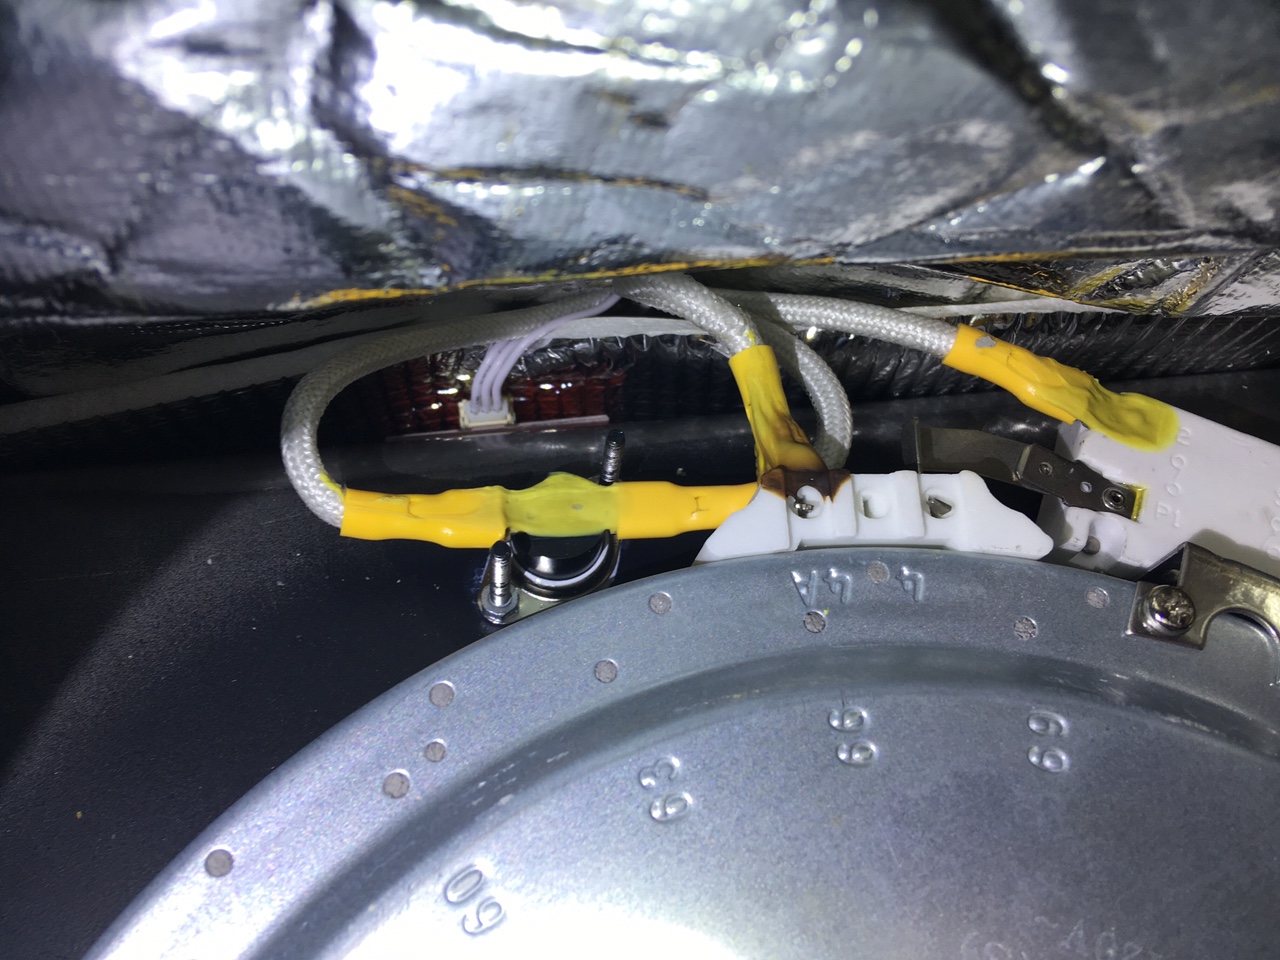
Well same story on the mash tun side. One of my connectors was being fried. I replaced all of them and insulated with silicone tape. Glad I caught this before it became any worse. I scraped off all of the epoxy. I would recommend doing both sides to everyone.

Design is exactly the same as the boil element and is easier to access. Four nuts, unclip the drain tube and wires, unclip the switch on the side and lift up.

Pics
IMG_0451.JPG
IMG_0453.JPG
IMG_0455.JPG
IMG_0457.JPG
IMG_0458.JPG
 
How did that possibly pass quality / validation testing? I would think hard about a quality mechanical fix. You you use crimp, select something that can handle the heat and cycling. I would not solder unless with a high melt point solder as the temp seems high.
 
Do you know how much arbor fab is going to charge for this or when it will be available? Also, can you still close the mash tank lid?

Received it today and we need to make it a tad smaller. This one doesn’t fit. It will be designed so you can lower the mash tank lid. Final cost is tbd right now, but I would guess about $120. They haven’t charged me anything yet until the design is final. Chad is awesome to work with. I highly recommend if anyone is in need of a BIAB basket, hop spider, etc.
 
How did that possibly pass quality / validation testing? I would think hard about a quality mechanical fix. You you use crimp, select something that can handle the heat and cycling. I would not solder unless with a high melt point solder as the temp seems high.

i dont think they have gotten to quality/ validation testing of this device yet. i think we should all just be happy theres finally a all in one brew device that lets you focus on beer making rather than tinkering with hardware.....
 
Received it today and we need to make it a tad smaller. This one doesn’t fit. It will be designed so you can lower the mash tank lid. Final cost is tbd right now, but I would guess about $120. They haven’t charged me anything yet until the design is final. Chad is awesome to work with. I highly recommend if anyone is in need of a BIAB basket, hop spider, etc.
I'd definitely be interested at that price. Looking forward to updates.
 
i dont think they have gotten to quality/ validation testing of this device yet. i think we should all just be happy theres finally a all in one brew device that lets you focus on beer making rather than tinkering with hardware.....

Sarcasm I hope. It looks like this all in one brew device needs to be tinkered with as soon as it arrives so that you don't burn your house down!
 
First brew day with the Brewie+ yesterday, seemed to go pretty well. Tried the Brickwarmer Holiday Red recipe kit I ordered online. 11.5lbs of mash ingredients, which I mashed at 152 for 60min and sparged at 170 for 45 min. I used one brewie bag and had zipper on the side, poked it a couple times to make sure corners were covered with the bag. I ended up with ~4.5 gal and my post boil gravity was 1.052, the recipe kit instructions has stated o.g. of 1.062. When I put in brewie profile I found on line on brewers friend along with ingredients I get and o.g. of 1.055. Personally, I’m probably fine with a lower abv.

Is there anything I should be doing to improve the outcomes of future brews? I was going to order an additional bag and some rice hulls for the next brew day.
 
Perfect brew day with my tuned up B+. Brewed a Pilsner recipe and the software hit the numbers spot on. 70% efficiency and 1.048 og.

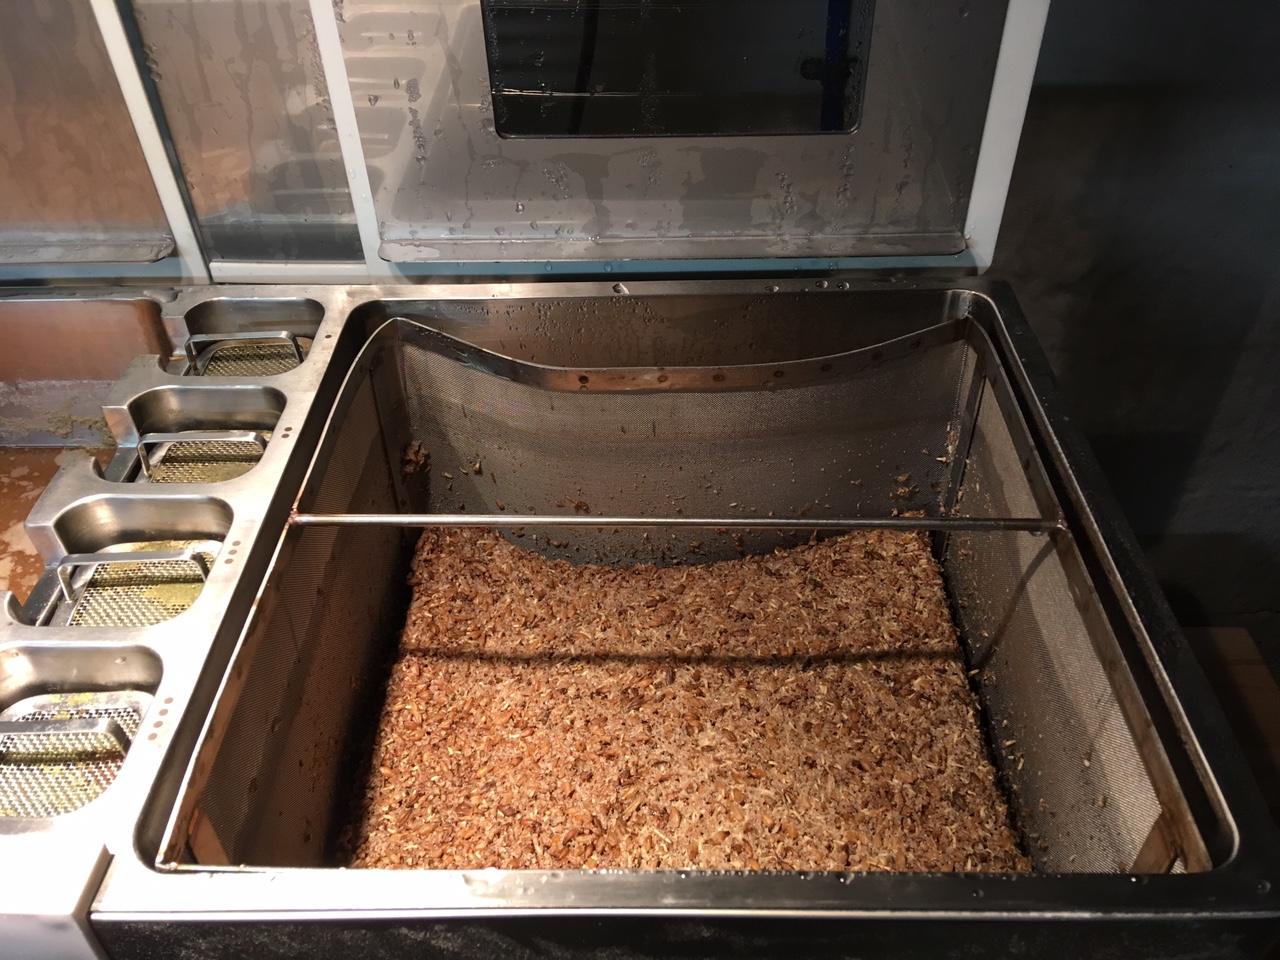
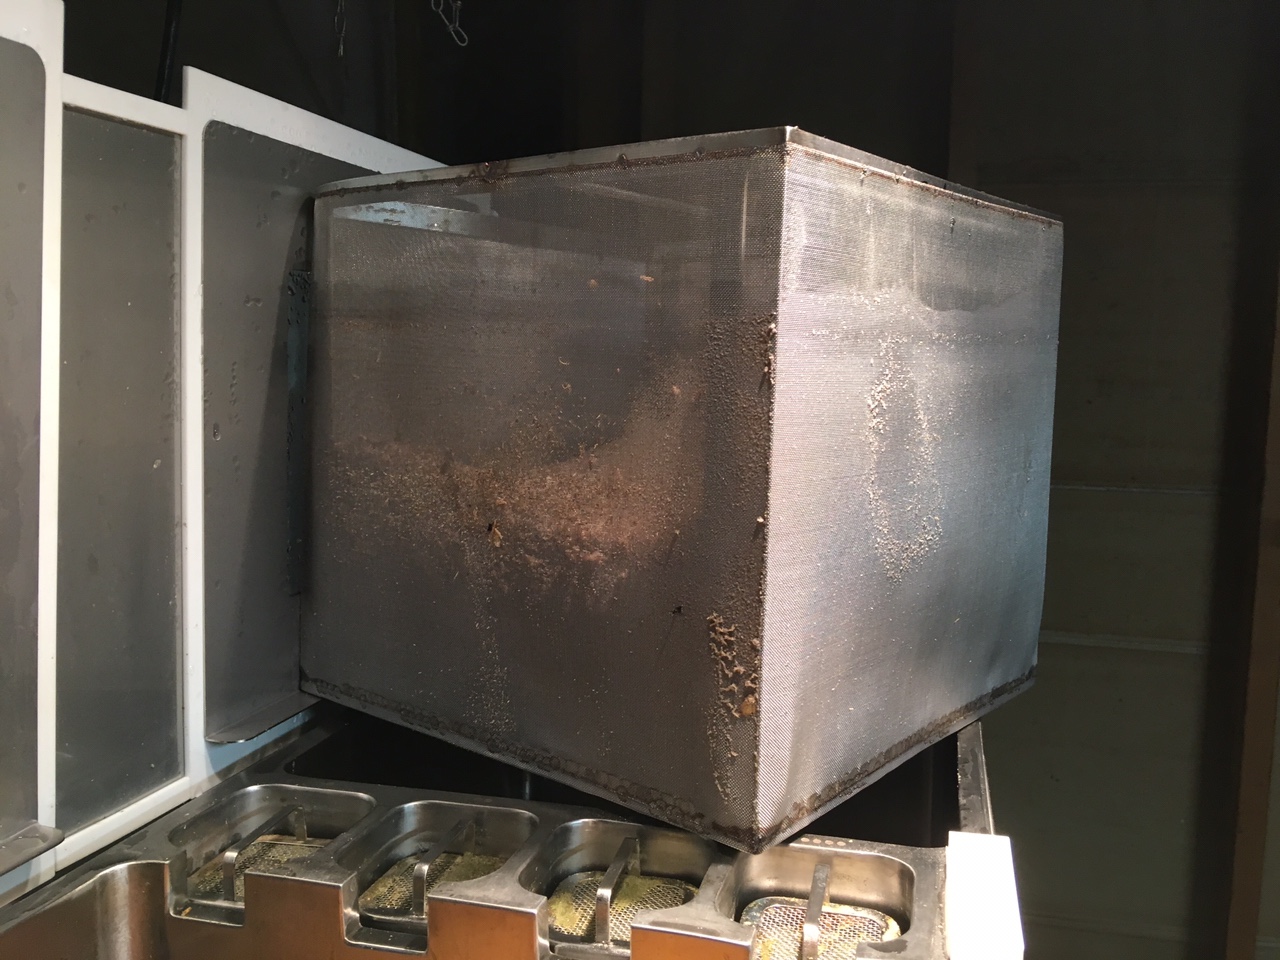
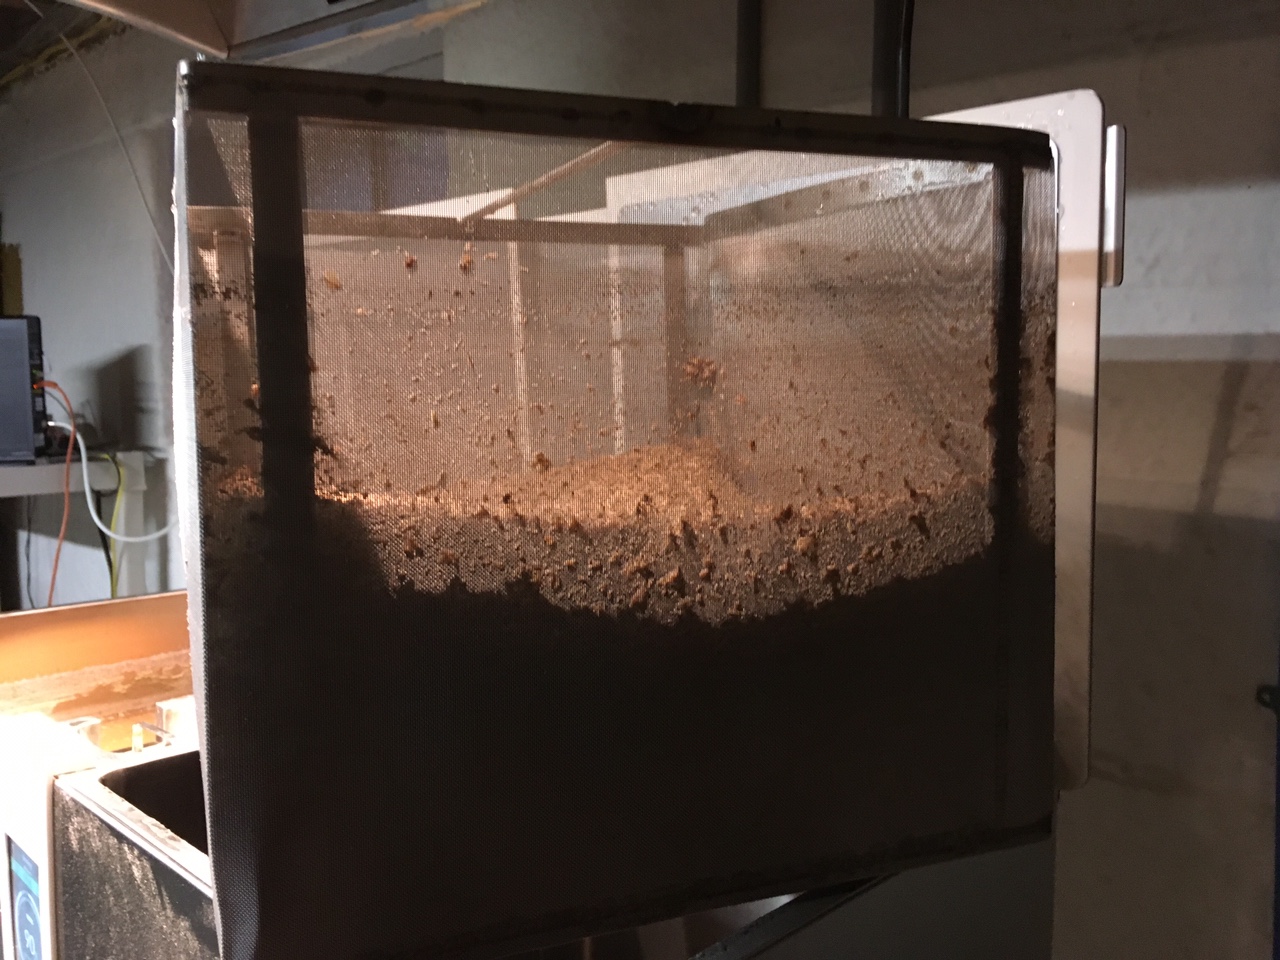
I couldn’t resist trying to use the mash basket. I pushed the sides in and found a way to muscle it into the mash tun. I had to pull back the top rear bar to make the top close. A hack job for sure but the basket worked well. I stirred at mash in and got all of the dough balls out. The most were in the corners of the basket. Easily lifted the basket at the end and dumped the spent grain and clean up was a snap. Dropped it into my dishwasher for extra measure. This design will work well once I have it sized up correctly.

Here are the pics:


IMG_0474.JPG
IMG_0475.JPG
IMG_0476.JPG
 
Well same story on the mash tun side. One of my connectors was being fried. I replaced all of them and insulated with silicone tape. Glad I caught this before it became any worse. I scraped off all of the epoxy. I would recommend doing both sides to everyone.

Design is exactly the same as the boil element and is easier to access. Four nuts, unclip the drain tube and wires, unclip the switch on the side and lift up.

Little bit less usage on this side didn't totaly toasted the therminals... I brewed too this WE and mesure the temp of the therminals while boilling. I can say for sure that this machine never boilled that much, even brad new, that was REAL boilling! Meantime I monitored the temperature at the terminal on the element, max reached temp while boilling was 83celcius with the small fan. I will do the same mod on the other side.

Nice job for the basket! might need one :)
 

Attachments

  • 20181214_200804.jpg
    20181214_200804.jpg
    3 MB · Views: 129
Haha... did you read the 1283 prior posts?
I do believe he was being sarcastic, I believe from his earlier posts in this thread that he is fully aware of all the quality and design problems and constantly changing designs after owners act as beta testers and reveal said problems on their own time and dime.
Thank God its so reasonable priced that its worth all this.. ;)

In all seriousness here though, for the cost of these this should be completely unacceptable to the consumers who buy them.
 
Last edited:
I do believe he was being sarcastic, I believe from his earlier posts in this thread that he is fully aware of all the quality and design problems and constantly changing designs after owners act as beta testers and reveal said problems on their own time and dime.
Thank God its so reasonable priced that its worth all this.. ;)

In all seriousness here though, for the cost of these this should be completely unacceptable to the consumers who buy them.

If I spent $1800 on one of these and the manufacturer was telling me to open it, check the impedence, voltages etc. I would be more than pissed. Everyone should be asking for refunds, not instructions and repair parts. These things look dangerous to me.

If this is even 10% of the machines, I don't expect the company to last much longer. I am surprised with all the problems, that they are still in business now.. There must be a huge profit margin....
 
Little bit less usage on this side didn't totaly toasted the therminals... I brewed too this WE and mesure the temp of the therminals while boilling. I can say for sure that this machine never boilled that much, even brad new, that was REAL boilling! Meantime I monitored the temperature at the terminal on the element, max reached temp while boilling was 83celcius with the small fan. I will do the same mod on the other side.

Nice job for the basket! might need one :)

So you got a more vigorous boil with the muffin fan hack? My latest brew had the weakest boil I have had with the machine, but I also used the most volume I have tried at about a 6 gallon boil volume.

Chad at Arbofab built a new basket over the weekend and is shipping it to me today. What a great guy.
 
My concern are the lost of power caused by 2 factor 1-those thermal switch are in a crazy hot envirment and they more than probably trig during the boil reducing the power delivered to the water. 2-the heat affect the contact of every terminals and limit the curent to the element du to higher resistance on every connectuion and crimp. I don't know if it's gona work but here is a little video of how it boilled during that batch: (it's an external link using onedrive)

https://1drv.ms/v/s!AhtJSz-TQFQ-vxOV_yRy0-4bqlPv

That is a much better boil than I have ever achieved.
 
What is the mesh size used in the basket making?

First basket was 400 micron, which is what Chad uses for the Pico. I asked him to build the second one with 600 micron mesh based on a few reviews I have seen around. I think 600 will provide better flow for this system.
 
Hi Gents Rob from the UK here, I spent last night reading the posts, and the mash basket is the nuts! I took the plunge this weekend and now have a Brewie+ European model 240V, have to say the machine looks great and the calibration and washout worked well, I'm going to run a water only test to see how I get on with temp and if any problems occur will let you all know what happens. Very apprehensive at the moment due to the posts but will stay positive!


HarkinBanks I don't suppose you have any roughed up drawings? If not for future endeavours I could get my drawing office at work to produce some what dimension did you use originally and what have you reduced this to now?
 
Ok so I was a bit impatient and decided to run Test number 1, mains pressure at 1.6 bar is perhaps a bit much, looking to put an inline filter as the hard water here will kill the machine so that should slow it down and the trusty old half turn back on the tap should also calm it down! in any case I'm wet now!
 
First basket was 400 micron, which is what Chad uses for the Pico. I asked him to build the second one with 600 micron mesh based on a few reviews I have seen around. I think 600 will provide better flow for this system.

I saw the earlier prototype mesh basket. Looks good. I also have a Grainfather system. (and it makes grest beer, just too time demanding thats why i got the B+) Any thoughts to making it similar? Solid sides but perforated top and bottom? Setup the top recirculation output with a small hose that would force liquid to the top of the basket and liquid would have to drain thru grain vs sneaking around the sides?
 
I saw the earlier prototype mesh basket. Looks good. I also have a Grainfather system. (and it makes grest beer, just too time demanding thats why i got the B+) Any thoughts to making it similar? Solid sides but perforated top and bottom? Setup the top recirculation output with a small hose that would force liquid to the top of the basket and liquid would have to drain thru grain vs sneaking around the sides?

That's the main reason that I'm selling my Speidel, the clean out is a nightmare and i always feel that it isn't clean enough, though looking at the inner tubes of the Brewie i'm sure its going to be a open it up after 6 brews and clean out the hoses. so padair519 your thinking about using a mesh box like a filter bed same as the Speidle this uses two circular mesh plates top and bottom. wouldn't you need another re-cuirciulation pump? I haven't even brewed on the system and I want to take it apart and improve the design. Have to say I like the mesh basket and being able to give the occasional stir is where I would like to be.
 
I saw the earlier prototype mesh basket. Looks good. I also have a Grainfather system. (and it makes grest beer, just too time demanding thats why i got the B+) Any thoughts to making it similar? Solid sides but perforated top and bottom? Setup the top recirculation output with a small hose that would force liquid to the top of the basket and liquid would have to drain thru grain vs sneaking around the sides?

Forgot to ask how long have you had yours and how many brews have you managed?
 
First basket was 400 micron, which is what Chad uses for the Pico. I asked him to build the second one with 600 micron mesh based on a few reviews I have seen around. I think 600 will provide better flow for this system.

Did you get any efficiency improvement from using the basket?
 
First prototype basket was based on the dimensions of the false bottom. So those came to 11 3/8" wide by 11 3/8" wide by 10 1/4" tall. This proved to be slightly too wide to fit the opening by only a few millimeters. Height was perfect. The lid of the Brewie had a clearance issue with the prototype basket in the rear because of the drip lip, so we are making the second unit 11" wide by 11" wide by 10 1/4" tall. This will ensure a fit and should allow the lid to open and close with no interference. Second unit arrives this Thrs.

Based on my previous experiences with Brewie, I do believe the basket helped my efficiency. The recipe was 9.92 lbs of pils malt into 7 gallons of total water volume (4.4 mash/2.6 sparge). Mash was higher at 156 degrees. Result was exactly as calculated at 1.048 og. I was very happy with the result.

What was the efficiency?
 
Yep... Good thing I can fix my sh.. by myself, had no return from Brewie about the ticket I fillup on their site 8 days ago... I don't know if somebody else had this problem reaching them?... A friend at the job just bought a machine fiew weeks ago cause of me, I might stop saying good thing about this machine soon...
 
Perfect brew day with my tuned up B+. Brewed a Pilsner recipe and the software hit the numbers spot on. 70% efficiency and 1.048 og.

I couldn’t resist trying to use the mash basket. I pushed the sides in and found a way to muscle it into the mash tun. I had to pull back the top rear bar to make the top close. A hack job for sure but the basket worked well. I stirred at mash in and got all of the dough balls out. The most were in the corners of the basket. Easily lifted the basket at the end and dumped the spent grain and clean up was a snap. Dropped it into my dishwasher for extra measure. This design will work well once I have it sized up correctly.

Here are the pics:


View attachment 602735View attachment 602736View attachment 602737
This is one of the most exciting pictures i have seen in a while!! Wow. This feels so promising!
 
Yep... Good thing I can fix my sh.. by myself, had no return from Brewie about the ticket I fillup on their site 8 days ago... I don't know if somebody else had this problem reaching them?... A friend at the job just bought a machine fiew weeks ago cause of me, I might stop saying good thing about this machine soon...

Iron-doing some boil tests with water and I can’t seem to make it past 205 F right now. The thermal switch appears to be cutting my power, or would that be my SSR? I can hear full power cycle on and off. Everything else is working fine. Any ideas?
 
70%. I was hoping for more but grain was older and mash temp was higher.

Chad at Arborfab just emailed me and confirmed the basket will be $120.

Do you think you could ask arborfab about making a hop spider that that has custom makings for volume in a Brewie? Might need a B20 and a + version. I think the tanks are slightly different.

Confirming the volume after auto inlet and pre boil is key in Brewie I think.
 
Do you think you could ask arborfab about making a hop spider that that has custom makings for volume in a Brewie? Might need a B20 and a + version. I think the tanks are slightly different.

Confirming the volume after auto inlet and pre boil is key in Brewie I think.

I was contemplating etching markings on the tanks. Or use a brewing spoon or stick with markings on it. I think that would be a lot easier.
 
Iron-doing some boil tests with water and I can’t seem to make it past 205 F right now. The thermal switch appears to be cutting my power, or would that be my SSR? I can hear full power cycle on and off. Everything else is working fine. Any ideas?

It is very unlikely to be the SSR, those device are quite robust and since triggered, theire internal resistance are very low, there is no in between. The brewie controller modulate the power (PWM) to the SSR like a top of the line PID would do but when the target is to boil, there is no raison why the trottling came from there too. Your problem is, like you said, comming from the thermal switchs or/and the connections that get too hot (connection get hot ther bring heat inside the thermal switch). As I said earlier, the ventilation of the area around the connections is the only way to realy make the thing work. I stop the water heating during my test without venting with the thermocouple when the water was at something like 65 celcius, cause the therminal were already at max temparature. Since the terminal raise in temperature, it lose grip on the connection and contact resistance raise, with 4 crimped connection, so 8 jonctions, it can surely lower the power to the element.

I should recieve as a gift ;-) a water heater for vaccum cooking (kind of rod with an impeller and a heater), 1200W, and i'm planning to use it to help the brewie to heat and boil water, as well as vaccum cooking ;-)
 
Yep... Good thing I can fix my sh.. by myself, had no return from Brewie about the ticket I fillup on their site 8 days ago... I don't know if somebody else had this problem reaching them?... A friend at the job just bought a machine fiew weeks ago cause of me, I might stop saying good thing about this machine soon...

Marcel has been responding to me, but not Mate. Claimed there was an office move going on.
It is very unlikely to be the SSR, those device are quite robust and since triggered, theire internal resistance are very low, there is no in between. The brewie controller modulate the power (PWM) to the SSR like a top of the line PID would do but when the target is to boil, there is no raison why the trottling came from there too. Your problem is, like you said, comming from the thermal switchs or/and the connections that get too hot (connection get hot ther bring heat inside the thermal switch). As I said earlier, the ventilation of the area around the connections is the only way to realy make the thing work. I stop the water heating during my test without venting with the thermocouple when the water was at something like 65 celcius, cause the therminal were already at max temparature. Since the terminal raise in temperature, it lose grip on the connection and contact resistance raise, with 4 crimped connection, so 8 jonctions, it can surely lower the power to the element.

I should recieve as a gift ;-) a water heater for vaccum cooking (kind of rod with an impeller and a heater), 1200W, and i'm planning to use it to help the brewie to heat and boil water, as well as vaccum cooking ;-)

Did you measure to see if you can run the new muffin fan off the same lead as either of the other muffin fans? I think I might try to cool that area like you did. Marcel replied to me today and said they are still moving offices, no responses from Mate for over a week now.
 
I was contemplating etching markings on the tanks. Or use a brewing spoon or stick with markings on it. I think that would be a lot easier.

Definitely easier, but something stainless would be nicer and I'm thinking about getting a spider anyways.
 
Definitely easier, but something stainless would be nicer and I'm thinking about getting a spider anyways.

A hop spider for the Brewie? Why would you do that vs using the chambers already built in?

You could always take a dremel to any hop spider and etch markings for the volumes.
 
A hop spider for the Brewie? Why would you do that vs using the chambers already built in?

You could always take a dremel to any hop spider and etch markings for the volumes.

Hop spider for first wort hops or whirlpool hops. The chambers (currently) only work for boil hops.
 
Marcel has been responding to me, but not Mate. Claimed there was an office move going on.


Did you measure to see if you can run the new muffin fan off the same lead as either of the other muffin fans? I think I might try to cool that area like you did. Marcel replied to me today and said they are still moving offices, no responses from Mate for over a week now.

I forgot about it. Just did it, it's never easy with those SMT component marking, have to refer to pages of code and never knew exactly which one is the good one. I would say I'm 95% sure it's this Mosfet. unfortunatly we will have to do an other hack in order to connect other fan to this control output. the mosfet can drive 200mA, so 2 fans might exceed it. the small 40mm I use draw 120ma at 12v...

What I will do is quite easy, I will control a second mosfet or a transistor or a relay instead of the fan, then draw the 12V from the supply directly to control the fans.

I've been thinking of a better setup to make things easier for everyone. I'm thinking of using a 12V blower fan, like this one on DK

https://www.digikey.com/product-detail/en/sunon-fans/MF60151V1-B00U-A99/259-1752-ND/6003454

then print a 3d part (or use tape or hot glue) to install 2 silicone tube of 1/2 or 5/8 ID at the output of the blower. then those tube can be run in the therminal area by the side of the insulating blanket or by where the wire run thru the side. so no fixation, no cut of the insulators etc. that might be part of an upgrade kit someone can build and sell, including blower, relay, wire and tubes. I think it deserve to be tested. I will probably make one and test it to know if it give enough flow of air (pretty sure it do, those blower generate good static pressure compared to a fan).

Marcel answer my direct email, told me about the moving of their office (hope it's for a bigger place, not a smaller one) he told me the problem we face is only for a part of the production, nothing more. I discuss the experiment I did with the venting of the area with a small fan and he told me he will speak with his eng... we will see.
 

Attachments

  • mosfet.JPG
    mosfet.JPG
    202.8 KB · Views: 102
  • 20181212_223844.jpg
    20181212_223844.jpg
    1 MB · Views: 151
Back
Top