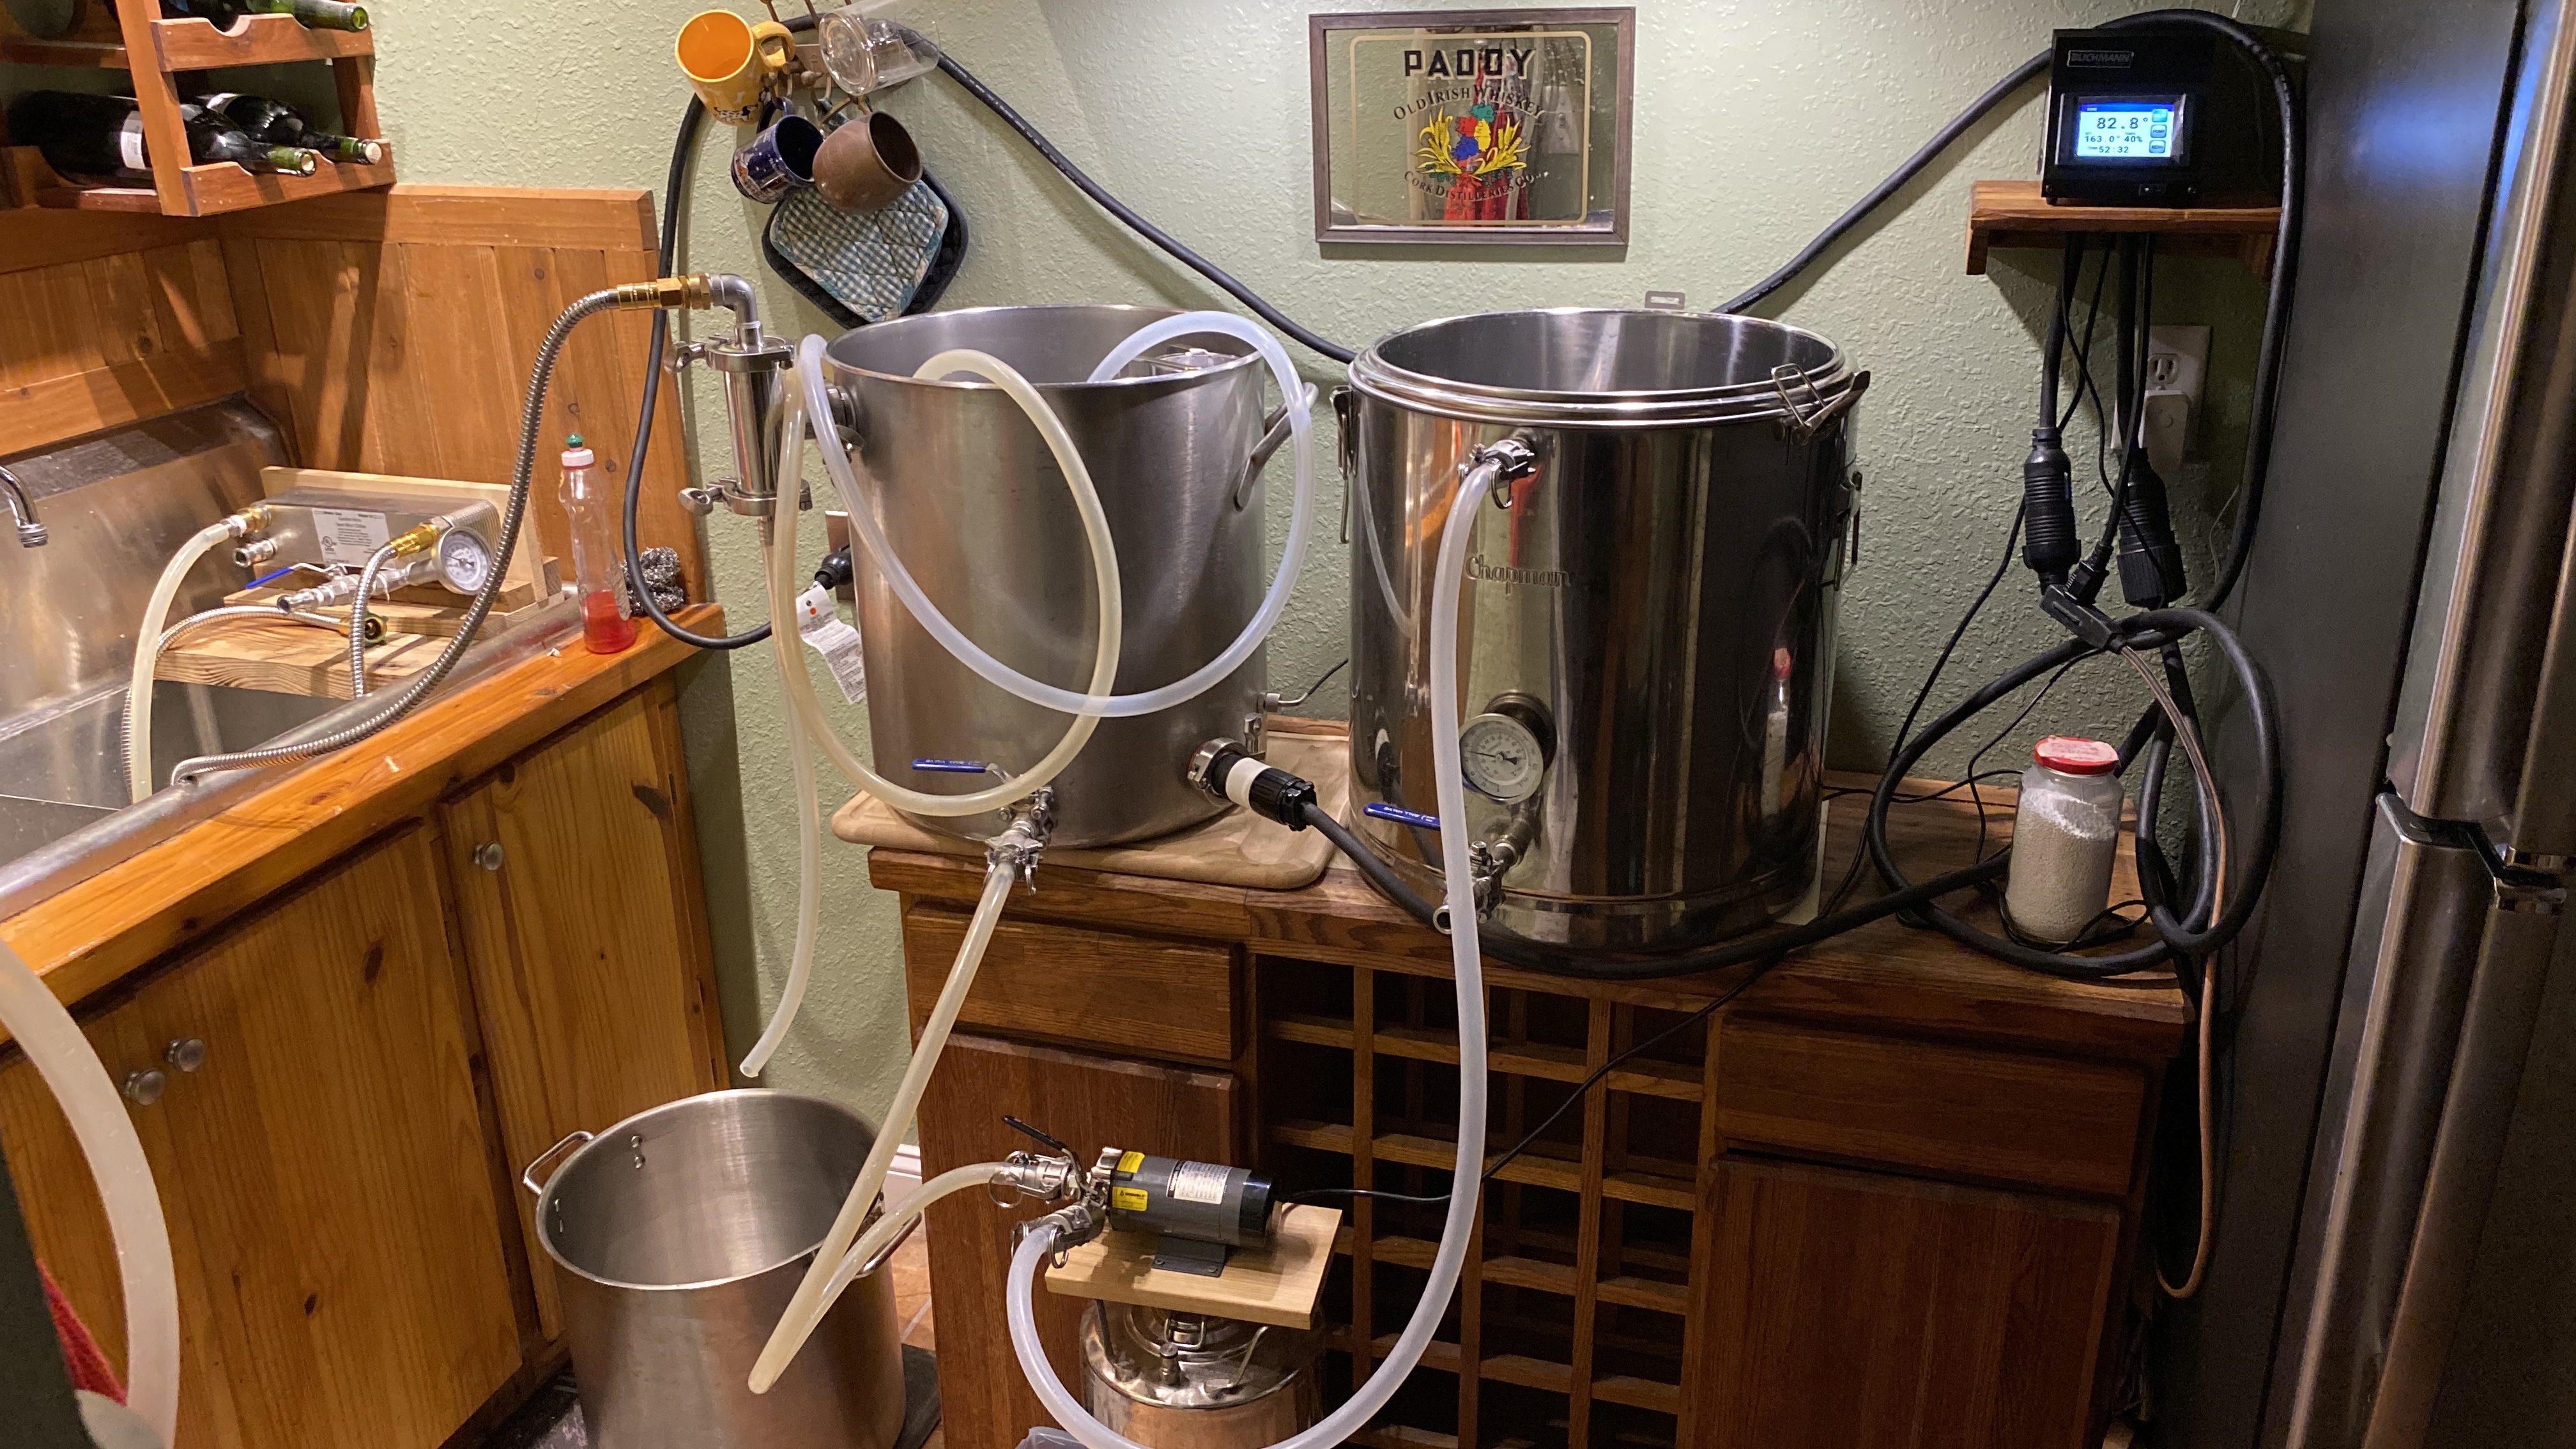
So I used the brewcommander for the first time the other night. Not nearly as hands off as I was hoping for, especially during the mash. Basically it would never get to the set mash temp. It seems to scale back as it gets close. It would always get within a degree or so and then start falling. Would fall 2-3 degrees than start increasing again. So the one mash step i set never started its timer. Not a huge deal I just set a custom one. Also i had to fiddle with the temp a lot as there was a lag between MT and HLT so I just kept adjusting the set temp based on where the MT was. Boil went better and didnt really have to adjust at all once i got it rolling.
You are using an out of date browser. It may not display this or other websites correctly.
You should upgrade or use an alternative browser.
You should upgrade or use an alternative browser.
BrewCommander - Impressive offering from John
- Thread starter BeardedBrews
- Start date

Help Support Homebrew Talk:
This site may earn a commission from merchant affiliate
links, including eBay, Amazon, and others.
So I used the brewcommander for the first time the other night. Not nearly as hands off as I was hoping for, especially during the mash. Basically it would never get to the set mash temp. It seems to scale back as it gets close. It would always get within a degree or so and then start falling. Would fall 2-3 degrees than start increasing again. So the one mash step i set never started its timer. Not a huge deal I just set a custom one. Also i had to fiddle with the temp a lot as there was a lag between MT and HLT so I just kept adjusting the set temp based on where the MT was. Boil went better and didnt really have to adjust at all once i got it rolling.
What kind of system do you have? Where is the temp probe installed? Nevermind... I saw your other thread. 2 vessels, originally going to be a kettle RIMS but you ran it as a HERMS with a counterflow chiller. The temp probe is on the boil kettle output leading into the jacket of the Exchillerator CFC and that gets pumped back into the boil kettle. In this configuration it's acting just like HERMS coil in a HLT where the probe is installed in the HLT.
You CAN do it that way but you will have to experiment with both the RAMP TIME and the RIMS OFFSET. First, put a separate digital thermometer into your mash bed and run the system at say 150F for about 15 minutes. Measure the actual temp of the mash. If it's at 145F then you set your rims offset to 5F. Now when you set the mash temp to 150F it will actually run your kettle's HERMS water at 155F going into the heat exchanger. Next, change your set temp 3 degrees hotter and start a timer immediately. When the digital thermometer in the mash reaches the set temp, note the time it took to get there. That's your ramp rate setting. Please note that if you continue doing it this way, make sure you always use the same volume of water in the boil kettle because variation here will affect your ramp time quite a bit.
Again, the mash timer starts based on the ramp rate you have set. It has nothing to do with the next temp actually being reached. This is corroborated in the user manual as well as actual testing.
Edit to add more: Another option for your current setup is to move the temp probe to the wort output of the CFC. The controller will then heat the kettle water to the temperature required to make the CFC wort output closer to the desired mash temp. Don't misunderstand me, you will still have offset and ramp time but the offset will be smaller.
Last edited:
Hoptimus Prime
New Member
- Joined
- Nov 19, 2019
- Messages
- 4
- Reaction score
- 0
Quick question for other BC users - mine works great, I have it for a one-vessel 120V BIAB. I got it to hold an accurate temp to 0.1oC by changing the cycle time(advanced settings) from 5 sec to 2 sec, and the control band from 3oC to 2oC. This way it gets closer to my desired mash temp faster at 100% power then alternates on/off faster for greater accuracy. I found at the default setting of 5 sec cycle time that I have getting a 0.5-1oC alternating under and overshoot. My temperature probe is inline along my re-circulation path just after the kettle out, so it is sampling the wort just after it is heated, my grain bed sits at ~ the same with re-circulation.
My question is can other people save their altered settings? Every time I boot up the BC it forgets my adjusted settings and I need to change it to Celsius and then make those two adjustments in the advanced settings. Not the end of the world but annoying. Might need to do the factory reset option and try again.
My question is can other people save their altered settings? Every time I boot up the BC it forgets my adjusted settings and I need to change it to Celsius and then make those two adjustments in the advanced settings. Not the end of the world but annoying. Might need to do the factory reset option and try again.
Zooksta
Well-Known Member
My question is can other people save their altered settings? Every time I boot up the BC it forgets my adjusted settings and I need to change it to Celsius and then make those two adjustments in the advanced settings. Not the end of the world but annoying. Might need to do the factory reset option and try again.
I have the same issue, the BC does not save my adjusted settings.
Hoptimus Prime
New Member
- Joined
- Nov 19, 2019
- Messages
- 4
- Reaction score
- 0
That's not great. I just sent an inquiry to Blichmann as if this is a missing feature it would have been nice to know beforehand, or if they can recommend an easy fix in case the BC is not behaving properly and it should be able to save setting changes.I have the same issue, the BC does not save my adjusted settings.
Zooksta
Well-Known Member
That's not great. I just sent an inquiry to Blichmann as if this is a missing feature it would have been nice to know beforehand, or if they can recommend an easy fix in case the BC is not behaving properly and it should be able to save setting changes.
Let us know what Blichmann has to say.


$479.00
$559.00
EdgeStar KC1000SS Craft Brew Kegerator for 1/6 Barrel and Cornelius Kegs
Amazon.com


$176.97
1pc Commercial Keg Manifold 2" Tri Clamp,Ball Lock Tapping Head,Pressure Gauge/Adjustable PRV for Kegging,Fermentation Control
hanhanbaihuoxiaoshoudian


$53.24
1pc Hose Barb/MFL 1.5" Tri Clamp to Ball Lock Post Liquid Gas Homebrew Kegging Fermentation Parts Brewer Hardware SUS304(Liquid Hose Barb)
yunchengshiyanhuqucuichendianzishangwuyouxiangongsi

$10.99 ($31.16 / Ounce)
Hornindal Kveik Yeast for Homebrewing - Mead, Cider, Wine, Beer - 10g Packet - Saccharomyces Cerevisiae - Sold by Shadowhive.com
Shadowhive


$20.94
$29.99
The Brew Your Own Big Book of Clone Recipes: Featuring 300 Homebrew Recipes from Your Favorite Breweries
Amazon.com


$76.92 ($2,179.04 / Ounce)
Brewing accessories 1.5" Tri Clamp to Ball Lock Post Liquid Gas Homebrew Kegging Fermentation Parts Brewer Hardware SUS304 Brewing accessories(Gas Hose Barb)
chuhanhandianzishangwu


$33.99 ($17.00 / Count)
$41.99 ($21.00 / Count)
2 Pack 1 Gallon Large Fermentation Jars with 3 Airlocks and 2 SCREW Lids(100% Airtight Heavy Duty Lid w Silicone) - Wide Mouth Glass Jars w Scale Mark - Pickle Jars for Sauerkraut, Sourdough Starter
Qianfenie Direct


$22.00 ($623.23 / Ounce)
AMZLMPKNTW Ball Lock Sample Faucet 30cm Reinforced Silicone Hose Secondary Fermentation Homebrew Kegging joyful
无为中南商贸有限公司


$58.16
HUIZHUGS Brewing Equipment Keg Ball Lock Faucet 30cm Reinforced Silicone Hose Secondary Fermentation Homebrew Kegging Brewing Equipment
xiangshuizhenzhanglingfengshop

$719.00
$799.00
EdgeStar KC2000TWIN Full Size Dual Tap Kegerator & Draft Beer Dispenser - Black
Amazon.com


$44.99
$49.95
Craft A Brew - Mead Making Kit – Reusable Make Your Own Mead Kit – Yields 1 Gallon of Mead
Craft a Brew


$53.24
1pc Hose Barb/MFL 1.5" Tri Clamp to Ball Lock Post Liquid Gas Homebrew Kegging Fermentation Parts Brewer Hardware SUS304(Liquid Hose Barb)
Guangshui Weilu You Trading Co., Ltd
![Craft A Brew - Safale S-04 Dry Yeast - Fermentis - English Ale Dry Yeast - For English and American Ales and Hard Apple Ciders - Ingredients for Home Brewing - Beer Making Supplies - [1 Pack]](https://m.media-amazon.com/images/I/41fVGNh6JfL._SL500_.jpg)
$6.95 ($17.38 / Ounce)
$7.47 ($18.68 / Ounce)
Craft A Brew - Safale S-04 Dry Yeast - Fermentis - English Ale Dry Yeast - For English and American Ales and Hard Apple Ciders - Ingredients for Home Brewing - Beer Making Supplies - [1 Pack]
Hobby Homebrew

$7.79 ($7.79 / Count)
Craft A Brew - LalBrew Voss™ - Kveik Ale Yeast - For Craft Lagers - Ingredients for Home Brewing - Beer Making Supplies - (1 Pack)
Craft a Brew


$159.50 ($26.58 / Count)
3M High Flow Series System BREW120-MS, 5616001, For Brewed Coffee and Hot Tea, Valve-in-Head Design
Amazon.com


They are aware of this issue and are working on it. It is supposed to save the settings. I had exchanged some emails with them a few weeks ago when I noticed it didn't always save.
I initially thought maybe I had to keep the controller plugged in between brew sessions, but that didn't solve the issue for me.
I initially thought maybe I had to keep the controller plugged in between brew sessions, but that didn't solve the issue for me.
Ugh. From the pics I've seen, there's no general comm port on the Brew Commander that would allow a firmware update in the field.
That may come back to haunt Blichmann...
That may come back to haunt Blichmann...
That being said, there are so many other phenomenal features, unavailable in a stand alone controller, that having to enter these in each time is tolerable. For me, anyway.
I can understand that ")
My comment was aimed more towards Blichmann Engineering saying it should retain settings then noticing there's no evident way to stuff the fix in a sold unit without it taking a ride to the mothership and back...
Cheers!
My comment was aimed more towards Blichmann Engineering saying it should retain settings then noticing there's no evident way to stuff the fix in a sold unit without it taking a ride to the mothership and back...
Cheers!
Zooksta
Well-Known Member
That being said, there are so many other phenomenal features, unavailable in a stand alone controller, that having to enter these in each time is tolerable. For me, anyway.
Agreed, I guess I need to write down my adjusted settings though so I can re enter them the same every session
Hoptimus Prime
New Member
- Joined
- Nov 19, 2019
- Messages
- 4
- Reaction score
- 0
Yah I haven't heard back from Blichmann yet. Unfortunate, but your right micraftbeer that the BC does so many other things well that this is only a minor inconvenience, and at the price its just a good deal. If I had known up front I would have still purchased the BC, just would have been nice to know. Hopefully Blichmann can come up with a hotfix, but the lack of port will make that difficult.
I think that is what it is. you probably have to send it back for programming. which is disappointing.One of the key features for the BC listed on Blichmann's website is "Upgradable Firmware". It would be disappointing if you have to send it to them for the firmware to be upgraded!
Ugh. From the pics I've seen, there's no general comm port on the Brew Commander that would allow a firmware update in the field.
That may come back to haunt Blichmann...
Doesn't it have a microSD slot? I thought I read that somewhere
I don’t see one
Zooksta
Well-Known Member
Here's the response I received from Blichmann along with an update file. So, there is a micro sd card slot on the board inside the controller..
We have seen this on a few controllers and have worked with our software folks to get this corrected.
See link and attachment below.
BrewCommander software update
https://www.blichmannengineering.com/pub/media/wysiwyg/pdf/Updating_BrewCommander_Software_v1.pdf
Software update: See attached file.
We have seen this on a few controllers and have worked with our software folks to get this corrected.
See link and attachment below.
BrewCommander software update
https://www.blichmannengineering.com/pub/media/wysiwyg/pdf/Updating_BrewCommander_Software_v1.pdf
Software update: See attached file.
Cool beans! Maybe a tad inconvenient to remove the cover but way better than a factory update...
Cheers!
Cheers!
Here's the response I received from Blichmann along with an update file. So, there is a micro sd card slot on the board inside the controller..
I just got the same email . I didn’t know there was an sd slot inside.
We have seen this on a few controllers and have worked with our software folks to get this corrected.
See link and attachment below.
BrewCommander software update
https://www.blichmannengineering.com/pub/media/wysiwyg/pdf/Updating_BrewCommander_Software_v1.pdf
Software update: See attached file.
I received the same email this morning.
Last edited:
FYI for whoever...You CAN do it that way but you will have to experiment with both the RAMP TIME and the RIMS OFFSET. First, put a separate digital thermometer into your mash bed and run the system at say 150F for about 15 minutes. Measure the actual temp of the mash. If it's at 145F then you set your rims offset to 5F. Now when you set the mash temp to 150F it will actually run your kettle's HERMS water at 155F going into the heat exchanger. Next, change your set temp 3 degrees hotter and start a timer immediately. When the digital thermometer in the mash reaches the set temp, note the time it took to get there. That's your ramp rate setting. Please note that if you continue doing it this way, make sure you always use the same volume of water in the boil kettle because variation here will affect your ramp time quite a bit.
Again, the mash timer starts based on the ramp rate you have set. It has nothing to do with the next temp actually being reached. This is corroborated in the user manual as well as actual testing.
I just tested mine with a water run for the first time. fumbling through everything as its a new process. I found the ramp timer annoying and hope they can re-program the BC to start mash steps based on set temp being reached.
10 gallon test for the kettle, pumped 5 over to the tun. (I love the pump-on button) the practice mash steps kept starting too early at a programmed 3degree per minute rise. wasn't organized enough to time it. Short Circuited Brewer recommended starting at 1degree per minute ramp and checking time from there. I would agree.
I'm using a 25' immersion coil in the kettle as a herms. 5500w element, temp probe is 4.5" from bottom, 1" above element & 5" to the right of element. my strike water ramp was 4 & 5 degrees per minute. only other thing to note was that at 207degress on the BC I was boiling in the kettle.
So last nights first Brew was a total disaster. I had tested the Brew commander and was having a problem where when the 120 V plug was plugged into the wall it would shut off the controller and trip the 30 amp circuit breaker. That is a new circuit with a 30 amp GFCI running into 100 amp sub panel. The 120 V is simply the closest wall receptacle. I sent that BC unit back thinking there was a problem with it, got another one and the exact same thing happened. I ran an extension cord to an outlet across the room and it worked.tested a full brew session with water. No issues using the other outlet. So in the middle of the actual brew last night I’m about to start recirculating the mash during and as soon as I get push pump button everything shuts off with the brew commander and it has tripped the 30 amp GFCI breaker.
I’m not sure what’s going on here, when powering the unit with just the 240 amp circuit everything works fine. When I plug in the 120 V to the wall receptacle it is tripping the 30 amp breaker but it is not tripping the breaker for the 120 V wall receptacle. I plug the pump directly into both of the wall receptacles that I tried and it works just fine. Any ideas what might be a problem? Thanks
I’m not sure what’s going on here, when powering the unit with just the 240 amp circuit everything works fine. When I plug in the 120 V to the wall receptacle it is tripping the 30 amp breaker but it is not tripping the breaker for the 120 V wall receptacle. I plug the pump directly into both of the wall receptacles that I tried and it works just fine. Any ideas what might be a problem? Thanks
Last edited:
Sounds like there is something wrong with the 30A GFCI breaker installation. There appears to be some kind of crosstalk between that circuit and what should be independent 120V circuits.
Brew on
Brew on
post a picture of the GFCI breaker install.
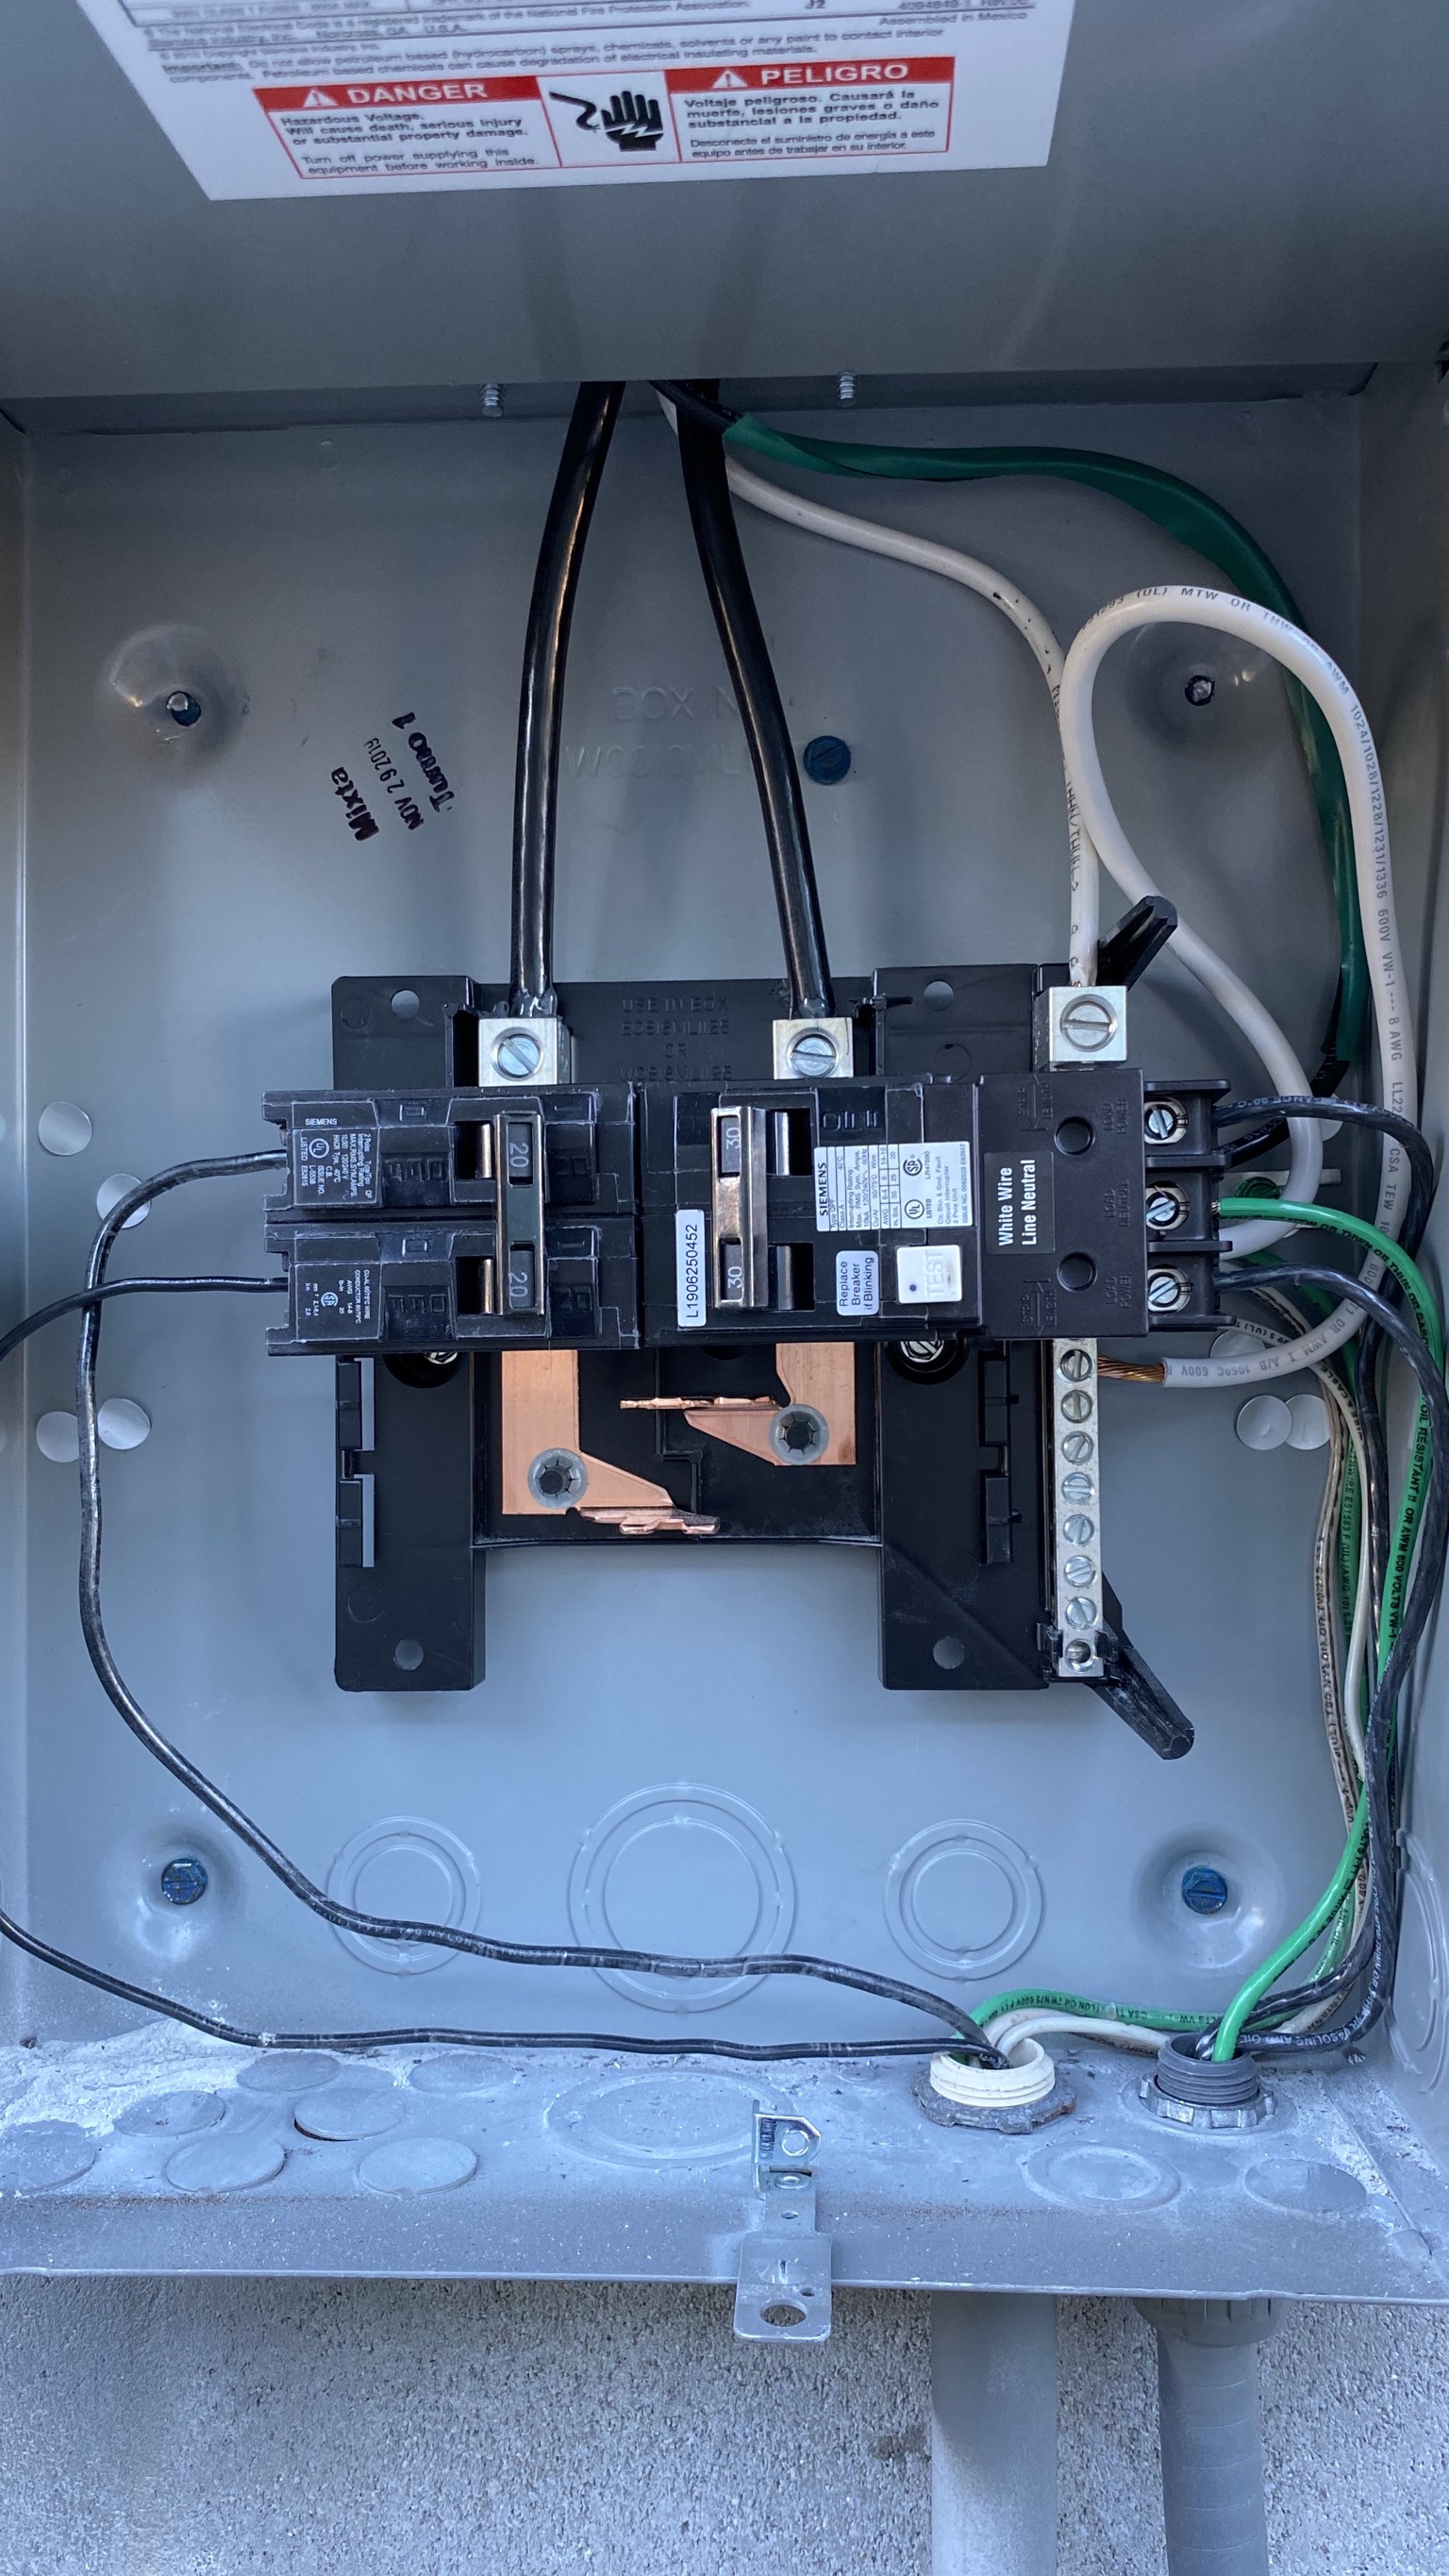
Photos of the electrical https://www.amazon.com/photos/shared/xZdR6OUaTjSDQ3k8P71VIg.qNj3q_wLyh6Z8zxvZNhVYZ
Can't get to any pics on that link. Please post directly here.Photos of the electrical https://www.amazon.com/photos/shared/xZdR6OUaTjSDQ3k8P71VIg.qNj3q_wLyh6Z8zxvZNhVYZ
Brew on
Can't get to any pics on that link. Please post directly here.
Brew on
Attachments


I didn’t know I could do a direct upload Lol

That 30A GFCI breaker is wired wrong! The green ground wire should connect to the ground bus in the sub panel. Since you don't have a neutral connection in the outlet for the BrewCommander 240V input, there should be no connection to the center load side terminal of the GFCI breaker.
Also, the two 20A 120V breakers should not be mechanically linked together. They are independent circuits, and you want them to trip independently. They should also be GFCI breakers since this sub panel is servicing a wet area. The 30A GFCI provides no protection to your 120V circuits.
Can't see where I assume the panel ground bus is (it appears to be under the end of the 30A GFCI. Can you remove that breaker and get a pic of the ground and neutral buses (leave all wires connected where they currently are.)
Brew on
Similar threads
- Replies
- 4
- Views
- 3K
- Replies
- 1
- Views
- 962
- Replies
- 6
- Views
- 4K
- Replies
- 9
- Views
- 3K
- Replies
- 1
- Views
- 2K
