For those who have tried @Bernhard's Bierbot brick(Bierbot github), here is another way to build your own BB brick.
Bierbot(Home | BierBot | Homebrewing automation) is a software designed to support your brewing process. They sell readymade Bierbot bricks but you can also build your own using a Sonoff smart switch along with couple of other components(which will cost approx. $25 to build). Unfortunately, the quality of Sonoff switches wasn't good and I also faced issues with the temperature sensors that Sonoff switches support. Hence, I decided to experiment with ESP8266 MCUs (which are base for the Sonoff switches).
Components you would need:
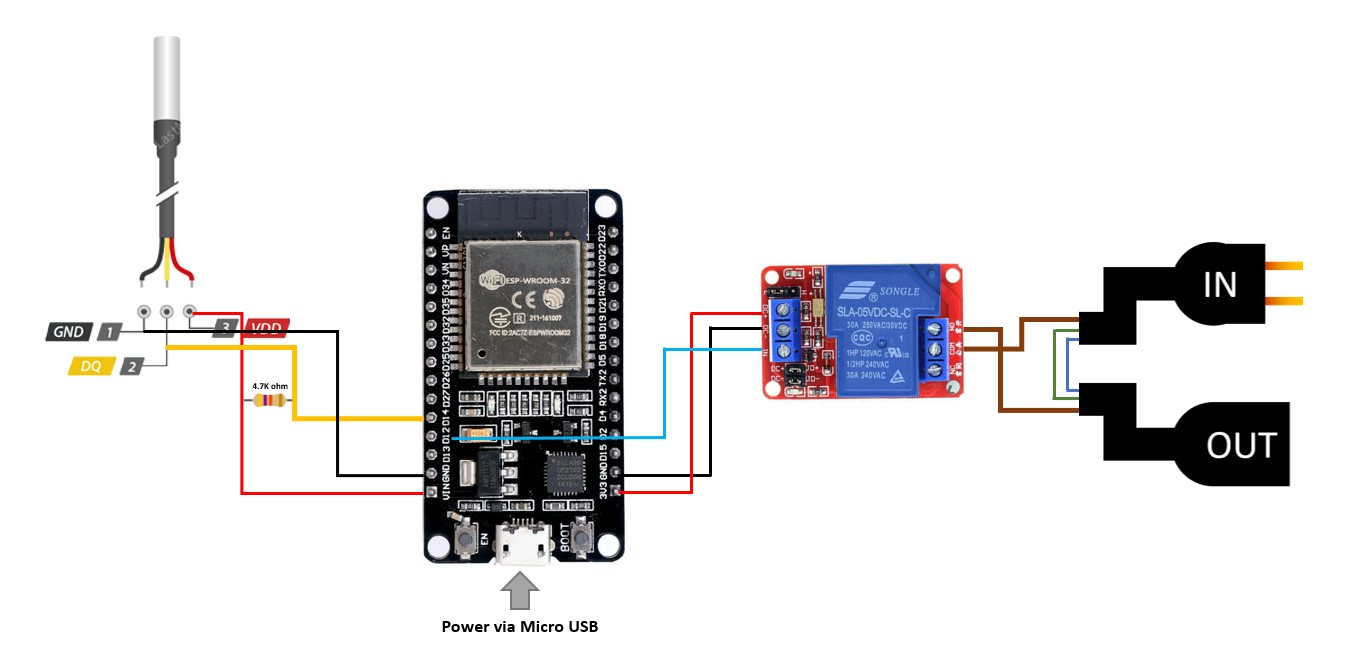
The connection is fairly simple as shown below:

The code/sketch is attached with this post, you have to upload into ESP8266 board using Arduino IDE (just connect via USB, select “Nodemcu 1.0” under boards and choose the COM port):
For more detailed instructions on how to program your ESP8266 board, refer to this - How to Program NodeMCU on Arduino IDE
The code is same that's part of Bernhard’s original Bierbot brick firmware with few changes (Thanks again to Bernhard for helping out and suggesting to do a post on this build)
The Sonoff switch uses GPIO14 as the data pin for Temperature sensor. Also, the relay is defined to be used on GPIO12. This is specified in the code as shown below:

Make sure you upload the code without connecting any components to the ESP8266(or else you will run into some kind of errors).
Once the code has been uploaded successfully, follow steps as per the github page(Bierbot github) to add your brick to your brewery:

If this thread helps someone in automating their brews, then please give a shoutout to @Bernhard for his amazing work! Cheers!
Bierbot(Home | BierBot | Homebrewing automation) is a software designed to support your brewing process. They sell readymade Bierbot bricks but you can also build your own using a Sonoff smart switch along with couple of other components(which will cost approx. $25 to build). Unfortunately, the quality of Sonoff switches wasn't good and I also faced issues with the temperature sensors that Sonoff switches support. Hence, I decided to experiment with ESP8266 MCUs (which are base for the Sonoff switches).
Components you would need:
- ESP8266 (I am using Nodemcu but you can use any, as long as it has both 5v & 3.3v pinouts) [Amazon link] = (~$4)
- 30A relays (do not use the regular 10A since your heating elements will burn the whole thing to ground) [Amazon link] = (~$4)
- Some breadboard jumper wires = (~$2)
- Temperature sensor (DS18B20) = (~$2)
- 4.7K ohm resistors = (~$2)
- A junction box or circuit enclosure (I couldn’t find a suitable one so I assembled the circuit inside a PVC CCTV junction box) [Amazon link] = (~$2)
The connection is fairly simple as shown below:

The code/sketch is attached with this post, you have to upload into ESP8266 board using Arduino IDE (just connect via USB, select “Nodemcu 1.0” under boards and choose the COM port):
For more detailed instructions on how to program your ESP8266 board, refer to this - How to Program NodeMCU on Arduino IDE
The code is same that's part of Bernhard’s original Bierbot brick firmware with few changes (Thanks again to Bernhard for helping out and suggesting to do a post on this build)
The Sonoff switch uses GPIO14 as the data pin for Temperature sensor. Also, the relay is defined to be used on GPIO12. This is specified in the code as shown below:

Make sure you upload the code without connecting any components to the ESP8266(or else you will run into some kind of errors).
Once the code has been uploaded successfully, follow steps as per the github page(Bierbot github) to add your brick to your brewery:

If this thread helps someone in automating their brews, then please give a shoutout to @Bernhard for his amazing work! Cheers!


![Craft A Brew - Safale S-04 Dry Yeast - Fermentis - English Ale Dry Yeast - For English and American Ales and Hard Apple Ciders - Ingredients for Home Brewing - Beer Making Supplies - [1 Pack]](https://m.media-amazon.com/images/I/41fVGNh6JfL._SL500_.jpg)

