BCS 2 Vessel No Sparge Garage Brewery Build

Homebrew Talk - Beer, Wine, Mead, & Cider Brewing Discussion Forum

Help Support Homebrew Talk - Beer, Wine, Mead, & Cider Brewing Discussion Forum:

This site may earn a commission from merchant affiliate links, including eBay, Amazon, and others.
But @Brundog, at what flow rate do you need to worry about channeling? I personally aim for about 1 to 1.25 gpm on my system, maybe I should step it up.

I think that's good. Probably can't get to 2 GPM unless its a big FB. As long as your temps are consistent, it's tuned and running well. No need to chase silly ideals.
 
@thekraken yea those are a lot tighter temps than mine.

That's only because of the really fast flow rate, I was just illustrating that the faster the better for the controller. But you have to balance flow rate with avoiding a stuck mash or channeling.
 
I love me a bottom drain but I think an issue is probe is located above the drain. The liquid flows down along the sides of the MT and flows along the dome and out the drain without getting heated by the element. In addition, with a slow enough flow rate, the liquid that is heated by the element actually rises, setting up a current, in theory, like this side view:

PTpic.png

One way to test this would be to run with just water, at the recirc rate you use, and without disturbing the water too much, drop in some food coloring drops with a long pipette. Try from about element height along side. Also try from about element height about halfway between side and center. See where the drops go. Another test would be to run with just water, as you did with the mash (same recirc rate), and see if you get the same temp variation/oscillation. Then, max out your flow to maximum, and see what you get (shorter peaks/faster oscillation). Yet another test would be to run with just water, as you did with the mash, and use an accurate temp probe and snoop around to see what are the different temps throughout the vessel.

This make sense?
 
I love me a bottom drain but I think an issue is probe is located above the drain. The liquid flows down along the sides of the MT and flows along the dome and out the drain without getting heated by the element. In addition, with a slow enough flow rate, the liquid that is heated by the element actually rises, setting up a current, in theory, like this side view:

View attachment 327572

One way to test this would be to run with just water, at the recirc rate you use, and without disturbing the water too much, drop in some food coloring drops with a long pipette. Try from about element height along side. Also try from about element height about halfway between side and center. See where the drops go. Another test would be to run with just water, as you did with the mash (same recirc rate), and see if you get the same temp variation/oscillation. Then, max out your flow to maximum, and see what you get (shorter peaks/faster oscillation). Yet another test would be to run with just water, as you did with the mash, and use an accurate temp probe and snoop around to see what are the different temps throughout the vessel.

This make sense?

Yea I can definitely believe that some channeling is happening. These are some good ideas although it will be hard to test the dye ones with the false bottom in place. Sounds like I have to plan some water play time this weekend. I need to tune the PID anyway so might as well right. Good to know why stuff is happening the way it is. But like you said earlier, it all comes down to how fast i can recirc.
 
I think if you insulate the heck out of the MT (including bottom if possible) and recirc as fast as possible, your problem will be mitigated. If you installed a dip tube that raised the drain up near/into the element, the problem would be solved even more. Maybe a design like your snorkel but a rubber stopper instead of the scrubbie and put the parallel portion inline with the element with maybe a couple of tees inline pulling liquid from above it.
 
I think if you insulate the heck out of the MT (including bottom if possible) and recirc as fast as possible, your problem will be mitigated. If you installed a dip tube that raised the drain up near/into the element, the problem would be solved even more. Maybe a design like your snorkel but a rubber stopper instead of the scrubbie and put the parallel portion inline with the element with maybe a couple of tees inline pulling liquid from above it.

I could get down with some chimney thing to help it pull from the element. Ill see what I can slap together.
 
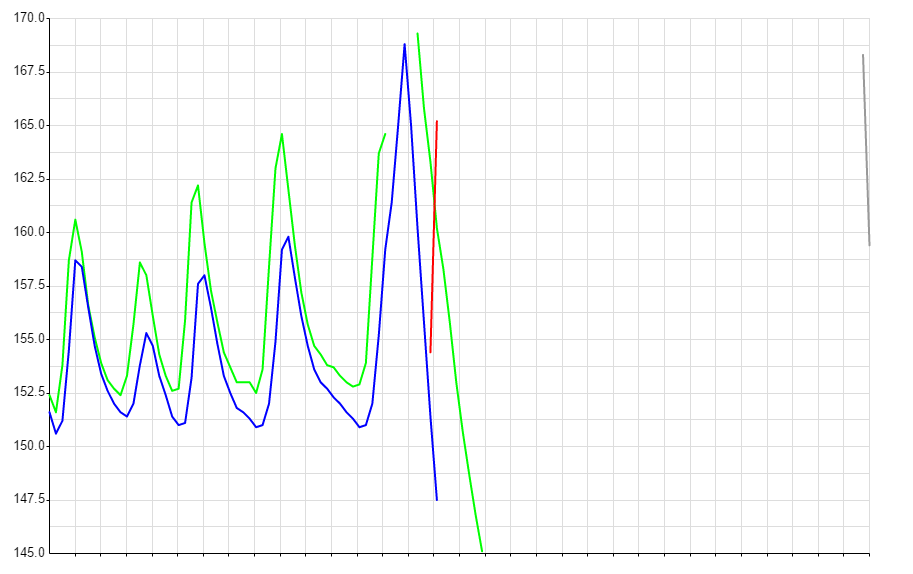
Mash from last brew day; setpoint 154, blue is return, green is MLT. Still has oscillation but nowhere near last time.
uOKKDb4.png

wB2o7lj.png


I knew it was going to be a bad day when my bcs was reading 2 degrees in the garage. The short version, everything was frozen, so frozen one of the ball valves broke. was able to take it apart and mend it during the mash. Lines apparently didn't drain fully so they had sections of solid ice in them. Ended up doing an hour or so whirlpool because I couldn't thaw the chiller for the life of me. Decided to just rack to carboy and chill in icy water. After cleaning up and taking the chiller inside and thawing it fully sad news was found. There was water left in the outer coil of the chiller that froze and appears to have collapsed the inner tube the wort runs through. Pretty sure its ruined beyond repair. I will cut it open to make sure but sadly I think its dead. I cant blow air through either end, its sealed shut. Here is a pic of the fallen trooper. Loved this chiller, it always worked perfect, 1 pass and done.
Q9Amwqt.jpg


Good news though, Austinhomebrew has a pretty sick deal on counterflows so I picked one of those up. Should be a lot easier to mount and drain. And I learned I think in the winter I need to take the hoses off and let them fully drain, and store the ball valves in open position when not in use. So yea any tips on how to tighten up the PID more or is this about as good as I should expect when its about 150 degreese colder ambient temp.

You really don't need the derivative for how slow our systems respond. I would suspect that this is causing your oscillations. I would set it to 0.1 to disable it.
 
Mash from last brew day; setpoint 154, blue is return, green is MLT. Still has oscillation but nowhere near last time.
uOKKDb4.png

There's actually not much oscillation going on there. Your blue graph runs from 153.5 to 154 for the first half and then from 153.5 to 155 for the second half. A little overshoot there, but that's still not bad at all. Anything different going on in the second half of the mash over the first?
 
There's actually not much oscillation going on there. Your blue graph runs from 153.5 to 154 for the first half and then from 153.5 to 155 for the second half. A little overshoot there, but that's still not bad at all. Anything different going on in the second half of the mash over the first?

Yea I bumped up the D value at 30 minute mark to see if it would help, but it appears to have done the opposite and made the wave length a bit longer.
 
I don't think .5 degree swing is bad at all. Is your setpoint is on the MLT return (blue line) or the MLT (green line)? Have you calibrated the temp probes?

Both (initially) only exhibit a .5 degree swing, so for me, the next goal would be to bring the two measurements inline with each other (as close as possible). That might be hard given that your plumbing is sitting in extreme cold temperatures right now.
 
For a large scale system, the temp should not vary that much IMO. Also, what is the actual mash temp... 153.5, or 158? Makes a big difference, especially if you have lots of stratification in both planes. Properly tuned, this should be holding dead nuts at the desired temp. The instability is also concerning to me, though he did say he changed D, as is the difference between those probes. I think a few tests as noted above and he will have the answers. No doubt this system would be responding very differently at 80 degrees ambient.
 
I have one of those. Works great. I use for cooling. What are you planning to use it for?

By the way, how are you making your brewing calculations with no sparge? In effort to achieve dream of possible weeknight all-grain brew session, as well as to shorten overall brewing time, I am wondering how you calculate everything. I use BeerSmith and I'm not very adept at the mash design section.

TD
 
It's my new chiller. A couple posts up I explain how mine broke. I use beersmith to calculate everything recipe wise.
 
It's my new chiller. A couple posts up I explain how mine broke. I use beersmith to calculate everything recipe wise.

Ah, I see it now. You'll love this one just as much if not more. In FL, one pass cooling isn't a practical reality for most. I recirculate with my chiller during whirlpool, and seems to work quite well on the one and only batch I've dont with my new setup.

TD
 
Good to here. Hopefully it's the last chiller I buy. I like that it's alot smaller than mine that's for sure.
 
Insulation in place, turned out pretty decent I think.
efNk9Qm.png

VaFYVJO.jpg


Started ventilation system, hole drilled, still waiting on a few pieces before I can assemble and permanent mount.
zgPgzIs.jpg


Chiller fitted and sudo mounted, seems like its going to work good.
Z2nMW2c.png


Did more tuning with PID, here is graph as I dialed it in more, set temp to 155 then 157, pretty decent all things considered. same flow rate, just with insulation and better numbers.
GE2m2Oc.png
 
How do you like that sight glass? I plan to get one once I get back to recirculating my mash.

Its awesome, I have some pics of it on my first brew day a few posts back. Really cool to watch the wort convert.
 
I love it when a plan comes together! Great job. How is first batch coming along??

TD

First batch stopped around 1020 so I added a lb of sugar to help dry it out. Just racked to dry hop keg over the weekend but didn't take a reading, I hope its like 1016 or so but we will have to wait and see. Tomorrow I will probably transfer to a keg and carb and get some pics and numbers for everyone, if its drinkable I will be happy.
 
Ah, I see it now. You'll love this one just as much if not more. In FL, one pass cooling isn't a practical reality for most. I recirculate with my chiller during whirlpool, and seems to work quite well on the one and only batch I've dont with my new setup.

TD

Sure it is... just need 2 chiller! Primary (groundwater) and secondary (ice water) cooling gets it done fast and one pass. Pre-chillers don't work (cooling down the groundwater) as its way too much volume.
 
I would have recommended against the insulation tape as that **** will be tough to remove if you ever need to (which you probably wont anyway, so I should STFU).

Looks like the temp is more stable. Question: Is your BCS ground tied to all other grounds? AC ground, and each power supply ground should be tied in a star configuration (one common ground point).

Yea DC and AC ground bar are linked... or should be I will have to double check now but pretty sure that's what I did.
 
The rest of my ghetto vent system has arrived, pretty stoked to try this one out next brew day.
 
Sure it is... just need 2 chiller! Primary (groundwater) and secondary (ice water) cooling gets it done fast and one pass. Pre-chillers don't work (cooling down the groundwater) as its way too much volume.

Ultimate goal is to just rack to fermenter at 75-80 degrees and turn on the glycol chiller. But... I have to make some modification to my fermentation setup before that can work reliably.

So you're saying chill with ground water as far as it'll go then chill with pre chiller in an ice bath?
 
Ya. Chill through CFC or PC as normal and pass wort though pre chiller (aka IC) which is in ice water bucket. Keep the ice water moving by stirring up frequently. Go as slow as you need and you can get to lager temp and not even burn a crappoad of ice. 20 lbs is what I usually use and have plenty left over.

You have to deal with sterilizing, so either run star San through it, which is tricky, or run boiling wort through it like the CFC/PC without chilling.
 
Finishing ventilation system tomorrow then brewing sunday, third time should be the charm I hope. IPA turned out pretty good, have not checked FG yet but its definitely a little too sweet but still drinkable. So not all is lost.
 
My new mash process now allows for up to 4 steps plus a mashout, all able to import from beersmith. My tool can now push desired chill to temp as well. Getting pretty happy with this stuff getting ironed all out.
STEOveT.png
 
Ya. Chill through CFC or PC as normal and pass wort though pre chiller (aka IC) which is in ice water bucket. Keep the ice water moving by stirring up frequently. Go as slow as you need and you can get to lager temp and not even burn a crappoad of ice. 20 lbs is what I usually use and have plenty left over.

You have to deal with sterilizing, so either run star San through it, which is tricky, or run boiling wort through it like the CFC/PC without chilling.

I would do it the other way. If you run through the CFC or PC first and then through the IC in an ice bath, you can go much faster. let the tap water do the bulk of the cooling and the ice water will finish it off. You should be able to go nearly full speed that way.
 
I would do it the other way. If you run through the CFC or PC first and then through the IC in an ice bath, you can go much faster. let the tap water do the bulk of the cooling and the ice water will finish it off. You should be able to go nearly full speed that way.

I don't think you read my post correctly. "Chill through CFC or PC as normal" means connected to ground water. I used the term pre-chiller to be consistent with Tricky Dick's terminology. Look at my first post on the topic a few posts up.
 
Brew day went stellar. Did a multi step mash for the helles recipe. Temps ramped fast and stayed stable at desired points. @Yuri_Rage inspired ventilation system worked so damn good. Boil off looks like it was at 1.6 gph today. I was able to make up for extra boil off by mitigating losses elsewhere in the process so hit target volume and gravity dead on. So so happy with how the system is starting to work and that I'm getting the hang of how to deal with it in the winter.

View attachment 1453093119146.jpg

View attachment 1453093126312.jpg

View attachment 1453093144297.jpg
 
And this was a 90 min mash 90 min boil and I was cleaned up and done in 4 hrs 10 mins. Pretty sure a brew day under 3 hrs is possible on this thing.
 
Is the inside of the vent pipe smooth or corrugated like the outside? I'm just wondering if your going to build up water inside it?
 
corrugated, its just semi rigid aluminum dryer duct. I would assume some goes back in but I boiled off over 2 gallons total yesterday so a large portion makes it out at least. This helles should be a pretty clean beer so it should be able to show us if there is going to be a DMS problem or not. @Yuri_Rage uses a very similar setup on his system and he doesn't have issues so i'm not too concerned. Until I try the beer I will hold my opinion of this is 10 times cheaper and better then a vent hood.
 
No doubt the motive force of hot steam will push up and out. I might be concerned about aluminum corrosion dripping back into the kettle but you can keep an eye on it. Aluminum can impart funny flavors if not oxidized.

Also, have you been no-sparging like planned?
 
No doubt the motive force of hot steam will push up and out. I might be concerned about aluminum corrosion dripping back into the kettle but you can keep an eye on it. Aluminum can impart funny flavors if not oxidized.

Also, have you been no-sparging like planned?

yea indeed, ill keep an eye on it, pretty sure it soaking in beer steam for a couple hours should oxidize it pretty quick. And yep no sparge for all 3 batches so far. Efficiency has ranged from 70-72% so pretty consistent. I was stable around 75% for these size beers on my old system so pretty stoked I only took a 3-5% efficiency loss from my batch sparging. Might tighten up the mill and see if I cant get it back to 75+ though.
 
Which size booster fan did you use? I was thinking about going this route but was worried that it might not pack enough punch to get the job done.
 
4" like 100cfm, super cheapo for like 19$ on ebay. I figured there is no more than 2cf of headspace in my kettle so if it cycles the air close to once a second that should be more than adequate. Plus the steam wants to go up and out and should do a majority of the moving on its own.
 
Back
Top