They were out of stock when I first looked at them, too. But, There is a link on the page to get an email when they are back in stock. I got a reply in a couple of days.
You are using an out of date browser. It may not display this or other websites correctly.
You should upgrade or use an alternative browser.
You should upgrade or use an alternative browser.
ANVIL FOUNDRY ALL-GRAIN BREWING SYSTEM
- Thread starter czmkid
- Start date

Help Support Homebrew Talk:
This site may earn a commission from merchant affiliate
links, including eBay, Amazon, and others.
I've now brewed a couple of batches on the foundry and so far I'm impressed. I still need to tinker to improve my efficiency rate.
This my first time using a pump and I'm kicking myself for not getting one before. I do have a question re the pump. After recirculating the mash, how do you empty what's left in the tubing? I close the valve on the foundry, but the pump will not push the remaining wort into the kettle.
This my first time using a pump and I'm kicking myself for not getting one before. I do have a question re the pump. After recirculating the mash, how do you empty what's left in the tubing? I close the valve on the foundry, but the pump will not push the remaining wort into the kettle.
user 263363
Well-Known Member
- Joined
- Feb 18, 2019
- Messages
- 1,199
- Reaction score
- 7,058
I've now brewed a couple of batches on the foundry and so far I'm impressed. I still need to tinker to improve my efficiency rate.
This my first time using a pump and I'm kicking myself for not getting one before. I do have a question re the pump. After recirculating the mash, how do you empty what's left in the tubing? I close the valve on the foundry, but the pump will not push the remaining wort into the kettle.
I had the same issue and what I do now is close the valve, pull the line off the valve, and turn it off once the inlet line is empty. I then pick the pump up and pull the outlet line off the pump and allow it to drain before pulling it out of the lid.
jlb307
Well-Known Member
silicon adhesive if you really need the gasket.Anybody else having issues getting the gasket to stay in the groove of the lid? What's the trick to keeping it in place?
I've been leaving mine off.
Jsmith2154
Well-Known Member
- Joined
- Dec 21, 2018
- Messages
- 70
- Reaction score
- 11
I couldn’t get mine to stay in place. Caused me to dump my first kettle sour attempt. After, I was looking at things I had on hand to fix and saw I have an extra ss Brewbucket gasket. Put the grooved side on the lip of kettle and lid on flat and while harder to clamp works great Going to try another kettle sour next week.


$22.00 ($623.23 / Ounce)
AMZLMPKNTW Ball Lock Sample Faucet 30cm Reinforced Silicone Hose Secondary Fermentation Homebrew Kegging joyful
无为中南商贸有限公司

$7.79 ($7.79 / Count)
Craft A Brew - LalBrew Voss™ - Kveik Ale Yeast - For Craft Lagers - Ingredients for Home Brewing - Beer Making Supplies - (1 Pack)
Craft a Brew


$53.24
1pc Hose Barb/MFL 1.5" Tri Clamp to Ball Lock Post Liquid Gas Homebrew Kegging Fermentation Parts Brewer Hardware SUS304(Liquid Hose Barb)
yunchengshiyanhuqucuichendianzishangwuyouxiangongsi


$719.00
$799.00
EdgeStar KC2000TWIN Full Size Dual Tap Kegerator & Draft Beer Dispenser - Black
Amazon.com


$479.00
$559.00
EdgeStar KC1000SS Craft Brew Kegerator for 1/6 Barrel and Cornelius Kegs
Amazon.com


$76.92 ($2,179.04 / Ounce)
Brewing accessories 1.5" Tri Clamp to Ball Lock Post Liquid Gas Homebrew Kegging Fermentation Parts Brewer Hardware SUS304 Brewing accessories(Gas Hose Barb)
chuhanhandianzishangwu


$58.16
HUIZHUGS Brewing Equipment Keg Ball Lock Faucet 30cm Reinforced Silicone Hose Secondary Fermentation Homebrew Kegging Brewing Equipment
xiangshuizhenzhanglingfengshop

$20.94
$29.99
The Brew Your Own Big Book of Clone Recipes: Featuring 300 Homebrew Recipes from Your Favorite Breweries
Amazon.com

$53.24
1pc Hose Barb/MFL 1.5" Tri Clamp to Ball Lock Post Liquid Gas Homebrew Kegging Fermentation Parts Brewer Hardware SUS304(Gas MFL)
Guangshui Weilu You Trading Co., Ltd


$10.99 ($31.16 / Ounce)
Hornindal Kveik Yeast for Homebrewing - Mead, Cider, Wine, Beer - 10g Packet - Saccharomyces Cerevisiae - Sold by Shadowhive.com
Shadowhive


$176.97
1pc Commercial Keg Manifold 2" Tri Clamp,Ball Lock Tapping Head,Pressure Gauge/Adjustable PRV for Kegging,Fermentation Control
hanhanbaihuoxiaoshoudian


$44.99
$49.95
Craft A Brew - Mead Making Kit – Reusable Make Your Own Mead Kit – Yields 1 Gallon of Mead
Craft a Brew

$159.99 ($26.66 / Count)
3M High Flow Series System BREW120-MS, 5616001, For Brewed Coffee and Hot Tea, Valve-in-Head Design
SpaceCityProviders
![Craft A Brew - Safale BE-256 Yeast - Fermentis - Belgian Ale Dry Yeast - For Belgian & Strong Ales - Ingredients for Home Brewing - Beer Making Supplies - [3 Pack]](https://m.media-amazon.com/images/I/51bcKEwQmWL._SL500_.jpg)


$33.99 ($17.00 / Count)
$41.99 ($21.00 / Count)
2 Pack 1 Gallon Large Fermentation Jars with 3 Airlocks and 2 SCREW Lids(100% Airtight Heavy Duty Lid w Silicone) - Wide Mouth Glass Jars w Scale Mark - Pickle Jars for Sauerkraut, Sourdough Starter
Qianfenie Direct


myndflyte
Well-Known Member
So I'm trying to plan my 2nd brew on the Foundry and have a question. Is there a reason to only sparge with 1 gallon in their instructions? Is there a reason why I couldn't adjust my mash volume to use more sparge water?
Noob_Brewer
Well-Known Member
No reason at all why you couldn't do this. You could also do a no sparge full volume if you'd like as well. These are just guidelines that you can adjust as needed. I generally have stuck with the 1 gallon sparge on most of my brews but on some bigger grain bills (~18-19.5lbs), you need to hold more water back for sparging just so the grain bill fits. So Ive sparged at 1.5g on these bigger grain bills myself.So I'm trying to plan my 2nd brew on the Foundry and have a question. Is there a reason to only sparge with 1 gallon in their instructions? Is there a reason why I couldn't adjust my mash volume to use more sparge water?
Jsmith2154
Well-Known Member
- Joined
- Dec 21, 2018
- Messages
- 70
- Reaction score
- 11
Yesterday I completed my third complete brew day with the foundry. Still got more trub into the fermentor than I wanted but will keep trying. I want to thank whoever suggested the shopvac for getting hop and break material out. Really sped up cleaning to the point if I can get the trub problem worked out I may not worry about a hopspider.
harrower
Active Member
I use the Anvil recommended volume of water for mashing and sparge water to bring up to my boil volume. The only time I got a stuck mash was when I use less than the recommended volume of mash water. I have over 25 brews with my Anvil an love it.So I'm trying to plan my 2nd brew on the Foundry and have a question. Is there a reason to only sparge with 1 gallon in their instructions? Is there a reason why I couldn't adjust my mash volume to use more sparge water?
Yesterday I completed my third complete brew day with the foundry. Still got more trub into the fermentor than I wanted but will keep trying. I want to thank whoever suggested the shopvac for getting hop and break material out. Really sped up cleaning to the point if I can get the trub problem worked out I may not worry about a hopspider.
After chilling, try whirlpooling the wort for a minute or two and then let it sit for half hour. Then either turn the spigot up has high as you can so you are getting mostly liquid. Another option is to do the same and then rack it to fermenter from the top with a siphon. Third option...transfer to fermenter, wait for it to settle and then transfer off trub to another fermenter.
Jsmith2154
Well-Known Member
- Joined
- Dec 21, 2018
- Messages
- 70
- Reaction score
- 11
I whirlpool chill with the brewhardware spin cycle. Next time I’ll try to be more patient and let settle longer. I think I only waited a couple of minutes.
Was wondering if anybody that ordered within the past couple of months included a small batch ring in their order. I never received mine, and did get info back on the 21st that they were experiencing delays w/this item.
senseichaz
Member
Well, I pulled the trigger and bought the Anvil Foundry 10.5 with the pump directly from Anvil. The price was pretty good compared to similar products. I read lots of reviews and the Anvil seems to be a solid choice. I ordered it on a Sunday, got an email that it was being processed and received it 10 days later. It was dropped off without a signature, even though they said it would need one. I only had time to unpack it. I hope to brew Sunday. I can't wait. I have 50 lbs of Marris Otter and an assortment of specialty grains. If this works out well, I'll be selling off my old three keg system.
cswant88
Well-Known Member
I finally pulled the trigger on a 10.5gal foundry unit. I’ve been looking at these things since they first came out. So far I’ve only one brew on this system. I did a no Sparge batch, going forward I’ll probably do the 1 gallon sparge like anvil recommends. I’ve still got some work to get the system dialed in, as is always the case on a new system. I came up about 3/4gal short and my OG was still a few points low. I neglected to take any measurements on the first run, so I’m not sure yet where exactly I’m coming up short.
I did recirculate the mash, using my own pump and ball valve, but with the perforated plate and bent top tubing purchased from anvil. You’ve got to watch your flow rates carefully to make sure you don’t overflow the malt tube. I noticed that even at very slow flow, the liquid level in the tube is going to be higher than the liquid outside of it. This leads to little bits of grain stuck to the sides that doesn’t get recirculated out. I wiped a lot of this out as much as I could but still ended up with some bits in the kettle that I scooped out with a mesh basket. I ordered a brew bag to for the malt pipe to prevent this going forward, and also to aid in the clean up, because cleaning all the bits of grain out of the perforated tube was a bit of a pain. I also had some issues with the lid gasket not wanting to stay put. I eventually just removed it entirely. There isn’t really any reason for it to be there unless you are going to ferment or distill in it. I have ordered a kegland alcoengine pot still to play with in the future.
Things I liked:
The unit performed adequately at 120v, with reasonable heating times and a decent boil. Eventually I will install a plug off of my ovens 240v wiring so that I have that extra power, but I’m in no rush. The double walled design is a good insulator without the need for any jacket. The outside barely even got warm. I like the controller mounted up near the top on the newer units, also the ability to adjust power in 1% increments independent of temperature is nice and will come in handy when distilling. The temp control will also let me easily do step mashing, which I will play with soon. The immersion chiller worked well, cooled from Boiling to around 95F in about 20 minutes with an occasional stir. After this things went much more slowly because of my ground water temps this time of year. At 90F I transferred to my fermenter to finish cooling to pitch temp. The support ring for the malt tube is nice, let’s you lift the basket and drain and sparge without having to hold it or use a pulley to hoist and suspend it above the kettle.
Overall I’m very happy with the unit for the money. Hopefully I’ll get her dialed in with a couple more brews.
Edit: I forgot to mention. All components including the chiller fit inside for a small storage footprint.
Edit: I originally said that the power was adjustable in 10% increments, I meant to type 1%. Not sure what I was thinking, too much homebrew I guess.
Last edited:
cswant88
Well-Known Member
This may have been addressed already in this thread, but a search didn't yield any good results and I really don't want to read through all 21 pages.
Can anyone tell me the reason behind raking the mash, and is it truly necessary? Anvil recommends raking the top 1/3 of the grain bed when doing a recirculating mash. I used to stir my mash in my cooler mash tun about every 15 minutes, but there was no recirculation providing even temps and what not. I followed the instructions on my first run on the system, and every time I raked it seemed like I had to reduce my flow rate because it would not flow as quickly and start filling up the malt tube.
It seems to me that raking the grain bed or stirring would not be necessary when you have a constant even flow through the grain bed. Also, once your grain bed settles and you've got a good flow rate going through, stirring it up again would compromise that.
Is there a scientific reason behind raking that I'm failing to consider?
Raking is an attempt to avoid channeling where the wort only flows through certain pathways in the grain bed. If you do not want to stir, throwing in some rice hulls would be the best way to keep the flow spread out around the grain bed. You will need to test this over time to see if what you brew and what efficiency you are getting is adequate. All barley grists will need less than wheat or rye laden grists. I still use rice hulls for safety but will be testing different crushes which might lead to not needing the rice hulls going forward.
myndflyte
Well-Known Member
For my last batch, I was getting the kids ready for the day while I was mashing and recirculating so I wasn't able to rake the top. In the end I mashed for about 2 hours and got a 64% mash efficiency. So maybe I could have gotten better efficiency if I was able to rake the top? Not sure.
myndflyte
Well-Known Member
What's the most grain any of you have used in the 10.5 Foundry? I'm looking to brew a Wee Heavy and based on my efficiency, I need to use 21 lbs of grain and my mash thickness ends up coming to about 1.35 with a 1 gal sparge.
I know the manual recommends a limit so am I in for a painful brew day trying this?
I know the manual recommends a limit so am I in for a painful brew day trying this?
I don't have a Foundry yet, but my calcs say you can mash 21 pounds in 8.24 gallons of 'pot'. The basket might be an issue, but you could always mash in a bag instead.What's the most grain any of you have used in the 10.5 Foundry? I'm looking to brew a Wee Heavy and based on my efficiency, I need to use 21 lbs of grain and my mash thickness ends up coming to about 1.35 with a 1 gal sparge.
I know the manual recommends a limit so am I in for a painful brew day trying this?
https://www.rackers.org/calcs.shtml
myndflyte
Well-Known Member
That's exactly what I've been using while deliberating if I should use the Anvil or just go back to my propane BIAB setup. I would like to use the Anvil but not if it's just going to be a disaster brew day.I don't have a Foundry yet, but my calcs say you can mash 21 pounds in 8.24 gallons of 'pot'. The basket might be an issue, but you could always mash in a bag instead.
https://www.rackers.org/calcs.shtml
harrower
Active Member
I use the water per lbs of grain that Anvil recommends. The one time I didn't, I got a stuck mash. Anvil's water recommendation are set with their design. You could probably add 21 lbs, but have no room for water to mash.I don't have a Foundry yet, but my calcs say you can mash 21 pounds in 8.24 gallons of 'pot'. The basket might be an issue, but you could always mash in a bag instead.
https://www.rackers.org/calcs.shtml
With 21 lbs of grain I'd use the old propane setup. It may be easier since anvil recommends not going over 18 lbs, but some folks with more experience on the anvil may have a better answer. I got mine last month, but I havent even used it yet because my pipeline is rather full right now. Good problem to have. 
Maybe you misunderstood my post. Ditch the basket and don't recirculate. Just use a BIAB and there is nothing to stick.I use the water per lbs of grain that Anvil recommends. The one time I didn't, I got a stuck mash. Anvil's water recommendation are set with their design. You could probably add 21 lbs, but have no room for water to mash.
- Joined
- Jan 17, 2017
- Messages
- 306
- Reaction score
- 136
What's the most grain any of you have used in the 10.5 Foundry? I'm looking to brew a Wee Heavy and based on my efficiency, I need to use 21 lbs of grain and my mash thickness ends up coming to about 1.35 with a 1 gal sparge.
I know the manual recommends a limit so am I in for a painful brew day trying this?
OK - I'm not taking credit for this since I don't know if it will work.
On the AF FB group a brewer found that a GrainFather replacement malt screen fits the 10.5 Foundry nicely but needs an extension to the standoffs ( Replacement Malt Pipe Boiler Screen for 35L Robobrew / BrewZilla | MoreBeer ). I found one of these on ebay and will mod it this week. Like said above he then will use a BIAB on top on this screen and without the malt pipe to go above the 16# limit. For recirculation he cut a hole in a cake pan but maybe you could just use the Anvil plate. I found one of these malt screens on ebay and will mod it this week and will try this on my new brew.
Jsmith2154
Well-Known Member
- Joined
- Dec 21, 2018
- Messages
- 70
- Reaction score
- 11
In my 6.5 anvil latest batch I tried was a “poly-gyle” mash. Brewstrong podcast talked about it with Blichmann a while back. My process was stuff the anvil with base malt and mash no sparse to end at target volume for second half of the mash. Second mash was majority base along with all the speciality malts. Total malt bill was ~15#. Came out pretty good my pre-boil volume was a little short but not terrible.What's the most grain any of you have used in the 10.5 Foundry? I'm looking to brew a Wee Heavy and based on my efficiency, I need to use 21 lbs of grain and my mash thickness ends up coming to about 1.35 with a 1 gal sparge.
I know the manual recommends a limit so am I in for a painful brew day trying this?
Aktormedic
Member
- Joined
- Jun 21, 2020
- Messages
- 11
- Reaction score
- 4
I know there’s been a lot of talk about increasing efficiency with the system. Per suggestions here and other sites, I made a single change - milled at .035. Went from 63-67% to 75-80% with absolutely no other changes. I have yet to have a stuck mash at that grist size, but I haven’t yet brewed anything with a large amount of oats, wheat etc.
I also bent the heck out of the chiller to get it to sit deeper in the malt pipe, and have more of it submerged. Seems to help the process.
I also bent the heck out of the chiller to get it to sit deeper in the malt pipe, and have more of it submerged. Seems to help the process.
myndflyte
Well-Known Member
Are you recirculating too?I know there’s been a lot of talk about increasing efficiency with the system. Per suggestions here and other sites, I made a single change - milled at .035. Went from 63-67% to 75-80% with absolutely no other changes. I have yet to have a stuck mash at that grist size, but I haven’t yet brewed anything with a large amount of oats, wheat etc.
I also bent the heck out of the chiller to get it to sit deeper in the malt pipe, and have more of it submerged. Seems to help the process.
Aktormedic
Member
- Joined
- Jun 21, 2020
- Messages
- 11
- Reaction score
- 4
Are you recirculating too?
yep. I was recirculating previously as well.
I have done both no-sparge and sparge. I have gotten better efficiency via sparge, but the recirculation requires more attention IMHO.
- Joined
- Jan 17, 2017
- Messages
- 306
- Reaction score
- 136
I know there’s been a lot of talk about increasing efficiency with the system. Per suggestions here and other sites, I made a single change - milled at .035. Went from 63-67% to 75-80% with absolutely no other changes. I have yet to have a stuck mash at that grist size, but I haven’t yet brewed anything with a large amount of oats, wheat etc.
I also bent the heck out of the chiller to get it to sit deeper in the malt pipe, and have more of it submerged. Seems to help the process.
What was your previous gap?
I have two brews on my Anvil and didn't change anything yet and got mid to high 60's BHE. Ready to change my mill gap on the next brew. Think I'm right around 0.040" - 0.042" right now.
Did you mess with water chemistry yet?
Thanks
Aktormedic
Member
- Joined
- Jun 21, 2020
- Messages
- 11
- Reaction score
- 4
What was your previous gap?
I have two brews on my Anvil and didn't change anything yet and got mid to high 60's BHE. Ready to change my mill gap on the next brew. Think I'm right around 0.040" - 0.042" right now.
Did you mess with water chemistry yet?
Thanks
I did not previously mill my own grain. The LHBS said they were about .045”. I have always adjusted water based on my local water report.
Just for clarity, I have the 6.5 version. Before buying a mill and changing the grain size, I was using a modified BIAB method (bag in malt pipe) with recirculation, acid and water adjustment as needed, both sparge/no sparge . Only parameter I changed was milling my own grain and knowing each time what my gap was.
I had 10 brews on the anvil prior to getting the mill, and 4 since then. The efficiency has been consistently 15-20% higher
- Joined
- Jan 17, 2017
- Messages
- 306
- Reaction score
- 136
I did not previously mill my own grain. The LHBS said they were about .045”. I have always adjusted water based on my local water report.
Just for clarity, I have the 6.5 version. Before buying a mill and changing the grain size, I was using a modified BIAB method (bag in malt pipe) with recirculation, acid and water adjustment as needed, both sparge/no sparge . Only parameter I changed was milling my own grain and knowing each time what my gap was.
I had 10 brews on the anvil prior to getting the mill, and 4 since then. The efficiency has been consistently 15-20% higher
Thanks.
Took a WFH mill gap setting break. I must have change my gap from what I recalled it was at 0.037" - 0.039". So I dropped it 0.005".
Probably like everyone else I measure the gap with feeler gauges but just for grins I found a piece of wax sheet that is used to measure gear lash and the such. I rolled it through the mill and it read about 0.030" higher than the feeler gauges - the wax is measuring the valley. Made me think if the depth of the knurl effects the crush.
Mike
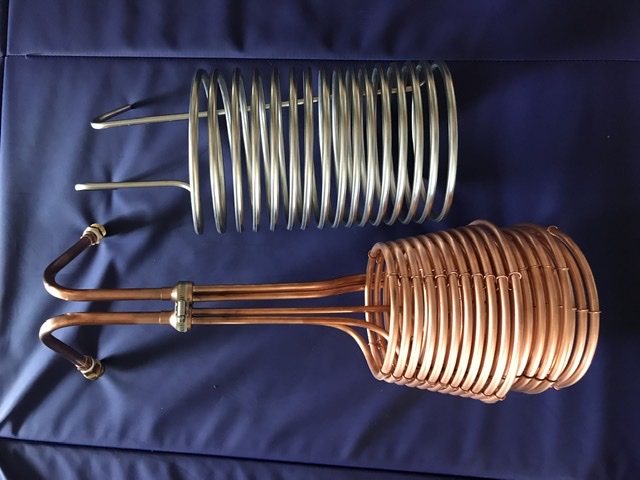
Figured somebody might be curious as to how the CuSS chiller might fit and how it compares to standard.
I put the brewhardware no weld whirlpool arm in there too. Pushed about as far as it will go, it is about 11 coils down, or approximately where the top section appears to flare out on last ring.
No dip tube in there in this pic, but it looks like it will clear no problem. I did let them know when I placed the order that it was for an Anvil Foundry
Attachments

user 263363
Well-Known Member
- Joined
- Feb 18, 2019
- Messages
- 1,199
- Reaction score
- 7,058
Figured somebody might be curious as to how the CuSS chiller might fit and how it compares to standard.
I put the brewhardware no weld whirlpool arm in there too. Pushed about as far as it will go, it is about 11 coils down, or approximately where the top section appears to flare out on last ring.
No dip tube in there in this pic, but it looks like it will clear no problem. I did let them know when I placed the order that it was for an Anvil Foundry
I have a Cuss sitting in the box until my next brew day. Really looking forward to the combo of that and my cool well water. Should cool really quick!
myndflyte
Well-Known Member
I'll throw in that the Hydra chiller fits but just barely. I just got their traditional size since I used it in a normal pot for years. But the chiller plus their whirlpool arm attached to it can just barely fit in the Anvil, but it works.
I have a Cuss sitting in the box until my next brew day. Really looking forward to the combo of that and my cool well water. Should cool really quick!
I bought a Cuss several months ago, it's great and fast, though with tap water after a very hot summer here in Mass, right now it struggles to get below 80F. But I am using a 20 foot hose and they do recommend a shorter one, so that does not help either, but still boiling to 80 degrees in 2-3 minutes is still crazy fast!
I was chilling with that whirlpool arm, the stock chiller, ice water bath in a cooler with my little 265 Gal/H and 3/8” hoses and got down to 65 in about 40 minutes or so.
Next brew day, using the CuSS, 1/2” hose and a 660 Gal/H so I’m expecting much better results.
Next brew day, using the CuSS, 1/2” hose and a 660 Gal/H so I’m expecting much better results.
myndflyte
Well-Known Member
For those with hot ground water right now, this pump (https://www.amazon.com/gp/product/B071RVPNQL/ref=ppx_yo_dt_b_search_asin_title?ie=UTF8&psc=1) with some hose fittings works great a pushing ice water through the Hydra. Once it's down to 90F or so, I just recirculate it back into the ice bucket.
- Joined
- Jan 17, 2017
- Messages
- 306
- Reaction score
- 136
I was chilling with that whirlpool arm, the stock chiller, ice water bath in a cooler with my little 265 Gal/H and 3/8” hoses and got down to 65 in about 40 minutes or so.
Next brew day, using the CuSS, 1/2” hose and a 660 Gal/H so I’m expecting much better results.
Maybe try a 5/8" hose?
All my main hoses are 3/4" and 100' long but I have a couple of 5' lead-in hoses that are 5/8". I figure the shorter hose will work better, even if it is slightly smaller diameter.
Similar threads
- Replies
- 12
- Views
- 797
- Replies
- 14
- Views
- 1K
- Replies
- 27
- Views
- 3K
- Replies
- 4
- Views
- 1K
