You need to join the Anvil Foundry group on Facebook. They have specs and links to all the parts you need for all the modifications that have been discussed here recently.
You are using an out of date browser. It may not display this or other websites correctly.
You should upgrade or use an alternative browser.
You should upgrade or use an alternative browser.
ANVIL FOUNDRY ALL-GRAIN BREWING SYSTEM
- Thread starter czmkid
- Start date

Help Support Homebrew Talk:
This site may earn a commission from merchant affiliate
links, including eBay, Amazon, and others.
The photos they show on their site show the nipples and connectors, it appears you should have gotten them, I’d contact them. Worst case maybe you can buy them from them.It showed up today and I got it assembled. I'm glad I waited to order parts, I realized I need two adapters, one for the ball valve and one for the swirly/whirlpool arm as they both use the same thread. Also need an additional camlock fitting.
Attachments

I got the nipples & connectors with the Foundry, but I want to attach 1/2" NPT to the threads, so I bought adapters.The photos they show on their site show the nipples and connectors, it appears you should have gotten them, I’d contact them. Worst case maybe you can buy them from them.
NSMikeD
Well-Known Member
I will post my set up later. I chose a hybrid set up, using NPT quick connects and a ball valve on the pump sides but kept the simple plastic compression ring for the foundry ball valve and the swirly/recirculating arms.
JoeSpartaNJ
Well-Known Member
Removable = yes
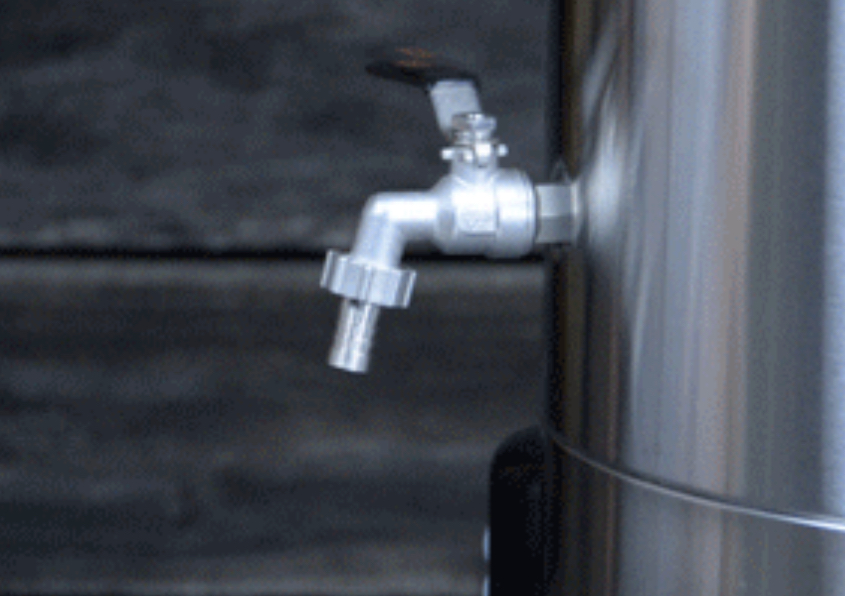
NPT = no, straight thread (aka G thread), it's like shower hose to shower head thread, it relies on a gasket to make the seal, not the threads mushing into each other
There are adapters for straight to NPT if needed. Some folks put a ton of PTFE tape on and cross their fingers.
This is what I did on the ball valve. So far so good after 2 years.


$58.16
HUIZHUGS Brewing Equipment Keg Ball Lock Faucet 30cm Reinforced Silicone Hose Secondary Fermentation Homebrew Kegging Brewing Equipment
xiangshuizhenzhanglingfengshop

$44.99
$49.95
Craft A Brew - Mead Making Kit – Reusable Make Your Own Mead Kit – Yields 1 Gallon of Mead
Craft a Brew


$22.00 ($623.23 / Ounce)
AMZLMPKNTW Ball Lock Sample Faucet 30cm Reinforced Silicone Hose Secondary Fermentation Homebrew Kegging joyful
无为中南商贸有限公司


$479.00
$559.00
EdgeStar KC1000SS Craft Brew Kegerator for 1/6 Barrel and Cornelius Kegs
Amazon.com


$719.00
$799.00
EdgeStar KC2000TWIN Full Size Dual Tap Kegerator & Draft Beer Dispenser - Black
Amazon.com


$53.24
1pc Hose Barb/MFL 1.5" Tri Clamp to Ball Lock Post Liquid Gas Homebrew Kegging Fermentation Parts Brewer Hardware SUS304(Liquid Hose Barb)
yunchengshiyanhuqucuichendianzishangwuyouxiangongsi


![Craft A Brew - Safale S-04 Dry Yeast - Fermentis - English Ale Dry Yeast - For English and American Ales and Hard Apple Ciders - Ingredients for Home Brewing - Beer Making Supplies - [1 Pack]](https://m.media-amazon.com/images/I/41fVGNh6JfL._SL500_.jpg)
$6.95 ($17.38 / Ounce)
$7.47 ($18.68 / Ounce)
Craft A Brew - Safale S-04 Dry Yeast - Fermentis - English Ale Dry Yeast - For English and American Ales and Hard Apple Ciders - Ingredients for Home Brewing - Beer Making Supplies - [1 Pack]
Hobby Homebrew


$176.97
1pc Commercial Keg Manifold 2" Tri Clamp,Ball Lock Tapping Head,Pressure Gauge/Adjustable PRV for Kegging,Fermentation Control
hanhanbaihuoxiaoshoudian

$33.99 ($17.00 / Count)
$41.99 ($21.00 / Count)
2 Pack 1 Gallon Large Fermentation Jars with 3 Airlocks and 2 SCREW Lids(100% Airtight Heavy Duty Lid w Silicone) - Wide Mouth Glass Jars w Scale Mark - Pickle Jars for Sauerkraut, Sourdough Starter
Qianfenie Direct

$76.92 ($2,179.04 / Ounce)
Brewing accessories 1.5" Tri Clamp to Ball Lock Post Liquid Gas Homebrew Kegging Fermentation Parts Brewer Hardware SUS304 Brewing accessories(Gas Hose Barb)
chuhanhandianzishangwu


$7.79 ($7.79 / Count)
Craft A Brew - LalBrew Voss™ - Kveik Ale Yeast - For Craft Lagers - Ingredients for Home Brewing - Beer Making Supplies - (1 Pack)
Craft a Brew


$172.35
2 Inch Tri Clamp Keg Manifold With Ball Lock Posts, Pressure Gauge, PRV (0-30 PSI) – Homebrew, Fermentation, Kegging System
wuhanshijiayangzhiyimaoyiyouxiangongsi

$49.95 ($0.08 / Fl Oz)
$52.99 ($0.08 / Fl Oz)
Brewer's Best - 1073 - Home Brew Beer Ingredient Kit (5 gallon), (Blueberry Honey Ale) Golden
Amazon.com


$53.24
1pc Hose Barb/MFL 1.5" Tri Clamp to Ball Lock Post Liquid Gas Homebrew Kegging Fermentation Parts Brewer Hardware SUS304(Gas MFL)
Guangshui Weilu You Trading Co., Ltd


$33.98
DYKWSWYX Heavy Duty Brewing Gloves (1 Pair) - 55CM Long Chemical Resistant Plastic Gloves for Beer & Wine Making, Cleaning, Homebrew Equipment Protection
wuhanshijiayangzhiyimaoyiyouxiangongsi

$20.94
$29.99
The Brew Your Own Big Book of Clone Recipes: Featuring 300 Homebrew Recipes from Your Favorite Breweries
Amazon.com


I did screw on NPT threads with no issue, I'm pretty confident that with some Teflon tape, you'd be good. Since I'm building this setup now and getting a ton of fittings, I figured Id just do it 'proper', even though it may be overkill.This is what I did on the ball valve. So far so good after 2 years.
NPT / straight combos can work. It's just luck if it does or doesn't. They aren't designed for it, but it can work depending on the fittings. Like exactly on the fittings, their exact sizing, how deep the threads are cut, and so on.
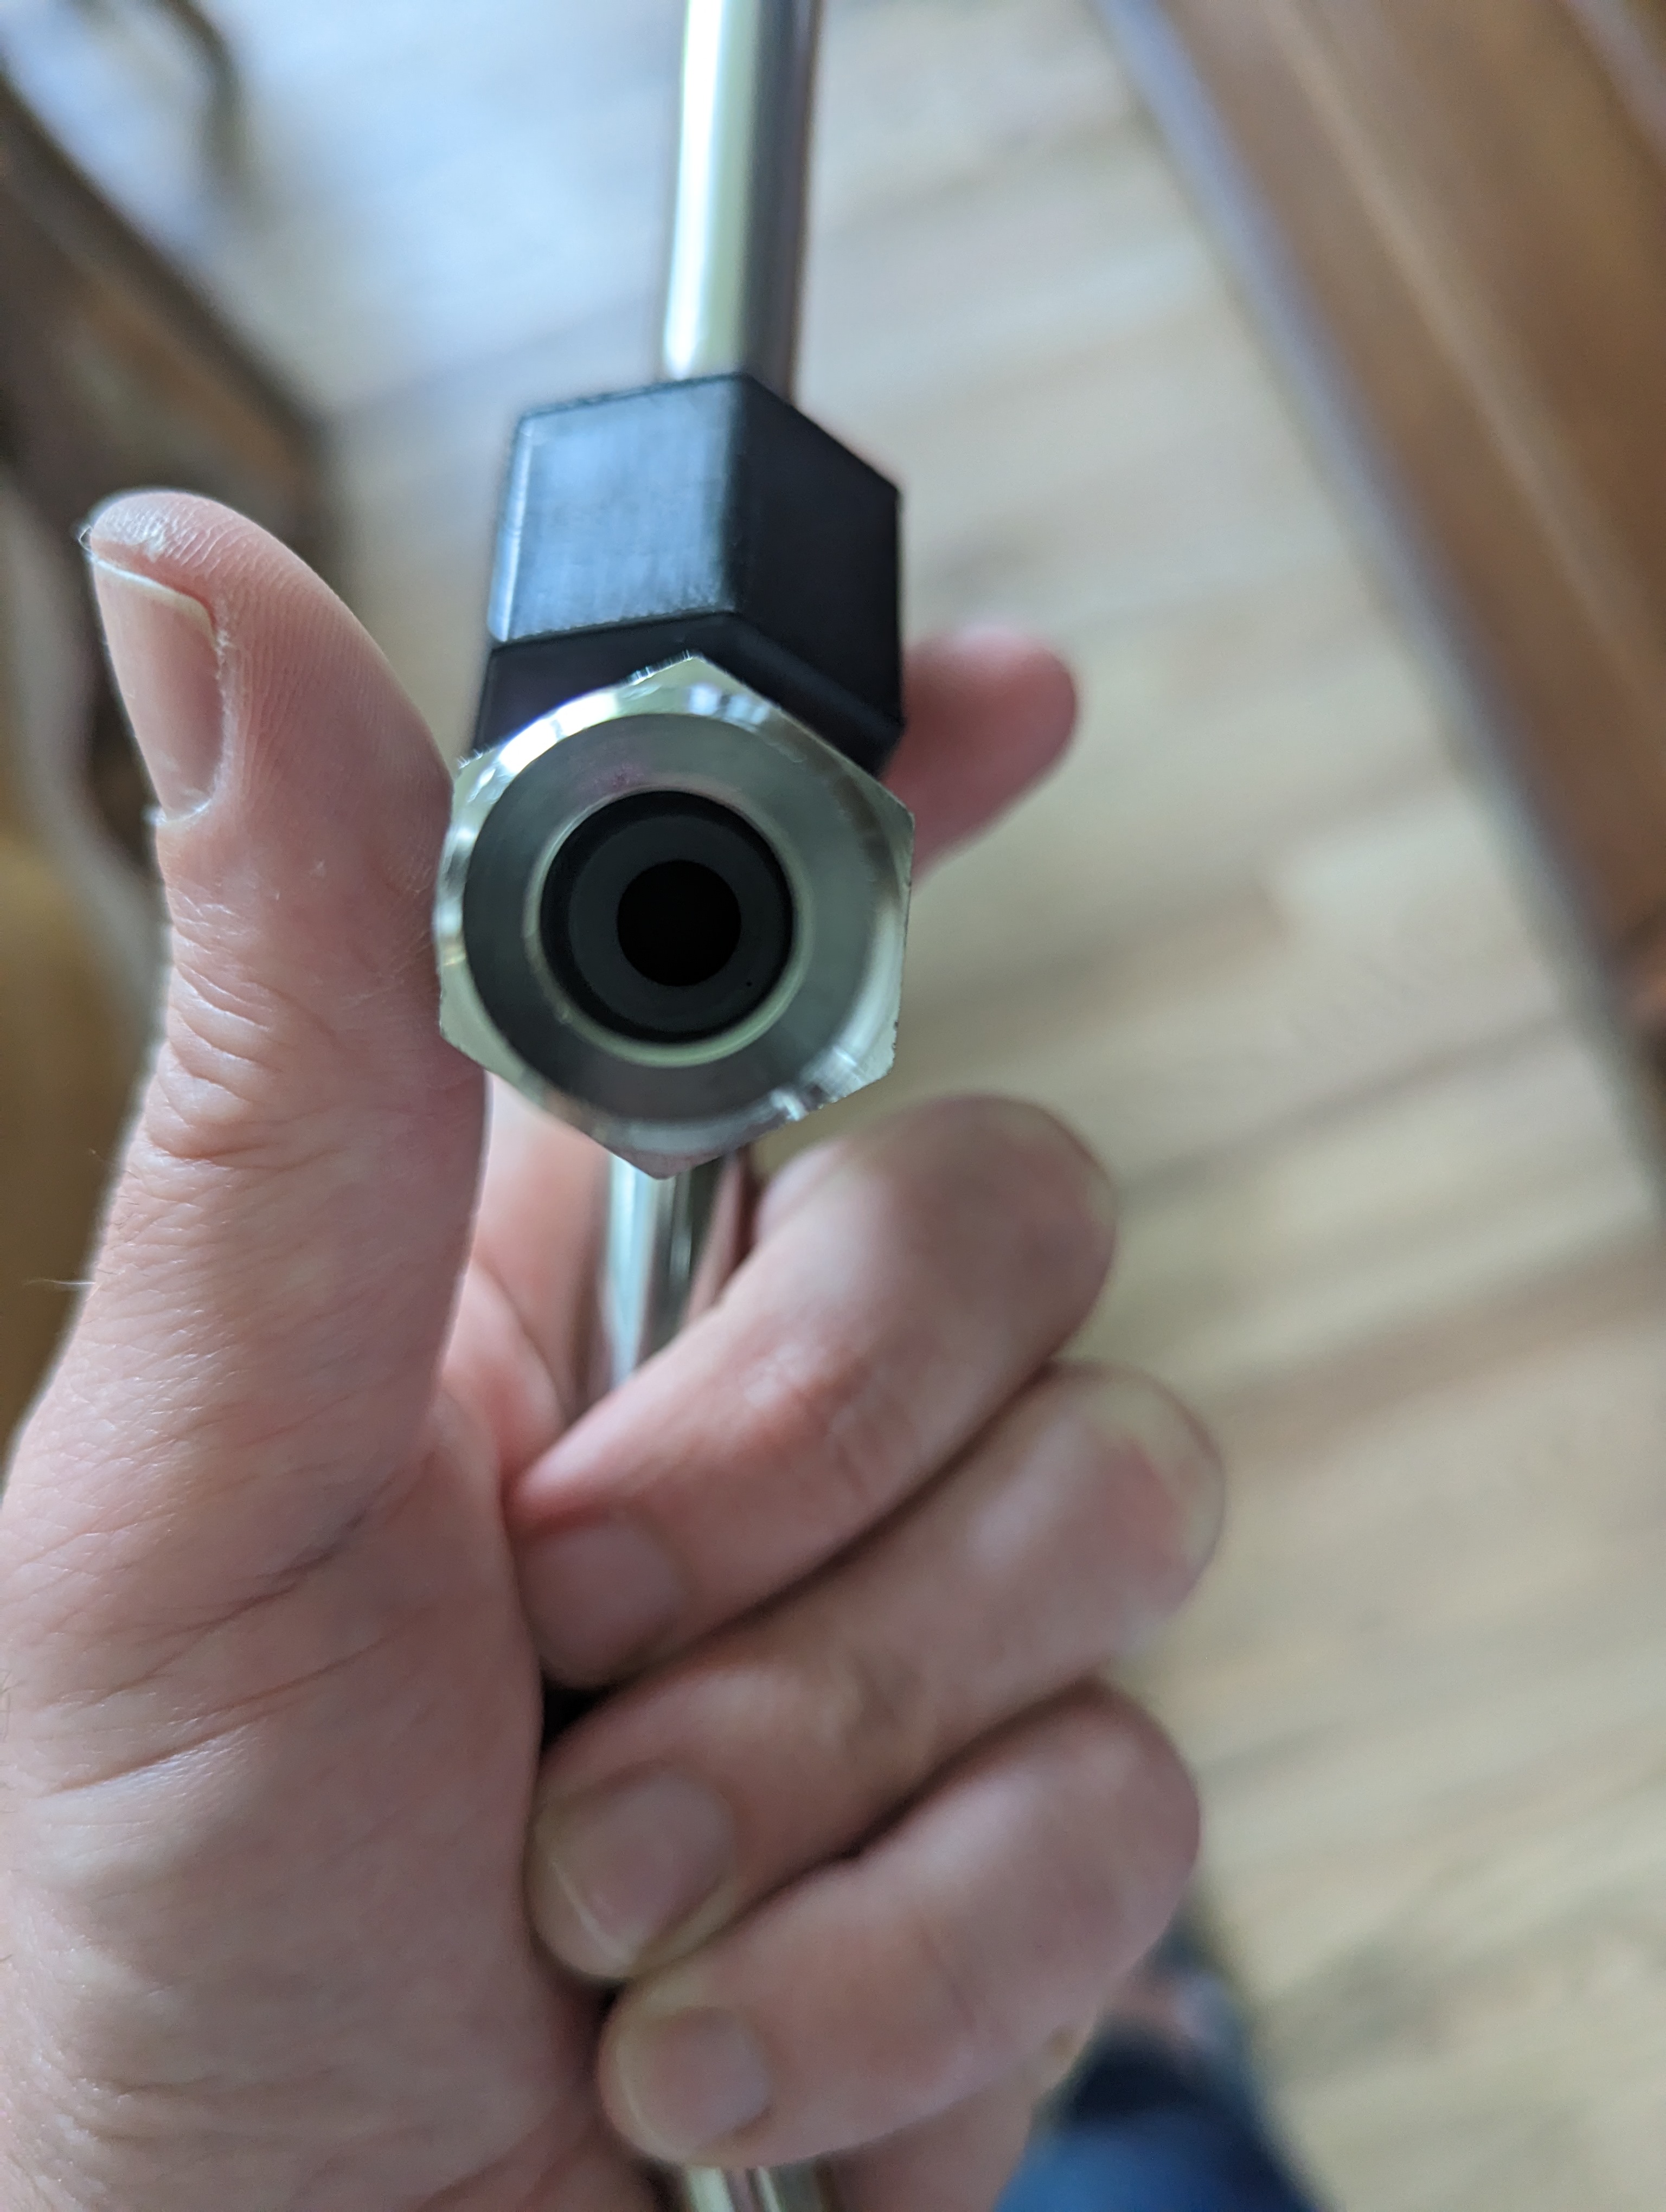
Do you guys think it's worthwhile to widen the hole in the G to NPT adapter silicone gasket? It looks like it's introducing restriction.
Or is the pump flow usually more than enough where the restriction will be helpful?
Or is the pump flow usually more than enough where the restriction will be helpful?
Attachments
Last edited:
Strange. I guess the shape is to keep it located? I've actually never seen that. You can see where the sealing happens, and what part needs to be left and what part can be removed.
Worthwhile... I kind of bet you wouldn't notice the difference without a way to measure it. But if you're like me you'll end up removing it just to be sure")
Worthwhile... I kind of bet you wouldn't notice the difference without a way to measure it. But if you're like me you'll end up removing it just to be sure
That's where my head is at. It really only needs a flat gasket, not sure why they bothered with the groove. In the inside of the fitting leading towards the NPT end, there is a slight indent that looks to be an intended area for that extra gasket material, but it's tapered and is causing more of a flow restriction. I'm going to try to find flat silicone gaskets. Not sure I can cleanly increase the diameter of these by cutting/drilling.Strange. I guess the shape is to keep it located? I've actually never seen that. You can see where the sealing happens, and what part needs to be left and what part can be removed.
Worthwhile... I kind of bet you wouldn't notice the difference without a way to measure it. But if you're like me you'll end up removing it just to be sure
Makes sense. That gasket should be a dime a dozen at any hardware store. Probably be Buna-N or similar as well and slightly softer, and seal better. Especially for our applications. Harder plastic is good for crushing into empty spaces, like sealing a gauge to a CO2 tank.
Noob_Brewer
Well-Known Member
Trying to figure out what I'm looking at here. Are you trying to see if you will modify the ball valve outlet or is this picture of the swirly arm? FWIW, I never modified the ball valve in any way and no issues. I still use white clips to fixate the hose to the ball valve. My whirlpool is brewhardware's over the top whirlpool attachment and I did not put any fittings on it. I just put the hose on it with white clips to fixate. Done over 70 brews on this system this way with no issues. But, if you are enjoying yourself, tinker and modify away! Thats what the hobby is all about lolDo you guys think it's worthwhile to widen the hole in the G to NPT adapter silicone gasket? It looks like it's introducing restriction.
Or is the pump flow usually more than enough where the restriction will be helpful?
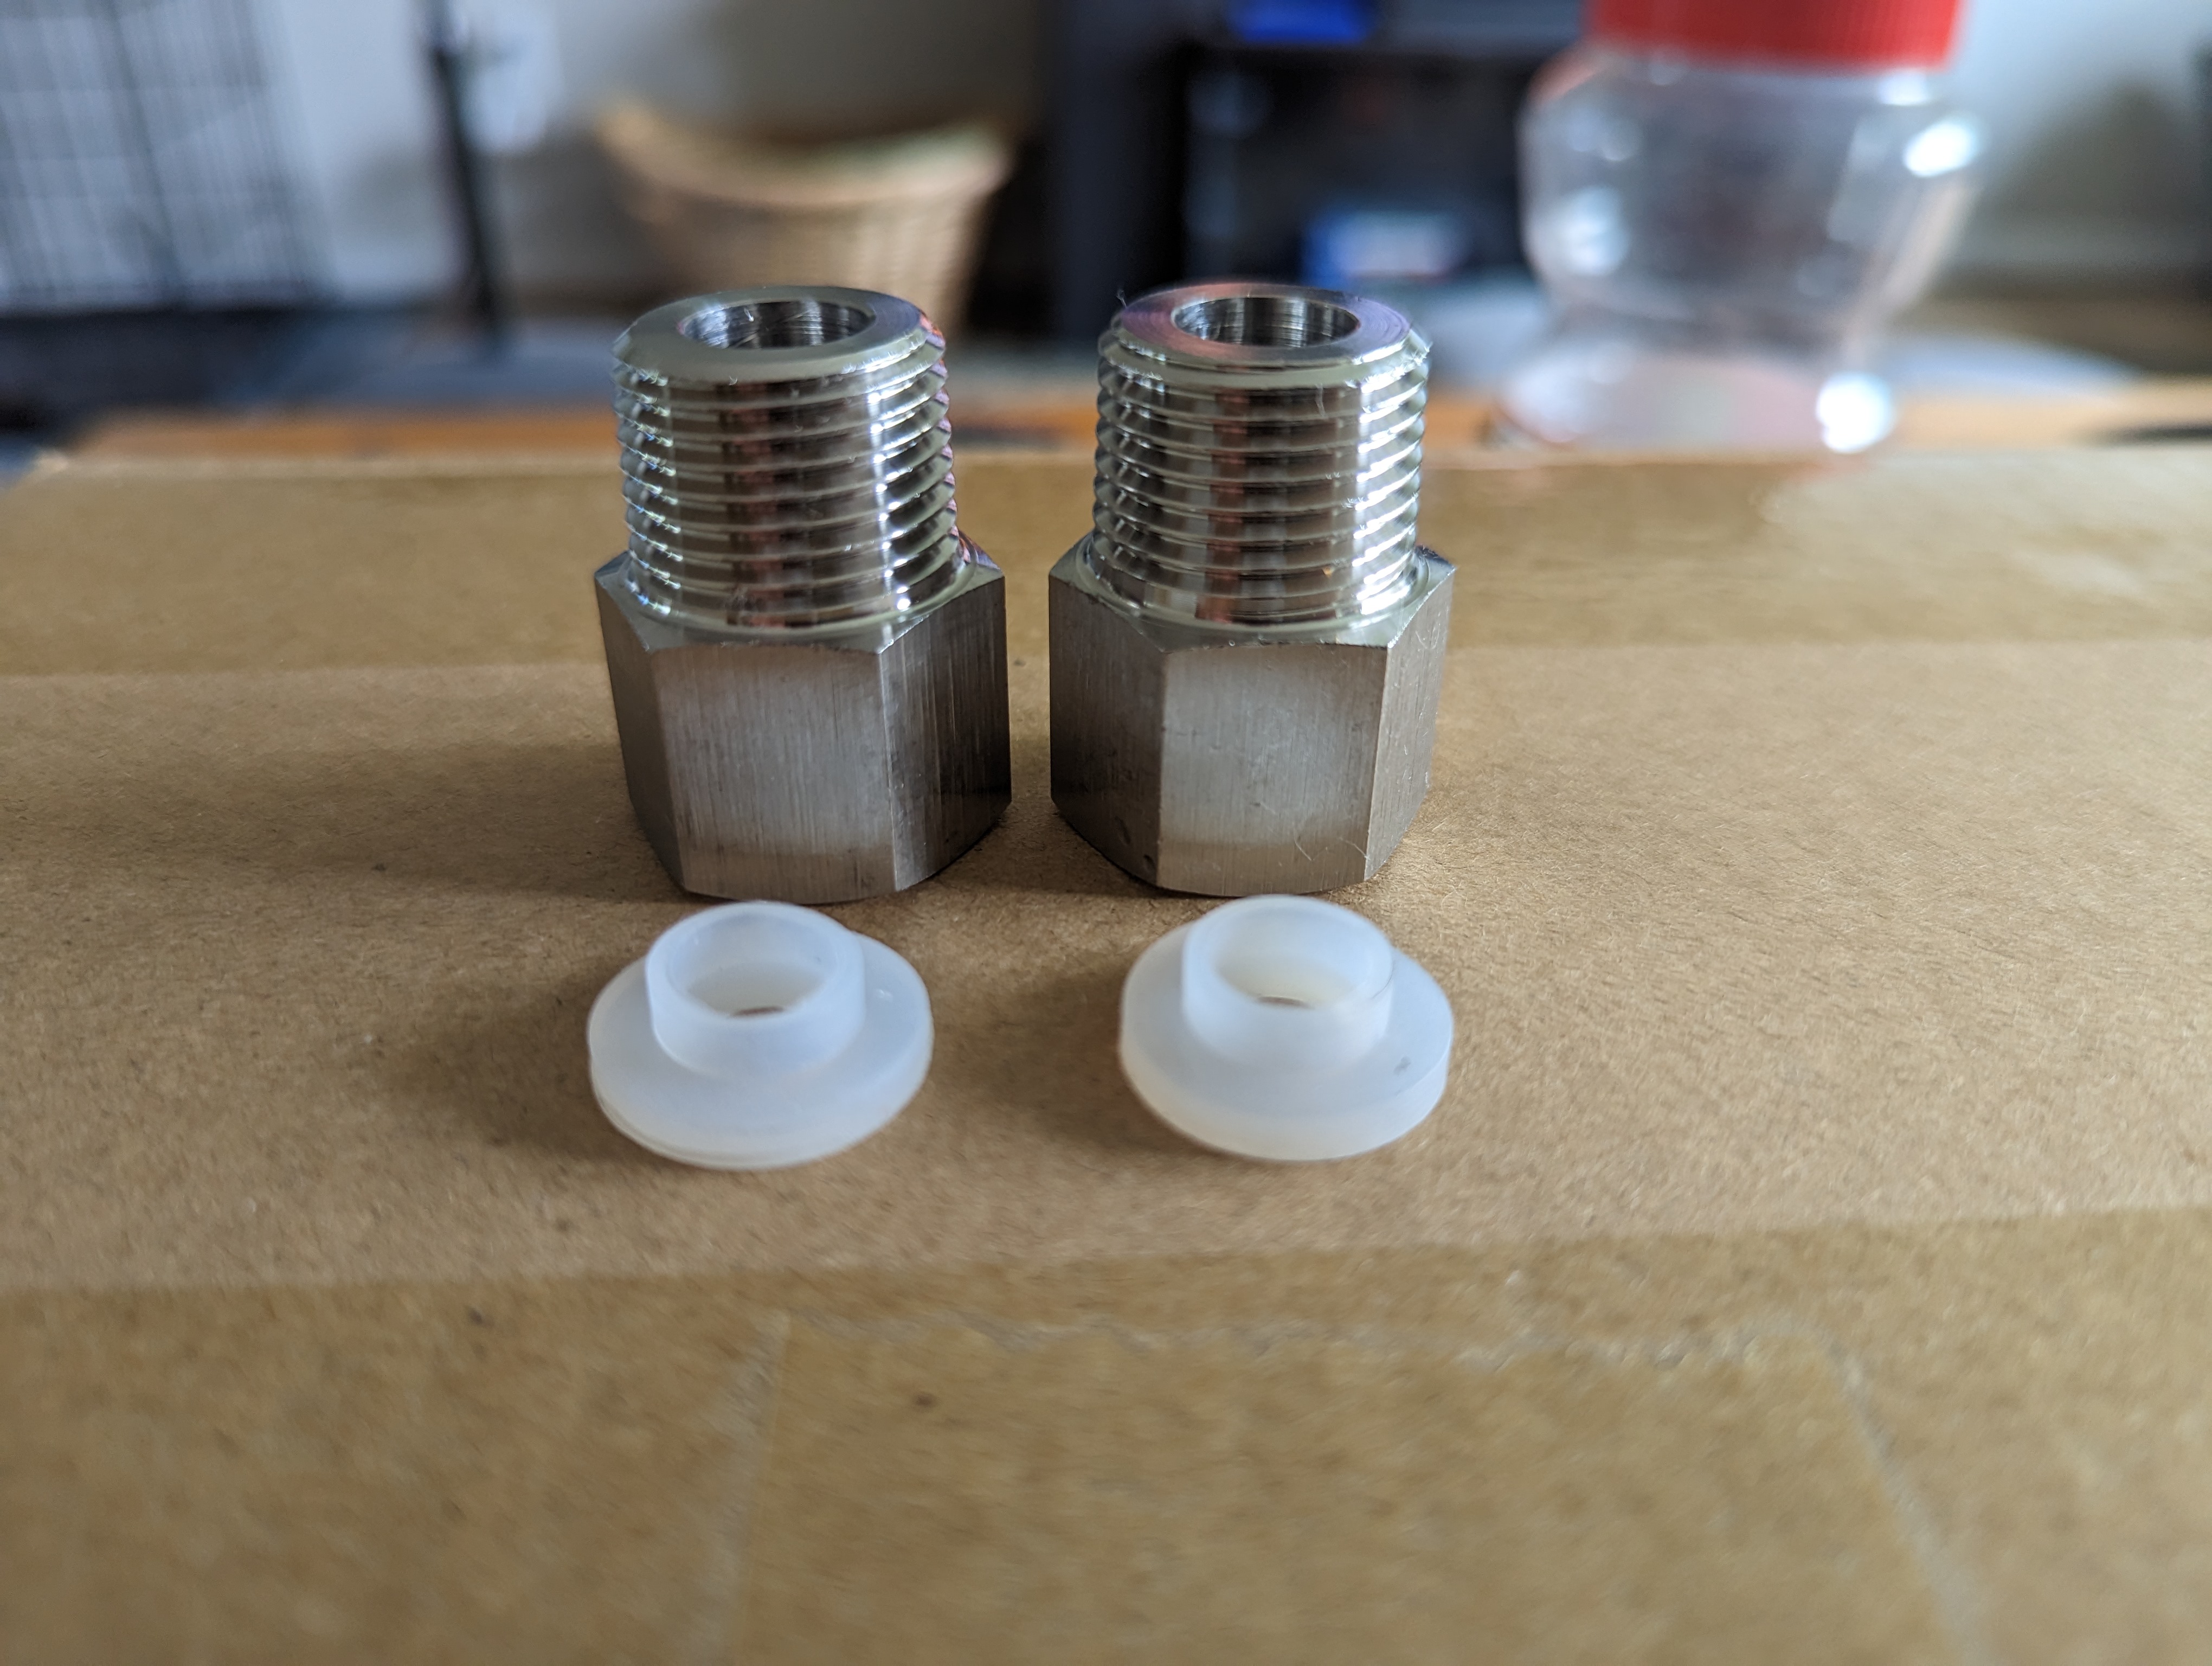
I bought 2 G-to-NPT adapters to allow me to use 1/2" NPT parts on Anvils ball valve and swirly arm, which use G threads.Trying to figure out what I'm looking at here. Are you trying to see if you will modify the ball valve outlet or is this picture of the swirly arm? FWIW, I never modified the ball valve in any way and no issues. I still use white clips to fixate the hose to the ball valve. My whirlpool is brewhardware's over the top whirlpool attachment and I did not put any fittings on it. I just put the hose on it with white clips to fixate. Done over 70 brews on this system this way with no issues. But, if you are enjoying yourself, tinker and modify away! Thats what the hobby is all about lol
Images are of the 2 adapters, their included gaskets, and one adapter installed on the swirly arm.
I agree that you should be able to remove the restrictive portion or as you say just replace it with an oring.. The adapter I got has a red oring seal and doesn't appear to restrict flow significantly.
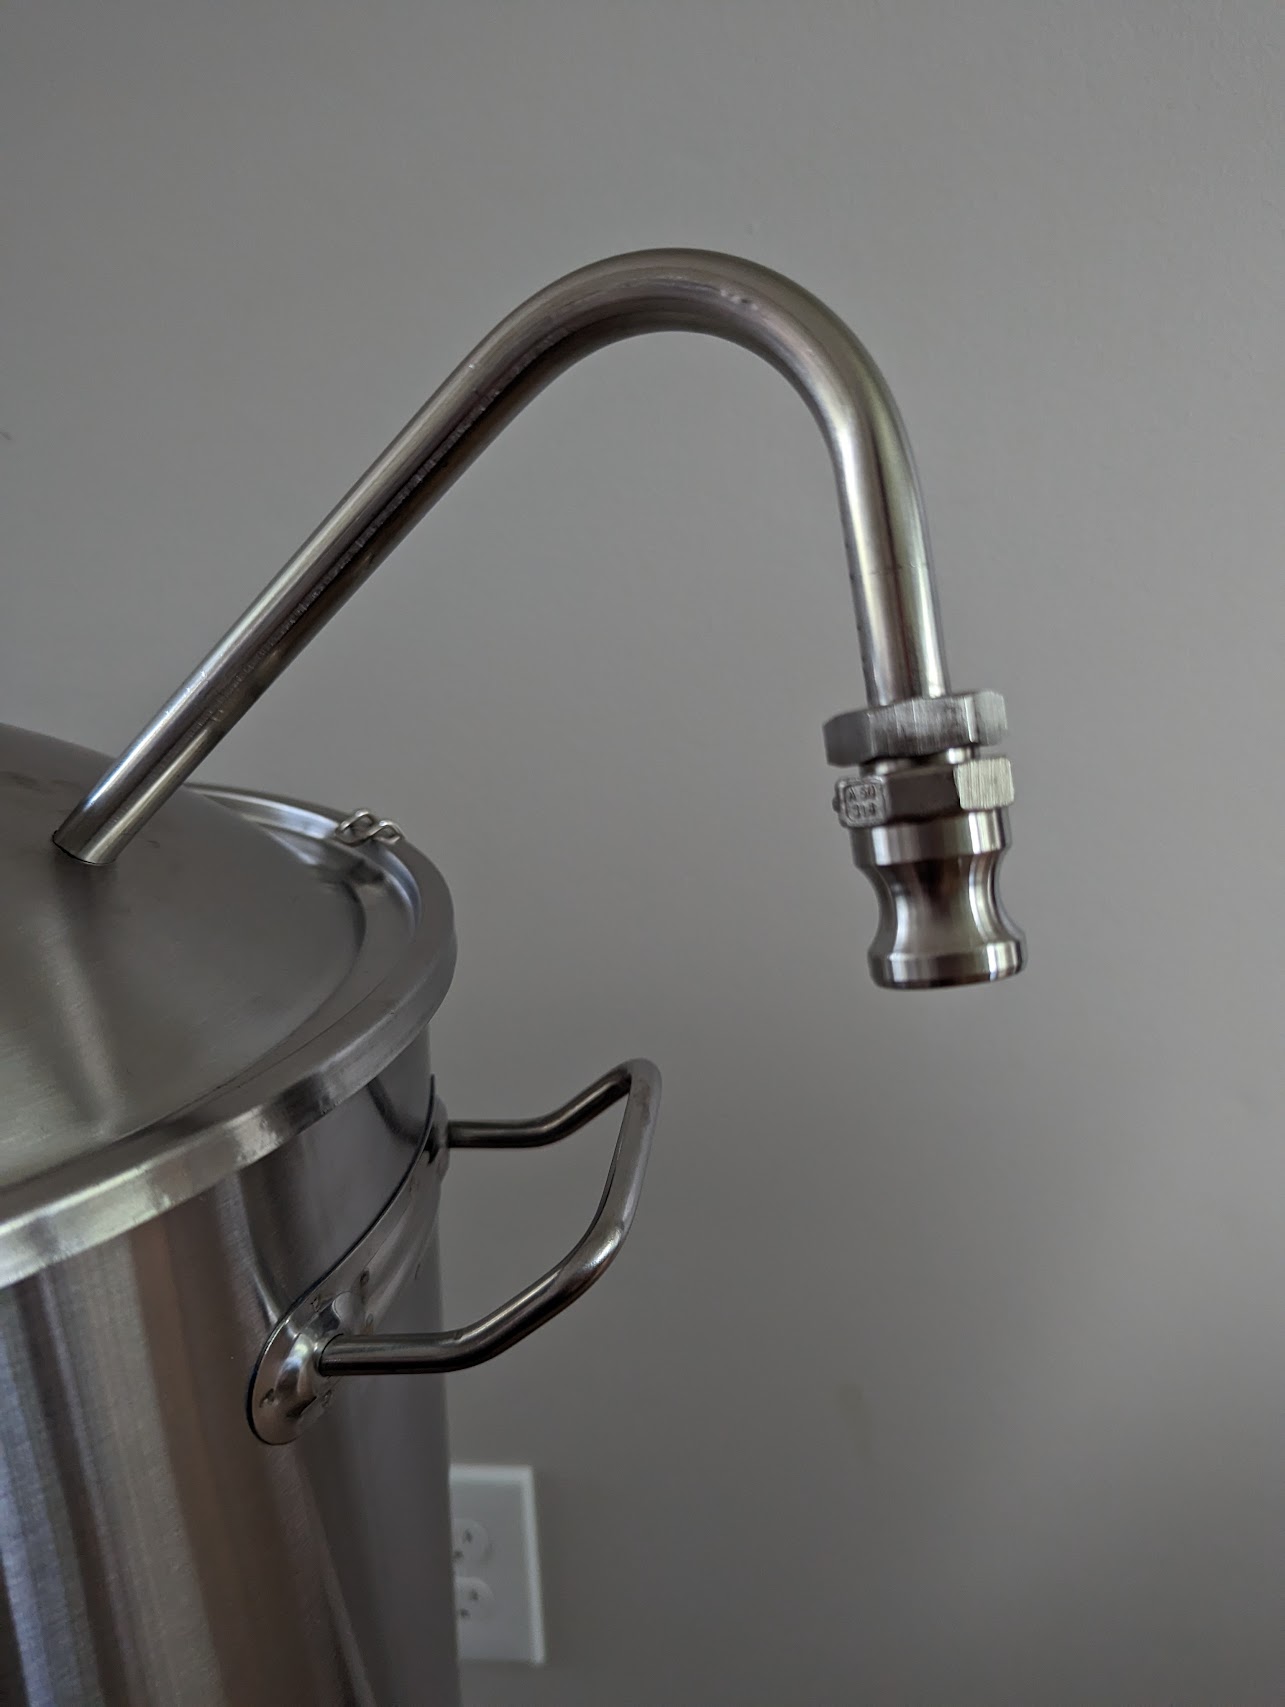
Old hat by now, but this is all the stuff I've done w/mine. Not anything out of the ordinary, but maybe helpful for somebody.
I decided to go the cam lock route for one reason or another. Pretty happy w/that decision tho.
Camlock w/lots of teflon tape on the spout, whirlybird with cam lock fitting and 240 waterproof plug. I plug this into a GFCI protected extension cord.
All stuff purchased from Brewhardware.com w/exception of 240 plug & extension cord.

Riptide pump head. Longer hose is drying out. Used it the other night to put water into a keg for cleaning. Have a cam lock fitting on the garage sink, best thing EVER! Those screws are from me installing the v2 brackets into the mash basket. Definitely worth the purchase.

No weld fitting..so outstanding.

I decided to go the cam lock route for one reason or another. Pretty happy w/that decision tho.
Camlock w/lots of teflon tape on the spout, whirlybird with cam lock fitting and 240 waterproof plug. I plug this into a GFCI protected extension cord.
All stuff purchased from Brewhardware.com w/exception of 240 plug & extension cord.
Riptide pump head. Longer hose is drying out. Used it the other night to put water into a keg for cleaning. Have a cam lock fitting on the garage sink, best thing EVER! Those screws are from me installing the v2 brackets into the mash basket. Definitely worth the purchase.
No weld fitting..so outstanding.

Noob_Brewer
Well-Known Member
That’s actually pretty awesome they are doing this now! I’ve got the first generation foundry and just cut the 120 plug off and had to rewire a 240 plug on it. Wondering if too many peeps burned down their house doing that and decided to make a standard choice on newer units. Risk mitigation strategy vs altruism lolNot sure if this is old news, but my Foundry came with a 240v plug with a 240 to 120 adapter plug. It's going to make the switch to 240 much easier
Agreed, I was surprised & happy when I saw it. Overall I'm happy with this generation, having the new electrical plug and no ring to hold the grain basket. The only thing I wish it had was 1/2" NPT threads on the ball valve and swirly arm, but this is minor.That’s actually pretty awesome they are doing this now! I’ve got the first generation foundry and just cut the 120 plug off and had to rewire a 240 plug on it. Wondering if too many peeps burned down their house doing that and decided to make a standard choice on newer units. Risk mitigation strategy vs altruism lol
Agreed, I was surprised & happy when I saw it. Overall I'm happy with this generation, having the new electrical plug and no ring to hold the grain basket. The only thing I wish it had was 1/2" NPT threads on the ball valve and swirly arm, but this is minor.
That upgrade..or change in the core offering is pretty awesome. I do agree though. Don’t understand why they don’t just take the same spout they put on their kettles on the foundry. Seems like a no brainer from a cost/parts consolidation perspective.
My brewhardware stuff arrived today and I got everything assembled -- it all went together as planned with no issues. The only missing piece is a cart/dolly which I am trying to figure out. I'm thinking about getting this one, and putting a few coats of poly on it. I wish they had something like this with a non-wooden frame - I'm trying to stay in the $30-$40 price range, but may need to go higher.
I am driving to my non-local LHBS on Saturday to stock up on grains and misc. supplies and may have my maiden brew Saturday night/Sunday morning.
Here's my parts list/links for those looking to put together a Foundry with camlock quick-disconnects on everything and upgrade to a better pump:
Price breakdown - These are all final prices including tax/shipping
I am driving to my non-local LHBS on Saturday to stock up on grains and misc. supplies and may have my maiden brew Saturday night/Sunday morning.
Here's my parts list/links for those looking to put together a Foundry with camlock quick-disconnects on everything and upgrade to a better pump:
- 10.5g Foundry
- Optional whirlpool tube / swirly arm
- I did not purchase the Anvil recirculation kit, as the below parts are upgraded versions of the recirc setup
- Ferroday homebrew pump with stainless head
- BrewHardware Foundry Recirculation arm with 1/2" NPT threads
- 4x - BrewHardware camlock fitting with female 1/2" NPT threads (for foundry ball valve, recirc arm, swirly arm, pump input)
- 1x - BrewHardware camlock fitting with male 1/2" NPT threads (for ball valve on output side of pump)
- 4x - BrewHardware camlock quick disconnects (for 2 silicone lines)
- 1x - BrewHardware 3-piece ball valve (for pump output)
- 6ft - BrewHardware silicone tubing (pump to Foundry connection, pump to recirc/swirly arm connection)
- G to NPT thread adapter, 2 pack (for Foundry ball valve and swirly arm)
- Teflon tape (10 pk) - I didn't even go through a full roll and I went pretty heavy on all connections. I have enough teflon tape for the rest of my life.
Price breakdown - These are all final prices including tax/shipping
- Anvil Foundry - $454
- BrewHardware fittings - $128.68
- Pump - $69.05
- G to NPT adapters - $13.80
- Teflon tape (10pk) $6.35
Attachments


Last edited:
Brewhardware.com!
Sent an email over to Bobby to make sure that it would work and it works flawlessly!!!
@RyPA
If you want to keep your cost down, this dolly will work. Also a harbor freight pickup. I’ve used it on numerous brews, no issues yet. I’ve got outdoor carpet tiles in my garage, rolls across w/o issue in the rare event I need to move it when full. Just need to push low on the Foundry vs high.
It sits on either side of the carpeted section an inch or two on each side.
@Knightshade I saw that one but IMO liquids and carpet aren't meant to be in the same place. Thought about grabbing that and getting a piece of some form of plastic board from home Depot and remove the carpet pieces and bolt up the board. Should only be a few bucks on top of the cost of the dolly
One of those immersion coolers is next on my list. Going to see how the SS one does while whirlpooling
One of those immersion coolers is next on my list. Going to see how the SS one does while whirlpooling
Part of the reason why I laid down carpet tiles with the second go around. Rip up and replace sections as needed. I’m an odd bird tho having carpet in my garage at all.
That chiller is no joke..it goes from boil to whirlpool temp in what seems like a minute or less. I push 10G of water through and use that for cleaning after, then recirculate it back into a cooler and add frozen water bottles. Down to pitching temps by the time I’ve prepped the fermenter and maybe gotten some other cleaning done.
That chiller is no joke..it goes from boil to whirlpool temp in what seems like a minute or less. I push 10G of water through and use that for cleaning after, then recirculate it back into a cooler and add frozen water bottles. Down to pitching temps by the time I’ve prepped the fermenter and maybe gotten some other cleaning done.
I may try this one. I really only need room for the Foundry and the pump. It'll fit
MaxWorks 80854 Polypropylene Dolly-200-lb Capacity , Black https://www.amazon.com/dp/B07C72GWLT?ref_=cm_sw_r_apann_dp_52B9N9E67AWH2BJ8EQ59
Edit: nevermind, it's crap, going to do the HF wooden one with a few coats of poly
MaxWorks 80854 Polypropylene Dolly-200-lb Capacity , Black https://www.amazon.com/dp/B07C72GWLT?ref_=cm_sw_r_apann_dp_52B9N9E67AWH2BJ8EQ59
Edit: nevermind, it's crap, going to do the HF wooden one with a few coats of poly
Last edited:
AlbertaBeer
Well-Known Member
Bought a 10.5 a couple weeks ago, still in the box yet, haven’t had time to even look at it. Hopefully by this time next week I will have a chance to play around with it.
Lots of good tips and tricks in here, I’ll be keeping them in mind for sure!
Lots of good tips and tricks in here, I’ll be keeping them in mind for sure!
It's double your price point but if you have room take a look at this small scaffold. It's what I use and there is room for the pump, the Foundry and a bucket (for grain or setting your mash basket) on the platform... plus it has a fold out tool rest which I use to keep small things like thermapen... refractometer... hops... iPhone with brewing app running... etc.
https://www.homedepot.com/p/MetalTe...ool-Shelf-500-lbs-Capacity-I-IMCNAT/205477926
https://www.homedepot.com/p/MetalTe...ool-Shelf-500-lbs-Capacity-I-IMCNAT/205477926
Do you have a pic of your setup? I think my problem with that will be my brew space, which is usually my kitchen. I won't have anywhere to park that thing.It's double your price point but if you have room take a look at this small scaffold. It's what I use and there is room for the pump, the Foundry and a bucket (for grain or setting your mash basket) on the platform... plus it has a fold out tool rest which I use to keep small things like thermapen... refractometer... hops... iPhone with brewing app running... etc.
https://www.homedepot.com/p/MetalTe...ool-Shelf-500-lbs-Capacity-I-IMCNAT/205477926
I did a batch last night and it did not good as smooth as I was expecting. I brewed a Victory Hop Devil clone, I got a 1.062 OG instead of 1.063 as expected so not so bad I guess.
1. I made the mistake of recirculating immediately, resulting in the wort accumulating to the top of the mash pipe. Luckily there was not enough water to spill over the malt pipe so the grains remained in the pipe. After turning off the pump and doing some stirring, the wort bled out into the kettle.
2. This may be a result of my mash/recirculation issue, but my temp readings were way off. The screen read up to 10F higher than actual in some cases. I was trying to mash at 150F, the screen read 154F, but taking the temp manually it was as low as 144 at one point.
3. I am new to using a brew pump and I do like how much easier it makes the cooling process, though I did help it by stirring manually with a spoon. I need to upgrade to one of those 3-in-1 coils. I also need to remember to turn off all ball-valves when disconnecting a line.
1. Can anyone share their mashing process as far as rice hulls, stirring, and how you recirculate?
2. I am using the recirc pipe from brewhardware and the tip/spray piece is under the surface of the wort, is this expected? I thought it would hover over the surface and spray to the sides. I had 7.2g of water (6.2 strike, 1g sparge) and 13# of grain.
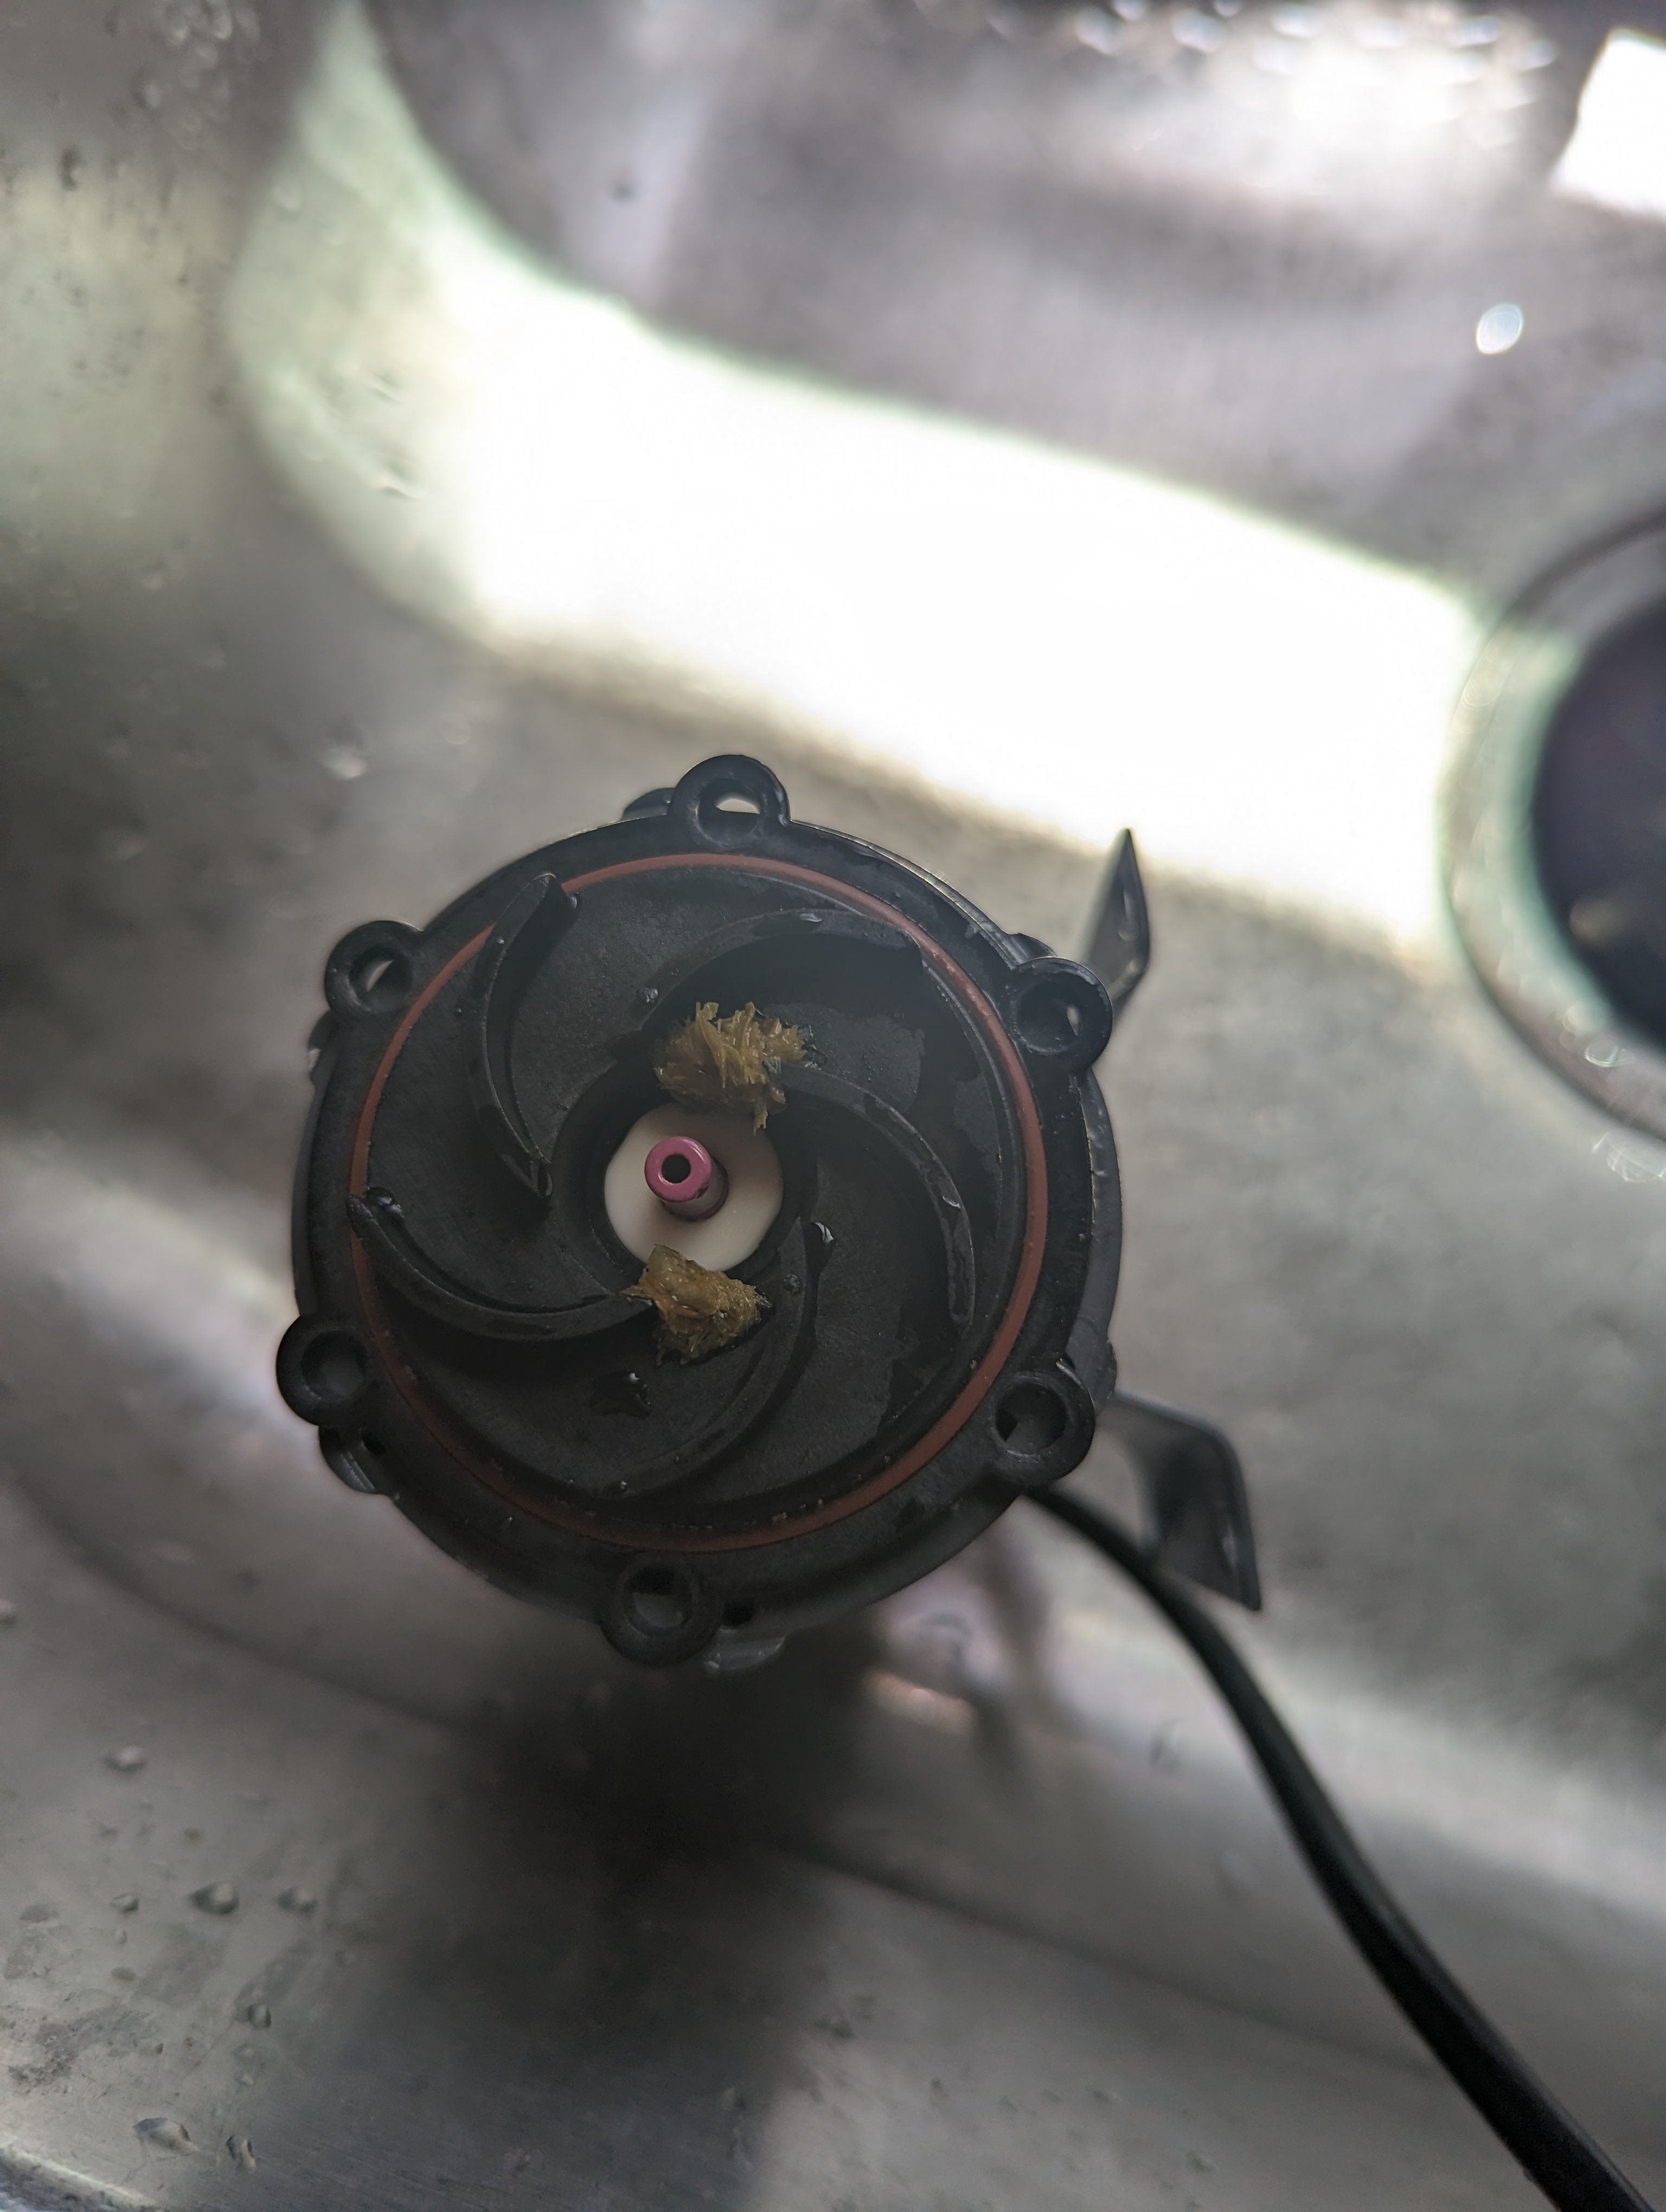
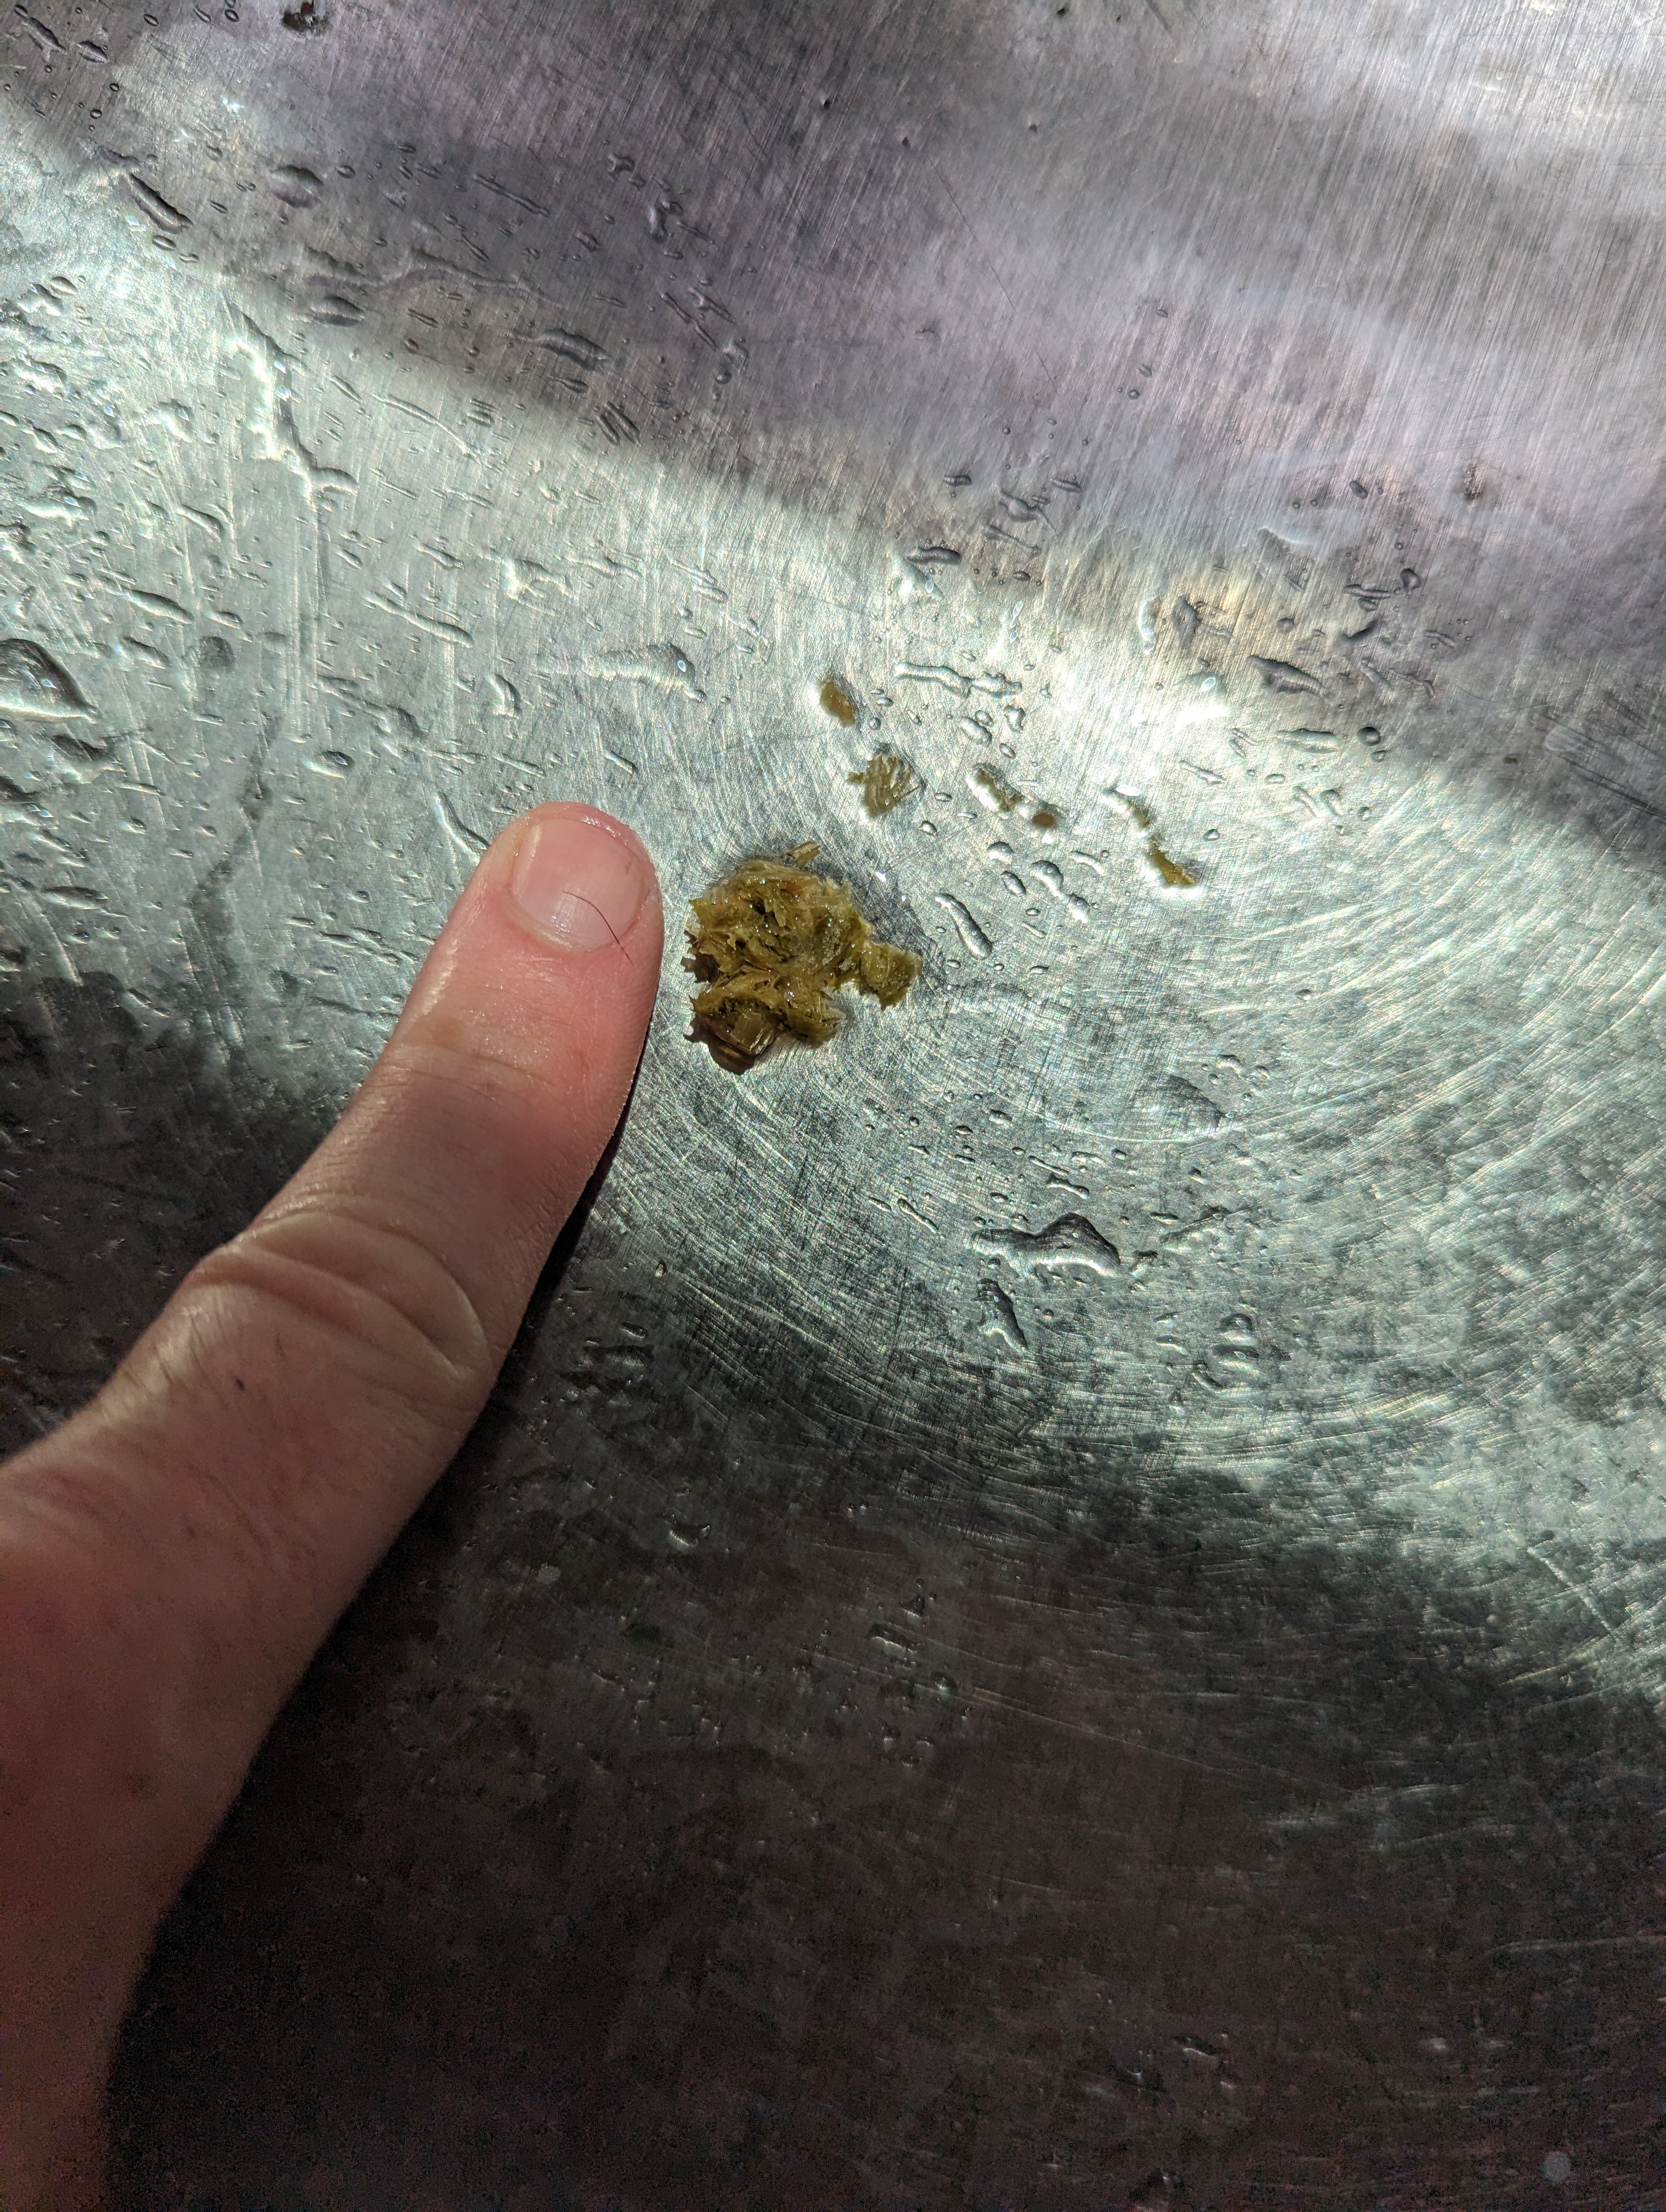
Found some hops stuck in my pump. May invest in a hop spider
1. I made the mistake of recirculating immediately, resulting in the wort accumulating to the top of the mash pipe. Luckily there was not enough water to spill over the malt pipe so the grains remained in the pipe. After turning off the pump and doing some stirring, the wort bled out into the kettle.
2. This may be a result of my mash/recirculation issue, but my temp readings were way off. The screen read up to 10F higher than actual in some cases. I was trying to mash at 150F, the screen read 154F, but taking the temp manually it was as low as 144 at one point.
3. I am new to using a brew pump and I do like how much easier it makes the cooling process, though I did help it by stirring manually with a spoon. I need to upgrade to one of those 3-in-1 coils. I also need to remember to turn off all ball-valves when disconnecting a line.
1. Can anyone share their mashing process as far as rice hulls, stirring, and how you recirculate?
2. I am using the recirc pipe from brewhardware and the tip/spray piece is under the surface of the wort, is this expected? I thought it would hover over the surface and spray to the sides. I had 7.2g of water (6.2 strike, 1g sparge) and 13# of grain.
Found some hops stuck in my pump. May invest in a hop spider
Attachments
Last edited:
1. Can anyone share their mashing process as far as rice hulls, stirring, and how you recirculate?
My normal process (5-6% ABV beers, in the 6.5) is to use the included pipe with a Wilser bag. I crush my own grains at a 0.030" gap (set with feeler gages). Bag goes in the pipe, and there's still just enough space for the Foundry perforated disc to go on top. The disc is angled however needed to visually get a flow across the whole surface. I use the Foundry recirc pipe connected to a pump with a ball valve in between. I throttle the flow to about 1/4 - 1/3 (guesstimate) of full flow. I stir the grains (top 2/3 of it perhaps, mostly so I don't scrape the actual bag) along with lift & lower the pipe about 3 times over an hour, to be sure it all gets mixed in (especially the dead water space on the side). Pump is temporarily turned off of course.
Per Brewer's friend I'm running about 70 - 75% efficiency and I don't ever get anything stuck. I used to do 4 - 8 oz. rice hulls per batch but over time quit that altogether. My measured temps are consistently 2 degrees F lower than the display screen. So consistently that I just add 2 onto whatever temp i actually want to mash at, and walk away.
6.5's a little easier as it's the same diameter just shorter, so I do have less grain (vertically measured) than 10.5 users. I run 240V at 35% for mashing, not sure for 10.5 or what voltage you have but as an aside you may not want 100%.
I'd suggest off the top to reduce your recirc rate a bit. Or, a lot.
Thanks, that's helpful.My normal process (5-6% ABV beers, in the 6.5) is to use the included pipe with a Wilser bag. I crush my own grains at a 0.030" gap (set with feeler gages). Bag goes in the pipe, and there's still just enough space for the Foundry perforated disc to go on top. The disc is angled however needed to visually get a flow across the whole surface. I use the Foundry recirc pipe connected to a pump with a ball valve in between. I throttle the flow to about 1/4 - 1/3 (guesstimate) of full flow. I stir the grains (top 2/3 of it perhaps, mostly so I don't scrape the actual bag) along with lift & lower the pipe about 3 times over an hour, to be sure it all gets mixed in (especially the dead water space on the side). Pump is temporarily turned off of course.
Per Brewer's friend I'm running about 70 - 75% efficiency and I don't ever get anything stuck. I used to do 4 - 8 oz. rice hulls per batch but over time quit that altogether. My measured temps are consistently 2 degrees F lower than the display screen. So consistently that I just add 2 onto whatever temp i actually want to mash at, and walk away.
6.5's a little easier as it's the same diameter just shorter, so I do have less grain (vertically measured) than 10.5 users. I run 240V at 35% for mashing, not sure for 10.5 or what voltage you have but as an aside you may not want 100%.
I'd suggest off the top to reduce your recirc rate a bit. Or, a lot.
Cliffs notes for next time around:
1. Wait 15 mins before circulating
2. Only stir the top 75% of the bed
3. Lift/lower the basket every 20 min.
4. Add 2F to my target temp
5. Check/adjust my mill gap
Last edited:
Yeah, a kitchen will probably make using this problematic. I brew in the basement. It's cramped. My laundry room "brew house" is only about 10 feet wide and 7 feet deep. Here is a pic from an early brew...Do you have a pic of your setup? I think my problem with that will be my brew space, which is usually my kitchen. I won't have anywhere to park that thing.
Attachments

My brew day is not starting well. My Foundry temp screen reads 169 while my mash temp is actually 155. Starting to regret buying this thing.
Edit: It evened out once I did a few lifts of the mash basket and got the pump going. But I wish Blichmann/Anvil would correct this issue, somehow.
Edit: It evened out once I did a few lifts of the mash basket and got the pump going. But I wish Blichmann/Anvil would correct this issue, somehow.
Last edited:
That's how temperature stratification works. Hot water, cold grains, heater on the bottom, lack of recirculation or stirring to even it out... no company on the planet can say what grain temps you actually have.My brew day is not starting well. My Foundry temp screen reads 169 while my mash temp is actually 155. Starting to regret buying this thing.
Edit: It evened out once I did a few lifts of the mash basket and got the pump going. But I wish Blichmann/Anvil would correct this issue, somehow.
I'd recommend lifting and lowering the basket (to mix the dead space on the sides) into the rest, as well as some stirring, every 15 minutes or so, the exact time isn't important but do it a few times. Keep the heater at a lower %, just enough to let things stay hot but not overshoot (try 50% and go up or down from there). And recirculate.
I find my grain bed is a very static 2 degrees less than what the temp sensor reads, and since it's by the heater that makes some sense. I account for that when I set the temp and good to go.
They don't need to know the grain temps, I set the strike water temp based on the amount of water, amount of grain, and grain temp. I wish they had a way to accurately give the temp of the water throughout the height of the basket and then maybe average it to make it more realistic. Maybe temp sensors along the sides of the kettle?That's how temperature stratification works. Hot water, cold grains, heater on the bottom, lack of recirculation or stirring to even it out... no company on the planet can say what grain temps you actually have.
I'd recommend lifting and lowering the basket (to mix the dead space on the sides) into the rest, as well as some stirring, every 15 minutes or so, the exact time isn't important but do it a few times. Keep the heater at a lower %, just enough to let things stay hot but not overshoot (try 50% and go up or down from there). And recirculate.
I find my grain bed is a very static 2 degrees less than what the temp sensor reads, and since it's by the heater that makes some sense. I account for that when I set the temp and good to go.
The 15F difference in temp in the first 15 minutes leading up to my first basket lift and turning on the recirc pump made me panic a bit, but it was smooth sailing aside from that. I just got done cleaning up, start to finish including cleanup was 4.5 hours.
When considering the Foundry I thought it was a much more set-and-forget process from a temperature control perspective but I find it's about the same as with traditional equipment. You cant just set it to X, you have to set it to X+Y and then you have to babysit the temperature .
This was only my second brew so it's just me not used to the equipment, I'm sure after a few more brews I will get better with it.
AlbertaBeer
Well-Known Member
I’m not sure what you expect them to do. It takes time for everything in there to heat soak. If they were to move the sensor to the top or whatever, I guess you would see the lower temperature there, but the temperature down by the element is going to be way higher. Then you’d be whining that it’s way too hot at the bottom 
Similar threads
- Replies
- 12
- Views
- 762
- Replies
- 14
- Views
- 1K
- Replies
- 27
- Views
- 3K
- Replies
- 4
- Views
- 1K
