I've been browsing this thread looking for ideas, and I'm so glad I found your build. I recently scored a used chest freezer which had already been converted with a double tap tower and drip tray. My plans were also to panel the front and sides and create a furniture look. And like someone else said, I intended to leave air channels between the freezer and panels. But now that I've seen your build, and your confirmation that heat hasn't been a problem so far, I may have to completely rethink my design.
You are using an out of date browser. It may not display this or other websites correctly.
You should upgrade or use an alternative browser.
You should upgrade or use an alternative browser.
Another KEEZER build.... w/ pics.
- Thread starter HOP-HEAD
- Start date

Help Support Homebrew Talk:
This site may earn a commission from merchant affiliate
links, including eBay, Amazon, and others.
HOP-HEAD
Well-Known Member
I've been browsing this thread looking for ideas, and I'm so glad I found your build. I recently scored a used chest freezer which had already been converted with a double tap tower and drip tray. My plans were also to panel the front and sides and create a furniture look. And like someone else said, I intended to leave air channels between the freezer and panels. But now that I've seen your build, and your confirmation that heat hasn't been a problem so far, I may have to completely rethink my design.
Going on two years now without an issue....
")
As I'm doing a quick search online, trying to put together a materials list, I'm not finding the 4'x4' 1/8" veneer. Lowes comes close with 1/4" plywood. And Amazon has several species of 2'x8' veneers.
I'm concerned the 1/4" ply would retain too much heat, and the smaller 2' veneers will require some creative trim work to avoid visible seams.
Do you have another source or suggestions?
I'm concerned the 1/4" ply would retain too much heat, and the smaller 2' veneers will require some creative trim work to avoid visible seams.
Do you have another source or suggestions?
HOP-HEAD
Well-Known Member
As I'm doing a quick search online, trying to put together a materials list, I'm not finding the 4'x4' 1/8" veneer. Lowes comes close with 1/4" plywood. And Amazon has several species of 2'x8' veneers.
I'm concerned the 1/4" ply would retain too much heat, and the smaller 2' veneers will require some creative trim work to avoid visible seams.
Do you have another source or suggestions?
I believe the material I used may have actually been considered "1/4"... but as with most all lumber, it was not true size. It measured much closer to 1/8" thick.
I believe the material I used may have actually been considered "1/4"... but as with most all lumber, it was not true size. It measured much closer to 1/8" thick.
I thought that might be the case. Thanks. The 1/4" ply was what I originally planned for panels, but now I'll probably attach it directly as you've done.
On the other hand, some those veneers offer some interesting possibilities for a more exotic looking finish, like mahogany, walnut, or even teak or burled maple.
Decisions, decisions ...
D_Ranged_Eskimo
Well-Known Member
I think I am going to steal your design of just panelling the freezer instead of building an incasement. I don't have the space to build a large incasement, and this would solve my problems!


$10.99 ($31.16 / Ounce)
Hornindal Kveik Yeast for Homebrewing - Mead, Cider, Wine, Beer - 10g Packet - Saccharomyces Cerevisiae - Sold by Shadowhive.com
Shadowhive

$44.99
$49.95
Craft A Brew - Mead Making Kit – Reusable Make Your Own Mead Kit – Yields 1 Gallon of Mead
Craft a Brew


$159.50 ($26.58 / Count)
3M High Flow Series System BREW120-MS, 5616001, For Brewed Coffee and Hot Tea, Valve-in-Head Design
Amazon.com


$172.35
2 Inch Tri Clamp Keg Manifold With Ball Lock Posts, Pressure Gauge, PRV (0-30 PSI) – Homebrew, Fermentation, Kegging System
wuhanshijiayangzhiyimaoyiyouxiangongsi


$53.24
1pc Hose Barb/MFL 1.5" Tri Clamp to Ball Lock Post Liquid Gas Homebrew Kegging Fermentation Parts Brewer Hardware SUS304(Liquid Hose Barb)
yunchengshiyanhuqucuichendianzishangwuyouxiangongsi

$49.95 ($0.08 / Fl Oz)
$52.99 ($0.08 / Fl Oz)
Brewer's Best - 1073 - Home Brew Beer Ingredient Kit (5 gallon), (Blueberry Honey Ale) Golden
Amazon.com


$22.00 ($623.23 / Ounce)
AMZLMPKNTW Ball Lock Sample Faucet 30cm Reinforced Silicone Hose Secondary Fermentation Homebrew Kegging joyful
无为中南商贸有限公司

$58.16
HUIZHUGS Brewing Equipment Keg Ball Lock Faucet 30cm Reinforced Silicone Hose Secondary Fermentation Homebrew Kegging Brewing Equipment
xiangshuizhenzhanglingfengshop


$7.79 ($7.79 / Count)
Craft A Brew - LalBrew Voss™ - Kveik Ale Yeast - For Craft Lagers - Ingredients for Home Brewing - Beer Making Supplies - (1 Pack)
Craft a Brew


![Craft A Brew - Safale S-04 Dry Yeast - Fermentis - English Ale Dry Yeast - For English and American Ales and Hard Apple Ciders - Ingredients for Home Brewing - Beer Making Supplies - [1 Pack]](https://m.media-amazon.com/images/I/41fVGNh6JfL._SL500_.jpg)
$6.95 ($17.38 / Ounce)
$7.47 ($18.68 / Ounce)
Craft A Brew - Safale S-04 Dry Yeast - Fermentis - English Ale Dry Yeast - For English and American Ales and Hard Apple Ciders - Ingredients for Home Brewing - Beer Making Supplies - [1 Pack]
Hobby Homebrew


$719.00
$799.00
EdgeStar KC2000TWIN Full Size Dual Tap Kegerator & Draft Beer Dispenser - Black
Amazon.com


$20.94
$29.99
The Brew Your Own Big Book of Clone Recipes: Featuring 300 Homebrew Recipes from Your Favorite Breweries
Amazon.com


$33.99 ($17.00 / Count)
$41.99 ($21.00 / Count)
2 Pack 1 Gallon Large Fermentation Jars with 3 Airlocks and 2 SCREW Lids(100% Airtight Heavy Duty Lid w Silicone) - Wide Mouth Glass Jars w Scale Mark - Pickle Jars for Sauerkraut, Sourdough Starter
Qianfenie Direct


$53.24
1pc Hose Barb/MFL 1.5" Tri Clamp to Ball Lock Post Liquid Gas Homebrew Kegging Fermentation Parts Brewer Hardware SUS304(Liquid Hose Barb)
Guangshui Weilu You Trading Co., Ltd


$176.97
1pc Commercial Keg Manifold 2" Tri Clamp,Ball Lock Tapping Head,Pressure Gauge/Adjustable PRV for Kegging,Fermentation Control
hanhanbaihuoxiaoshoudian
HOP-HEAD
Well-Known Member
For all the nay-Sayers that questioned my heat transfer logic.... we'll be hitting the 3 year mark in October. Over that time she hasn't been shut-off for more than an hour for an occasional cleaning, and she's still purring like a kitten.
If you need the look and ventilation why don't you cut different wood types. Place in a planer with plywood underneath and take them down to 1/8 inch thick by 1 inch wide and steam them in a box and weave them and place them in a dado end all way around. They will look sharp. Email me if you want a photo of a cloths basket I made this way or a coffee table for your RV. I used walnut and oak but ash would also work. The verticals are about 1 1/2 inches wide and about 3 inches apart. They do not need to be steamed.
HOP-HEAD
Well-Known Member
Great job! Share the recipe on Rootbeer?
Nothing special... I've always taken the quickest route... 2 oz bottle of Old Fashion Homebrew Root Beer base, 8 cups sugar, 4 gallons water, and about 25 psi of Co2... done.
Ultimately, I think something "thicker" and "creamier" would be better, but I've always gotten rave reviews from those that drink it (though I don't drink much of it myself)...
Thanks, it's a start and the grand kids do drink rootbeer and orange soda.
maseline_98
Member
A few "final" pics since I realized I never added them to the end of this thread.
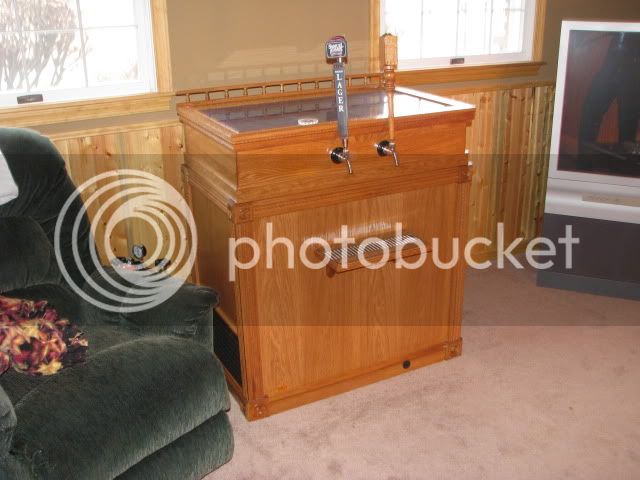
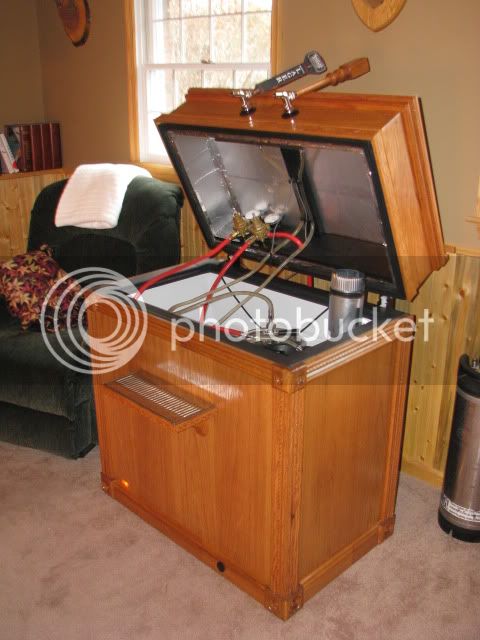
Have the plumbing in hand to add a third gas line off the end of the existing regulators to provide a spot to gas a third keg while I'm drinking the other two.... and eventually I'm sure I'll slide a 3rd tap in the middle of the other two as well as another reg.
With the fan I've added now, I can maintain a friggid' serving temp of about 38 with no freezing at the bottom. At 10 psi I've got beautiful pours from both taps and ice cold brew. 12 psi poured well also, but seemed over carbed after I lowered the temp from around 42 or 44.
What stain and poly finish did you use? Also...whay is the distance from the tap hole to the drip tray?
HOP-HEAD
Well-Known Member
What stain and poly finish did you use? Also...whay is the distance from the tap hole to the drip tray?
I honestly can't recall which stain I used. I have about a million Varathane, Minwax, etc cans laying around from previous projects and used one of them at the time... not sure which though.
Before staining, I started with a coat of Varathane Pre-Stain Wood Conditioner to help ensure that the stain adhered evenly. I was worried about the thin paneling and various trim pieces all accepting the stain equally. The conditioner also assists in hiding any glue squeeze out.
For the clear, I used a semi-gloss water based Varathane floor sealer. I like the durability of the stuff, and being waterbased, it allows for easy application, quick drying, and no mess clean-up. Love the stuff.
And the tap handle to drip tray distance is 10-1/2" from lowest point of the taps to the top of the stainless tray. I am very happy with the distance, which accommodates pitchers well, and looks appropriate for the scale of the keezer.
Similar threads
- Replies
- 1
- Views
- 2K
- Replies
- 6
- Views
- 1K
