• Please visit and share your knowledge at our sister communities:
  • If you have not, please join our official Homebrewing Facebook Group!

    Homebrewing Facebook Group

Advanced extract brewing

Homebrew Talk

Help Support Homebrew Talk:

This site may earn a commission from merchant affiliate links, including eBay, Amazon, and others.
Yeah...I noticed that the quote that @WouldBeBrewmaster pulled in was from 2013...
Adding a small amount of base malts can really help an extract brew out. In a way they were talking about doing very small partial mashes, by adding in a pound or so of 2-row or whatever base malt the AG recipe was using, to the steeping grains, and pretty much aiming for a "steep" at 152....The idea behind it is that extract doesn't carry much of the original flavour of the grains, and that by adding a pound or so of the base malt to the steep/mash can make a huge difference.
I am not positive that doing a simple partial mash with a generic Pale Malt would have enough impact to make it worth the effort, but I have not tried. It does open you up to base malts that are not available in extract form, such as Vienna Malt, Simpsons Golden Promise. A partial mash is also the best way to pull in starch containing specialty malts like Aromatic, Victory, Biscuit, Honey Malt, Melanoidin, Brown Malt, Special Roast, etc. Also unmalted grains like raw, torrefied or flaked oats, wheat, rye, etc.

Note that most malted grains like wheat or rye have plenty of diastatic power to be uses as the base grain in a partial mash. I have only done one partial mash ever. It was for a Hazy Pale Ale and I mashed some Malted Wheat and Flaked Oats.
 
So what are your thoughts on how to implement an effective partial mash?
For the mechanics of how to do it, get out your spaghetti pot or the largest pot from your cookware set that is not a giant homebrew pot. Put in your crushed grains and hopefully you can fit enough water 1.5 qts per pound. Put on the lid.

Stick it in your oven, set your temp to 148 or so, leave it for an hour at temp.
The idea of a using a pre-heated oven for temperature control of mini-mashes was well convered in 1-gal brewers unite a couple of years ago.

I was curious if @WouldBeBrewmaster had some additional ideas.
 
The idea of a using a pre-heated oven for temperature control of mini-mashes was well convered in 1-gal brewers unite a couple of years ago.

I was curious if @WouldBeBrewmaster had some additional ideas.
I have some other ideas. Blow your monthly brewing budget on a Corona style mill and set it as tight as it gets. Blow your next months brewing budget on a pair of paint strainer bags (they come 2 in a package in most places, some will have a 5 pack or even more). Mill your grains and heat water to about 160F, enough water to make a thin mix. Put the bag into the water and stir the grains into the bag to eliminate any dough balls. Wait 30 minutes. Pull the bag out and let it drain into the pot. It will take less than 30 minutes for conversion of the starch to sugars but extracting flavor takes longer. The temperature is only important during the conversion of starch to sugar so you don't need to keep the temperature stable. Extracting flavors happens over a large range of water temperatures.

https://www.homedepot.com/p/TRIMACO-6-2-in-x-9-5-in-Disposable-Strainer-2-Pack-11523/300307493
https://www.amazon.com/Cranking-Ope...cphy=9020279&hvtargid=pla-1886912518276&psc=1
 
Mill your grains and heat water to about 160F, enough water to make a thin mix.
For a BIAB type mash, I'd aim at using around 2 quarts of (hot) water per pound of grist, I wouldn't go thinner than that.
And make sure there's enough diastatic power in the grain mix (> 35°Lintner) to convert all the grain.

Unless you know your tap water is soft (low in minerals and alkalinity) or when in doubt, use RO (or distilled) water for the mash, or even the whole brew.
The mash needs minerals in the water. Extract does not.
 
The idea of a using a pre-heated oven for temperature control of mini-mashes was well convered in 1-gal brewers unite a couple of years ago.

I was curious if @WouldBeBrewmaster had some additional ideas.

Never done it before. Back when I was doing small batch BIAB, our oven wouldn't go lower than 190F. If you oven can, I don't see why it wouldn't work.


So what are your thoughts on how to implement an effective partial mash?

The simplest way is to heat your strike water to 12 degrees F above your mash temp, 162F to mash at 150F. Put your grains in and mash for 60 mins. Turn your stove burner on it's lowest setting, as low as it can go just to help maintain the temp. Don't worry if it drops a couple degrees, if it drops 5 degress or more, turn up the heat one click. If the temp raises by 5 degrees, turn the burner off.

Don't tinker with the mash if the temp is off by a couple degrees. Close enough is good enough. Excessively screwing with it will only make it worse. When I first started doing BIAB on the stove top for small batches or partial mash, I definitely fiddled with the mash too much. If my thermometer went down a few degrees, I'd add boiling water or turn on the heating element on our electric stove. Then when it got too hot, I'd panic and throw ice in the mash. Don't do that. As always, RDWHAHB

After doing a few partial mashes, you will get a feel how to maintain a steady temperature on your stove. Also, stir the mash or grain bag every 15-20 mins or so.
 
since this is the "advanced extract brewing" topic let's try to move past 'simplest' approaches ...


Is that what you do (if not, what do you do)? is there a better way?


Everyone else: I'm interesting in reading what brewers are actually doing with mini- and partial- mashes.

For about three years that's how I brewed almost every batch; either as a 5-gal partial mash or 3-gal BIAB.
 
Everyone else: I'm interesting in reading what brewers are actually doing with mini- and partial- mashes.
The only time I use DME any more is for making imperials. With my 3 gallon batches, one 3 lb bag of DME replaces about 4 to 5 lbs of base malt, allowing me to mash full volume and still get 80+% lauter efficiency on my grain bill, and by adding the DME at the end of the boil, I don't need as much bittering hops.
 
I did a side-by-side on 10%-ish barleywine a couple of years ago: all-grain v partial mash (50%). For me, it was easy to tell the difference.
I haven't done a side-by-side, but I have added 3 or 4 lbs of DME late to turn a mid-gravity wort into a high gravity wort. But it's usually more like a 2/3 to 3/4 mash. I guess maybe I should try some smaller batches to see if they turn out better.
 
I really like the idea of a small mash in the oven I hadn't thought of that before.
I also suffer from an oven that won't go low enough, only goes down to 170f.
But I do have a nice digital thermometer that has alarms for high and low temps that would facilitate manual temp control.
 
I really like the idea of a small mash in the oven I hadn't thought of that before.
I also suffer from an oven that won't go low enough, only goes down to 170f.
Most oven thermostats are not that accurate or reliable to reach a set or holding temperature. Don't just rely on that for keeping your mash at the right temps.

Just pre-warm the oven to a few degrees above your intended mash temp, then turn it off!
Use an oven thermometer or a non-plastic one to measure.

Then place your mash vessel inside the oven. That mash should be at the right temp already. The oven only helps keeping the mash at that temp.

Instead of using an oven, wrapping the mash pot in a thick blanket also slows down heat loss. Of course the whole pot gets wrapped, including the bottom.
 
Set oven to WARM or lowest.
Heat strike water and add milled grains and sitr
Put lid on pot
Turn off oven
put pot in oven

The thermal mass of the mash in the pot, with the addition of warm thermal air mass of the warmed, but turned off, oven, will do a great job over the short time needed for conversion (it happens fairly quickly if grains are milled well).
 
Most oven thermostats are not that accurate or reliable to reach a set or holding temperature. Don't just rely on that for keeping your mash at the right temps.

Just pre-warm the oven to a few degrees above your intended mash temp, then turn it off!
Use an oven thermometer or a non-plastic one to measure.

Then place your mash vessel inside the oven. That mash should be at the right temp already. The oven only helps keeping the mash at that temp.

Instead of using an oven, wrapping the mash pot in a thick blanket also slows down heat loss. Of course the whole pot gets wrapped, including the bottom.
This oven corresponds well to the thermopen baking unit so I'm reasonably confident in the accuracy.
Its a convection model with digital settings so the problem with the heat then turnoff tactic is that it uses the fan to cool-down when it is turned off, so that contributes to the problem of temp cycling.
When your oven keeps the right temps, that's perfect, mash away!
 
Its a convection model with digital settings so the problem with the heat then turnoff tactic is that it uses the fan to cool-down when it is turned off, so that contributes to the problem of temp cycling.
If there's no way to disable that fan, try wrapping some of this around your kettle, and forget about the oven. Not only will it keep your mash temp stable (my 4 gallon mash only loses about 3 degrees over 60 minutes), but it'll help you heat up your water significantly faster.
 
If there's no way to disable that fan, try wrapping some of this around your kettle, and forget about the oven. Not only will it keep your mash temp stable (my 4 gallon mash only loses about 3 degrees over 60 minutes), but it'll help you heat up your water significantly faster.
Thanks for the ideas.
But I wasn't looking for a solution, I have that, it's called a mash tun.
I was simply stating that I hadn't considered mashing in an oven. I think it is a great solution where equipment constrained or the desire for a smaller mash exists.

Thank you all for the well-intentioned responses.
 
Let's see what develops in 2022 ...

In retrospect, I feel that 2022 was a good year for this topic.

But, as they (occasionally) say, "all good things must come to an end need a break". And I'm working on some ideas that appear to need about a year to prove/dis-prove to my satisfaction. Maybe some of the ideas will leak into "I brewed an experimental recipe a few weeks ago...".

As a follow-up, 2023 could be summarized as ...

1705356308607.png


... and a couple of other things that didn't fit on the 1st line.

For those looking to advance extract brewing in 2024 (and beyond), consider listening to
  • Brew Files #160
  • BeerSmith Podcast #293
  • BeerSmith Podcast #269
and create your own "Microbrewed Adventures".

:mug:
 
LME containers: MoreBeer and Williams moved to oxygen barrier bags a while back. Other places continued with the plastic jugs. I've been a little curious about the potential head space in those jugs. Not curious enough to order some to investigate, just a little curious.

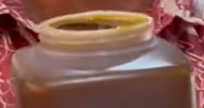
While I can't (and won't try to) answer that question for all suppliers, at least one supplier appears to have removed most/all of the head space:

1720815017004.png
(the photo is about head space, not color - which is 'impossible' to visually measure from a photo in a container when the LME is still concentrated).

/1/ link to post that has the link to the video where I did the 'screen grab'.
 
LME containers: MoreBeer and Williams moved to oxygen barrier bags a while back. Other places continued with the plastic jugs. I've been a little curious about the potential head space in those jugs. Not curious enough to order some to investigate, just a little curious.

While I can't (and won't try to) answer that question for all suppliers, at least one supplier appears to have removed most/all of the head space:

(the photo is about head space, not color - which is 'impossible' to visually measure from a photo in a container when the LME is still concentrated).

/1/ link to post that has the link to the video where I did the 'screen grab'.
A person could, before opening, turn the container upside down and let it stand on it's lid for some time. The true volume of "air" would be more accurate to assess rather from an opened, now "relaxed" container.
(just a thought, if it makes any sense,,,)

Cheers, :mug:
Joel B.
 
A person could, before opening, turn the container upside down and let it stand on it's lid for some time. The true volume of "air" would be more accurate to assess rather from an opened, now "relaxed" container.
Makes sense.

For now, I'm not going to buy some containers to do the testing. And the photo suggested that the amount of head space was very small (if any). That's good enough for me (for free) for now.

Also, over the last couple of years I have seed only one "Why did my LME-based IPA kit turn out brown?" topic (it was outside of HBT). After about two days of discussion (maybe 20 replies) that OP mentioned that the LME had been left in a warm garage for a number of months before being used.
 
Back
Top