
Derek Allen
New Member
- Joined
- Oct 19, 2015
- Messages
- 1
- Reaction score
- 0
September 27th marked the 1st anniversary for me and my new found love Homebrewing! I jumped into all grain brewing with both feet after first reading John Palmer's How To Brew. I scoured tons of forums and homebrew community sites in search of the most detailed information and the best setup I could find before purchasing a single grain or piece of equipment. It was a risky commitment, since starting with all grain can be more expensive, but with determination and perseverance it has paid off!
Now with 20 plus batches under my belt, moving from 5 gallon to 10 gallon batches, and getting one of my best friends hooked on brewing himself within 3 weeks of experiencing his first sample, I realized something: my success has all been due to the wealth of information I've accessed from various brewing communities (primarily HBT). However, I had yet to contribute anything other than the odd reply to any of the HomeBrewTalk forums.
After a year of scavenging from others, I decided it's time to start giving back by detailing some of the successes and failures I've learned about since that nerve-racking sunny afternoon last September.

Current Brews - Chocolate Oatmeal Stout and Session IPA
What I've learned about my equipment:

Homemade mashtun, manifold, counterflow wort chiller, grain crusher and stirplate
What I've learned about my ingredients:
A blonde split batch - Raspberry and Blueberry Ale
What I've learnednot to do again:

Boil additions all ready to go
Hopefully you've picked up a pointer or two, which will hopefully prevent you from making a mistake I've already made. I suggest taking the leap and make the move to all grain. It might not be for everyone in the beginning, but it will be well worth it in the end. I don't doubt you can make great beer with extract kits, but from my previous experiences using extract kits, I knew there had to be a better way. I've definitely found more versatility with all grain, and hope that you can do the same!
Happy All Grain Brewing!
[URL="//www.pinterest.com/pin/create/extension/"][/URL]

Now with 20 plus batches under my belt, moving from 5 gallon to 10 gallon batches, and getting one of my best friends hooked on brewing himself within 3 weeks of experiencing his first sample, I realized something: my success has all been due to the wealth of information I've accessed from various brewing communities (primarily HBT). However, I had yet to contribute anything other than the odd reply to any of the HomeBrewTalk forums.
After a year of scavenging from others, I decided it's time to start giving back by detailing some of the successes and failures I've learned about since that nerve-racking sunny afternoon last September.
Current Brews - Chocolate Oatmeal Stout and Session IPA
What I've learned about my equipment:
- Be sure to have the correct tools. It turns out there are different types of hydrometers! Build what you can! Stirplates, mashtuns, wort chillers, grain crushers, manifolds, etc. They can all be made with a little bit of effort and a little cash. Most designs are even available for free!
- Use technology that is at your disposal. On brew day I regularly access Beersmith, Brew Timer, Brewer's Friend calculators, and of course HomeBrewTalk for a wealth of knowledge on the go!
- Take apart things like 3 piece ball valves, manifolds, hoses/fittings, etc. every few brews to clean/sanitize them. Unwanted gunk buildup can lead to infections and off-flavours.
- If you're using Powdered Brewery Wash (PBW) to clean, make sure you rinse before using StarSan to sanitize.
- Use a blow off tube for the first week of fermentation. Clogged airlocks are gross and can be potentially dangerous!
Homemade mashtun, manifold, counterflow wort chiller, grain crusher and stirplate
What I've learned about my ingredients:
- Use Carafoam, flaked barley or carapils. There's nothing like pouring a highly anticipated stout only to have the head fizzle out like a Pepsi Colawhich brings me to my next lesson learned:
- Mash temps DO matter! A small difference in temperature can make a big difference in the body of the final product.
- Treat your water. I believe this is the most important ingredient, considering beer is primarily made up of it. Taking this step will help your homebrew to have distinct clean tastes like the common commercial beers most people are used to. Many first time tasters were very surprised a homebrew could taste so clean and real once I started treating my water. Get a city water report or start with reverse osmosis water, and adjust accordingly to achieve your desired profile.
- Use Bru'nwater. It can be overwhelming at first, but it is an amazing tool! I tried a few different calculators and methods for water adjustments, but nothing compares to this.
- Use HBT for feedback and help for recipe creations and ideas.
- You can recover from an un-carbonated bottle conditioning! See See this link on a discussion I had with fellow members about re-opening bottles and adding new yeast to them.
- When crushing your own grain, condition it first! This took my low 60's efficiency, up into the mid 70's " all for about 5 minutes of work.
- If you get into liquid yeast and making yeast starters, go straight to a 5L flask and harvest yeast for future batches. Some yeast starter calculators will actually calculate over-building for you.
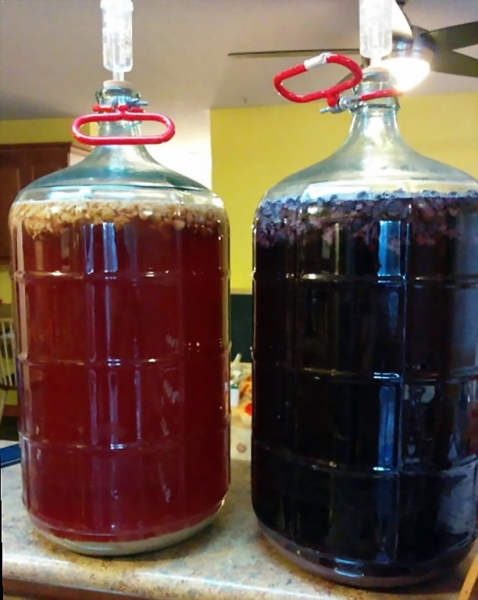
A blonde split batch - Raspberry and Blueberry Ale
What I've learnednot to do again:
- Don't scale-up recipes by the seat of your pants. 2LBs of Crystal 60L in a 9lb grist for an IPA does not taste good. Batch #1 sucked.
- Don't collect your brewing water from a brand new garden hose. That rubber hose taste gets baked in and becomes super intensified. Batches 4 and 5 had to be dumped.
- Don't add hop pellets at bottling time for an extra little hoppy goodness. What a mess!
- Don't start drinking until your boil starts. A lot of beer can accidentally be consumed while you're sitting around watching your mash.
- Don't assume you know where everything is on brewday. Get organized! Run through all your equipment and ingredients BEFORE you start brewing. You don't want to get stuck scrambling for a camlock or hydrometer because you thought I put it back last time you used it.
Boil additions all ready to go
Hopefully you've picked up a pointer or two, which will hopefully prevent you from making a mistake I've already made. I suggest taking the leap and make the move to all grain. It might not be for everyone in the beginning, but it will be well worth it in the end. I don't doubt you can make great beer with extract kits, but from my previous experiences using extract kits, I knew there had to be a better way. I've definitely found more versatility with all grain, and hope that you can do the same!
Happy All Grain Brewing!
[URL="//www.pinterest.com/pin/create/extension/"][/URL]


![Craft A Brew - Safale S-04 Dry Yeast - Fermentis - English Ale Dry Yeast - For English and American Ales and Hard Apple Ciders - Ingredients for Home Brewing - Beer Making Supplies - [1 Pack]](https://m.media-amazon.com/images/I/41fVGNh6JfL._SL500_.jpg)


") The rubber hose thing and the "batch 1 sucked" were too funny. I'm just about at first year in myself, only got chance to make 5 batches so far though. About to start again now that kitchen is cool enough to ferment in (brewing 5 gallon batches in 1br apartment myself). You got 20 batches in and doing 10 gallons/per already, sounds awesome!
The rubber hose thing and the "batch 1 sucked" were too funny. I'm just about at first year in myself, only got chance to make 5 batches so far though. About to start again now that kitchen is cool enough to ferment in (brewing 5 gallon batches in 1br apartment myself). You got 20 batches in and doing 10 gallons/per already, sounds awesome!