• Please visit and share your knowledge at our sister communities:
  • If you have not, please join our official Homebrewing Facebook Group!

    Homebrewing Facebook Group

2nd Brew Takeaways and Questions

Homebrew Talk

Help Support Homebrew Talk:

This site may earn a commission from merchant affiliate links, including eBay, Amazon, and others.
Joined
Jan 29, 2019
Messages
16
Reaction score
2
Thanks again for the advice I've been getting on this forum. It's been valuable.

I brewed my second beer. It was using a blonde ale extract recipe I had used before. I used less liquid malt extract and more dry malt extract. 3 gallon batch 3.8 ABV. I used cryo hops for bittering I learned not to do this instead adding pellets so will tweak it on the next batch. I used citra hops for the bittering and mosaic hops for flavoring and aroma lowering the quantity since I read from advice here cryo hops are stronger. I also added in guava to give it a fruit flavor and honey to increase alcohol content.

Fermentation was active and I made sure to keep the temperatures at about 68 degrees with the Safale US 05 yeast for the first three days.

I tried it after 10 days of carbonation and compared to my first beer I made I was impressed with the improvement in taste. I got more flavoring and aroma and a clearer looking beer!

I'm trying to figure out what I did differently to the first brew and second. I know that I got the sanitation better and lower fermentation temps but do you think the hops I used could have made more of a difference?

Also, I would like to get a higher alcohol content next time. How could I do this? Would it be simply adding more liquid malt or dry malt extract? Are there any other things I could be doing to increase the content?

Thanks again for any advice or tips.
 
Yes, more extract will increase alcohol content, too much may make it boozy.
I think your process probably improved, yielding better beer, though ingredient changes certainly changed the flavor and aroma. Keep practicing and studying to improve your brew and your understanding. Have fun, keep us posted.
 
A few suggestions:

I'm of the opinion that new brewers should brew relatively simple recipes, and learn the process. In fact, I think brewing the same recipe 2 or 3 times is good, simply because you can nail down that process and not have the confusion of a different recipe altering the results.

You brewed the same thing which was good, but made some changes which may or may not be good. :)

Once you have the process down, where you can brew good beer, then altering the ingredients/recipe will yield better results, because you can be more certain that changes are due to the changes in ingredients, not changes in how you did the brewing.

Some may argue that they didn't do it this way and it worked out, but I'd suggest that maybe they got lucky. Ask yourself where you want to be as a brewer in, say, 6 months, and what approach you can take NOW will allow you to reach that goal.

The way to do this is to use established recipes and brew those--they're already "vetted" and aren't subject to unusual changes such as, say, using Cryo hops.

And simple recipes. I see, from time to time, a new brewer who wants to do a triple-stout with coconut overtones double-hopped with lactose and jelly beans. It's so....wacky...that if it doesn't turn out, was it the recipe or the process? And new brewers don't have the process down, so they can't separate process from recipe.

Simpler is better at the outset, IMO. Six months from now, after you've got the process down, go nuts.

My 2 cents.
 
It could have been the hops. Most likely just by brewing more and more you will get comfortable with the process and end up with a better result.

Adding more extract will yield more alcohol, but you just need to be careful with having a nice balance between that and the hops depending on how you want your beer to turn out.
 
Agree with Mongoose. Even if your ultimate goal is Guava Pale Ales, you should work on learning and nailing the fundamentals.
Good fundamentals give you consistency, which leads to repeatable and, more importantly, predictable results.

It will also allow you to make informed decisions when you want to try something new or figure out how to make a clone (a good, experienced brewer doesn't need a "clone" recipe to make a decent clone of another beer - they just figure it out based on knowledge of what every ingredient brings to the table).
Now that takes years, but why not start now?
Plan some standard "classic" beers - a porter, a brown ale, a golden ale, etc.

Contrary to what I said earlier about recipes (that applies to experienced brewers), I suggest even as an extract brewer, to use recipes instead of kits.
That way you have more involvement in gathering and selecting the ingredients and learn more about them along the way.
 
A few suggestions:
I'm of the opinion that new brewers should brew relatively simple recipes, and learn the process. In fact, I think brewing the same recipe 2 or 3 times is good, simply because you can nail down that process and not have the confusion of a different recipe altering the results.

That's a good point. I definitely changed the variables by adding in different hops and ingredients. I'll be sure to use the same recipe a few times and not change any variables so I can get the process down!

The way to do this is to use established recipes and brew those--they're already "vetted" and aren't subject to unusual changes such as, say, using Cryo hops.

Can you recommend any websites which I can get basic extract recipes?
 
Agree with Mongoose. Even if your ultimate goal is Guava Pale Ales, you should work on learning and nailing the fundamentals.
Good fundamentals give you consistency, which leads to repeatable and, more importantly, predictable results.

Great advice and I will be sure to focus more on the processes rather than trying different hops/ingredients.

Plan some standard "classic" beers - a porter, a brown ale, a golden ale, etc.

Contrary to what I said earlier about recipes (that applies to experienced brewers), I suggest even as an extract brewer, to use recipes instead of kits.
That way you have more involvement in gathering and selecting the ingredients and learn more about them along the way.

The last brew I did was an extract kit. Do you have any recommendations to where I can find some basic starting recipes using extracts?

Thanks again!
 
Read “Brewing Classic Styles”, co-authored by John Palmer. Does exactly what the title says, discusses the classic styles, and presents recipes in extract, followed by all grain. Not a brewing instruction book, but very good information and keys to brewing good beers with extracts!
 
The last brew I did was an extract kit. Do you have any recommendations to where I can find some basic starting recipes using extracts?

Thanks again!
Extract Recipes are all over the place. BYO magazine does a good job of almost always giving recipes with all-grain, partial mash, and extract options.
That is informative because it allows you to get an idea of what grains you are approximating with your extracts.

If you're not already, I suggest doing extract-with-grains brewing, and not 100% extract. You typically use the palest extract you can get (pale or pilsner) and then add color and flavor with specialty grains. Again, you may already be doing that, but it's better than using colored and flavored extracts.
 
That's a good point. I definitely changed the variables by adding in different hops and ingredients. I'll be sure to use the same recipe a few times and not change any variables so I can get the process down!

The more willing you are to learn, the faster this will go--and you seem very willing.

I taught a local guy how to brew. He watched me do a brew day; then I helped him with a recipe for a brew, and I had him do the brew day while I kibbitzed. Once he decided what he wanted to brew, I made all the ingredient decisions for him so he was focused on learning the process, not what went into it. Then the third time he brewed on his own, without me there. I got about 5 texts and one phone call during to clarify things, but he got through it. He was smart that way in his focus on process, and it greatly accelerated his learning curve.

I'm not saying to brew the same recipe 10x, but maybe 3x or so. You will kind of know how it's supposed to taste so when it's there, you'll know--and now you can start expanding your brewing repertoire. With extract brewing many of the variables are already predetermined (mashing using all-grain), so this is faster.

BTW, one issue with brewing is that it generally takes 3 weeks or more to even get a beer to sample and to see how it all went. That's hard--at least it was for me, the waiting 3 weeks just to see how it all turns out--and then if it didn't, trying to guess why.

IMO, that's the biggest reason why nailing the process is important; nothing worse than waiting three weeks to find out the beer is "meh" and not having any idea why. Also why watching someone brew or getting a mentor can be so advantageous. You're past that point (though there may be some value in it).

Can you recommend any websites which I can get basic extract recipes?

https://www.morebeer.com/category/ales.html

Morebeer has a TON of extract kits; this link is just the ales but there is this:

https://www.morebeer.com/category/malt-extract-beer-recipe-kits.html

Anyway, here's a blonde ale kit:

https://www.morebeer.com/products/blonde-ale-extract-beer-brewing-kit-5-gallons.html

If you scroll down under "documents" you'll see a link for "Ingredient sheet" and for "Brewing instructions."

They all have that.

HBT has a recipe section though it tends more toward all-grain: https://www.homebrewtalk.com/forum/forums/homebrew-ale-recipes.62/
 
BTW, in case you haven't already run across this:

Most brewers here would probably tell you that fermentation temperature control was a big leap forward in their beers. You can't go by ambient temperature; yeast is exothermic, meaning they produce heat when working, and that can raise the temp of the wort 5-10 degrees above ambient temp.

You can manage this on the cheap by using a swamp cooler; turkey pan, fill with 2" of water or so, put fermenter in it. Drape a t-shirt over fermenter so it hangs down in the water. As it evaporates, the water wicking up in the t-shirt will help cool the fermenter.

You can also do this in a refrigerator with a controller and a heat mat. An Inkbird 308, a heat mat, and a cheap refrigerator is what you need. You might even be able to squeeze a fermenter in a tall dorm-style minifridge.

swampcooler.jpgfermchamber2e.jpg fermchambers.jpg minifermchamber.jpg fermchamber2a.jpg

*********

The other place to think about is water. When i started brewing extract kits I just used my tap water. Big mistake. Mine is very hard, has chlorine in it, doesn't work that well. My son, who also brews, was struggling with water until he switched to RO (reverse osmosis) water. Made a huge difference for his brewing. This all depends on what YOUR water is like. If I were brewing extract I would use RO unless I knew for certain that my local water was very soft and had no chlorine. BTW, you can add something called a Campden Tablet to remove chlorine.
 
I will go +1 with process. If you do the same thing every time, the right way, soon it will become second nature and you can add new twists to your brewing such as more complex recipes, new equipment that you need to learn the ins & outs of, and more advanced processes that take time and experience to get right. Hardly any of us brewed a perfect beer (at least to other people, your first drinkable beer is always in the top 5) on the first go; there are ALWAYS ways to improve your process, recipe, what have you. I always laugh at reading posts from noobs who want to know why they didn't get a perfect beer on their first go; would you expect a person never exposed to music, to pick up say, a violin, and play something complicated and perfect without practice? Unless they are the 21st century version of Mozart, no. This hobby/obsession takes practice, learning, and trial and error to get it right. Most especially learning, and the DESIRE to learn. However, if you are willing to learn from mistakes, take advice, and keep trying, you will make some stellar beers.
 
Read “Brewing Classic Styles”, co-authored by John Palmer. Does exactly what the title says, discusses the classic styles, and presents recipes in extract, followed by all grain. Not a brewing instruction book, but very good information and keys to brewing good beers with extracts!

That's actually what I really need to learn. I mean I can know what a porter and a stout are by color but I'm not sure what differentiates them by grains. It'll be good to learn how these different styles of beers are formed! I'll look out for the book!


Extract Recipes are all over the place. BYO magazine does a good job of almost always giving recipes with all-grain, partial mash, and extract options.
That is informative because it allows you to get an idea of what grains you are approximating with your extracts.
Great, I'll be sure to look at that website. It'll be good going into the next brew to have an idea of what recipe I'll use. I'll be sure to post here with questions before I start.

If you're not already, I suggest doing extract-with-grains brewing, and not 100% extract. You typically use the palest extract you can get (pale or pilsner) and then add color and flavor with specialty grains. Again, you may already be doing that, but it's better than using colored and flavored extracts.

The recipe I used called for steeping grains. I used them and read it's like making tea. I still wonder what their role is in the overall taste and flavor of the beer, though? I know a newb question lol!
 
That tea has flavors, colors and aroma that help your beer. You could taste a sip, or even chew on some grains to learn which flavors
The replies above are great suggestions. Threads like this are what makes HomeBrewTalk shine.
OP, there's a recipe section on this forum too, some recipes are extract, others are grain but if you read the thread you'll find extract versions. You're off to a good start, keep us posted.
 
The more willing you are to learn, the faster this will go--and you seem very willing.

IMO, that's the biggest reason why nailing the process is important; nothing worse than waiting three weeks to find out the beer is "meh" and not having any idea why. Also why watching someone brew or getting a mentor can be so advantageous. You're past that point (though there may be some value in it).

You are right. Three weeks is a long time to figure out what went wrong. I don't really have a mentor so that's why I'm using this forum to get help. I plan on posting as I go through my brews so that way I can get feedback.


BTW, in case you haven't already run across this:

Most brewers here would probably tell you that fermentation temperature control was a big leap forward in their beers. You can't go by ambient temperature; yeast is exothermic, meaning they produce heat when working, and that can raise the temp of the wort 5-10 degrees above ambient temp.

You can manage this on the cheap by using a swamp cooler; turkey pan, fill with 2" of water or so, put fermenter in it. Drape a t-shirt over fermenter so it hangs down in the water. As it evaporates, the water wicking up in the t-shirt will help cool the fermenter.

You can also do this in a refrigerator with a controller and a heat mat. An Inkbird 308, a heat mat, and a cheap refrigerator is what you need. You might even be able to squeeze a fermenter in a tall dorm-style minifridge.

I've also been relying on ambient temperature and also an air conditioner. I like the idea of getting a mini fridge. I was just curious about the temperature control. Would the Inkbird allow me to control the temperature in the fridge? I know most fridges just have a set temp so getting it at a constant 68 degrees may be difficult.


*********
The other place to think about is water. When i started brewing extract kits I just used my tap water. Big mistake. Mine is very hard, has chlorine in it, doesn't work that well. My son, who also brews, was struggling with water until he switched to RO (reverse osmosis) water. Made a huge difference for his brewing. This all depends on what YOUR water is like. If I were brewing extract I would use RO unless I knew for certain that my local water was very soft and had no chlorine. BTW, you can add something called a Campden Tablet to remove chlorine.

I am using purified water. What characteristics can I look at to see if it's good quality or not? As far as RO water, I'll need to look into as in I'm in the Middle East and setting up a filter may be a bit difficult. Once I move from here later this year, it might be easier to get RO water.

I always laugh at reading posts from noobs who want to know why they didn't get a perfect beer on their first go; would you expect a person never exposed to music, to pick up say, a violin, and play something complicated and perfect without practice? Unless they are the 21st century version of Mozart, no. This hobby/obsession takes practice, learning, and trial and error to get it right. Most especially learning, and the DESIRE to learn. However, if you are willing to learn from mistakes, take advice, and keep trying, you will make some stellar beers.

Yup, my first beer didn't taste that great and I was kind of down on myself, but like you said whenever you try something new you won't be great at it during the start. Very good advice!
 
I've also been relying on ambient temperature and also an air conditioner. I like the idea of getting a mini fridge. I was just curious about the temperature control. Would the Inkbird allow me to control the temperature in the fridge? I know most fridges just have a set temp so getting it at a constant 68 degrees may be difficult.

Depending on how long you're going to be in the Middle East, there may be other ways to mitigate this. There's a kind of yeast called Kviek that can handle higher temps without throwing off undesirable esters. No idea if you'd even be able to get it.

The way the inkbird works is this: you turn your refrigerator to as cold as it goes; then, you plug it into the inkbird. The temperature probe from the inkbird--which you attach to the fermenter with bungee cords or string or something, covering it with something to insulate it from ambient--is what tells the inkbird to turn the refrigerator on and off as needed, so it's controlled from the inkbird and not the internal thermostat in the refrigerator.

Same thing happens with the heat mat; when too cold, it turns on the heat mat.

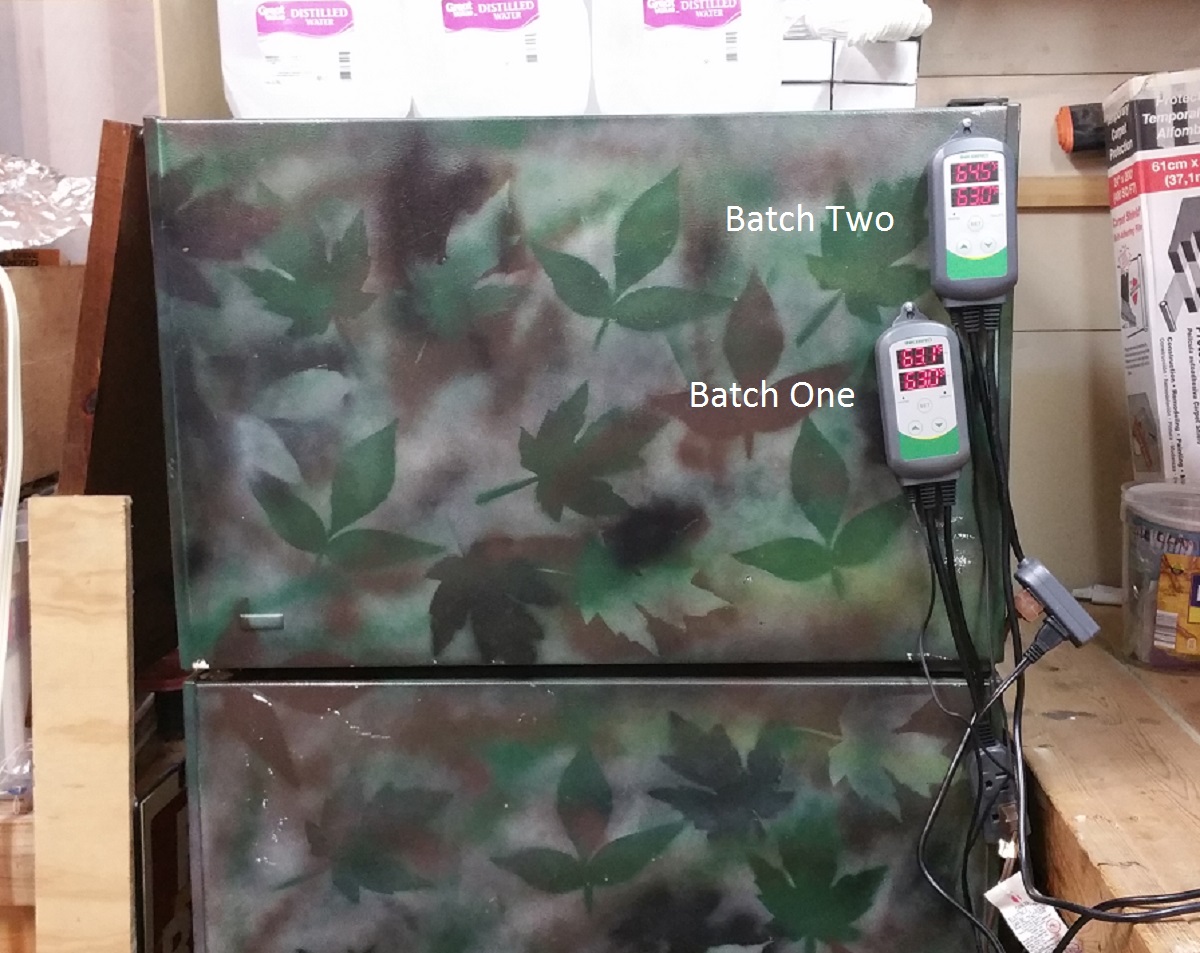
In the earlier pic showing two fermenters in a fridge, you can see the probes; one is under a piece of pink foam, the other blue foam. That way it draws temp from the fermenter, not from the air in the fridge.

There are two receptacles on the inkbird, one to plug in the refrigerator, one to plug in the heat mat. If you look here:

https://www.amazon.com/dp/B01HXM5UAC/?tag=skimlinks_replacement-20

You can see that in the pic--one receptacle marked "heating" the other "cooling."

Here's another view; you can see on the Batch Two inkbird I have the brown refrigerator cord plugged in, and the black heat mat cord plugged in. Don't worry about the other one--it's the second batch inside the fridge and only needs heat to overcome the cooling of the refrigerator as Batch 2 ferments and creates heat.

fermchamber2d.jpg


If you have a refrigerator, you can run the cords between the gasket and the frame; do it on the hinged side and you're golden. No need to drill holes unless you feel the need, and there's little need. :)

*********

I am using purified water. What characteristics can I look at to see if it's good quality or not? As far as RO water, I'll need to look into as in I'm in the Middle East and setting up a filter may be a bit difficult. Once I move from here later this year, it might be easier to get RO water.

If it's "purified" I'm going to guess it's distilled, though it might also be RO water. If it's bottled water, it may well say on the label. I buy bottled water and it says on the label it's RO water. Either way, distilled or RO is fine.

I'd lay $20 on your water being ok. But it's worth finding out.
 
Hey mongoose, what size heat mats are those on the bmb? I use the same fermenters for my bigger batches and I’m looking for a way to heat the fermenters in my cool basement.

Any tips on 1g jugs?

Thanks
 
Hey mongoose, what size heat mats are those on the bmb? I use the same fermenters for my bigger batches and I’m looking for a way to heat the fermenters in my cool basement.

Any tips on 1g jugs?

Thanks

One of them is an 18-watt reptile (or seed starter) heat mat; the other is called a "Fermwrap" and it's 40 watts. I originally bought the Fermwrap, then learned about the reptile mat. Bought that to see. If it's kept in contact w/ the fermenter and provided ambient isn't really cold, it has worked well for me.

Thinking out loud here, if I were trying to control temp on a 1-g jug, I'd certainly use the lower wattage; I think I've seen reptile mats that have lower wattage, like 15 or so. Here's one that is only 8 watts: https://www.amazon.com/dp/B018VQ71JC/?tag=skimlinks_replacement-20 Depending on ambient, it's probably enough; if not quite, you could wrap a towel around the jug to isolate it a bit more from ambient.

What I might do with a higher wattage mat is rather than wrap the jug in the mat, I might set the jug on the mat and see if that provided enough heat. The trick is to not overheat before the heat transfers to the temp probe.
 
Thanks for the reply. Looks like they only wrap around about half or so of the bmb? I’ve been debating building a crate of sorts big enough for 3-4 small jugs and using some type heat tape on the inside of it. I don’t have much problems with cooling, not sure what it’ll be like in the summer but the basement is always pretty cool and dry. Just too cold in winter.
 
Depending on how long you're going to be in the Middle East, there may be other ways to mitigate this. There's a kind of yeast called Kviek that can handle higher temps without throwing off undesirable esters. No idea if you'd even be able to get it.

I'll look into picking it up next time I'm in the US. That is definitely a better yeast for the warmer temperatures here!

Thanks again for sending the information on the inkbird. Once I get a mini fridge, I will definitely be using it along with the heat mat!
 
Thanks for the reply. Looks like they only wrap around about half or so of the bmb? I’ve been debating building a crate of sorts big enough for 3-4 small jugs and using some type heat tape on the inside of it. I don’t have much problems with cooling, not sure what it’ll be like in the summer but the basement is always pretty cool and dry. Just too cold in winter.

Generally, you want to heat the wort, not the ambient air. If all 4 jugs were the same batch, you might be able to make this work. If the basement is cold enough, it'll work like a refrigerator and the heat just has to overcome that. Provided you're taking the temperature of the wort and not the air, and that all jugs are the same batch, that would likely work.

In the pics above in post #11, you see two fermenters in one refrigerator. Two different batches, offset by a few days. I brewed batch one, set it at 63 degrees. The refrigerator would kick on whenever it creeped above that.

Then, I put in the second batch 3 days later controlled by a second Inkbird, and transferred the refrigerator plug to that Inkbird. Both had heat mats on them. Since the second batch was actively fermenting and producing exothermic heat from the yeast, I needed the refrigerator to cool that one. BUT, since the first batch was done actively fermenting, that would cool the first batch too much. So the first batch was still controlled by an Inkbird to which only the heat mat was connected.

So the second one proceeded as normal; the heat mat on the first kicked on whenever it dropped below set temp.

*******

So as you do multiple jugs consider those issues. It's certainly easier to play with smaller containers like that and see what works best.
 
Thanks again for the thorough response mongoose. I think I’ll give one of the small seed mats a try for the small batches. Didn’t realize they’d have a size to fit a small jug. I’d really like to move all my fermenters downstairs (40-50f these days, mid 60s during summer) and out of my wife’s way on the main floor. I’m frugal (also:cheapass) and have been trying to brainstorm ways that aren’t too sketchy or likely to burn the house down, but I’ll keep my eyes out for a fermwrap or similar for my bmb/bucket. Really bites to need a temp controller for each unit, but trying to remind myself that it’s important and should last for many, many brews.
Thanks again, and sorry if I hijacked a thread

Perhaps you could....brew larger batches?

My gut feeling is the fermwrap is too powerful for a 1-gallon jug. You want to goose the temp, not slam it. Besides, a Fermwrap might completely encircle a 1-gallon jug, which would make placement of the temp probe problematic.
 
A fermwrap would be for my larger batches (big mouth bubbler, bucket), small seedling mat for the jugs if needed. I tend to have one 5 gallon batch (or two 2.5-3G batches) fermenting at most times, then fill in the gaps with 1 gallon batches. I enjoy the variety and the more frequent brew days.
 
I would agree with those who extol the virtues of starting with simple recipes and focusing on the process. Try to pick a style you like and drink frequently so that you have an experienced palate when it comes time to evaluate the result. Really get the process down so that you're comfortable with the mechanics of brewing, sanitation, etc.

One place I'll differ from others is the idea of only changing one thing at a time. As an engineer with a strong science background, this pains me to say, but the reality is that you could literally spend decades trying to learn that way. There are so many variables in ingredients, process, timing, temps, etc, and the time span needed for each "experiment", coupled with the fact that you can only drink so much beer, renders this approach untenable for me. I'm 55, I want good beer now, not 30 years of brewing trying to get there.

My approach, instead, was to read and try to learn from others' experience so that I didn't need to duplicate the effort of the thousands and thousands of brewers over the last 40 years. I have been drinking craft and import beers since the mid 80's, so I know a lot about beer. I brew and make educated guesses on why things are different and try to home in on things using my knowledge of what different processes and ingredients bring to the table coupled with what I'm tasting. Reading, learning, asking questions, and taking it all in with a critical eye is another viable approach.

There is a trick to learning from books/web/forums though. First, you will hear things that sometimes don't agree or are even diametrically opposed. It's like reading reviews on Amazon. You have to develop a critical eye and look for trends or common themes. I used this approach to brewing my first all grain beer, a NEIPA from my own recipe. I read hundreds of recipes and countless posts etc about how to brew them. I also asked questions about what are the big bang for the buck processes to brew great beer. Unlike many first time brewers, I had water/pH management, a yeast starter and fermentation temp control from the outset. My first beer was excellent and the third one scored a 42 at a local homebrew competition.

This approach may not work for everyone, but I can say that, unless you can brew several times a week or, for some variables, the ability to break wort up into smaller experimental batches, you'll spend a boatload of time changing one thing at a time only to potentially realize it wasn't that big of an impact.
 
One other thing, really just to emphasize part of what I just posted.

If you want to get up to speed quickly, you need to be an information junkie. I treated brewing like school. I read incessantly (like 4+ hours a day). Books, online articles, this forum. I asked questions, read the responses. I kept notes. I keep a detailed diary of each beer I brew and I also have a bunch of information on ideas, thoughts, ingredient notes, etc that I've accumulated over the years to help me retain and access as I'm building recipes or working through other aspects of brewing.

I have notes on hops...flavors, relative flavor strength, etc that I put together not just from my brewing, but from drinking single hopped commercial beers and others' homebrews.

I have a document full of notes on what goes into great NEIPAs. One for big, chewy stouts (which I love). This is my database of information and it grows almost daily as I still read and research constantly.

Another example is an article I found on IBUs. Many use a simple abv/ibu ratio. I found a white paper that uses OG-FG and IBUs and has a list of value ranges by style. I saved the article, created a spreadsheet to quickly implement it's ideas and brewed some beers using it. I really like the results, so it has become a mainstay of my recipe creation.

Beer is great. Brewing is fun and rewarding. Learning and improving is addictive. Having friends request that you re-brew beers that you've brewed in the past is awesome.
 
I would agree with those who extol the virtues of starting with simple recipes and focusing on the process. Try to pick a style you like and drink frequently so that you have an experienced palate when it comes time to evaluate the result. Really get the process down so that you're comfortable with the mechanics of brewing, sanitation, etc.

One place I'll differ from others is the idea of only changing one thing at a time. As an engineer with a strong science background, this pains me to say, but the reality is that you could literally spend decades trying to learn that way. There are so many variables in ingredients, process, timing, temps, etc, and the time span needed for each "experiment", coupled with the fact that you can only drink so much beer, renders this approach untenable for me. I'm 55, I want good beer now, not 30 years of brewing trying to get there.

My approach, instead, was to read and try to learn from others' experience so that I didn't need to duplicate the effort of the thousands and thousands of brewers over the last 40 years. I have been drinking craft and import beers since the mid 80's, so I know a lot about beer. I brew and make educated guesses on why things are different and try to home in on things using my knowledge of what different processes and ingredients bring to the table coupled with what I'm tasting. Reading, learning, asking questions, and taking it all in with a critical eye is another viable approach.

There is a trick to learning from books/web/forums though. First, you will hear things that sometimes don't agree or are even diametrically opposed. It's like reading reviews on Amazon. You have to develop a critical eye and look for trends or common themes. I used this approach to brewing my first all grain beer, a NEIPA from my own recipe. I read hundreds of recipes and countless posts etc about how to brew them. I also asked questions about what are the big bang for the buck processes to brew great beer. Unlike many first time brewers, I had water/pH management, a yeast starter and fermentation temp control from the outset. My first beer was excellent and the third one scored a 42 at a local homebrew competition.

This approach may not work for everyone, but I can say that, unless you can brew several times a week or, for some variables, the ability to break wort up into smaller experimental batches, you'll spend a boatload of time changing one thing at a time only to potentially realize it wasn't that big of an impact.

I'm a scientist, and find the above interesting. Agree that if all you can do is change one variable at a time, you're going to be at this a while.

The downside is when you change multiple things and it doesn't work, to what do you attribute the result? No way to separate multiple causes. Drives me nuts as a scientist because the essence of causal experimenting is....control of alternative explanations.

My approach, which I think is similar to yours, was to identify what is generally seen as best practices, and adopt them. That got me to good beer in a relative hurry, at which point the change one thing approach was much more fruitful.

And there are some things I do based on....wait for it...reading a lot of stuff and forming an opinion/conclusion. I oxygenate my starter wort from that analysis, for instance. I pour in the whole starter, too (same thing). Limiting oxygen pre-boil and post-fermentation also came from that.

I don't think I've ever put in 4 hours a day reading books, but I suspect there have been many days when I spent that much time or more reading HBT and other online sources.

Yep, I struggle with it too, but I'm not as disciplined as you. I don't think I've ever brewed the same recipe while changing only one thing. It certainly helps develop clear cause/effect relationships, but there are still way too many variables. Just for NEIPAs alone, there's chloride/sulfate ratio and actual amounts, pH, base grain options (pilsen, brewers malt, pale ale, marris otter, golden promise, just to start), with/without flaked wheat, with/without flaked oats, with/without carapils, a dizzying array of yeasts, mash temp, hop additions (early & late boil, different temps and durations of WP hops, different amounts of dry hops at different times with different durations, all multiplied by the huge array of hop options and combos and how you blend those combos), with cold crash, without, different fermentation temps...on a per yeast basis.

The sheer number of combinations is insane. You could literally spend a lifetime trying different things, changing one at a time. Even then, there may be a change that, on its own, isn't very satisfying, but when coupled with another change that isn't all that on its own, becomes magic...and that's just with NEIPAs. Now add in another mulitplier with different styles and the elements that drive them and it becomes staggering. Especially for me, since I only brew once a month at the peak and I'm down to about once every other month now as I'm trying to lose my beer belly. I give most of my beer away these days just to try to get down to a reasonable weight.
 
Back
Top