• Please visit and share your knowledge at our sister communities:
  • If you have not, please join our official Homebrewing Facebook Group!

    Homebrewing Facebook Group

Welding questions

Homebrew Talk

Help Support Homebrew Talk:

This site may earn a commission from merchant affiliate links, including eBay, Amazon, and others.
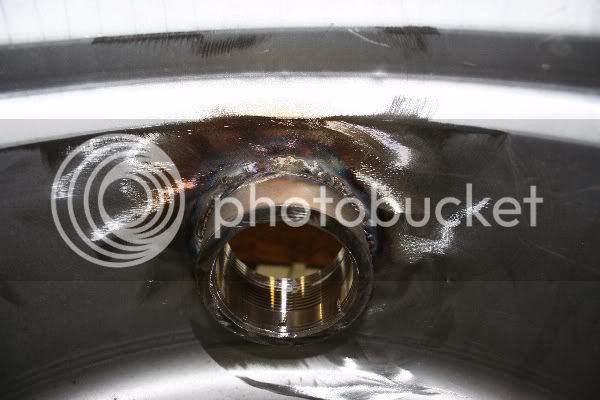
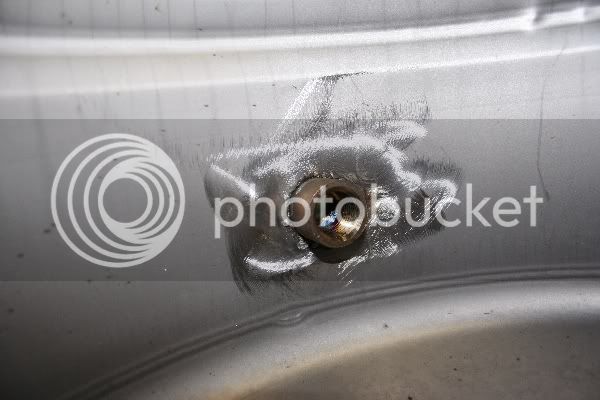
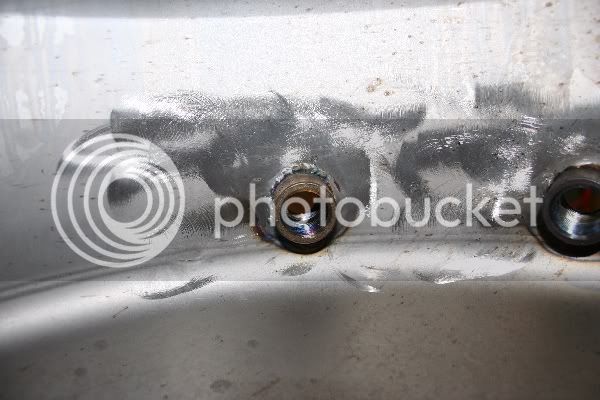
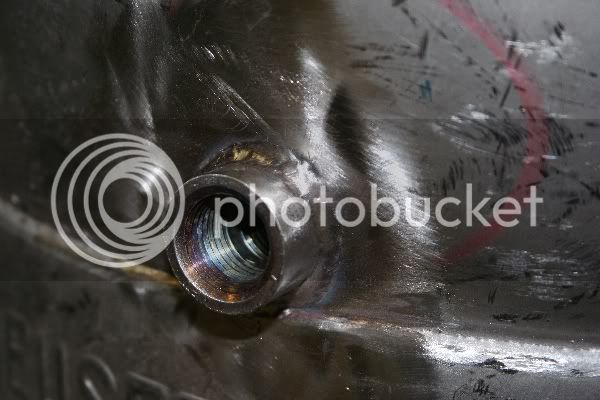
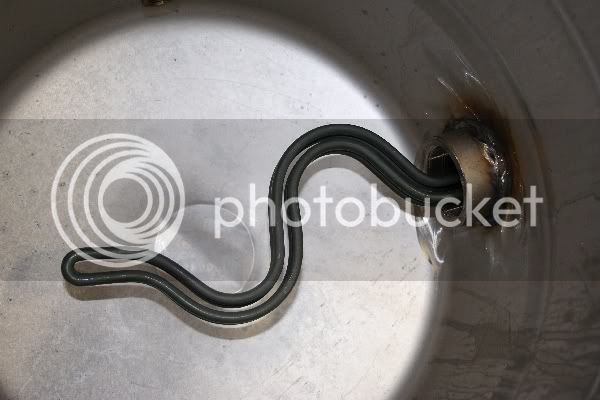
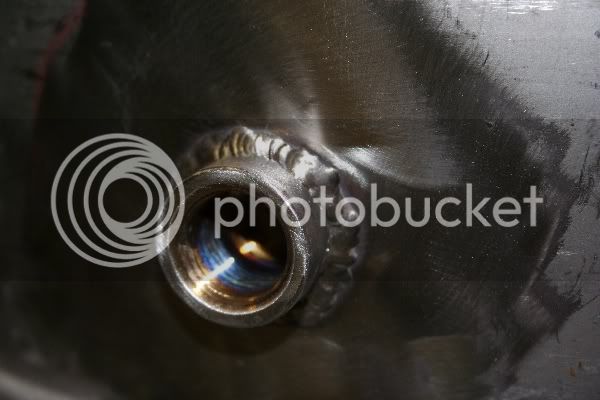
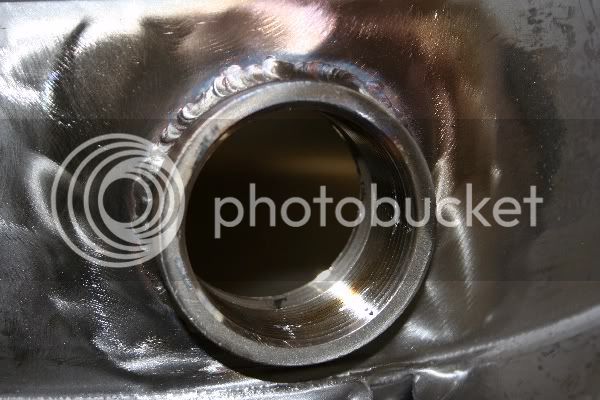
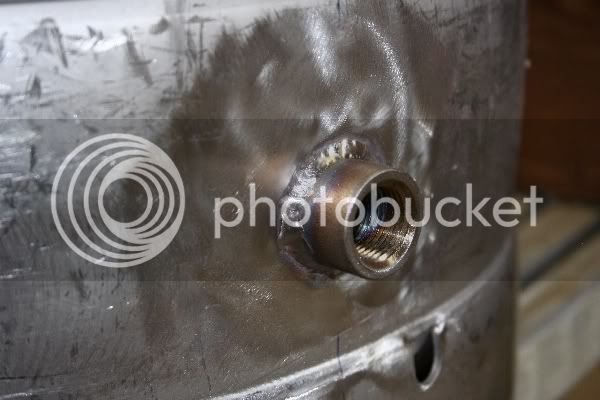
I picked up the last two kegs from the welder yesterday and I'm gonna post the last round of pictures. These two kegs had 5 couplings welded in each one. They each had a 2" coupling and 4, 1/2" couplings. They are not perfect, I sure would have liked to have Swagman or GreenMonti do these. However, they are done. And I think I did really well on the cost... He basically charged me $10 per coupling and he put the holes in the kegs (I supplied the couplings). Here are a bunch of pictures of the welds, inside and out.

Inside1-1.jpg


Inside1-2.jpg


Inside1-3.jpg


Outside1-2.jpg


InsideElement.jpg


Outside1-4.jpg


Outside2-1.jpg


Outside2-3.jpg
 
Ed,

Congrats on getting the plug out of the coupler. Doing the surgery like you did and others mentioned, I wouldn't have thought of. Well done.:mug:

It looks like he was trying real hard to make it look good. The welds are inconsistant. The guy needs to slow down.

So that's it. Your done with the welding of your kegs right?
 
GreenMonti,

Kegs are done!

Well, I didn't have him weld couplings for a herms coil in the HLT like I planned. I was gonna add a herms coil just in case, but decided to hold up at the last minute.

Now I just have to decide on a stand. Being that this thing will be electric, I think the options are pretty wide open.

Thanks for all your help and guidance.

Your very welcome for anything I may have added.

Are you hinting at doing a wood stand? You have that stick unit, you could weld up the stand yourself. Get some small rod and go for it.

Any reason why you backed out on the HERMS?
 
Your very welcome for anything I may have added.

Are you hinting at doing a wood stand? You have that stick unit, you could weld up the stand yourself. Get some small rod and go for it.

Any reason why you backed out on the HERMS?

I have thought about welding a stand and that may be it. But, I really don't know... Since I don't have to worry about fire, I can use anything that will hold up the weight, put up with a bit of heat and is easy to clean right?

I build a RIM's heater and I'm very happy with it. I was gonna add the Herms coil for experimenting.

Ed

I have seen your RIM's and it is a very nice piece.

Yea, I think you get to build with what ever you want to.
 
Iron! You got the welder, you gotta use it. You know you want to.

Na just BS'ing. From the looks of things you'll come up with something nice either way. Look'in good.


I just want to add, this has been a good thread. Lot of good info in this one. Thanks for starting it.
 
Iron! You got the welder, you gotta use it. You know you want to.

Na just BS'ing. From the looks of things you'll come up with something nice either way. Look'in good.

I really haven't got to the point of thinking about the stand to much. My original thought was of course doing something with metal. Then I used polyurethane insulation on my MLT's maiden voyage and realized heat is not a huge issue and I have a lot of options for a stand.

I just want to add, this has been a good thread. Lot of good info in this one. Thanks for starting it.

Thanks for the complement. I appreciate all I got out of this thread. So I really feel I'm the one that owes the thanks to you all!!

Ed
 
You guys have thrown a wrench in my spokes. I was following and going HERMS, now it looks like people are switching to RIMS.:confused: I've never tried either one......oh well it's HERMS for me.
I thought your kegs looked ok. Instead of thinking they could have been better, I look at it as could have been much worse. Great thread and the teachings will continue each time it makes it back to the front by someone. Keep us posted on the RIMS build.

Well... I have a HERMs coil that I used one time. I built it to hang in a direct fired kettle. It has valves to control the amount of flow through the coil or by-pass. The problem that I had was controlling the temp of the water in the kettle. I was using propane to heat and it was a PIA, constant adjusting flame & flow. If you have it in your HLT, there is a significant volume of water that has to heated / cooled to change the HERMS temp which takes time. Or you need a separate dedicated vessel with a smaller volume.

In a nutshell, the RIMS heater holds about a quart of liquid (I haven't actually measured it). You can VERY rapidly change the temp of that volume. Then, depending on flow through your mash, I think you have almost 100% heat efficiency.

Having a controller monitor the output temp of the RIMs pretty much guarantees no scorching.

Ed
 
I agree with the RIMS. I started my build with a 3 tier nothing special. Now I have multiple pumps, a bunch of tri clovers, HERMS coils, yada, yada, yada. I was changing before ever using. I'm going to try it, maybe I won't like it and go back to basics. If I had it to do over, it would be a stainless 2 tier RIMS. I guess hind sight is 20/20. Brewing education is a dangerous thing. :D
 
I read through this whole thread then got in contact with GreenMonti and decided to have him weld up my keggles. Here is the thread of his welding.
 
Congratulations...

I'm sure they are outstanding.

Today I found two pinholes in one of the couplings I had welded... Had the keg all cleaned up and put together, doing the "sea trials" (to steal Swagmans line) and found a couple drops where they definitely should not be. So now I get to break it back down and haul it back to the welder.

Ed
 
oh dang that does suck. I'm sorry you have had to go through all of this but for what its worth, you taught me a good lesson on looking for the right man for the job.
 
Congratulations...

I'm sure they are outstanding.

Today I found two pinholes in one of the couplings I had welded... Had the keg all cleaned up and put together, doing the "sea trials" (to steal Swagmans line) and found a couple drops where they definitely should not be. So now I get to break it back down and haul it back to the welder.

Ed


Ed,

It was very disappointing to read this the other day. Did you make it back to the weldor yet?

Out of courisity, was the welds leaking from a pin point in the end of the weld? If one doesn't "tail" out on their heat at the end of a weld it will leave a crater or a pin hole. Just interested if that is where the leak is.

This is a shot of my welds just after welding. I marked the area where you can see my "tail" out of the heat.
P1010130-1-1.jpg
 
Ed,

It was very disappointing to read this the other day. Did you make it back to the weldor yet?

Out of courisity, was the welds leaking from a pin point in the end of the weld? If one doesn't "tail" out on their heat at the end of a weld it will leave a crater or a pin hole. Just interested if that is where the leak is.

This is a shot of my welds just after welding. I marked the area where you can see my "tail" out of the heat.

I was pretty disappointed too...
In one spot it looked like a hairline fracture across the weld. The other spot may have been the end of the weld, to be honest I didn't pay attention to the "weld puddles".

I took the keg back to the welder (I quit using the term Weldor in this case)on Tuesday and picked it up on Wednesday. He said he tried to weld over the problem area and the crack got even larger... said he had no idea what the problem was. So he heated the area all around the coupling (turned about a 3" diameter area blue) and was able to get it to weld.

I brought it home, re-assembled the fittings and filled it with water... darn if there aren't two new leaks!!! I let it sit with about 10 gallons of water and checked the other couplings. Found a leak in one other coupling as well. Keep in mind, these are tiny leaks... maybe 3 minutes for a drop to actually form. So, I disassembled it once again. I filled the other two kegs he welded just to double check... no leaks in them.

I took the keg back for a second time yesterday. I took two new couplings and told him maybe it was contamination that was causing the problem?? I told him it was his option if wanted to cut them out and start over.

I should have it back this afternoon. I'm pretty disappointed that at this point I have to have my fingers crossed and "hope" it doesn't leak. This time I will probably just tape and screw in some plugs to check for leaks instead of going through the hassle of installing and aligning the fittings.

Ed
 
+1 on the plugs. I'm going to guess that he didn't have them clean enough. I wonder what his filler is? Isn't this how things go. You spent the time to educate yourself, and others, and of couse this would happen. I hat it for you and I hope it gets cleared up. GM may be able to tell you what happend.
 
I was pretty disappointed too...
In one spot it looked like a hairline fracture across the weld. The other spot may have been the end of the weld, to be honest I didn't pay attention to the "weld puddles".

I took the keg back to the welder (I quit using the term Weldor in this case)on Tuesday and picked it up on Wednesday. He said he tried to weld over the problem area and the crack got even larger... said he had no idea what the problem was. So he heated the area all around the coupling (turned about a 3" diameter area blue) and was able to get it to weld.

I brought it home, re-assembled the fittings and filled it with water... darn if there aren't two new leaks!!! I let it sit with about 10 gallons of water and checked the other couplings. Found a leak in one other coupling as well. Keep in mind, these are tiny leaks... maybe 3 minutes for a drop to actually form. So, I disassembled it once again. I filled the other two kegs he welded just to double check... no leaks in them.

I took the keg back for a second time yesterday. I took two new couplings and told him maybe it was contamination that was causing the problem?? I told him it was his option if wanted to cut them out and start over.

I should have it back this afternoon. I'm pretty disappointed that at this point I have to have my fingers crossed and "hope" it doesn't leak. This time I will probably just tape and screw in some plugs to check for leaks instead of going through the hassle of installing and aligning the fittings.

Ed

Oh boy......

As others have mentioned, I believe the issue with the cracking is due to dirty weld area. The cracks need to be ground out to get all the crap out of there that the weld isn't liking. This could be from a few different things. Poor prep on the "welder's" end ie...dirty, oily, hands or gloves. It could have been from not keeping the filler rod in the gas zone. It could be from not enough gas coverage on the torch side. I don't think it is a filler issue, unless he just blatantly isn't using good filler.

I would use a nice and small carbide to grind the area out and clean the surface around the trouble area to tie into, then put the gas on the back side and fill just the little area up washing the puddle to the clean outer area. Tail off the heat so you don't leave a crater and it should be good.......I fear that the torch move might have done more harm then good. The more "hard" a material is, the more difficult it is to weld without cracking. The more heat, the more crap you put in, the harder this is going to be to fix. If you can tell him to grind out that area he will be a lot better off being able to fix it. I hope he didn't forget to use the back gas on these repairs he is doing?

I agree with the above statement on the fact that "HE" should be checking them for water tightness. It wasn't a secrete as to what you were going to use them for. I check all mine and I also make sure that a fitting can still be screwed in from either side of the coupler, just in case I need to run a tap through one. I have never had the need but....

I hope he gets it taken care of for you and you can be done with this. I also hope it doesn't come down to needing a patch to fix it.

Good Luck.

Edit: I know I sound like a "clean" freak sometimes in my posts in other threads about weld prep. But this is a good reason why. If you are diligent about your prep and can rule it out right off the bat "IF" the need should ever arise with one of your welds. Look at the last pic I posted of my weld. There is nothing in that weld. Nothing on the surface, no carbon streaks, no mill scale looking stuff.
 
Damn what a PITA. He should be water testing them after welding on them. I'd take some plugs with me next time. Bummer.

He has the keg now, but not plugs. Last time he had a SS plug, he welded the coupling with the plug in it and got a 2" plug stuck to the point I had to cut it out, (even after I told him to only put in in 1 or 2 threads... I figured if I took it back to him, he would just put a pipe on the end of a wrench and torque it out ruining the threads) so I didn't really trust him with the plugs. I left him with 1 brass plug so he could back gas. Maybe he will find a way to plug and test, but I will test when I get it home anyway.

Got my fingers crossed.

Ed
 
Ed, how was the fit on the couplers?

It doesn't take much of any kind of a gap (just a couple thousandths is all) to have the back gas come through the weld zone creating a lot of havoc on the torch gas. The turbulence is such that O2 is pulled into the weld zone.
 
Ed, how was the fit on the couplers?

It doesn't take much of any kind of a gap (just a couple thousandths is all) to have the back gas come through the weld zone creating a lot of havoc on the torch gas. The turbulence is such that O2 is pulled into the weld zone.

He put the holes in and fit the couplings so I don't know.
If you remember, I made one hole and turned half of one of the couplings... that one fit fairly tight (but that's not the one leaking).

A soon as I saw the blue metal where he heated it, my heart sank... that did not seem like the right thing to me. I took the "coffee can purge" back to him and it looked like he back gassed the first repair, hope he does the same again.

My fear is that every time he touches one of these, it's one more chance for him to mess it up (instead of a chance to fix it).

Got my fingers crossed... hoping karma is on my side.
 
Talked with the welder this afternoon... sounds like karma is not on my side.
He said they ended up welding a patch over one of the holes and re-setting the coupling. That one is leak free (he said they water tested).

He said they are still struggling with the other one... He said he thinks there is a difference in the composition of the kegs??

Said they fashioned some kind of seal for the top, plugged all the couplings and purged the entire keg with argon, and were still having problems. He threw out that they had wasted $60 worth of argon. I asked if they were trying to weld while the keg was pressurized, he said "no".

He said he'd like to keep the keg over the weekend and finish it Monday.
Fortunately I have plenty to do, so it's not holding me up.

At this point I'm pretty bummed... we'll see what happens Monday.

Ed


Ed
Just a guess on my part but a few years back I ran into a problem with pin holes on a weld project. These where very very small in size. I tried everything I could come up with. Even turn the weld down on the lathe and rerun a bead and pressure test and the hole was in the same place. I run into a friend who has been tig welding longer than I can remember, I asked him for a solution, now this guy will give you an answer maybe not the correct one but you will get an answer. He said too much gas flow on the weld. So the next day argon turn down and I ran a bead same thing pin hole. I went on to do something else when it hit me the problem got worse than before. Took some new material turned up the gas ran a bead and pressure tested and no problem. The problem was not enough flow onto the weld and I was gettin O2 into weld. I found when I got a pin hole they where a bear to flow over and get a seal. Another problem is with some of the china metal is high in carbon and foreign material. Couplers are casted and some are pretty bad. Not sure this will help but Greenmonti is correct about a tight fit is a must. They might be getting blow by again just a guess.

The couplers I weld I turn down on the lathe to half length to one inch plus and where I'm going to weld I clean that area up also. My opinion is when things. are cast the foreign material will rise to the top so a little turn down don't hurt. Just my opinion.

Swagman
 
Talked with the welder this afternoon... sounds like karma is not on my side.
He said they ended up welding a patch over one of the holes and re-setting the coupling. That one is leak free (he said they water tested).

He said they are still struggling with the other one... He said he thinks there is a difference in the composition of the kegs??

Said they fashioned some kind of seal for the top, plugged all the couplings and purged the entire keg with argon, and were still having problems. He threw out that they had wasted $60 worth of argon. I asked if they were trying to weld while the keg was pressurized, he said "no".

He said he'd like to keep the keg over the weekend and finish it Monday.
Fortunately I have plenty to do, so it's not holding me up.

At this point I'm pretty bummed... we'll see what happens Monday.

Ed

There is no composition difference. He is the composition difference. I would bet the patch isn't welded on the inside either. I am not so sure I would be happy with the patch. Who knows what material they used for the patch and what the inside looks like. The old hole should be sealed off with a weld IMO. Depending on the patch size, that's a lot of room for liquid to set around. Boiled or not.

There must be pressure or the purge is pretty much useless. There only need be a whisper of gas coming out, but that is pressure.(technically) What I mentioned in the other post is enough pressure to cause upset on the torch end of things. I would be REALLY upset if they hadn't asked me if it was ok to weld a patch on my keg. Did they call you and ask?

I am pretty bummed for you.
 
Sounds like a lot of gap in the weld and pulling the arc out in the weld zone instead of tailing of on the side of the keg away from the main puddle. We have always called that the pull out as***le as it leaves a nice round crater in the weld to leak for you.
 
Swagman & GreenMonti - Thanks for the feedback, I feel real helpless with this one. I'm afraid this problem is about to beat this guy and this might get ugly. He did not ask me about welding a patch on the keg (he did say they used a piece of 16g stainless). I can only hope he did a decent job with the patch. He did mention he used a bunch of gas and my fear is that he is setting the stage by trying to convince me the kegs are different that this is somehow my fault. I know he is trying to run a business and make money and I'm sure he hates looking at these kegs as much as I hate dropping them off.

The leak was so small, I thought about trying to silver solder it myself (been following that thread) or just sealing it with silicone. But I know as soon as I touch it, it becomes my problem and decided to try to get it finished the way I planned from the beginning.

Maybe karma will be good to me over the weekend.
 
A leak of any size is a leak. You idn't have the poject done to have a leak. He obviously isn't a stainless welder. I really feel bad for you. I hope things work out. I agree with what GM said, he is the problem.
 
Back
Top