Welding 101 = Fun Brutus Build

Homebrew Talk - Beer, Wine, Mead, & Cider Brewing Discussion Forum

Help Support Homebrew Talk - Beer, Wine, Mead, & Cider Brewing Discussion Forum:

This site may earn a commission from merchant affiliate links, including eBay, Amazon, and others.
Thanks for the pics and plans, I am in the process of building one myself :mug:

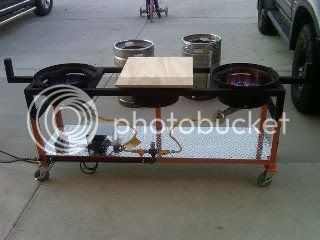
This was after 5 hours last night. None of the 3 of us building it are welders, hopefully it holds up :eek:

stand_resize.jpg
 
Just got mine done as well. First time welder. The welds don't look terrible. Hopefully I got enough penetrateion... haha penetration :ban: guess time will tell. Going to primer it and paint this week. Then I'll have to buy the casters and burners.
 
First, I absolutely love your stand. I would like to do something very similar. If you don't mind, could you tell me what all went into your gas set up (i.e. size pipe, fittings, valves, etc.)? That is the one item that I just can't seem to get a grasp of.

Thanks in advance!
 
First, I absolutely love your stand. I would like to do something very similar. If you don't mind, could you tell me what all went into your gas set up (i.e. size pipe, fittings, valves, etc.)? That is the one item that I just can't seem to get a grasp of.

Thanks in advance!

page 15-16
 
So here is the progress so far. Believe it or not the weld I'm posting is my average weld and is an improvement over my first ones LOL. :D

Try to get ten beads in each inch. count them as you go and try to get them tight. You should be trying to use a small flick of your wrist. Just doing this will make you a lot better welder.
 
brewstand.jpg


Not the best photo but I am almost done with the project. I just need to fine tune a few things. Thanks for the help and inspiration.
 

Its the consistent high temp that kills any paint.
I use this on automotive headers: [ame="http://www.google.com/search?q=VHT+Flame+Proof+Header+Paint+&ie=utf-8&oe=utf-8&aq=t&rls=com.yahoo:en-US:eek:fficial&client=firefox#q=VHT+Flame+Proof+Header+Paint&hl=en&client=firefox&hs=gMU&rls=com.yahoo:en-US:eek:fficial&prmd=imvns&source=univ&tbm=shop&tbo=u&sa=X&ei=V0nyTp7ZIuf40gGe5tjDAg&ved=0CFEQrQQ&bav=on.2,or.r_gc.r_pw.,cf.osb&fp=483154faee4a1d96&biw=1794&bih=875"]VHT Flame Proof Header Paint [/ame] Should hold up well. Heat curing works best. Its also available in color (I've only used black)
You can also look into jet hot coatings. (+2500 deg. ceramic coatings).. this is the best way but price is an issue. If you can find someone with a big oven you also powder coat it...
 
Try to get ten beads in each inch. count them as you go and try to get them tight. You should be trying to use a small flick of your wrist. Just doing this will make you a lot better welder.

Thanks for the advice Warex, although this project is long done I have a new brew space and am contemplating a new brew rig. Just designing the space layout to figure out placement. :mug:
 
I just placed an order for all my valves, fittings, pump, false bottom etc. to finish of my MLT, HLT, and BK and then off to start on the stand. I ventured to find a good design for this and nailed it when I found this thread! Thanks Yankee for documenting this for us so well. I love this stand and should work perfectly for my vision of AG brewing. I can;t wait to start the build. Luckily my father in law is a great welder and has all the equipment for that. Thanks again!!
 
awesome work. good for you taking on a project like this with the will to lean something you've never done before.
 
fwiw, I've seen rigs shown here that have used every form of paint imaginable, from barbecue paint, header paint, powder coatings and even "ceramic" paint, and every one of them eventually has failed in high heat areas.

I think the only real "cure" is to use stainless steel in high heat areas...

Cheers!
 
I built mine similar to those shown here, and the only issue I found was that the diagonal pot supports in combination with the sidebars essentially seal off the bottom of the kettle and do not allow proper combustion using the banjo burners.

Tonight I'm going to install some 1/2" round-bar steel pieces for kettle supports to let it breathe. Last night for the first brew we found out that the kettles were smothering the flames and placed some pieces of rebar under the kettle edges and that improved the performance greatly. I have seen similar input from other folks that there needs to be good airflow at the bottom of the kettles outward. I've been using these burners for about 8 years in their factory mounts, so airflow was never an issue.

IMG_2808.JPG


IMG_2823.JPG
 
How did you mount your casters on the open end of the square tube?

For mine, I didn't have open ends as I did the bottom square as 45 degree angles, but I tacked a small plate at the corner, drilled a 1/2" hole, then welded a 3/8" nut over the hole to be able to use threaded stem casters. This made the rack able to be leveled at any time.
 
I built mine similar to those shown here, and the only issue I found was that the diagonal pot supports in combination with the sidebars essentially seal off the bottom of the kettle and do not allow proper combustion using the banjo burners.

Tonight I'm going to install some 1/2" round-bar steel pieces for kettle supports to let it breathe.

Here is the first of them tonight...

IMG_2827.JPG
 
Deal alert, Northern tool MIG welder 125 is on sale for $119. I got mine online today and picked up in store.
 
Deal alert, Northern tool MIG welder 125 is on sale for $119. I got mine online today and picked up in store.


As you can tell its been awhile since Ive been on this site. But thats a great deal for anyone wanting to get in hobby welding.

I see some of my plans in use, which is a great thing!
Keep up the good work guys....
Happy Brewing!

:mug:
 
I'm in GA and can't figure out where to get steel from. The cheapest I could find it "metalsupermarkets.com" wants $122 for 10 5ft square tube steel (0.083).
 
Yeah, that's about the right price depending on the tubing size. I paid around $125 for all of my steel, 1.5" square tubing, .120 wall at a local place here in MD.
 
I bought an Eastland MIG welder with Gas and an trying to learn. I welded some stuff and hope to make a stainless stirrer for my MLT. Wish me luck!
 
Just got my welder from Amazon Friday.

http://www.amazon.com/dp/B009X43F38/?tag=skimlinks_replacement-20

Went to a local weld shop and picked up assist gas.

It is a Mig, Flux Core but I am figured worth the investment in gas for a cleaner weld. Also ordered 60lf feet of 1.5" Square Tube for a total of $90.

Just need to get a cut off wheel for my chop saw and I should be good to go building my prototype stand.

This page has been an interesting read and well timed in my discovery.
 
Last edited by a moderator:
@ Blasbrew, Got the same MIG welder just under a year ago, specifically for building my single-tier, and it's been a breeze to self-teach and begin welding with!
Mixed gas makes beautiful welds over the flux-core, provided that the material is clean enough.
Getting the miter cuts straight with the chop saw has been its own adventure.
 
Last edited by a moderator:
@Sarsnavy05, that's good to hear. I am fortunate to work in a job shop, currently training on out Laser. My employer has been pretty supportive and allowed me to use our accounts to purchase steel and welding supplies from our vendors.

The Mig tank cost me around $190 alone.

I have been using Sketchup to design, redesign and redesign my build. Once I got the hang of the software it has become very useful in visualizing not only what I want but planning out the production. When that day comes, soon I hope.

I am picking up a few abrasive wheels today for my Chop saw, still not sure how well it will handle cutting steel but I have access to two cold cut saws as well as an industrial tube cutter if it doesn't work out.
 

Latest posts

Back
Top