Son of a FastFerment Chamber

Homebrew Talk - Beer, Wine, Mead, & Cider Brewing Discussion Forum

Help Support Homebrew Talk - Beer, Wine, Mead, & Cider Brewing Discussion Forum:

This site may earn a commission from merchant affiliate links, including eBay, Amazon, and others.

lorne17

Well-Known Member
Joined
Jan 14, 2013
Messages
360
Reaction score
30
For anyone who's interested in creating a fermentation chamber for your FastFerment...here are my plans. I tried to get creative with the name, since the original SON OF A FERMENTER plans inspired me, I used that as a conceptual guide, I've just put my spin on it for FastFerment. So here's my "SON OF A FASTFERMENT CHAMBER" I'm open to suggestions before I go to cut!

Cons:
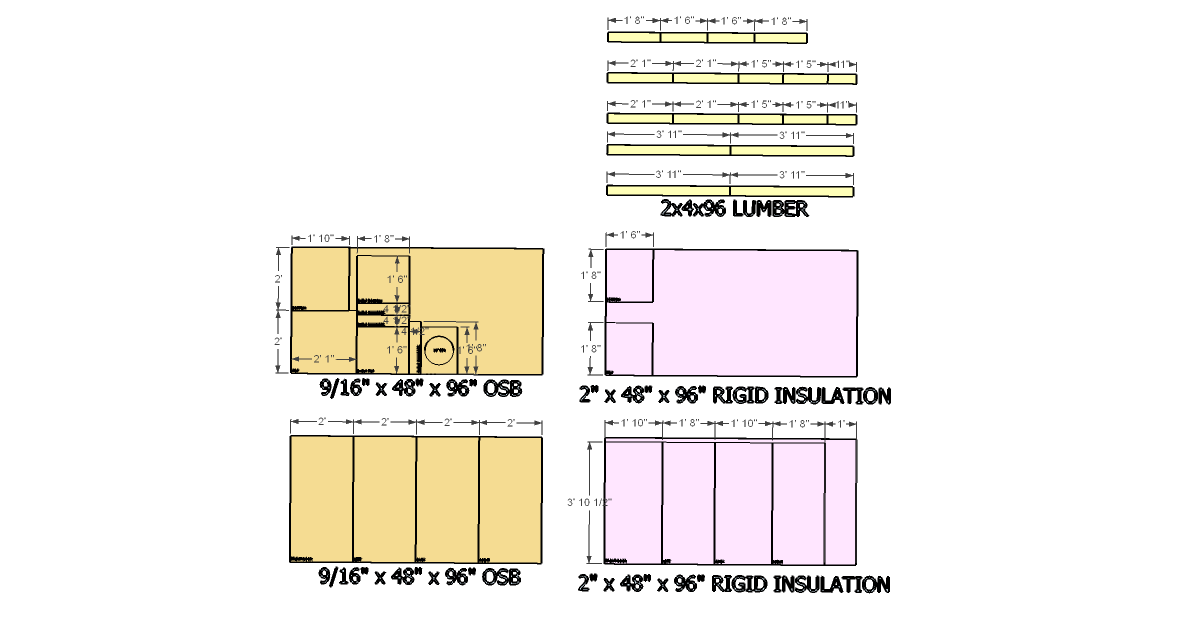
  1. I can't seem to get it any shorter to prevent the waste of the Rigid Insulation from those last two 20"x18" pieces. Anyone got any ideas? HD sells 1" Rigid 24"x 24" which would work. But if I buy 4 so I have 2 2" pieces, then I'm almost to the exact same price as a whole sheet as the 24"x24" is just under $6.
  • I also have about half a piece of OSB of waste due to the cuts :( Luckily I have some 24"x24" OSB left over from another project.

Suggestions, both good and bad, are welcomed! Even ideas of how to cut cost even lower!

Thanks,
Lorne
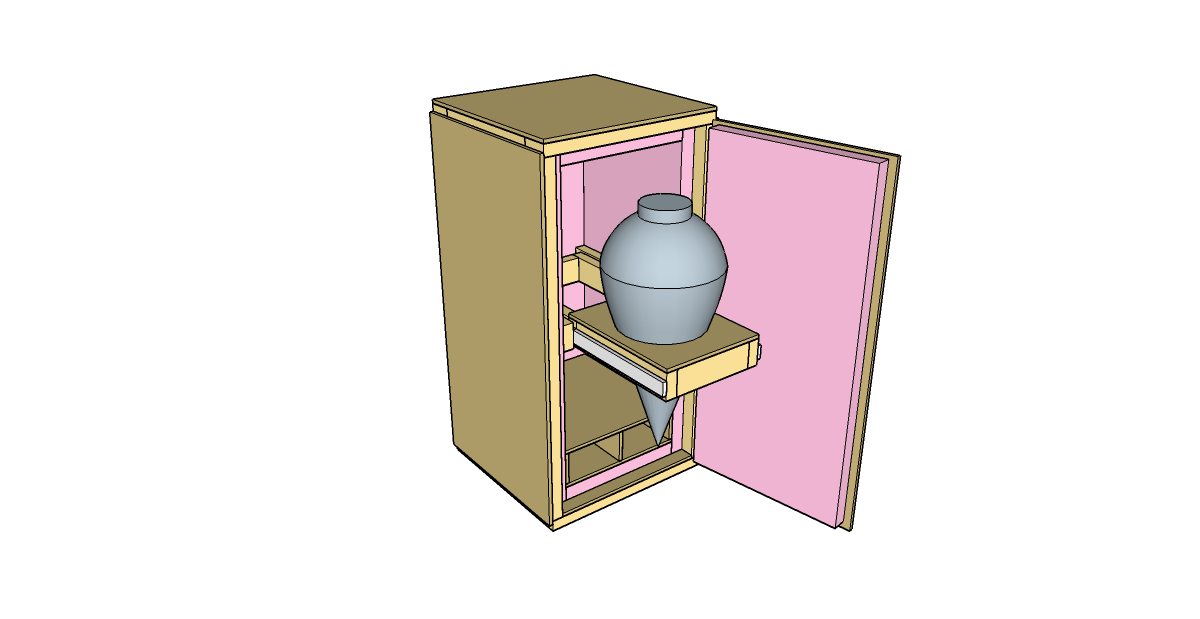
01-Assembled.png


02-Exploded.png


03-Cutlist.png
 
For anyone who's interested in creating a fermentation chamber for your FastFerment...here are my plans. I tried to get creative with the name, since the original SON OF A FERMENTER plans inspired me, I used that as a conceptual guide, I've just put my spin on it for FastFerment. So here's my "SON OF A FASTFERMENT CHAMBER" I'm open to suggestions before I go to cut!

Cons:
  1. I can't seem to get it any shorter to prevent the waste of the Rigid Insulation from those last two 20"x18" pieces. Anyone got any ideas? HD sells 1" Rigid 24"x 24" which would work. But if I buy 4 so I have 2 2" pieces, then I'm almost to the exact same price as a whole sheet as the 24"x24" is just under $6.
  • I also have about half a piece of OSB of waste due to the cuts :( Luckily I have some 24"x24" OSB left over from another project.

Suggestions, both good and bad, are welcomed! Even ideas of how to cut cost even lower!

Thanks,
Lorne

So did you ever build this? If so, how is it working? Can we get some pictures?
 
Hey Team,

I did in fact make it! It's bad a$$ with the full extension drawer etc. The only catch, I haven't used it yet. I know, I know, super embarrassing, but with a toddler and newborn I haven't had time to brew since last November! :smack: So I can't speak to how well the temperature works. I'm thinking of making this swamp cooler though on the bottom of it if I need to keep the temperature down. http://www.instructables.com/id/DIY-baby-swampy-small-evaporative-cooler/ It'll be a trial and error basis, but I need to brew in order to trial it up!

But here's a quick shot of it when it was 95% complete, I'll get more pictures for you all soon! I ended up with a bit smaller rigid insulation as it was cheaper and foil faced. I think the R-Value was a bit lower, but not by much. Thanks for following up and asking about it!

Lorne

IMG_0872.jpg
 
@lorne17 Looks great. So all the dimensions on your plan are correct? I would like to use and modify the plans. I have a small dorm fridge that I will incorporate into it to use for cooling. I really like the pullout draw. How is it with balance when the FF is full? No fear of toppling over when pulled out like it is in the picture?
 
Awesome Job! Looks great.

My Fermenter for my Fast Ferment isn't nearly as interesting. It's an upright freezer with temp control. The Fast Ferment stand stand on the bottom shelf, I took all other shelves out.

Dan
 
Thanks Dan,

Honestly it's been awhile since I've finished it. But as far as I remember yes all the measurements worked. I used some extra OSB i had for the top and bottom so that I didn't have to buy a whole separate piece. But I suggest just measuring everything as you go in case something did change or as you walk through it you may want to tweak it as you make it.

let us know how it goes! Can't wait to see pics!

Again, I'll try to take pics soon. Been busy with work and a newborn!

Lorne
 
Kicking up an old thread but I now have finally cleaned everything and put water in it overnight looking for leaks. I plan to brew today. I haven't brewed since thanksgiving of 2015!

But to answer your question no it doesn't topple over with 5 gallons in it when the drawer is extended. See pics. I did push down on it and it will topple but I had to put a lot of weight on the drawer. Let's just say the entire thing isn't light!

Also @TorMag, I saw your other post about filing and sanding the plastic mold seam (from manufacturing) to help the threads and connections. I just cut the top mold off. Do you suggest I get it all cut off from all the treads? I can exacto/file it. Or just use my dremmel. Since you have done this what do you suggest? I'd like to clean up during my brew so I'm ready! And make sure it's done right!

My last concern is the height it is off the ground. Does anyone have any ideas how to get the beer into the keg when it's done fermenting? I believe it's high enough for bottling but not kegging. Thoughts?

Finally, one note to make, I have to use spray foam in some of the seams between insulation. I didn't cut them perfect in two spots so I filled the gap. I also think I will put caulking along the seams to help keep condensation from getting between the insulation and getting into the wood. Could get nasty overtime!

Thanks all,
Lorne

View attachment ImageUploadedByHome Brew1483799625.123169.jpgView attachment ImageUploadedByHome Brew1483799638.195300.jpg
 
Kicking up an old thread but I now have finally cleaned everything and put water in it overnight looking for leaks. I plan to brew today. I haven't brewed since thanksgiving of 2015!

But to answer your question no it doesn't topple over with 5 gallons in it when the drawer is extended. See pics. I did push down on it and it will topple but I had to put a lot of weight on the drawer. Let's just say the entire thing isn't light!

Also @TorMag, I saw your other post about filing and sanding the plastic mold seam (from manufacturing) to help the threads and connections. I just cut the top mold off. Do you suggest I get it all cut off from all the treads? I can exacto/file it. Or just use my dremmel. Since you have done this what do you suggest? I'd like to clean up during my brew so I'm ready! And make sure it's done right!

My last concern is the height it is off the ground. Does anyone have any ideas how to get the beer into the keg when it's done fermenting? I believe it's high enough for bottling but not kegging. Thoughts?

Finally, one note to make, I have to use spray foam in some of the seams between insulation. I didn't cut them perfect in two spots so I filled the gap. I also think I will put caulking along the seams to help keep condensation from getting between the insulation and getting into the wood. Could get nasty overtime!

Thanks all,
Lorne

View attachment 383547View attachment 383548

Glad to hear back from you on this. I would not hit with the dremel if you have files to do it with, it's not that much work. I thought about using my dremel but did not want to chance f-ing it up. I would clean the flash lines up on the threads on the lid screw for sure. I did both the lid and the ball threads.

I plan on using your plans with the exception of adding a mini fridge to the bottom back to provide the cooling. I have my conical mounted on the wall at the height to slip a keg underneath. If I was you, I would figure a way to mount the brackets on the top sticking forward, that way, when it is time to keg, you can lift it up out of the draw to the brackets above and then push the draw back in... Just a thought.
 
Glad to hear back from you on this. I would not hit with the dremel if you have files to do it with, it's not that much work. I thought about using my dremel but did not want to chance f-ing it up. I would clean the flash lines up on the threads on the lid screw for sure. I did both the lid and the ball threads.


I plan on using your plans with the exception of adding a mini fridge to the bottom back to provide the cooling. I have my conical mounted on the wall at the height to slip a keg underneath. If I was you, I would figure a way to mount the brackets on the top sticking forward, that way, when it is time to keg, you can lift it up out of the draw to the brackets above and then push the draw back in... Just a thought.


Good call on the dremmel. It would be overkill and may screw it up for good.

However I did notice one thing: last night the connection at the base of the conical fermenter had leaked VERY SLOWLY. but nevertheless there was collected water on top of the gray connector. I took a closer look when filing and there are two vertical grooves the length of the threads. Take a look at the image I took (I used my new macro lens from my iPhone attachment and holy cow it can get in close!!). I think these vertical "channels" are causing the water to run right through. I may use plumbers putty to help seal it vs just the tape. Thoughts?

Does yours have these grooves?

I also got some more foam craft paper to put in the lid. The ring it comes with is a joke IMO.

Thanks,
Lorne

View attachment ImageUploadedByHome Brew1483824934.817167.jpg
 
Mine does not have those groves. If I was you, I would contact customer service and show them that photo. They have very good customer service. I have a sheet of the craft foam to sitting on my desk waiting for me to make extra gaskets.
 
Mine does not have those groves. If I was you, I would contact customer service and show them that photo. They have very good customer service. I have a sheet of the craft foam to sitting on my desk waiting for me to make extra gaskets.

I will see how this batch goes. I put plumbers putting or that thread sealant on the connection. My beer has been fermenting overnight, so I hope it works. Wither way, after first brew I may return it so I don't have to worry about it being an issue overtime.

Thanks,
Lorne
 
Quick question, I just took off the collection ball and emptied it. Resanitized it, filled it with CO2, then reconnected it. Once I reopened the valve the CO2 didn't RISE to the top. Should I sanitize my spoon and stir up the yeast a bit to have it fall into the ball?
 
For anyone who's interested in creating a fermentation chamber for your FastFerment...here are my plans. I tried to get creative with the name, since the original SON OF A FERMENTER plans inspired me, I used that as a conceptual guide, I've just put my spin on it for FastFerment. So here's my "SON OF A FASTFERMENT CHAMBER" I'm open to suggestions before I go to cut!

Cons:
  1. I can't seem to get it any shorter to prevent the waste of the Rigid Insulation from those last two 20"x18" pieces. Anyone got any ideas? HD sells 1" Rigid 24"x 24" which would work. But if I buy 4 so I have 2 2" pieces, then I'm almost to the exact same price as a whole sheet as the 24"x24" is just under $6.
  • I also have about half a piece of OSB of waste due to the cuts :( Luckily I have some 24"x24" OSB left over from another project.

Suggestions, both good and bad, are welcomed! Even ideas of how to cut cost even lower!

Thanks,
Lorne
For both your 1. and 2.
Check your local lumber yard for the sizes you need. I work at one and we often sell parts of osb that we will cut to size for you. The Foam insulation sheets often come in with dunage sheets on the bottom that could be free for you. We also have broken sheets that we have given away for free. Just be sure to talk to the guys inside the warehouse. They are more likely to give it away because it is a hassle to keep broken items around because of inventory.
 
Quick question, I just took off the collection ball and emptied it. Resanitized it, filled it with CO2, then reconnected it. Once I reopened the valve the CO2 didn't RISE to the top. Should I sanitize my spoon and stir up the yeast a bit to have it fall into the ball?


No need for the spoon. Just leave it be, gravity will take care of it.
 
Hi lorne17,

Any chance of a cleaner image for your OSB and insulation image? Looks like you've got labels on the lower left of the pieces but, blow it up as far as I can, they don't come clear at all. Did you do that in SketchUp?

Cheers!

Chris (who got a FastFerment for Christmas)
 
Hi lorne17,

Any chance of a cleaner image for your OSB and insulation image? Looks like you've got labels on the lower left of the pieces but, blow it up as far as I can, they don't come clear at all. Did you do that in SketchUp?

Cheers!

Chris (who got a FastFerment for Christmas)

Hello Chris,

I unfortunately don't have a picture on me. But the OSB was purchased at Home Depot. Whatever the cheapest stuff is. Honestly I wish I actually purchased plywood. I think the OSB is quite horrendous looking in my storage room next to the counter and cabinets I'm about to install by my utility sink. I'd suggest upping to whatever their cheapest plywood is. But the OSB was about $20 for 8'x4' sheet. I got the foil faced Insulation, there are no labels on it though so I can't remember the exact kind I purchased. However there is a new product on the market that is 5/16" of an inch thick and R-16 value! Super insulating and more than the 1.5" I have installed. IT's called Prodex: http://www.insulation4less.com/Insulation4lessProduct-1-Prodex-Total-48-Inch.aspx

Also yes, I used sketchup. I'm an Architect by day so I have some experience with it. But this Ferminator (That's the name I've come up with), was pretty easy to construct and model.

Hope that helps,
Lorne
 
Appreciate the info, Lorne. I'll see if the HD here in Ontario stocks that stuff. The labels I was referring to were the ones in your diagrams though...the ones that look like black squiggles on your cut diagrams. :)

Cheers!

Chris
 
Yea they should have it, it's very common building materials.

The black squiggles are merely the dimension strings. I can provide a PDF of it if you'd like?
 
Back
Top