
I've got a single tier already, and it can be hauled around using my smoker. Sometimes when using the smoker, I want to be able to boil a pot of salt potatoes, or heat up some sauce/melt some butter. And yeah, that's why we (father and I) designed the single tier to have all the brewing stuff be easily removed. But I'll be honest, sometimes it's a PITA to get that sucker up on the smoker.
To light my smoker, I have a turkey fryer burner mounted to a piece of plate. It slides under the grate in the coal chute, turn on the gas and light the charcoal. I figured I'd make a burner grate that allows me to use the same burner (since I'll have it at a tailgate anyway) once I get the smoker lit.
The company I work for is also in the process of re-imaging itself. We've gone from a hardware company to a software company. This means they have been tearing apart our huge lab, and all of the test equipment/racks. Anything that can't be resold is split up into bins, one being just metal scrap. So after checking to make sure it was cool with work, I came home with some of the angle iron/mounting pieces from a lab rack, as well as the 1U and 2U filler panels on the rack as well. hey, free metal is free metal. All I have to do is take the coating off.
I've just finished off a continuing ed "learn to weld" class as well, and took some of the "coupons" home that you weld on. The biggest problem with this class is that the machines we were learning on were 220 units that read the actual wire speed and voltage on them. My 110v Lincoln does the same, but reads voltage in letter designations from A-J and wire speed from 1-6. The two don't really correlate. So it took a while to get everything where I wanted it. As usual it was at the end that everything was working where I wanted and the welds came out looking good.
The grate is only 11" square, with two of the filler panel pieces being used to fill in the open space so the pot can't slide through. This is from underneath.

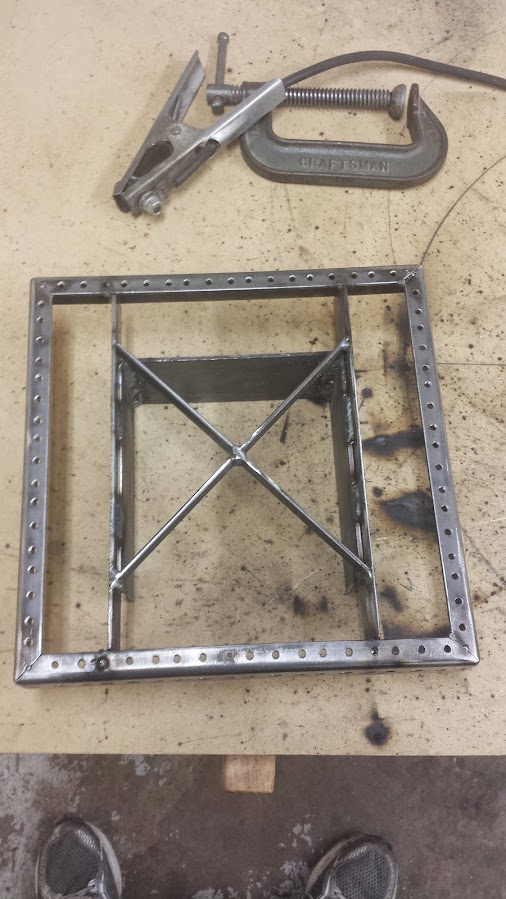
And this from the top.

Now, while this will work for my big pot to boil potatoes, I may also want to use a smaller pot to melt some butter. I had some flat bar, so I just welded in an "x" so that it would not be able to fall through the space. I also took three of the "coupons" and used them to create a wind screen.
Like I said, the welds by the end had the right amount of heat/wire speed for them. These would be the ones holding the windscreen to the two rails. The ones on the inside of the windscreen itself look like crap. But the outside weld (i did both inside and outside, I know it's overkill) were much better.

So at this point, I just have to figure out the legs. Initially I was just going to make them however high I wanted the grate off the burner, and slide the burner under the grate. Then I realized how low to the ground that would be. The plus side? it's small and won't take up too much room in the car. The downside is you have to kneel next to it or be hunched the entire time. Now, since I'm making this in lieu of using my brew rig, I could make a base that would span the area that would normally sit in (22" wide), so that it would at least get it up higher. Then I run into the problem where I now have this larger unit I have to store, and I'd have to figure out a nice solution to hold the burner at that point. So i'm still weighing my options here. I may just go with the short legs for compactability.
To light my smoker, I have a turkey fryer burner mounted to a piece of plate. It slides under the grate in the coal chute, turn on the gas and light the charcoal. I figured I'd make a burner grate that allows me to use the same burner (since I'll have it at a tailgate anyway) once I get the smoker lit.
The company I work for is also in the process of re-imaging itself. We've gone from a hardware company to a software company. This means they have been tearing apart our huge lab, and all of the test equipment/racks. Anything that can't be resold is split up into bins, one being just metal scrap. So after checking to make sure it was cool with work, I came home with some of the angle iron/mounting pieces from a lab rack, as well as the 1U and 2U filler panels on the rack as well. hey, free metal is free metal. All I have to do is take the coating off.
I've just finished off a continuing ed "learn to weld" class as well, and took some of the "coupons" home that you weld on. The biggest problem with this class is that the machines we were learning on were 220 units that read the actual wire speed and voltage on them. My 110v Lincoln does the same, but reads voltage in letter designations from A-J and wire speed from 1-6. The two don't really correlate. So it took a while to get everything where I wanted it. As usual it was at the end that everything was working where I wanted and the welds came out looking good.
The grate is only 11" square, with two of the filler panel pieces being used to fill in the open space so the pot can't slide through. This is from underneath.
And this from the top.
Now, while this will work for my big pot to boil potatoes, I may also want to use a smaller pot to melt some butter. I had some flat bar, so I just welded in an "x" so that it would not be able to fall through the space. I also took three of the "coupons" and used them to create a wind screen.
Like I said, the welds by the end had the right amount of heat/wire speed for them. These would be the ones holding the windscreen to the two rails. The ones on the inside of the windscreen itself look like crap. But the outside weld (i did both inside and outside, I know it's overkill) were much better.
So at this point, I just have to figure out the legs. Initially I was just going to make them however high I wanted the grate off the burner, and slide the burner under the grate. Then I realized how low to the ground that would be. The plus side? it's small and won't take up too much room in the car. The downside is you have to kneel next to it or be hunched the entire time. Now, since I'm making this in lieu of using my brew rig, I could make a base that would span the area that would normally sit in (22" wide), so that it would at least get it up higher. Then I run into the problem where I now have this larger unit I have to store, and I'd have to figure out a nice solution to hold the burner at that point. So i'm still weighing my options here. I may just go with the short legs for compactability.
