My itty bitty keezer

Homebrew Talk - Beer, Wine, Mead, & Cider Brewing Discussion Forum

Help Support Homebrew Talk - Beer, Wine, Mead, & Cider Brewing Discussion Forum:

This site may earn a commission from merchant affiliate links, including eBay, Amazon, and others.

mrgreen4242

Well-Known Member
Joined
Dec 30, 2009
Messages
107
Reaction score
0
Location
Grand Ledge, MI
I'm getting near the mid point of this build, so I thought it was time to post about it... The freezer is a 5cuft Kenmore (I bought a ~15cuft freezer on CLs for $75, but decided to swap around my current food freezer so it wouldn't take up so much room in the house.

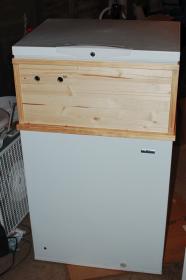
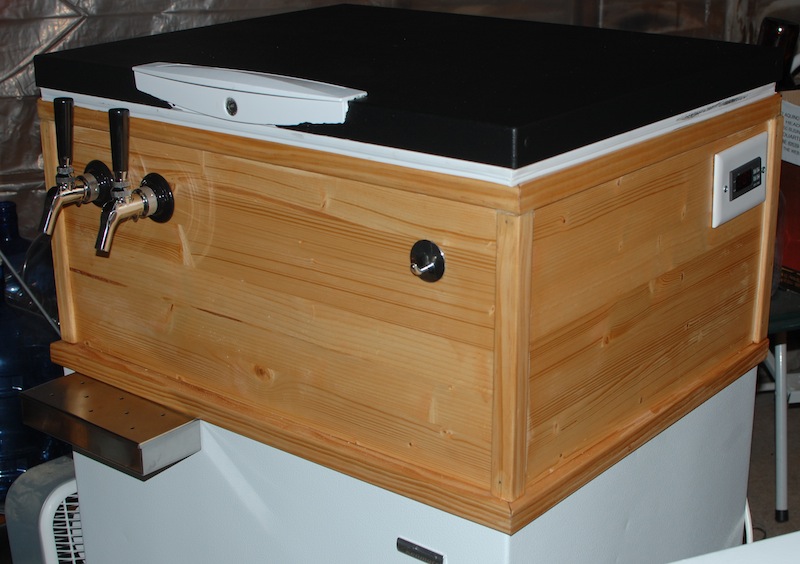
The collar is 1x12" glued spruce, which ended up being really bowed, nearly an inch of curve from edge to edge. Cie la vie. Held together with finishing nails and liquid nails. Lots of liquid nails. My carpentry skills are subpar, I had to borrow a circular saw and buy a hand miter saw for the trim. :p

The lid is getting painted with chalkboard paint, and the wood stained/poly one step in a light oak color (classic oak, or some such). The bottom trim is s silicone glued to the freezer and the collor sits on top and will be held in place by a 1x3/4" lip on the inside (probably put either some rope caulk or some weather stripping on it to form an airtight seal) so I can lift the collar off for cleaning/maintenance.

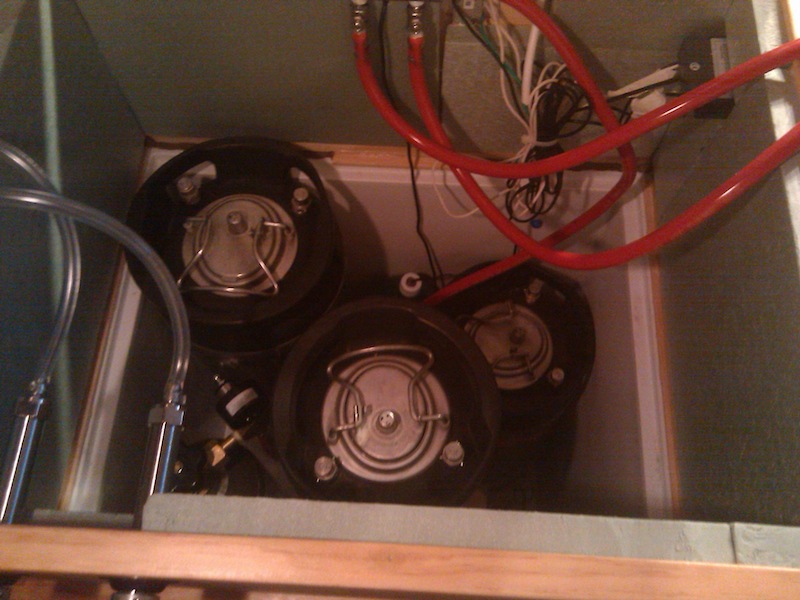
There will be two kegs/faucets in at first (currently in transit from Keg Connection - two stainless Perlicks, 5# CO2, and pin locks with all other bits) but there's room for a third in there with the CO2 tank. I had to build a little stand to extend the hump out a bit to make room for the 3rd keg. The third keg will be on it's own regulator, mostly for soda water to make mix-in-the-glass soda.

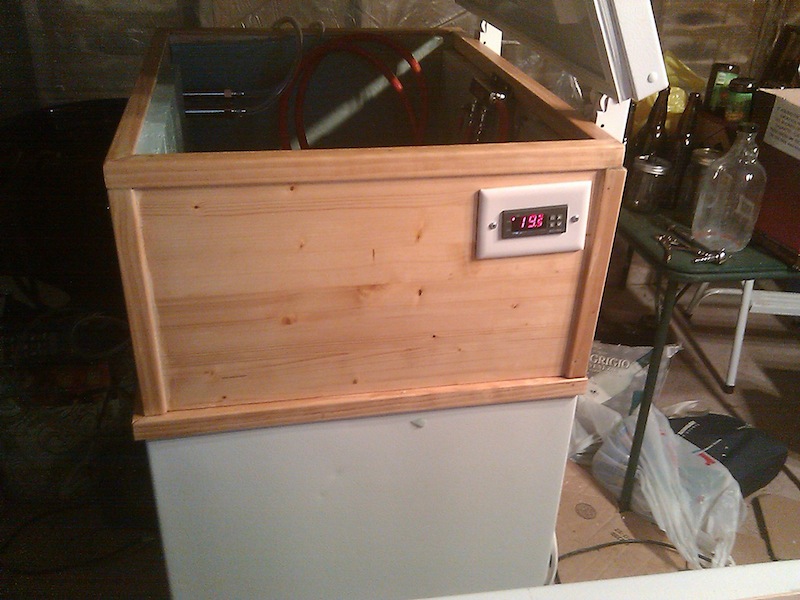
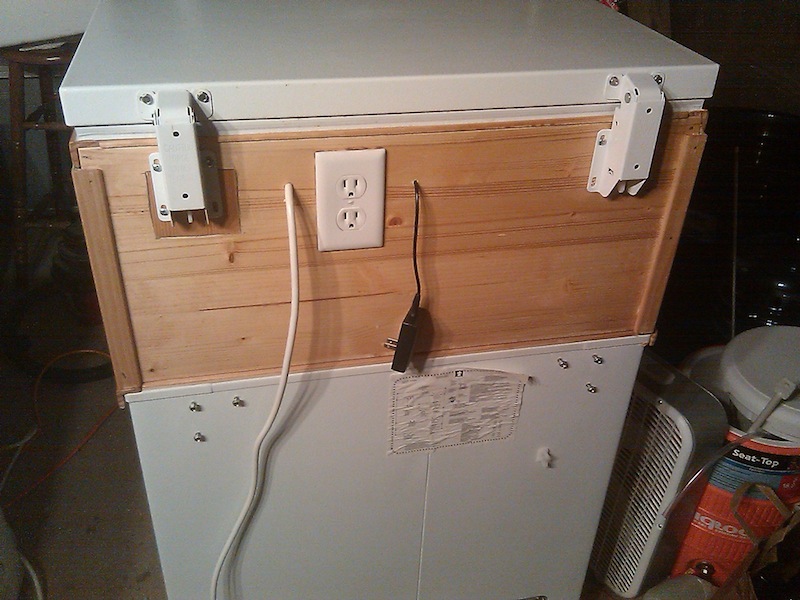
Hm, what else... I got my eBay aquarium thermostat in the mail today and I'll be mounting it on the side of the collar, with the outlet box around the corner on the back, so the whole thing (kegs, co2, thermostat) is all self contained in the keezer - it's one of the reasons I went with the 12" collar, extra space in the "head space". Oh, I have a 100mm case fan rigged up to an old cell phone charger to push cold air all the way up there. Not sure if I should run in continuously or only when the compressor is on?

Oh, also, right now I just have some 1" foam insulation (the cheap white stuff) but I'm concerned that with the size of the collar it will lose a lot of cold. Anyone have experience they want to share?

I guess that's it, I'll post updates as I move forward. I'm hoping to pour the first pint the first weekend in June!

(Crap, posted this with the HBT iPad app and I don't think I can attach pics with this... I'll add some in a moment. :( )
 
Ok, I could add them in a reply... Weird. Anyways, there it is. I'll add some photos of the inside later, if anyone wants to see the "keg stand" or the lip/electrical/kegs and reg once I install them...

image-3163552924.jpg
 
The rest of my equipment came in over the last few days. Ebay aquarium thermostat is here and wired up, kegs, reg, CO2 tank, and faucets from KegConnection arrived today. The Perlicks look beautiful, can't wait to see them install on the stained collar.

Also, I can confirm that 3 pin locks, a 5# CO2 tank and regulator all fit (snuggly) inside this little freezer (with it's big collar). If you wanted to have a dual body reg you'd have to mount it remotely from the main regulator, though. I don't think it would fit in there with both installed directly on the tank.

Hoping to get the collar finished (final holes drilled/cut, stained) and hopefully installed (with all the thermostat controls, faucets, etc) next weekend/week.

I have some ESB sitting (overdue) in secondary, so I'll be racking it into a keg as soon as my tank is filled. Need to find time to brew something else now!
 
I like it! Pretty sweet that you can fit three kegs, especially pinlocks, in 5 CF of space.
 
Aw that is adorable. Also very cool that you could fit three kegs etc in there....that's not bad for such a small amount of floorspace.
:)
Ya, it'll live in a small pool shack during the summer, so the size is nice both for floor space and for mobility. Which reminds me that I need to build a rolling little cart for it eventually. It's also small enough that I could easily see it fitting into even fairly small apartments and such.
 
Got the collar stained with two coats of one step polyurethane/stain mix, just need to sand it now. Weather stripping will go on in the next day or two so I can check for airtightness and then I can install all the (already assembled) temp controller and shanks this weekend. Screw on the lid and prep for chalkboard paint hopefully next Tuesday. I'm hoping to get a batch of overly aged ESB into a keg tonight (need to clean it real quick) so beer might pour on Memorial day!

I'll post some pics of the interior one the collar is in its final spot. :)
 
Not sure if anyone is "following" this, but made some progress over the last week, despite being setback by a day and a half of the flu...

Nearly done, really. Collar is completed and installed, ended up using a lid on the freezer to hold it in place and then rope caulked it in for an airtight seal. Also rope caulked around the thermostat and power outlets to minimize air exchange there.

Insulated with 1" foam board which I glued to the inside of the collar. There's lots of gaps and spots I chose not to cover, but I did a quick test and even without any insulation and no thermal mass in the freezer (beyond the 2-liter bottle) it took 40-45 minutes to raise 1C, so I think it'll be OK.

Thermostat is done and installed, the probe is tucked into a 2-liter soda bottle to help get an accurate temperature reading of the beer and minimize compressor cycling. Currently set at 4C with a 2C tolerance, but I'm not sure what the final settings will be.

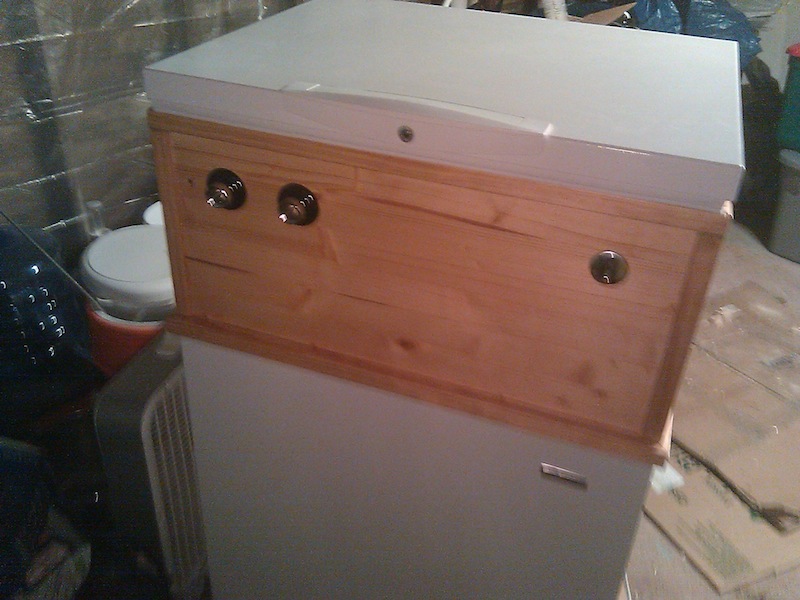
The shanks are in (only two at the moment, but I drilled the hole for the third which will be added later in the year along with a secondary regulator as a soda water keg) and disconnects attached. Not sure how tight that is supposed to be, though? I did it pretty snuggly with the wench KegConnection included (assumed that it was supposed to be pretty tight since they gave me a wrench, but I'm always afraid of damaging things by over tightening, etc).

The third faucet hole is temporarily covered by that little metal hook on the front and a chunk of non-glued insulation on the back.

Regulator is all hooked up to my full CO2 tank, and the manifold is mounted, all ready to hook kegs up to. I still need to screw on the faucets, which I am waiting for the lid to be painted before I take those out. I have 2 coats of chalkboard paint on the lid right now (done after the pics were taken), and the third and fourth will go on tomorrow morning and night.

Let's see... There's an old 100mm case fan hooked up to a 5v cell phone charger tucked in down there under the little keg stand. It angles up slightly, but mostly hits the wall. Not sure if it'll be effective there, but it cost nothing and that was one of the few places it would fit.

I also washed, sanitized, and filled with some (over aged) ESB one of my kegs tonight. The rest will get washed and sanitized this weekend while I brew up a Blue Moon clone.

I guess The only other part to mention would be overall price. The freezer I had, but it was our food freezer. I bought a 15cuft freezer off CL for $75, originally for the keezer, but decided to swap them around.

The collar materials ran about $75-80 including a cheap miter saw, and the 2-keg pin lock standard refrigerator conversion kit from KegConnection, with SS Perlick upgrades was ~$275, if I recall.

So, total price was approximately $425 (plus 30-40 hours, all said and done - I have ZERO carpentry skills, so this was actually a bit of a challenge for me).

I'll post some proper (non cell phone) photos once I'm all done, but here's some of the latest in progress photos.

Sorry for the long winded post(s)... going over all this stuff while sitting here helps me properly plan and evaluate what I'm doing and maybe someone will find something useful in it one day. :p

IMG_20110524_211837.jpg


IMG_20110524_212002.jpg


IMG_20110524_211922.jpg


IMG_20110519_214449.jpg


IMG_20110524_211739.jpg
 
Great thread. I like the small foot print of this freezer. I can't tell by the photo, but can you fit two kegs on the floor? I assume no since you built a small shelf. Also, without a collar could you fit a 5gal carboy on the hump? Thanks in advance. I am thinking about building a unit, but I have not even started kegging yet. Am I putting the cart before the pony?
 
oh man.. Im totally in--subscribed. thanks so much for writing this up. That thing is SWEET!!


edit-- that collar looks complicated... is there a reason you chose not to just do the 2x6s with 45deg cuts? just curious
 
Great thread. I like the small foot print of this freezer. I can't tell by the photo, but can you fit two kegs on the floor? I assume no since you built a small shelf. Also, without a collar could you fit a 5gal carboy on the hump? Thanks in advance. I am thinking about building a unit, but I have not even started kegging yet. Am I putting the cart before the pony?

Two pin locks do not fit on the bottom, and my measurements say ball locks are no good either. The little shelf bridges the hump and the floor and is the only way to get a third keg in.

As for a carboy, I can try to check tomorrow, but I would guess you will need a little shelf t make it wide enough, but I bet you could do a carboy + 1 keg in this with no collar.

You pretty much need to build the kegerator to start kegging, so I would say you're not to far ahead of yourself.
 
oh man.. Im totally in--subscribed. thanks so much for writing this up. That thing is SWEET!!


edit-- that collar looks complicated... is there a reason you chose not to just do the 2x6s with 45deg cuts? just curious

Well, with a 6" tall collar I don't think I would have had room for the temp controller built into the collar, which is something I envisioned when I first starting imagining this project. The extra "head space" gave me room for the controller and outlet to be built in, as well as to install a manifold, and eventual second regulator to have two different pressures, up high and still leave room for the kegs.

Also, the shanks are mounted way up high and if the collar wasn't tall they would interfere with the kegs (it's a TIGHT fit in there with three). Finally, the tall collar and high mounted shanks put the faucets at a "better" (for me) height, which I liked.

As for complicated... it's just a 12"x3/4"x8' board chopped up into a box, and then trimmed out with "outer edge corner molding" or whatever it's called. The "lip" (and molding) attached to the freezer are two fold. One, the collar isn't permanently attached to the freezer - I can make a new one, or repair or modify this one, fairly easily. I also didn't trust myself to not mess things up, so non-permanent is good.

The lip and trim on the freezer is attached with silicone, which in theory, will come off the freezer with some work (messing up the wood, but hopefully not the freezer) so I could, in theory return the freezer to regular freezer duty.

Lastly, I wanted something that looked a little bit nicer than just construction lumber mitered together. Wether I succeeded, I won't comment, but I tried. :) I also didn't want to spend a bunch of money of a "fancy" wood board (oak, maple, walnut, etc) because my woodworking skill is very low and I felt I would be wasting something nice (and a lot of money) so the edge glued spruce was sort of an in between - I liked the look of the grain and glued pieces but it was cheap.

Hope that answered your questions?

Lastly, I couldn't sleep so I did some more work tonight... basically finished now. Just have to leak test everything, and do some tests of the cooling system (cycle patterns, etc). And also clean up the paint on the handle with a razor and small brush... :p It looks worse in the photo than in real life, I assume the flash blows out the shadows around the handle that obscure the sloppy paint. I got some on the rubber seal, too, and didn't notice. It's dry now and I'm not sure it'll come off. Oh well.

Here's a slightly better photo, though the garage is kinda tight so I couldn't get a good angle. It's currently getting down to temperature and my ESB is chilling, getting ready for some CO2.

DSC_4913.JPG


DSC_4912.JPG
 
:ban::ban::ban::mug:Nice build.:mug::ban::ban::ban:

I have three of these small freezers because the local supermarket (CUB/ Supervalu) has had a deal the last three Januarys where if you buy the freezer for $149.00 you get $149.00 in free coupons for free groceries and other stuff.

I have built a collar for one of mine out of 2x12 wood, no insulation or fan on the inside. Ran it as a cooler with three pin lock corny kegs, no problem.

I was wondering why you wanted to put all of the electronics and wiring on the inside? There is plenty of condensation in there...

I run mine with a ranco temp controller in-line with the power cord and temp probe coming through the top and everything on the outside. Seemed to me a better long tem solution as the components will corrode and deteriorate over time...

Was your controller cheaper than a ranco? My ranco was ~$50 from Jonstone supply. I have no issues with my keezers running the electronics externally. I'll post some pics of mine...

My controller is one of the DIY eBay ones. About $30 for everything required (controller, outlet, extension cord, etc). As far as why it's in the collar... I like the way it looks and I like everything all enclosed, I suppose. Condensation will be controlled with DampRid or one of those rechargeable moisture absorbers. How airtight is your collar? That's where condensation comes from (and opening and closing the lid). I'm hoping my work making the collar fairly airtight, and the insulation, will help minimize condensation.

Thanks!
 
It's almost an exact duplicate of mine, except I didn't put the ebay controller in the collar. I bought a rubbermaid square watertight tub and put everything in it. 3 kegs and two taps just like mine. So far it's been great, and fits beneath a set of stairs in the garage.

Great job
 
Great job, I also bought a TINY freezer like this and plan on something similar...
 
nice. I like the small footprint of this. And Really, who needs to have 5 taps running at one time..?? hahahaha..

This is something i might tackle as my brewing "knowledge" increases.

thanks for the thread!.

jake
 
Gunfighter04 said:
It's almost an exact duplicate of mine, except I didn't put the ebay controller in the collar. I bought a rubbermaid square watertight tub and put everything in it. 3 kegs and two taps just like mine. So far it's been great, and fits beneath a set of stairs in the garage.

Great job

I'm curious about what you did with the rubbermaid tub... Do you have pictures?
 
Back
Top