Interesting German Brewing PDF

Homebrew Talk - Beer, Wine, Mead, & Cider Brewing Discussion Forum

Help Support Homebrew Talk - Beer, Wine, Mead, & Cider Brewing Discussion Forum:

This site may earn a commission from merchant affiliate links, including eBay, Amazon, and others.
How did you raise your bag? I'm BIAB and am following this thread. I read where someone had a pulley and just raised the bag about an inch at a time which reduced splashing. They didn't squeeze the bag either, which I would think you would need to account for a 10-20% drop in efficiency.

I did the same as Texas. I brew on my balcony and have a pulley on the roof. Raised the bag gently so that the wort was draining through the bottom of the bag rather than the sides. I was able to raise the bag nearly all of the way out and then started burner. I didn't squeeze (normally do) so took an efficiency hit of I think 2 points. However, since I avoided stirring mash and wort there may have been stratification of wort when I took refractometer sample. I hit target gravity into fermenter but I think that is because I had slightly more boil off even with the simmer boil.
 
Fascinating topic! Thank you to everyone who did the work behind this paper, even though there is more proof-of-concept that needs to be done this gives me hope. I have a Hofbrauhaus near me, love the lager on tap but hate the price, but I can't quite replicate the freshape unique malt character at home. This is now on the top of my summer projects list.

I have a suggestion for the GBF crew. I noticed at least one of you lists a location near Minneapolis, which just happens to be the home of the 2017 NHC. Have you given any thought to putting together a presentation on LoDO and having side-by-side tasting in a seminar? Not to put any additional burden on any of you as you have already contributed a lot to the homebrew community but it would bend amazing to actually taste your beers.

I will be trying this process out later in the summer but have no illusions that the first time or two will run perfectly smooth (and I'm not ready to pony up for a DO meter just yet) and you have had a chance to really dial in this process.

Prost!
 
Drinking my 2 week old cascade pale ale that's kegged. Needs another 2 weeks to properly carbonate but there is definitely a difference. The malt flavour is different and takes a while to adjust to. Not a bad thing. The colour is also extremely light.

Did an American brown this weekend and had a few issues. Got mash cap sorted but I dropped the rope on the biab bag making a huge splash. Much swearing and grumpiness. Thankfully the mash had the very sweet clean character associated with lodo.

Now I've worked out kinks I'll do a nz pilsner and vienna lager.

Is it worth the effort for American beers? I think so but the difference isn't as massive as one poster said on the german forum. He said it was a bigger improvement than all his previous improvements combined. I think getting ph sorted had a bigger effect for me.

Having said that, I think the cold side will make a difference in stability.

I'm really glad it worked out for you!

Indeed, the Lodo process primarily impacts the malt flavor of the beer. So in certain styles where the malt takes a backseat to strong late hop or yeast flavors, the difference probably won't make or break the beer - although like you say, you can expect dramatically increased flavor stability in the keg or bottle when taking care to minimize O2 at packaging.

If you want to taste the impact of the Lodo process in all its glory, try brewing a helles, festbier, marzen, dunkel, etc. Low oxygen brewing really does make or break these styles, since they're almost entirely driven by clear, fresh malt flavors.
 
I'm really interested to give this a try. I definitely notice the sweet malt flavor difference in commercial brews vs home brew. I'm going to be in the same boat as a lot of others though with the lack of a DO meter.


I do have a few questions though:

1. Can I boil the mash and sparge water the night before and allow it to cool to strike temp, or will this let the O2 back in? I was envisioning the following process:
a. Night before brewing, collect 18G of RO-DI water.
b. Add calcium chloride, calcium sulfate and Na-meta.
c. Bring entire volume to boil for 1 minute. Turn off power, put lid on.
d. Next morning raise to strike temp (probably close already)


2. How important is it to crush the grains right before using? Seems that the grain would already be oxygen saturated from sitting around for months and months. I typically crush the night before.


3. The PDF says copper immersion chillers are a no-go due to copper oxides. This could present an issue for me. Would soaking the immersion coil in star san prior to placing in the BK remove the oxides?
 
Answers
1)
A) You can collect your water the night before, but...No...You can't really preboil & expect O2 to not dissolve back into your water.

B) As far as mineral additions...Please, re-read the order of operations. Do not add the minerals before you preboil the water.

C) One minute is not enough time to drive off the amount of O2 that we need to eliminate.

D) You should chill from boiling to your strike temp & dough in, before O2 goes back into solution.

2) We theorize that the husks of the grain act much like the skin of a fruit.
When you bite into an apple, it isn't already brown from oxidation, right?

3) Copper *can* be used, but you will get better results with stainless.
(Read that statement as: "You should not use copper".)


If i boiled the night before i would expect some O2 to come back, any thoughts as to how much? What about wrapping the top of the kettle in plastic wrap and throwing the lid on?

Any thought as to how long the water needs to be boiled to drive off the O2?
 
If i boiled the night before i would expect some O2 to come back, any thoughts as to how much? What about wrapping the top of the kettle in plastic wrap and throwing the lid on?

Any thought as to how long the water needs to be boiled to drive off the O2?

the PDF says to boil vigorously for 5 minutes. I'm not one of the authors, but I would imagine that you're out of luck as far as doing things that far before hand.
 
If i boiled the night before i would expect some O2 to come back, any thoughts as to how much? What about wrapping the top of the kettle in plastic wrap and throwing the lid on?

Any thought as to how long the water needs to be boiled to drive off the O2?

Having muddled my way through 2 LODO brews I don't think there is any room for shortcuts. It is a fair amount of extra time / effort / stress since every step is important. From memory the LODO guys say that 02 is absorbed at around 1-2ppm per hour. Glad wrap is permeable.
 
Looking forward to giving this method a shot since i do mostly german lagers. Sounds like a long brew day but I've got everything to make it happen except for the no-copper part. That'll be my weak link but hopefully i can mitigate.
 
I found the only extra time was the water boil and chill. Theres a minor saving in only doing a 60 min boil if you normally do a 90 minute boil with pilsner malt.
 
I found the same thing. No extra time except for the pre boil.

I did spend some extra time chilling because I usually chill as cool as I can with tap water and let it ride down the rest of the way in the fermentation chamber. I don't have a pond pump for circulating ice water through an IC, but I'm hoping I can get there with a pre chiller next time. I pitched warm last two brew days.

Also, I have confirmed that my system is not adequate for a 10 gallon low DO brew. Tried it a couple if weekends ago and it was a major pain in the rear. The sparge was the biggest issue.

I've got a low DO marzen that's been lagering for a couple of weeks now. Need to tap that keg and see what the verdict is.
 
After reading over the PDF, I do have to ask, why is it so important to purge the secondary keg so thoroughly? I understand at least purging with CO2, but filling it with sanitizer seems not necessary, especially after the logic of oxygenating the cold wort. If you are racking when the beer is still fermenting, won't the remaining oxygen be taken care of by the yeast long before it harms the beer?
To be honest, I guess I'm just trying to find an excuse to get away with going the equivalent of keg dry hopping without introducing too much oxygen :p
 
I dont have an answer but I am keg hopping at the moment. I copied techbraus setup by having the fermenting keg hooked up to secondary keg with the spunding valve on secondary at 2 to 5 psi. Secondary keg gets flushd via co2 from fermentor. I put a bag of dry hops in secondary at start of fermentation. Its not ideal because hops sitting at fermenting temperature for 4 to 5 days in the empty keg. You also cant remove the hops. Thats not a big deal for me because I keg hop anyway. If there is another way to dry hop Id like to know.
 
I dont have an answer but I am keg hopping at the moment. I copied techbraus setup by having the fermenting keg hooked up to secondary keg with the spunding valve on secondary at 2 to 5 psi. Secondary keg gets flushd via co2 from fermentor. I put a bag of dry hops in secondary at start of fermentation. Its not ideal because hops sitting at fermenting temperature for 4 to 5 days in the empty keg. You also cant remove the hops. Thats not a big deal for me because I keg hop anyway. If there is another way to dry hop Id like to know.

My understanding is that they dry hop during active primary fermentation, while the yeasts are still doing their thing. I've read up on this technique and it seems to be something that's been debated for years. The conclusion I came to, dry hopping during primary is A OK. Still need to try it out though.
 
To me, there is a noticeable difference in hop aroma/taste between primary and keg hopping. I don't know if it's because of the multiple stages or the physical difference, but I've found increased pungency by waiting to add an amount of my dry hop directly to the serving keg
 
Personally...I wouldn't even bother dry hopping, with lodo brewing.
I'd probably build a Randall & hop right at the point of serving.

But, then...
I'm not dry hopping any of my German lagers, either.
 
the cold side of lodo would be directly beneficial to highly hopped beers. I've never heard of a Randall and did a quick search. That's pretty cool! Probably not what I'm looking for, but it's a neat concept
 
I've thought about changing all the dry hoping to hop extract that could be inserted into a sealed keg..... before I get too far though I need a DO meter to evaluate what I am currently doing.
 
The best idea I can come up with (or copy) for lodo dry hopping would be something like the sierra nevada torpedo (http://byo.com/bock/item/1899-torpedoes-away if you haven't seen it). It's a stainless vessel you fill with hops, purge with CO2, and then recirculate the beer through. Doesn't sound like a cheap solution for use with a corny keg (would require a self priming pump plus a hop canister per keg).
 
If i boiled the night before i would expect some O2 to come back, any thoughts as to how much? What about wrapping the top of the kettle in plastic wrap and throwing the lid on?

Any thought as to how long the water needs to be boiled to drive off the O2?

There is another technique being kicked around on the German Brewing Forum to deaerate the water, and it looks like you can do it a decent amount in advance. Here's a link if you are interested: http://forum.germanbrewing.net/viewtopic.php?f=50&t=355
 
Alright looking forward to doing this process as close as possible to the instructions as possible so I'm looking for some more feedback:

1. I see the PDF mentions no sparge is preferred. This would be realllly borderline to my mash run capacity (want 9G into 2 corny kegs; mash tun capacity is 15G). Does anyone have any idea what no sparge efficiency looks like? I get 85-93 when i sparge.

2. If i were to apply these same techniques on ales, should I also rack when 6 points above FG? Assume temperature should remaing at room temp though? Only experience i had with racking before FG before resulting in a beer that didn't budge another point even. Had to re-pitch.

3. Is there any harm to fermenting primary under ~5 psi using spunding?

4. When should I add my calcium salts to the RO water. I assume before the strike water is boiled?

5. pitching delay - No way with my water temp i'll get down to the desired pitching temps right away. What about getting as far as i can get (guessing 85F), then pressurizing keg head space with 30 psi and allowing it to chill before pitching?

1. See Doug's chart here for an efficiency estimate. https://www.homebrewtalk.com/showthread.php?p=7619878
2. I haven't done an ale yet, but what you describe is my plan. Except the room temp comment. I ferment ales around 66F.
3. No
4. I add mine after boiling.
5. Let me know what you find out on this one. I have pitched the yeast while the wort was too warm. It's hot in Texas. There will definitely be some O2 uptake if you delay pitching. How much, I don't know. Here's where a DO meter would be handy.
 
6. Back to the topic of water treatment. I don't see anything in the PDF regarding when to add the calcium chloride, so I'm going to add it pre-boil to 50 ppm. After boil i'll add the 100 ppm SMB and wait 5 minutes.

7. This will be my first time fermenting in a keg and also carbonating naturally in a keg. Is it possible to rack with more than 6 gravity points left? I travel quite a bit for work so i can certainly envision a Sunday when i might have 10-12 points to go and need to travel for a week. I understand spunding in primary and then racking carbonated beer is undesirable since the receiving keg isn't 100% flushed. Thoughts as to what could be done to mitigate if i have to do this due to time constraints? Maybe reactivate fermentation by adding some boiled water/sugar?

8. I did not see a mashout step in the PDF recipe. I normally do one but will assume it's not used here. Any idea on how long the lauter should take? Typically i'll do it in about 20 minutes (i try to chase the boil during the lauter).

The order of operations, according to the forum, puts any mineral/salt additions after the oxy-scrubing boil. I can't see the difference it would make, but that's just how they suggest.

If you ferment in a keg, then simply pigtail (gasPrimary-to-liquidServing) with a short length of hose, and put your spunding valve on the serving keg. The primary keg will purge the serving keg completely of oxygen using it's own fermentation-produced co2 giving you a vessel in which to rack to. Primary would ideally have a shortened liquid diptube so that you're only racking the beer to serving keg, and avoiding excess trub/yeast transfer. Hope that makes sense.

The goal is less time in mashtun and a mashout would increase time. Given a system that has been "dialed-in" to these low oxygen brewing techniques and measured for dissolved oxygen, you can certainly perform a mashout knowing your variables and how to adjust for your system/process. Lauter as quickly as possible without introduction of oxygen (goal is less time overall getting back to boil, avoid any oxygen pickup which increases over time). Sacrifice some efficiency if necessary, but not a grotesque amount.
 
If you ferment in a keg, then simply pigtail (gasPrimary-to-liquidServing) with a short length of hose, and put your spunding valve on the serving keg. The primary keg will purge the serving keg completely of oxygen using it's own fermentation-produced co2 giving you a vessel in which to rack to. Primary would ideally have a shortened liquid diptube so that you're only racking the beer to serving keg, and avoiding excess trub/yeast transfer. Hope that makes sense.

Should the serving keg be water purged first, then the fermentation gas use to re-purge it?

Kicking myself for missing this little trick earlier. I think i'm short a few gas QDs to get this done.
 
Yes, absolutely. CO2 from the fermentation vessel (nor a CO2 bottle) will purge the air from a keg. If the keg is at 1 atm (absolute) and you pressurize with CO2 to 3 atm absolute (29.4 psig) you will wind up with a mixture in the keg that is 1/3 air and 2/3 CO2. A second pass will get you to 1/9 air, a third to 1/27th and so on. Of course if you flow CO2 through the keg continuously you will also get to a low air content. In either case you waste a lot of CO2. It is much better to start with no air in the keg e.g. push out water or steam.
 
I've got a water purge method currently where i fill the keg with tap water, then attach a QD to the liquid post that attaches to my water supply, attach a QD to the gas post, open the PRV, then fill with water until it's spouting out everywhere. Then I take gas QD off, following by closing the PRV and taking water supply off at same time. Then i push all the water out with CO2. Suppose it doesn't get every last bubble of air out, but it is way better than just filling to the rim.
 
I've got a water purge method currently where i fill the keg with tap water, then attach a QD to the liquid post that attaches to my water supply, attach a QD to the gas post, open the PRV, then fill with water until it's spouting out everywhere. Then I take gas QD off, following by closing the PRV and taking water supply off at same time. Then i push all the water out with CO2. Suppose it doesn't get every last bubble of air out, but it is way better than just filling to the rim.

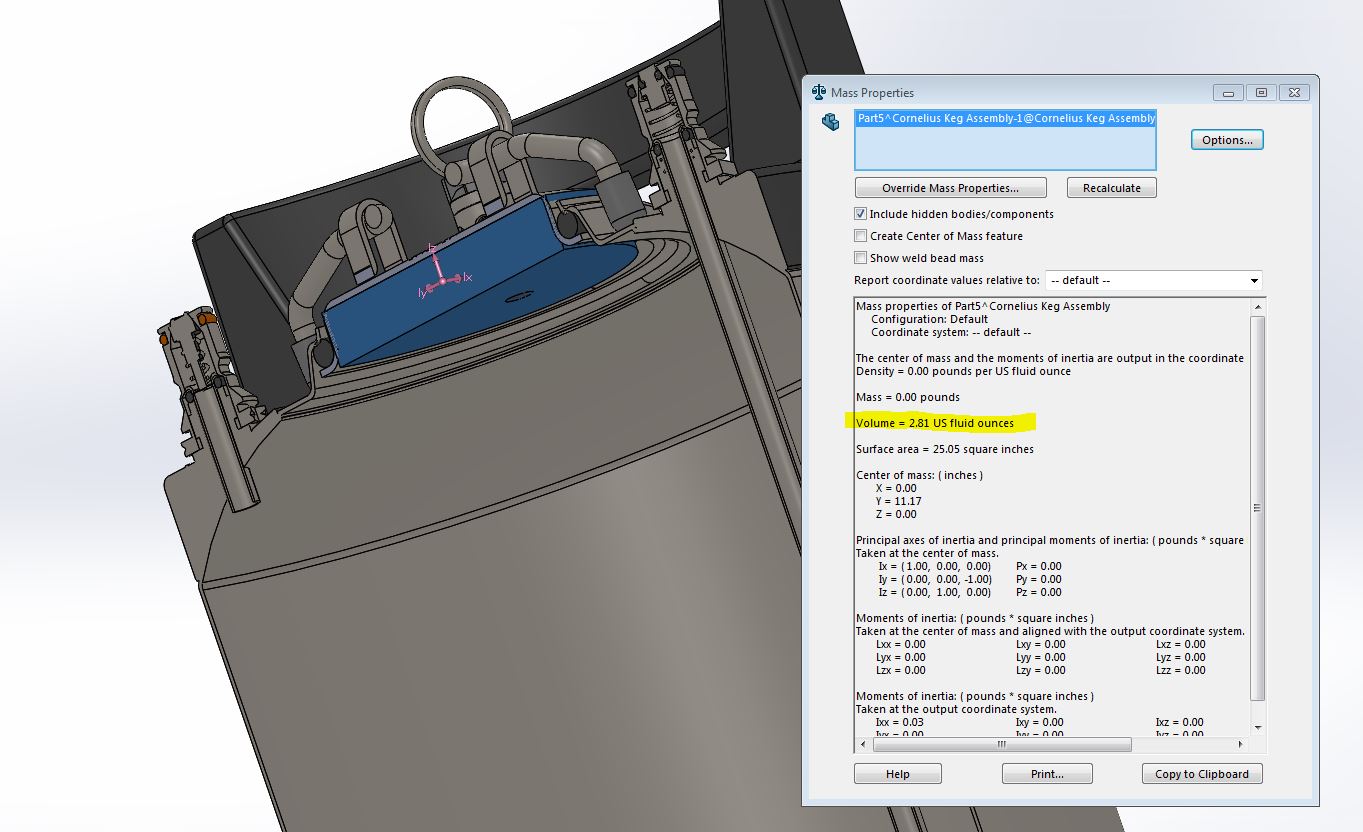
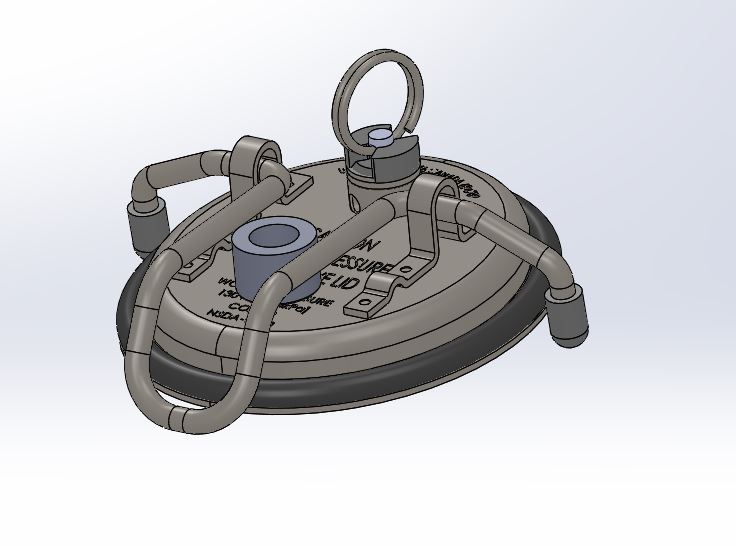
There is actually about 3 ounces (WAYYYY too much) of air left in the lid in most kegs due to the way the PRV extends into the keg. I've been trying to come up with ways to purge completely....been thinking about welding a NPT purge port to my lids.

Volume.JPG


Keg lid.png


more practical.JPG
 
There is actually about 3 ounces (WAYYYY too much) of air left in the lid in most kegs due to the way the PRV extends into the keg. I've been trying to come up with ways to purge completely....been thinking about welding a NPT purge port to my lids.

I saw this in the thread with JayBird the other day and was like what the hell is this guy talking about??? :confused:

Makes sense now. If you fill the keg in the upright position you will still have a pocket of air. All I did is take it from probably 8oz to 3oz. Almost thinking it would be better to fill in the inverted position.

hahah, yea... I usually purge multiple kegs in a row and fill from the out port, and end up wiggling the lid all over trying to get the smallest air pocket possible.
 
There is actually about 3 ounces (WAYYYY too much) of air left in the lid in most kegs due to the way the PRV extends into the keg. I've been trying to come up with ways to purge completely....been thinking about welding a NPT purge port to my lids.


I cut the gas tube flush and tilt the keg 45* with the gas post high. I pump sanitizer in he liquid post until it pours out the gas post. I shake the keg gently as it overflows. After about 15 seconds past full and overflowing, I can no longer hear any airspace when shaking the keg. It's certainly not a steam purge, but I've gone from 3-4 months to 18+ months before I can detect the beer turning. I still don't think it's perfect but it's the best I've come up with before the diminishing returns of some convoluted Goldberg method of purging. Steam... Someday!
 
I cut the gas tube flush and tilt the keg 45* with the gas post high. I pump sanitizer in he liquid post until it pours out the gas post. I shake the keg gently as it overflows. After about 15 seconds past full and overflowing, I can no longer hear any airspace when shaking the keg. It's certainly not a steam purge, but I've gone from 3-4 months to 18+ months before I can detect the beer turning. I still don't think it's perfect but it's the best I've come up with before the diminishing returns of some convoluted Goldberg method of purging. Steam... Someday!


I do almost the same but instead of cutting the gas dip tube, I remove the gas post and pull the dip tube. I fill (with sanitizer) what I can through the lid and work the bubble up to the spot where the gas post was. Then fill through the hole where gas dip tube lives. Once there's no more bubble, I replace the dip tube and post. Pretty easy. I've got an IPA that I've had in tap since the end of April - as of last night it is still nice and fresh!
 
Does 2.5 qt/lb sound about right for no sparge brewing? That and 20lbs of grain should put my 15 gallon boiler maker mash tun up to the brim. No need for a mash cap ;-)
 
Does 2.5 qt/lb sound about right for no sparge brewing? That and 20lbs of grain should put my 15 gallon boiler maker mash tun up to the brim. No need for a mash cap ;-)

2.5 qt/lb is a typical full volume mash thickness. I get your mash volume at a hair over 14 gal. Depending on conversion efficiency, your pre-boil SG should be in the range of
1.047 (90%) to 1.052 (100%.)

Brew on :mug:
 
2.5 qt/lb is a typical full volume mash thickness. I get your mash volume at a hair over 14 gal. Depending on conversion efficiency, your pre-boil SG should be in the range of
1.047 (90%) to 1.052 (100%.)

Brew on :mug:

Just realized a few minutes ago i neglected to consider grain absorption in my calculations so i might be up to 2 gallons short of target. I think i'm going to leave the extra volume of deoxygenated and treated strike water in the BK with the lid on (where i plan to boil the strike water) as top up water and hope i'm on the higher end of the efficiency range (I normally get 90-92% with sparge).

Worst case i'll have Helles Light.
Using your original numbers, your pre-boil volume (corrected to 68˚F) would be 9.85 gal, assuming 0.12 gal/lb grain absorption and 0.25 gal undrainable MLT volume. So, if you're looking for a ~10 gal batch, then you are short strike water.

Brew on :mug:
 
Some notes from today's brew:

Following recipe as closely as possible. Some exceptions noted:
1. Recipe - Using 82% Pilsner and 6% vienna since i was little over a lb short on Pilsner malt and didn't want to crack open a new 55lb sack for that. Impact on color was 0.1 SRM and impact on pH was to the 3rd decimal place.
2. Mash/Lauter - Using small volume of sparge water (about 5G since my MLT wasn't big enough). Second Hockhurz step I did at 158 (70C) instead of 162 (72C).
3. Chilling - I used a copper IC since my other chiller option would be a blichmann therminator, which also contains copper too so not ideal.

Notable points:
Grain conditioning - first time doing this. used 2% water with 100ppm SMB. Never seen my Barley Crusher tear through grain so easily. There were a lot more whole hulls than I normally get. A lot of kernels seemed to get smashed rather than blown to bits. Very little flour.

Mash in - When i underlet the mash the grain didn't float (as indicated). It did however seem kind of dense. I gently stirred. Is this density an issue or should i just leave it? There is literally 0 mash odor! I am going to adopt this technique for the future just to appease my wife who hates the mash smell. Through the entire mash you couldn't smell anything.

Boiling water - is a soft boil with the lid on (or barely cracked) acceptable? My vent hood only covers my BK and I dont' want to be putting that much moisture into the air in my basement.

Wort sample taste - WOW! the smell that normally fills my brewery is now all flavor in my wort! I've never had this flavor or aroma before. It is exactly as described... sweet grain.

My efficiency took a huge dive. Not sure what to blame but will investigate my measurement devices first since my pre-boil hydrometer reading was 11.2P and my final hydrometer reading was 1.044.

P.S. Anyone want to buy a therminator? I'm done with it.
 
I kind a miss that smell during brew day but can't complain after tasting the results.

I use to boil with my lid on about 75% and never had an issue, I was a little under powered back then. I have a spare 3500w induction burner if your interested.
 
Back
Top