skemp45
Well-Known Member
Filezilla is the best FTP fo sho'

Well I have all the parts and a few hours to work on this. Not being a computer guy we will see how it goes. Wish me luck.
The fourth and fifth numbers were 1and 0. The numbers went like this. 192.10x.x.x
When I did this I lost my connection to the router and couldn't get it back. So I reformatted the SD card and started over again.
I do recall seeing something listing a range of what IP address would be valid, or that's how I interpreted it.
It was
192.168.1.0
192.168.2.254
If I remember correctly the 192 and 168 had a gray background.
I won't get home until tomorrow morning so I will take any suggestions on how to make this work. I'll also be spending time today doing some research on the internet.
Thanks...
So with the post on facebook about V2 nearing completion, is there a parts list anyone would care to share? I'd like to have as much of it on hand for the big reveal as possibleFlow meters are the big thing for me.

I've been saving up my drinking out money to buy all of this stuff. I bought a TV at Costco while it was on discount. I thought it would be nice to have a TV out in the garage while I'm tinkering around in the brewery. The bonus I can use it as a RaspberryPints Tap list too. That helped me justify the purchase in my mind.
Unfortunately my keggerator is in the garage, but I have it mounted and working out there. I have a few taps added to the list but, still need to add more beers, kegs and taps to the list.
Thanks for the help.
Now to add the motion sensor and a two column list. So I won't have to rotate the TV when I change it between the two options.
The good news is that if I can do this anyone can.


Yea but the webgui1.py script isn't a rpints script.
		<div id="ShowTemp">
			Refrigeration Temperature: 00.0 F
</div> <script type="text/javascript" src="bcs.js"></script>
<script type="text/javascript" src="q.js"></script>
<script type="text/javascript" src="request.js"></script>
<script>
var bcs = new BCS.Device('192.168.1.147');
bcs.on('ready', function () {
bcs.helpers.getTempValues().then(function (temps) {
document.getElementById("ShowTemp").innerHTML = "Refrigeration Temperature: " + temps[1] + " F" ;
});
});
</script>

The rpint works perfectly even when the logger is installed.The logger worked before and then suddenly started giving problems.Right. So?
The question remains "Does the underlying infrastructure work?" and knowing if R'Pints runs successfully would go a long long way towards knowing. If it doesn't work, the logger won't work...
Cheers!
My apologies if someone has already posted about this option for using RaspberryPints.
I had an old laptop which wasn't being otherwise used so I decided to set it up as both a webserver and client to run and view RaspberryPints. It took about an hour to do the following.
Download and burn an Ubuntu Server 14.04 CD then installed it on the laptop including the LAMP and OpenSSH packages. I then connected the laptop to an Ethernet cable, rather than trying to set up wifi which can be tricky from a command prompt, and used apt-get to install the Unity GUI.
I downloaded the RaspberryPints files to /var/www and ran the installer then logged in as admin and configured it. I then set up wifi so I can edit or transfer files with Putty, WinSCP, or access the admin panel. I made a few edits to index.php to customize the screen a bit and will make more once I decide what I want it to look like.
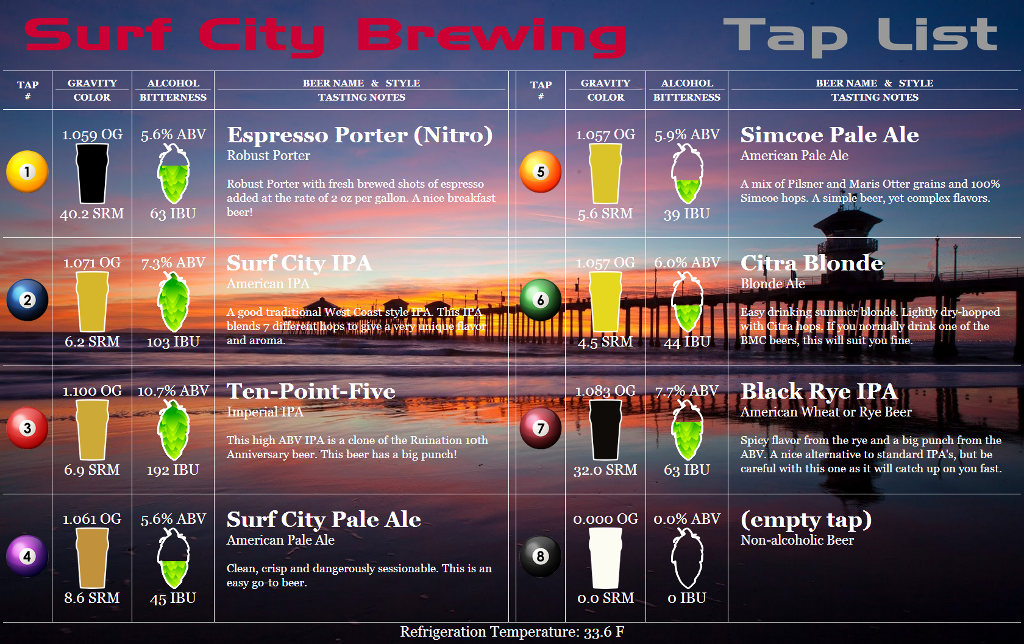
I leave the laptop closed on top of my keezer but all I have to do is open the screen, tap the mousepad, and the RaspberryPints display in a full screen Firefox window appears. Easy peasy and I didn't spend a dime. Since pictures are worth a lot of words:
Run that in chrome not Firefox the SRM will work much better
 Chromium is the open-source, community version of Chrome. If you want Chrome, you have to go to http://google.com/chrome and add the repo to your system. THEN you can add it.
 Is there a reason I should install Chrome instead of Chromium?Actually, Chromium browser is NOT the same thing as Chrome.
Is there a reason I should install Chrome instead of Chromium?
Enter your email address to join:
