Hoppo's E-Brewery Build

Homebrew Talk - Beer, Wine, Mead, & Cider Brewing Discussion Forum

Help Support Homebrew Talk - Beer, Wine, Mead, & Cider Brewing Discussion Forum:

This site may earn a commission from merchant affiliate links, including eBay, Amazon, and others.
They have a 50 amp package for $1600 - just barely outside your goal budget...

I know, but I already have the 10 guage wire in the wall and back to my service panel connected to a 30 amp. GFCI breaker. Although I would love to have the capability to use both elements at the same time for obvious reasons that BNB mentioned, I really don't want to rip out the 40 lineal feet of wire 10 guage wire (which is covered with drywall at this point and stapled to the stud per code) and snake 6 guage down the wall and run it back to a 50 amp. GFCI. I wired everything long ago to accommodate Kal's original 30 amp. panel and already spent a couple hundred bucks on it, so I am going to roll with it.

Taking a step up from 5 gallon batches that I currently brew the old fashion way (on my patio or in my garage) up to 10 gallon batches should cut down on the need to do back to backers like I routinely have done in the past. I honestly feel that once I have all of my brewing equipment housed in one spot (ie....my brewery) and no longer have to spend an hour setting up and an hour cleaning up and tearing down, it will make brewing way more convenient. Rather than knocking out 2 or 3 five gallon batches in one day every couple of months, it will be far less of a hastle and much more enjoyable to brew more often.

Yes, I am a die hard DIY'er and a firm believer in never paying for something that I can do for myself. However, in this instance I have no background in advanced electrical wiring required for a project of this nature. Sure I have no problem doing basic household electrical work, but this stuff seems a bit overwhelming. Not to mention, I hear people mentioning the hours that they have devoted to building their panels, and I am not sure if I have that kind of time to devote to it. I just opened my 3rd PT practice this week and it's still requiring quite a bit of my time. I am leaning towards just buying the plug and go assembled panel to drastically speed up the process of finishing my brewery. Hell, I still have about 400 sq. ft. of floor tile to lay, all of the grouting yet to do, the duct work for the exhaust fan, and finish sanding/polishing my kegs. I had to take a several month hiatus in the build to devote time to my newest business, so I'm getting a little impatient at this point.

I still haven't decided conclusively which way I want to go, so feel free to chime in if you have any direct experience with either system that I am considering. Thanks for the feedback thus far!
 
Build it yourself, hoppo! I'm on batch 6 of the new system and I wouldn't change a thing... because I designed it specifically for my process.

You can build a great panel for $1500. Ebrewsupply was one of the main vendors I used. They have good prices on individual components - their kits don't create much discount versus buying individual components from them. (At least 10 months ago, they did not.)
 
my panel was about $750, and if I'd gone most of the way to a Kal panel (ie with interlock) it would have been 850 or so. I had fun and learned a lot with my panel, but it took me a few months of on and off work. Advice: get a good crimper, I didn't so I crimped and soldered all my terminals which took more time.

Ask yourself if you want to spend the time, if you'll have fun doing it.. If you will and you do, the go definitely build it yourself. It'll be a lot cheaper, but you will certainly spend time on it.
 
I hear you guys.....I'm just still really on the fence. I had Ryan at www.ebrewsupply.com price out a complete DIY BCS 30 amp./2 element unassembled control panel with all of the other goodies that he includes with the panel such as the 4 temp. probes, twist lock plugs for the elements and pumps, the power supply cord/with twist lock plug, etc., etc. and his price was $1100. I'm sure if I took the time to source all of the parts myself, I could do better, but I simply don't have the time to piece everything together myself. For $1450, I can get everything fully assembled and ready to go out of the box, including all of the extras that he includes. On the flip side of the coin is Kal's panel, which is the same price for the unassembled version. Honestly, I really love Kal's panel with all of the extra bells and whistles........plus it looks damn cool. If the enclosure came cnc cut for all of the components and I could cut that step out of the equation, I would likely go thru the process of building his. However, a lot of the extra things that Ryan includes with his assembled panel cost extra with Kal's, so there are savings with the prior. DAMN IT!!!! Too many decisions. :D
 
So despite being a lover of all things DIY (I have half a boat engine and an outdrive in my garage, despite me not having ever turned a wrench on a boat before last week), I'd have to say go pre-built. You've already got a huge DIY going on, and you've got a lot going on in the personal / professional world. If you work hard and make good money, some times it's worth it to pay a little bit more to make life easier for you. Could you build it? Sure - even with basic wiring knowledge, you'd have the help of the board and a wiring diagram and you'd be golden. It might take a few days, or weeks, or even a month based on other comittments though.

Spend the extra few bucks, get a panel you know works, and you can start brewing NOW. Plus, you can invest the time you would have spent on the panel into finishing the last few bits of the brewery - those parts that we always put off... otherwise 5 years down the road you'll have a hand-built panel and still no grout on the tile because it got put off and put off and eventually... 'eh... who needs grout...' - at least, that's how long drawn-out projects seem to go for me.

So I'd have to cast a vote, in this particular scenario, for spending the extra few bucks, saving yourself a ton of time and headache, and finally get the point where you can start turning water and grain and hops into beer!

-Kevin
 
After much thought, I placed me order with Ryan at www.ebrewsupply.com for the 30 amp assembled panel and the power cords for my heating elements, which should arrive in a couple of weeks. Today, my wife roped me into going shopping with her, but when I get home, I'm going to start doing the final finish on the wood work in the brewery. Essentially, all I have left to do in the brewery is tile the floor and grout. Almost there. :mug:
 
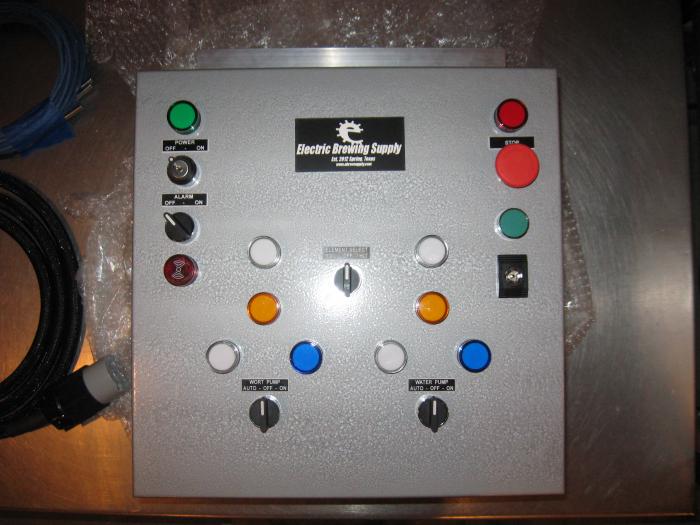
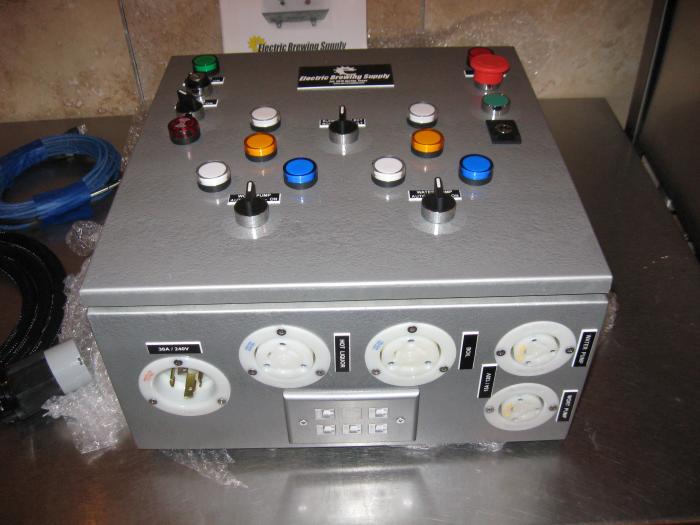
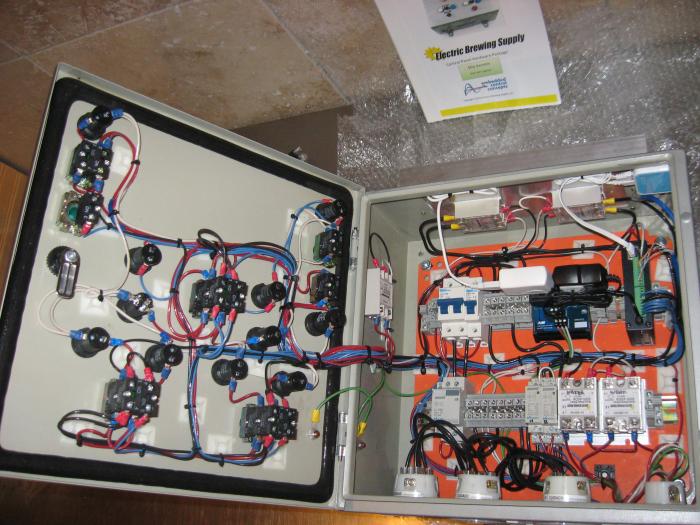
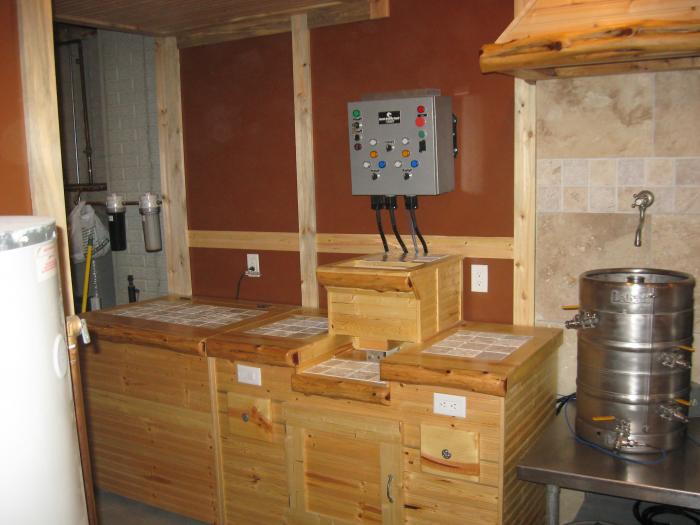
Sorry it has been a while guys. I got my control panel from Ryan at www.ebrewsupply.com via UPS yesterday. I haven't had time to hook it up yet, but asthetically it looks really nice and the wiring is exceptionally clean. I'm really glad I decided to purchase the preassembled version, as I have been way too bogged down with work to devote much time to the brewery. It's the 30 amp./2 element BCS panel with built in WiFi. Ryan has been great to work with and since I am IT challenged, he offered to walk me through the set up and networking over the phone. I have an extra HDTV wall mount that I may try to modify to mount this thing on the wall.

IMG_3219.jpg


IMG_3220.jpg


IMG_3223.jpg
 
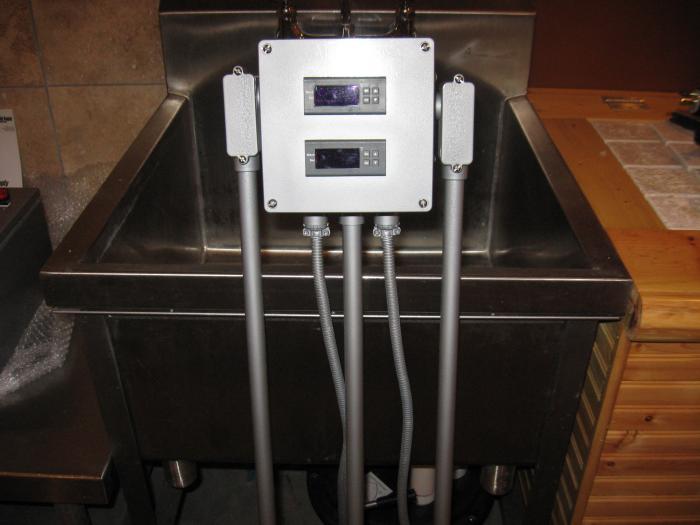
While I was at it I painted my fermentation chamber temp. control panel to match the new brewery control panel. I also ordered the wire and water tight adapters for my heating elements. Ryan's panel includes the plugs for the heating elements and he threw in the braided expandable material to cover the wires and match the power supply cord. The cords on my chugger pumps were way too short, so I used a weatherproof junction box with water tight fittings to creat cord extensions for my pumps to reach the panel as well. He threw in the braided sleeving for that as well. I did puchase a little more of the braided material, so that I can cover the power cables for my fermentation chamber panel and some of the smaller diameter material form my temp probes to match the temp. probes that came with his panel as well. I threw the cords together last night, but Ryan forgot to put the pump twist lock plugs in the box, so he mailed them express and they should be here tomorrow.

Now I need to spend the afternoon cleaning up the kegs, so I can assemble everything.

IMG_3224.jpg


IMG_3221.jpg


IMG_3222.jpg
 
I've always meant to ask you why you never combined all of those cables for the ferm controller into one conduit or pipe to hide the individual lines? Why are there 5 again? Two supplies, 1 for probes, 2 for the controls for the chambers?

Not trying to hate or anything - it's just a little octopus looking/cluttered and to my eye sticks out in an otherwise super clean layout.
 
I know, it is a strange design. I was meaning to conduit the supply cords, but never got around to it and probably won't at this point. Basically all of the tentacles of the "octopus" consist of 2 input power supply cables (one for the Lager controller/one for the Ale controller), which are in the corrugated tubing, 2 temperature probes that cannot be seen in this picture, then the 3 conduits. The conduits house the power output supply to the 3 receptacles.....one powers the lager cooling source, one powers the ale cooling source, and one for the ale warming source. Although it looks a little goofy, it looks better now that the power supply cords are sleeved in black expandable mesh and the probe wires in blue to match the brewery control panel. I just covered the wires last night and will post some pics once I get the both panels hung.

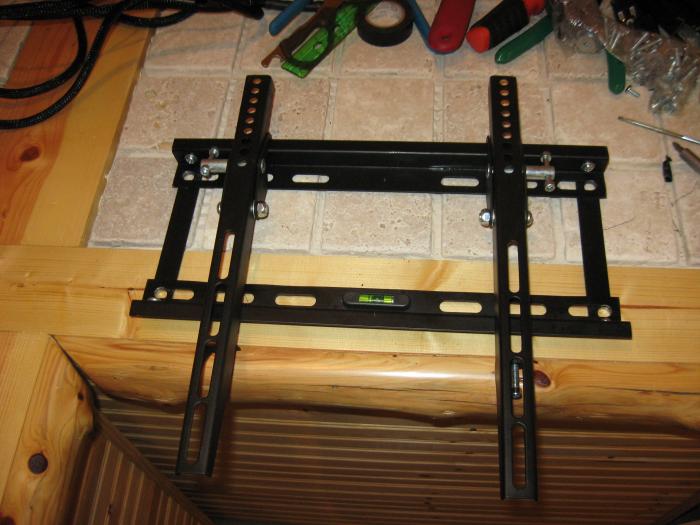
I was able to take an extra flat panel HDTV mount (designed for 42" an larger) that I had laying around and modify it, so that it will work to mount the new brewery control panel. I cut all of the components down to size, re-drilled some holes, and did some touch up paint. I'm going to anchor it to the wall tonight and mount the hanging brackets onto the back of the panel, but have to stop by HD tonight after work for some bolts, lock washers, nuts, etc. Slowly but surely it's coming along. Hopefully this weekend I can finish grouting the tile pieces and get my clear coat on the rest of the woodwork. I would love to have everything put back together sometime next week. Still need to purchase a plate chiller, so any feedback on that would be great. :mug:
 
I guess my only last question is why two power source feeds? Doesn't seem like more load than one cord could handle.

:cheers:
 
Ignorance I guess. :confused: I was under the impression that refrigeration units should technically be on their own 20 amp. dedicated circuit, so the power feed for the temp. controler that supplies the lager chamber plugs into a dedicated 20 amp. outlet on it's own circuit. The ale chamber power feed plugs into a 15 amp. outlet.

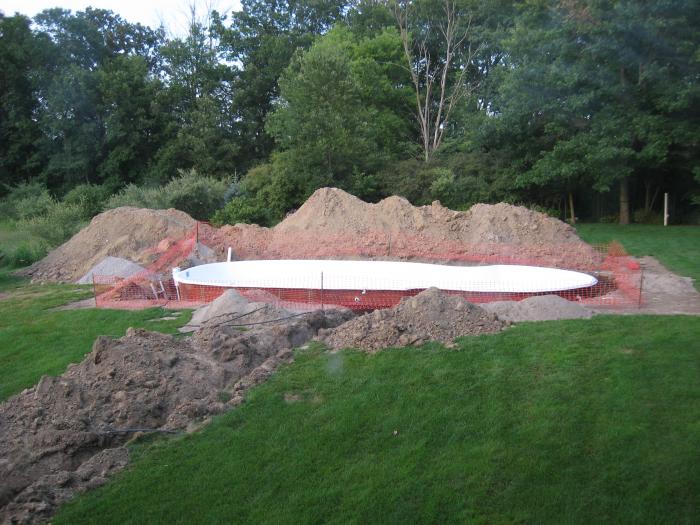
Anyways.....I finished sanding my kegs and got most of the plumbing put back together last night. Pics. later today, but we are in the middle of having an inground swimming pool installed, so my time is very limited outside of work. Not enough hours in the day! :drunk:
 
Hoppopotomus said:
Ignorance I guess. :confused: I was under the impression that refrigeration units should technically be on their own 20 amp. dedicated circuit, so the power feed for the temp. controler that supplies the lager chamber plugs into a dedicated 20 amp. outlet on it's own circuit. The ale chamber power feed plugs into a 15 amp. outlet.

Anyways.....I finished sanding my kegs and got most of the plumbing put back together last night. Pics. later today, but we are in the middle of having an inground swimming pool installed, so my time is very limited outside of work. Not enough hours in the day! :drunk:
Makes sense - I know code in my area requires every kitchen appliance (range, micro, disposal, dishwasher, fridge, etc) to have its own dedicated circuit breaker and in many cases contractors end up putting each outlet in the kitchen on its own circuit breaker too.

Dude can you cut it out with all of your overlapping projects? You're making me feel lazy ;)
 
I'll post some updated pics over the weekend. We are having an inground pool installed and they are going to start the digging early next week. Last weekend, I decided to rent a sod cutter and strip out 1800 sq.ft. of sod to transplant into two large perimeter landscape beds that I am sick of dealing with. Every night this week, I have been moving the sod and will be spending this entire weekend digging up and pulling back the main lines of my sprinkler system to the back yard to try to salvage it. Haven't had much time to get the new panel up and running.
 
Here's the reason I have gotten so far behind on my brewery build. This little project has taken up the majority of every waking moment outside of work for the past few weeks. The prep work of stripping sod and digging up sprinkler system zones affected by it has been a nightmare....especially in the 90 degree plus weather with near 100% humidity. :drunk:

IMG_3267.jpg
 
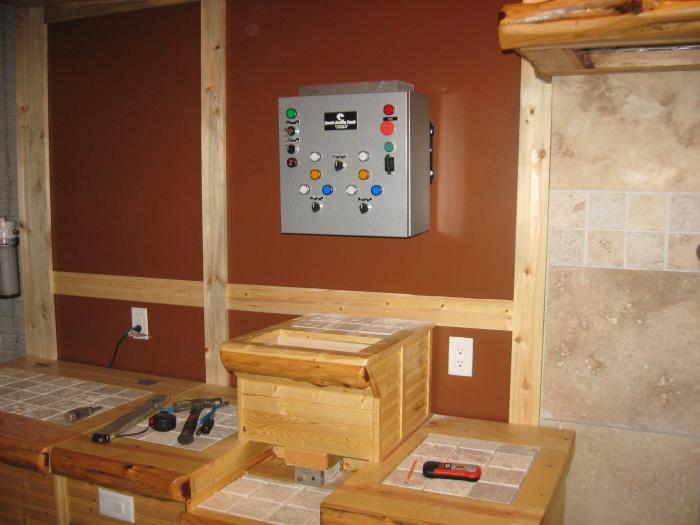
I did manage to get the HDTV wall mount modified and the control panel hung. Sure makes it much easier to take off of the wall if need be, and I can mount it higher to keep it out of the reach of the kids, but still tilt it downward slightly for a comfortable reach for me.

IMG_3226.jpg


IMG_3227.jpg


IMG_3231.jpg


IMG_3233.jpg
 
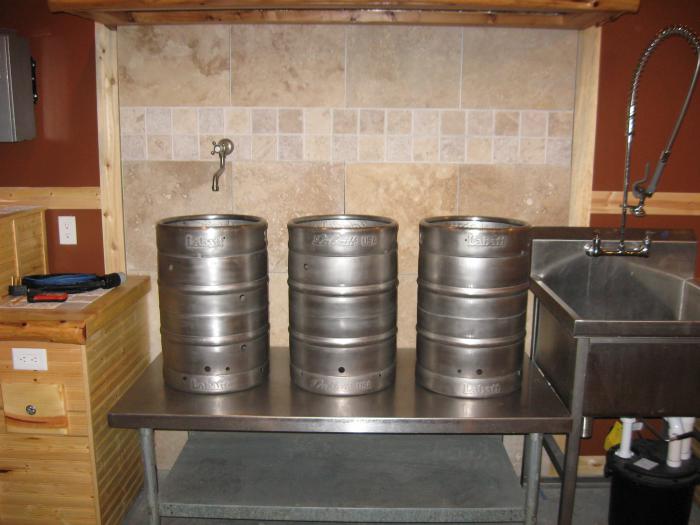
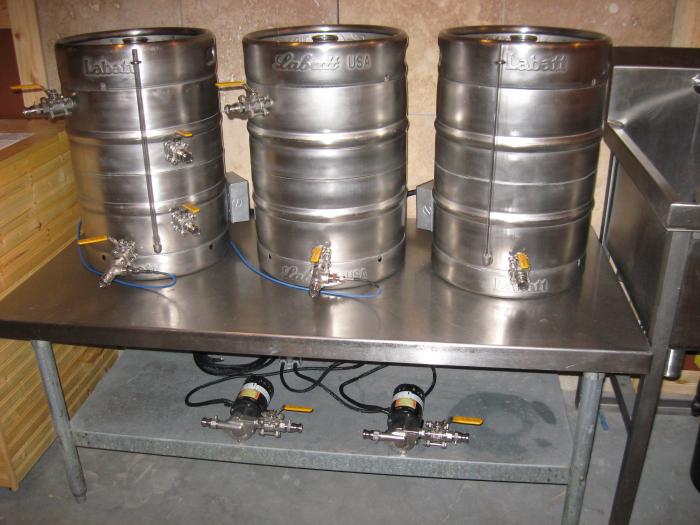
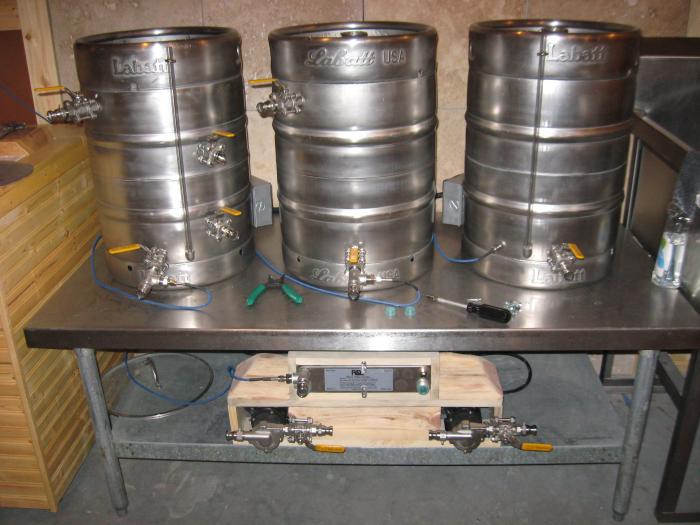
Kegs cleaned up and reassembled. Still need to build a pump mounting system and some hoods for over the pumps. I've decided that I don't have the patience or time to polish to a mirror finish, so I'm keeping them in a matte finish to match the other stainless in the brewery.
 
Looking impressive!


Have you milled any malt in there yet, and if so, how do you deal with the malt dust? I apologize, that I wanted to see your build, but mostly skimmed the thread and looked at the pics, so redirect me if this is already discussed.

Also curious about the fermentation chambers. How are they cooled? I see some control panel, but again confess I skimmed and gawked.

How has the sump pump drain been working for you? I've been thinking about doing something like that on a much smaller scale for the beer tap drain plate, which currently drains into a bucket. Not fun to clean and dump....

TD
 
I have used the mill a half dozen times down there. There is a little dust at the top end of the mill, but not bad at all. The grain drops down a chute into a bucket housed in a sealed cabinet below. Everytime I mill, I wipe down the top surfaces of the mill cabinet and shop vac. the lower compartment. I plan on simply placing a garbage bad over the control panel above while milling, so I don't anticipate any issues.

I have a full thread devoted to the grain mill build, as well as the fermentation chambers. Check out my signature line and you will find the links. The chamber thread explains my cooling sources in both chambers.

The ejector pump works great. It has made life so much easier having a big deep well sink with a drip pan and pre-rinse faucet. Clean up is much quicker. :mug:

Hey BadNewBrewery......I'm getting to it! I am having a pool installed, so all of my time has been devoted to that project. Don't worry though....I continue to brew the "old fashion" way with my other system, so the pipeline is full. ;)

A pool as a mash tun would make some big batches. :)
 
The pool has a high efficiency boiler to heat it, along with a solar cover, so I'm sure it could hold some pretty consistent mash temps. I think your onto something. :mug:
 
Looks like a great build, and you've clearly thought it all out.

I have the "luxury" of outdoor brewing ability year round. Rain or shine, I can usually get er done, but indoor brewing sounds like a lot of fun. I could get in trouble thinking about it..

Mom went to Oxford HS btw. Spent lots of time there visiting grandparents.

TD
 
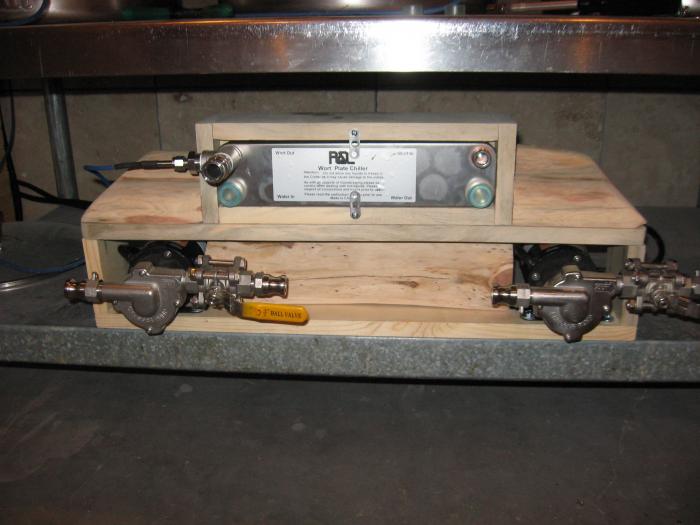
Had a couple of hours today to build the pump and plate chiller mounting system. Of course, I had to incorporate knotty pine boards and cedar logs. Hard to tell by the pics, but should look decent once clear coated. I just need to order a couple of more cam lock fittings for the plate chiller and run the duct work for the ventilation fan. Almost there! :mug:

Thanks TD! My kids go to Oxford Schools....great school system and a great place to live. Close to everything, but still some seclusion if you want it.

IMG_3281.jpg


IMG_3283.jpg
 
WOW! This looks amazing!! I am very envious of this! I started homebrewing wine and after being pretty successful at that my interest has shifted gears a little into all grain! I skipped extract. I tried a Mr. Beer kit once and hated it! I have been pretty cheap with my all grain equipment. ( I made a mash tun out of a cooler) :rockin: Some day I would love to be able to have a brewery like this in my basement! You are quite the carpenter! Nice work man!
 
Looking awesome man!
This has come a LONG way. Are you going to live-stream your first brew session? Or, maybe the third or fourth - once you get the bugs worked out?
 
WOW! This looks amazing!! I am very envious of this! I started homebrewing wine and after being pretty successful at that my interest has shifted gears a little into all grain! I skipped extract. I tried a Mr. Beer kit once and hated it! I have been pretty cheap with my all grain equipment. ( I made a mash tun out of a cooler) :rockin: Some day I would love to be able to have a brewery like this in my basement! You are quite the carpenter! Nice work man!

I appreciate the compliments. I started with a deluxe home brewing kit from my local HBS and a SS kettle that my wife surprised me with a few years back. At first it was just extract with steeping grains and then I moved to more of a BIAB partial mash approach. When I decided to move to AG, I started with a cooler too. Very effective at keeping temps! Like I have said for a long time, it's not about the equipment that you use, it's the process that you use that produce great beer. I tend to be a little ADD, so I have to have projects going at all times. Once I starta project, then tend to get a little carried away with things.....what do they call that....OCD? ;) Anyways, it all started from a redwood bar top that I found in northern California, then the rustic bar, then the keezer, etc., etc. Once I started with the whole rustic decor thing, I decided to carry it though to the brewery. I am not a master carpenter by any stretch of the imagination....knotty pine paneling and cedar logs are very forgiving to work with, so you don't have to be a highly skilled cabinet maker to produce some pretty cool things. Thanks again! :mug:
 
Looking awesome man!
This has come a LONG way. Are you going to live-stream your first brew session? Or, maybe the third or fourth - once you get the bugs worked out?

Dude! I'm not that high tech.....I wouldn't have the slightest clue how to do that. :confused: Maybe you and Chip could take a little road trip to Michigan....it's only 750 or so miles! Shoot a little video of my set up in action (if it ever gets done!), tour, and showcase some of the great breweries in my state, etc. Sounds like a great episode 25 for C&B.....make it happen brotha! ;)

Seriously, I don't anticipate the first go round with this system to go too smoothly, so it would probably be a live stream of me swearing and thowing sh*t. Maybe someday I'll post a video, but not until I have a few batches through it.
 
I just drank 3 cups of coffee spending my Sunday morning reading about this! Awesome build and thanks for reminding us that we all have lives outside of brewing and it can take time to build what YOU want.

The question is, how did the first brew day go!?! I'm only a short distance from you, and know the pool days are about over ;) get to brewing!
 
Dude! I'm not that high tech.....I wouldn't have the slightest clue how to do that. :confused: Maybe you and Chip could take a little road trip to Michigan....it's only 750 or so miles! Shoot a little video of my set up in action (if it ever gets done!), tour, and showcase some of the great breweries in my state, etc. Sounds like a great episode 25 for C&B.....make it happen brotha! ;)

Seriously, I don't anticipate the first go round with this system to go too smoothly, so it would probably be a live stream of me swearing and thowing sh*t. Maybe someday I'll post a video, but not until I have a few batches through it.

I was still swearing after 4-5 batches on my new eherms system ;)
 
I just drank 3 cups of coffee spending my Sunday morning reading about this! Awesome build and thanks for reminding us that we all have lives outside of brewing and it can take time to build what YOU want.

The question is, how did the first brew day go!?! I'm only a short distance from you, and know the pool days are about over ;) get to brewing!

I still haven't brewed on it. :( I'm juggling way too many things at once right now. I'm trying to get the landscaping done around the pool before winter and just finished harvesting my hop garden. I just opened my 3rd PT practice on top of working a crap load of hours. Not to mention family obligation, two kids in soccer, etc., etc. Just not enough hours in the day. I really want to hold off on brewing until the entire space is 100% complete, or I'm afraid that I will just keep brewing and never finish it. I meant to grout the backsplash and countertops this weekend, but couldn't find time. Still need to finish a bunch of woodwork and run the vent for the exhaust fan. Too much to do!!!! :drunk:
 
cheez said:
I was still swearing after 4-5 batches on my new eherms system ;)

That is definitely true. I remember thinking there was going to be a relatively quick learning curve. I was surprised how long it took to get a decent handle on all the moving parts. But now it is always smooth sailing.
 
I have been assured by Ryan at ebrew supply, where I got the panel, that he would walk me through the initial setup and programming when I'm ready to fire it up. I already have my entire process for a typical brewing protocol mapped out, so if I can get those processes programmed into the BCS, hopefully it will be far less frustrating than I'm anticipating. I guess we'll cross that bridge when we get there. Now that fall is upon us and I'll be cutting out 4 hours of lawn work per week, I should have some free time to finish the flooring, woodwork, and grouting in the brewery. I have also been exploring water chemistry and am sending samples out to Ward Labs to determine if my hard water, dual filtered setup is going to work or if I'm going to have to install an RO system. I know that my water is quite alkalinic, so I'm hoping for the best, but expecting the worst.
 
Back
Top