Help with Mash Recirculation

Homebrew Talk - Beer, Wine, Mead, & Cider Brewing Discussion Forum

Help Support Homebrew Talk - Beer, Wine, Mead, & Cider Brewing Discussion Forum:

This site may earn a commission from merchant affiliate links, including eBay, Amazon, and others.
In building my re-circulating BIAB system, I was under the impression that the goal of re-recirculating was two fold. 1. To maintain a constant mash temp., 2. To pass the wort THROUGH the mash. This thread seems to advocate keeping the grains in motion rather than passing the wort through a set bed. I just finished building my system. I have a 20 gl kettle with a false bottom and have bought a mash re-recirculation manifold from SS Brewtech that will sit in the bag on top of the mash. http://www.ssbrewtech.com/products/re-circulation-manifold-for-infussion-mash-tuns
After reading this thread I'm concerned that I have set myself up for failure. Does anyone successfully and consistently re-circulate through the mash and should I just plan on a re-design and make a COFI type solution as many on this thread are doing?View attachment ImageUploadedByHome Brew1478444397.672361.jpgView attachment ImageUploadedByHome Brew1478444419.865697.jpg
 
Nice looking rig you have there. I've been recirculating thru the bed for about 3yrs. using propane to maintain temp and a small spray head under the lid. It's worked great for me only having one issue with low flow through the bed causing the pot to over flow. I've stopped asking for double crushed grains and have had no problems since. I like to stir the grains a couple times during the mash also just in case i've got any channeling going on. I use Bayou classic with the basket and am very satisfied as you probably will be with your setup.
 
The only problem with having that manifold on the bottom of the bag is the wort will take the path of least resistance and bypass the grain if your pickup is on the bottom as well.
 
In building my re-circulating BIAB system, I was under the impression that the goal of re-recirculating was two fold. 1. To maintain a constant mash temp., 2. To pass the wort THROUGH the mash. This thread seems to advocate keeping the grains in motion rather than passing the wort through a set bed. I just finished building my system. I have a 20 gl kettle with a false bottom and have bought a mash re-recirculation manifold from SS Brewtech that will sit in the bag on top of the mash. http://www.ssbrewtech.com/products/re-circulation-manifold-for-infussion-mash-tuns
After reading this thread I'm concerned that I have set myself up for failure. Does anyone successfully and consistently re-circulate through the mash and should I just plan on a re-design and make a COFI type solution as many on this thread are doing?View attachment 376268View attachment 376269

Funny, I don't remember this thread advocating keeping the grains in motion. Of course I didn't re read it all, so it's possible I'm wrong. The conclusions I remember were a few best practices, like mill gap settings, allowing the mash to sit, throttling the pump at start up.

You'll be fine with the set up you have. I would wager that an overwhelming majority of people with recirculating BIAB systems take your approach. I have no hard data to back that up, but I am going solely on the conversations I see occurring in this forum.

From what I can tell, there is no huge benefit to keeping the grains in motion. Maybe there's a minor benefit in terms of efficiency, but I'm not convinced of that.
 
I guess I misunderstood. I thought the COFI setup being talked about here where all the "lock line" installs with the holes being drilled were being stuck down in the mash to create a moving mash. I'm glad to know I've got a good setup. I definitely plan on doing the wider crush of .050", 10 min. rest, easing into the flow on startup.
 
Perhaps disturbing the top of the grain bed during recirc may have some benefit, I have noticed during a regular runoff that some flour or small bits can make a layer of mud at the top of the grain bed...idk

IME I've seen it plug up both top and bottom??
A light stir, or "raking" the grain bed surface may help. Idk
 
In building my re-circulating BIAB system, I was under the impression that the goal of re-recirculating was two fold. 1. To maintain a constant mash temp., 2. To pass the wort THROUGH the mash. This thread seems to advocate keeping the grains in motion rather than passing the wort through a set bed. I just finished building my system. I have a 20 gl kettle with a false bottom and have bought a mash re-recirculation manifold from SS Brewtech that will sit in the bag on top of the mash. http://www.ssbrewtech.com/products/re-circulation-manifold-for-infussion-mash-tuns
After reading this thread I'm concerned that I have set myself up for failure. Does anyone successfully and consistently re-circulate through the mash and should I just plan on a re-design and make a COFI type solution as many on this thread are doing?
The point is to have relative motion between the grits and the liquid, in order to create shear at the surface of the grits. It doesn't really matter if the liquid is moving past the grits, or the grits are moving thru the liquid, as long as you get shear. Shear can dislodge low density gelatinized layers from the surface of the grits, allowing easier access for water nearer the center of the grits, thus increasing the rate of gelatinization, thereby giving an overall increase in the rate of conversion. Shear will also reduce the thickness of the diffusion zone near the grit surfaces, thus increasing the local concentration gradient, resulting in increased rates of diffusion, also speeding up the conversion.

Brew on :mug:
 
I guess I misunderstood. I thought the COFI setup being talked about here where all the "lock line" installs with the holes being drilled were being stuck down in the mash to create a moving mash. I'm glad to know I've got a good setup. I definitely plan on doing the wider crush of .050", 10 min. rest, easing into the flow on startup.

I don't think you misunderstood. Both the Brew Boss and the Colorado Brewing systems imply the constant washing will promote efficiency.
 
Does anyone use a Corona mill? How would you determine gap settings there? I have been having this issue and am considering loosening up my crush a little bit.
 
It's possible to modify your controller so that you can switch to 120V for heating during the mash, which would drop the element power to 1375W max. If the element is overheating the wort locally and denaturing the enzymes, this could help. Let me know if you are interested in how to do this.

Brew on :mug:

In a PM @stever1000 wrote:
"In this post you mentioned a way to switch the voltage between 240 and 120 going to my element (cutting the power) so that I have less heat during mash re circulation, to reduce my concern about local scorching

https://www.homebrewtalk.com/showpost...&postcount=237

Could you explain how to do this with a switch? Can I put a suitably rated switch on the output of one leg of the contactor going to the element, or what's the method?"​

The following diagram shows the switching involved.

DSPR120 1-Pump 1-Aux Dual Voltage Input Output.jpg

You can ignore the pigtail on the input side. This was for someone who wanted to be able to run their system from either 120V or 240V input.

Brew on :mug:
 
Thanks Doug, I will check it out again :mug:

doug293cz said:
Steve,

No, putting a switch between terminal 2 of the SSR and the contactor just enables and disables the SSR. You need to have a selector switch between neutral and the hot line that does NOT go to the SSR. This is what the R30A power relay does.
Doug
stever1000 said:
Hi Doug,

Thanks for the diagram, but I am having trouble seeing what selects 120 vs 240 volt?

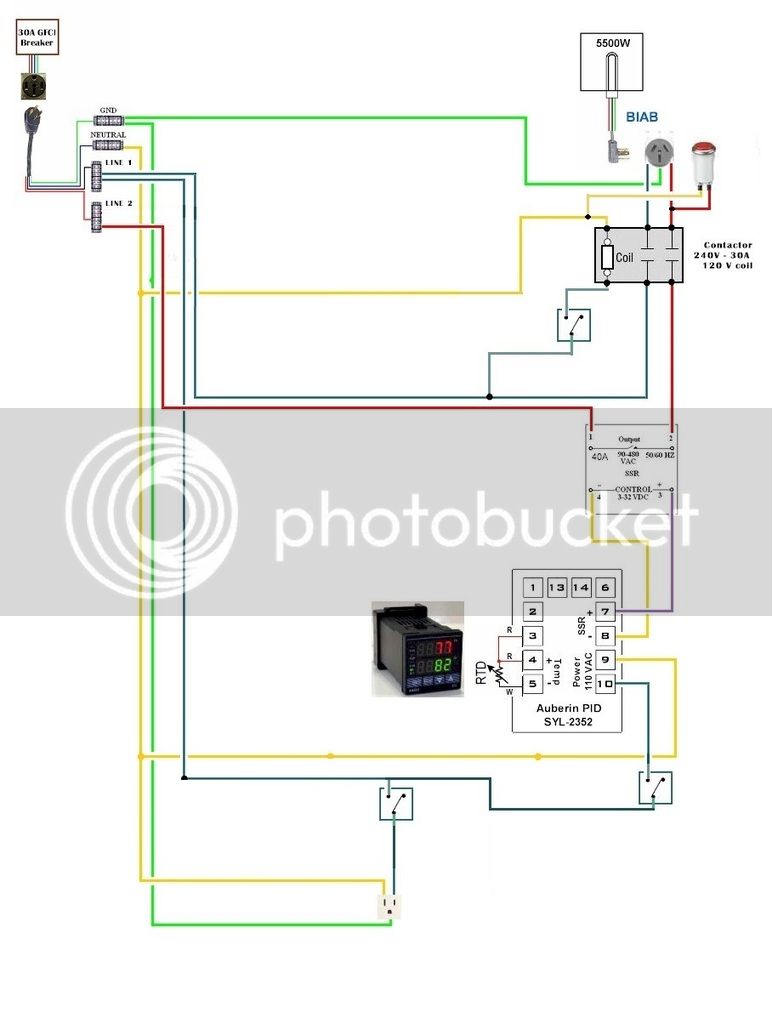
This is my setup (similar)

Could I put a switch between output 2 of the SSR and the contactor (red line)?

Thanks,

Steve

30a%20setup_zps7zd8txvl.jpg
 
Just to confirm I understand...

when switch SW4 is off the element operates on 120V, when the sw4 switch is turned on, it sends current to the coil of the mini relay and the relay switches and sends the remainder of 120V to the element making the voltage 240V. Is this right?
 
Thanks Doug, I will check it out again :mug:

Steve,

No, putting a switch between terminal 2 of the SSR and the contactor just enables and disables the SSR. You need to have a selector switch between neutral and the hot line that does NOT go to the SSR. This is what the R30A power relay does.
Doug

To understand what is going on, there are a couple of concepts that you need to understand.

First, electrical current flows in a loop. Think of water flowing thru pipes. If water flows in thru one pipe, it must flow out thru another pipe (or else have a place where it is dumped or collected.) Electricity is the same. You alway have at least one wire where current flows in and another where current flows out. With AC current, the in and out directions reverse 120 times per second (100 in Europe and other 50Hz countries.) But, you can ignore the direction reversals conceptually. If you put a valve (switch) anywhere in the flow loop, closing the valve (opening the switch) causes flow to stop everywhere in the loop. If you have multiple, interconnected loops, then things can get complicated.

Second, 240 volt systems in the US (and countries with similar electrical standards) provide the 240 volts from a paired set of hol lines. When one is at +120V the other is at -120V, so that the total voltage difference between them is 240V. For 120V in a US style system, you pick one of the 120V hot lines, and for the return part of the loop you use the neutral wire (which is at close to 0V always.) So, to get 240V you have to use both hot lines, and to get 120V you need to use one of the hot lines and neutral. To switch between 240V and 120V, you have to switch between one of the hot lines and neutral on one side of the load. This is what the R30A relay (controlled by a separate switch) does in the diagram in the post above.)

Another thing that is required (by code) is that if you have both hot and neutral feeding a load, then switching the load on and off must be done on the hot line rather than the neutral line. If you have two hot lines, then any main disconnects need to switch both hots, but you can switch current to the load on and off by switching just one of the hot lines (that's the hot line that connects to the SSR.)

In the 120V operation mode, the SSR needs to switch the one remaining hot line feeding the load. That means switching between 120V and 240 volt (switching between neutral and hot 2) feeding the load must be done on the hot line that doesn't go thru the SSR.

Brew on :mug:
 
Just to confirm I understand...

when switch SW4 is off the element operates on 120V, when the sw4 switch is turned on, it sends current to the coil of the mini relay and the relay switches and sends the remainder of 120V to the element making the voltage 240V. Is this right?

We posted at the same time - reading what you said I understand the relay part (had to google the orientation too :D )

Right??
 
We posted at the same time - reading what you said I understand the relay part (had to google the orientation too :D )

Right??

Sounds like you've got it now.

Note that you can't just use any SPDT (single pole, double throw) relay for this application. Most double pole relays have very different current ratings for the NO contacts vs. the NC contacts. It's common for the NC contacts to be rated at only 1/10 the current of the NO contacts. For this application we need a minimum rating of 23A when in 240V mode, and 12A when in 120V mode. The R30A has NO contacts rated at 30A max, and the NC contacts rated at 20A max (unusually high for NC contacts.) The R30A is ideally suited for this application. The hot line needs to go thru the 30A NO contacts, and the neutral line then goes thru the 20A NC contacts.

Brew on :mug:

Thanks, I will source out a suitable relay with those requirements.

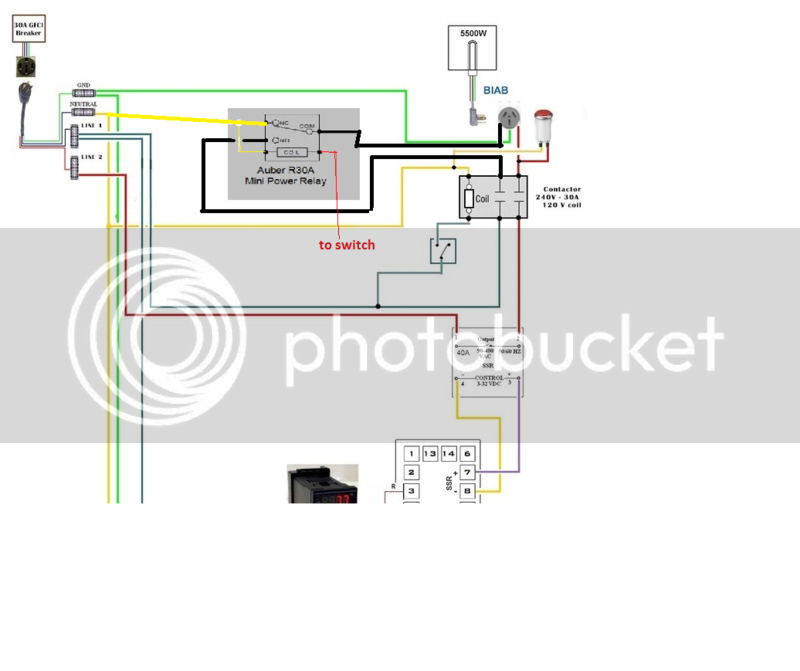
Is this how I would incorporate it into my diagram when I am also using a contactor?

diagram_1.png
 
Note that you can't just use any SPDT (single pole, double throw) relay for this application. Most double pole relays have very different current ratings for the NO contacts vs. the NC contacts. It's common for the NC contacts to be rated at only 1/10 the current of the NO contacts. For this application we need a minimum rating of 23A when in 240V mode, and 12A when in 120V mode. The R30A has NO contacts rated at 30A max, and the NC contacts rated at 20A max (unusually high for NC contacts.) The R30A is ideally suited for this application. The hot line needs to go thru the 30A NO contacts, and the neutral line then goes thru the 20A NC contacts.

Is there another device or a different way I can accomplish this? The R30A ends up being $20usd to ship it up here in Canada, and I can't find an equivalent relay locally with the same amperage ratings for the contacts. :(
 
Is there another device or a different way I can accomplish this? The R30A ends up being $20usd to ship it up here in Canada, and I can't find an equivalent relay locally with the same amperage ratings for the contacts. :(

The R30A is the simplest, cheapest solution I have seen. another way to do it requires two contactors and an on-off-on, 3 position selector switch, and has a potentially nasty failure mode if the selector switch is operated too quickly.

Brew on :mug:
 
What are other uses of a power relay like this? I found an option that has cheap shipping, but I need to buy 5 minimum (at $4/ea):confused:
 
Reviving an old thread. Is anyone using a COFI style recirculation arm in a MT with a false bottom and no bag/basket? Maybe I have missed it in this thread but thinking of buying a piece of copper and drilling holes in it for recirculation (bottom to top) jamming it down in the center of the grain to try out to see if it will help with mash efficiency, but wasn't sure if the draw from the bottom of the tun under the false bottom along with center-out wort recirculation above it would be fighting each other or not. Right now I use the standard silicon hose draped above the grain to whirpool. I seem to get some channeling around the side and a cone in the middle and thought this might help.
 
Last edited:
My brew boss came with a false bottom, I also regulate the flow with the gate valve that was included as well. You can close it or open it the get matching flow
 
The point is to have relative motion between the grits and the liquid, in order to create shear at the surface of the grits. It doesn't really matter if the liquid is moving past the grits, or the grits are moving thru the liquid, as long as you get shear. Shear can dislodge low density gelatinized layers from the surface of the grits, allowing easier access for water nearer the center of the grits, thus increasing the rate of gelatinization, thereby giving an overall increase in the rate of conversion. Shear will also reduce the thickness of the diffusion zone near the grit surfaces, thus increasing the local concentration gradient, resulting in increased rates of diffusion, also speeding up the conversion.

Brew on :mug:
Why do you add grits to the grist?
 
Reviving an old thread. Is anyone using a COFI style recirculation arm in a MT with a false bottom and no bag/basket? Maybe I have missed it in this thread but thinking of buying a piece of copper and drilling holes in it for recirculation (bottom to top) jamming it down in the center of the grain to try out to see if it will help with mash efficiency, but wasn't sure if the draw from the bottom of the tun under the false bottom along with center-out wort recirculation above it would be fighting each other or not. Right now I use the standard silicon hose draped above the grain to whirpool. I seem to get some channeling around the side and a cone in the middle and thought this might help.

I use the same method with the hose. I’m a single vessel brew in a basket guy. I’ve seen the same results as you during recirculation but my efficiency has been so consistent at 75% I just don’t see a reason to change it.
 
I have the COFI and have three batches under my belt. I’m in the 70-80% mash efficiency. BH is 65-70. I recently tried Scotch Ale 1.080 and came up with 1.066 OG. I started a thread under the electric brewing section trying to get suggestions for improvement. My next batch I plan to stir the grains which I haven’t before. The benefit to the bag is you guys can easily stir without having to remove anything. Just Something to think about.
 
Back
Top