Frigidaire Model FRC445GB Mini-Fridge Kegerator Conversion

Homebrew Talk - Beer, Wine, Mead, & Cider Brewing Discussion Forum

Help Support Homebrew Talk - Beer, Wine, Mead, & Cider Brewing Discussion Forum:

This site may earn a commission from merchant affiliate links, including eBay, Amazon, and others.
Damn, I thought I did good by talking them down to 130.00.,. does it have a plug?

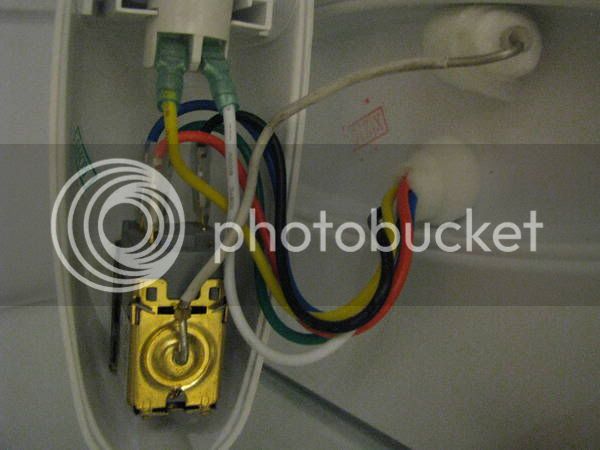
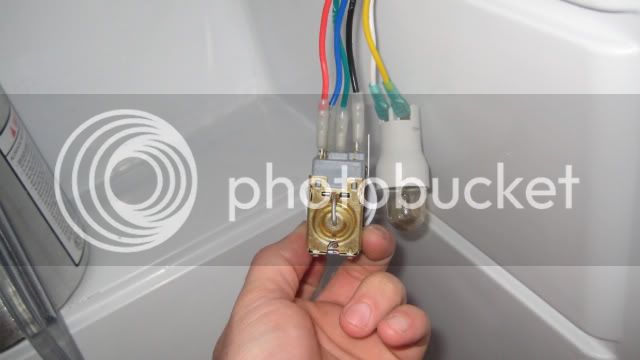
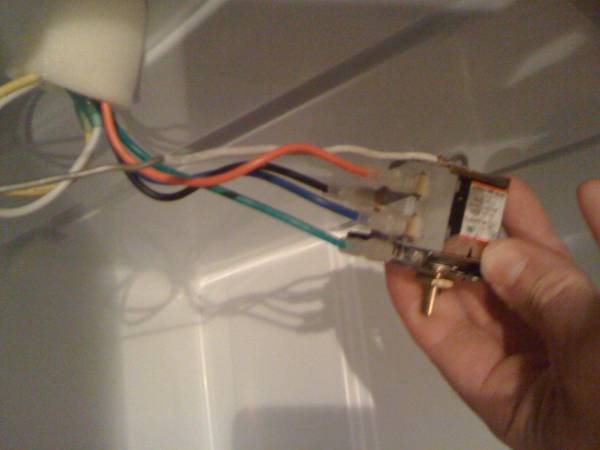
Anybody ever NOT re-install the light if/when the relocate the thermostat?

Do I really need a light in there?

EDIT:
I just disconnected the Light and power it up and the compressor fired up. So I guess I don't need the light.

Damn, then I feel amazed by the deal I got. Two for $150! Scratch and dent at Lowes last year. One is a kegerator now (cold box extension under bar) and the other is my bottles and mixers fridge (also under bar)
 
I manged to mess up my thermostat a little bit. Any chance anyone could help me out.

I managed to pull off the blue wire, and there are 2 posts that it could go to. One is a short post that matches the other 3 where wires are hooked up. (I assume its this one) There is another post though, a longer one that is more on the outside apart from the other 4. Just want to make sure its not this one the blue wire goes to.

Also, what did you guys do with the long wire that was tethered to the inside of the fridge once you pulled it out? Its over 12" long.
 
Hope this helps.
I ALWAYS take a pic of the existing wiring BEFORE I start any job.
IMG_06292.JPG
 
Thanks for the pic.

I'm still not to sure what to do with the wire that is tethered to the thermostat. (The one that actually senses the temp) It goes into the side panel in the very front of where the thermostat is mounted so I couldn't' just flip the whole unit around. I pulled the wire out the whole way. I'm guessing I could just stick it to the wall with duct tape but think there must be a better way. I've looked through all the pics on this thread and haven't really seen a solution.
 
Well, I was going to start a new thread, but what the hell. I have the very similar Frigidaire. The one I have is the, Frigidaire FRC445GM. Well, anyone who owns one of these fridges and uses it as a kegerator should know what a tight fit it is for two corny kegs not to mention it couldn't hold a corny and a 1/6 barrel commercial sankey at the same time :mad: And in order for it to hold this 1/4 barrel of Modelo I had to prop the keg up on to a disc golf disc to avoid the bottom lip of the fridge door.

IMG_1018.jpg


IMG_1021.jpg


So the fridge door on this fridge sucks, I don't use the shelves, and it is just a pain in the @SS so I decided to take action, and luckily one of my friends let be borrow his rotary tool, so the fridge door meet its match. *YAY* :ban:

IMG_1029.jpg


Things have been working out great since the door mod, and all I need to do now is find a piece of plastic to cover it up. ;)
 
Thanks for the pic.

I'm still not to sure what to do with the wire that is tethered to the thermostat. (The one that actually senses the temp) It goes into the side panel in the very front of where the thermostat is mounted so I couldn't' just flip the whole unit around. I pulled the wire out the whole way. I'm guessing I could just stick it to the wall with duct tape but think there must be a better way. I've looked through all the pics on this thread and haven't really seen a solution.

I too pulled the whole temp lead out. I decided that function was much more important than looks so I used a tube of Dap Quick Seal bathroom adhesive to actually glue the probe around the back wall and glue the thermostat/light housing to the back wall also after extending the wires for both the light and the thermostat.

I made sure the housing was set and dried before fitting the probe around the corner and against the back wall and around the other corner. Plugged it in and compressor fires up as before and cools.

Waiting for the tower, should be here today.
 
Well, anyone who owns one of these fridges and uses it as a kegerator should know what a tight fit it is for two corny kegs not to mention it couldn't hold a corny and a 1/6 barrel commercial sankey at the same time :mad:

I was disappointed in this as well as this is exactly what I wanted to use it for. Not hard to get it to work though. A 1/6 and corny (the 8.5" one anyway) will fit with a little alteration. I used my Fein tool and cut out the sides where the freezer was. Scraped some of the foam out so it was flush with the other side rails. Now both kegs fit but the door didn't quite close. Again, chopped out a small section of the bottom most rail of the door about 8 inches wide and now it all fits like a charm.
 
I was disappointed in this as well as this is exactly what I wanted to use it for. Not hard to get it to work though. A 1/6 and corny (the 8.5" one anyway) will fit with a little alteration. I used my Fein tool and cut out the sides where the freezer was. Scraped some of the foam out so it was flush with the other side rails. Now both kegs fit but the door didn't quite close. Again, chopped out a small section of the bottom most rail of the door about 8 inches wide and now it all fits like a charm.

I have used a Fein multimaster, and that tool is awesome. That being said I just wish the price of the tool and the bits were more reasonable.
 
I have used a Fein multimaster, and that tool is awesome. That being said I just wish the price of the tool and the bits were more reasonable.

Harbor Freight's Multi tool, although not close in quality to the Fein, is what I used to trim the molded door on my Frigidaire. For 30-something bucks, can't be beat.
 
Harbor Freight's Multi tool, although not close in quality to the Fein, is what I used to trim the molded door on my Frigidaire. For 30-something bucks, can't be beat.

While I agree that the Fein tool is WAY too expensive for most DIYers and shade-tree woodworkers to afford and justify I am a firm believer of not spending the same money twice. 30 bucks vs. 400.00+ for the Fein makes other models somewhere in the middle seem more attractive. Just remember, you DO get what you pay for.

For a "One Project" tool, the 30 bucks sounds great. But I guarantee that once you own the tool, you will find more uses for it.

On a separate topic, on an earlier post it was said that the use of a roto-zip cut-out tool was used to clean out the foam where the plywood sits so it can sit flush under the top. GREAT tip.

Additionally, when you get the plastic top off, notice the "X" that is on the underside. It is a VERY subtle thicker re-enforcement for the top. Set your rot-zip for that depth + the thickness of the plywood otherwise there will be a slight rounding or bulge to the top. Also I used a router to do this. If the roto-zip kicks up as much dust as the router be warned---DO THIS OUTSIDE AND WITH A DUST MASK ON--- Not sure what the foam is made of but I am pretty sure you don't want that crap in your lungs!!! VERY fine dust all over the garage.

still waiting on the tower........ FEDEX Hurry the hell up!!!!!
 
Just a couple of quick pics to show how I hacked this beast apart to get a 1/6 and corny to both fit in there, as I mentioned a few posts above. Left side gets the sixtel, the right side gets the corny.

First keg comes today. Rise Up Stout from Evolution Brewery in Delmar DE. Good stuff!


Just a couple of quick pics to show how I hacked this beast apart to get a 1/6 and corny to both fit in there, as I mentioned a few posts above. Left side gets the sixtel, the right side gets the corny.

First keg comes today. Rise Up Stout from Evolution Brewery in Delmar DE. Good stuff!

You might want to check to see if you can fit a 1/4 barrel in there with the current front door mod. You might have to hack a little more off.
 
I doubt I'll try to get a 1/4 in there. I'll probably stick with the sixth and corney setup. Still kinda suckss that I'll have to keg jump into the corny but at least I know it can be done.
 
I doubt I'll try to get a 1/4 in there. I'll probably stick with the sixth and corney setup. Still kinda suckss that I'll have to keg jump into the corny but at least I know it can be done.

keg jump?
 
I meant that I'll have to transfer the contents of one sixtel to a corny so I can get 2 kegs of commerical beer in there.
 
Well, I did it. I accidentally pulled too hard on the main thermostat wire (the white one) and it severed the main wire. It would seem like I'm totally hosed for using the fridge thermostat now, but can I still use an external controller?? I'm really concerned that I may have hosed this entire fridge.
 
I can lend my advice. Is it the white wire or the grey large sensor probe? I broke the probe and needed to go with an external. If it's just the wire you should be able to splice it or attach it somehow I would think. Don't panic though at the very least you should be able to go external. I can help you through PM or this thread although I'm busy this weekend with my own bachelor party. So bear with me.
 
Unfortunately, it's the gray sensor probe--broke it off flush with the top of the thermostat, so doubtful there's enough wire (hardly any) left to solder it. Looks like external is the way I'll be going.
 
Yeah that sucks. I did the same damn thing. It's pretty fragile. If you go back a few months in this thread you can read my sad story. External is the way to go from here. I had some struggles but got it done. I would have been tempted to buy a new fridge but this was the last thing I had to do. I had already secured the tower and rails. I spent another 60 bucks on a temp control and put it in. It works fine now. I can send you the directions I got from other helpful people on the site once you select a controller.

I will supply you with another feel bad story to make you feel better. I had left the kegerator door open a crack so the compressor ran constantly and froze the beer line. So when I was trying to pour nothing came out and I left the tap open. Needless to say it thawed when I was gone and a full untouched keg of a wheat and rye ale blew all over my carpeted floor and walls at 30psi. Drained my co2 as well. That should make you feel better. You already made the same mistake as me once... Dont be like me!
 
Alright, I just realized something. Even though the gray probe wire is broken, the compressor will run if I have it set on the "6" max setting.

If I bought a digital temperature controller that is pre-wired with a probe, like this one: http://www.northernbrewer.com/default/review/product/list/id/2335/ couldn't I just plug my fridge into it on the max setting, put the probe in the fridge, and the temperature controller would maintain temps by shutting the fridge on and off? Isn't that how these work?
 
You stil have a problem. the temp control unit you have picked out will not do anything Because the thermostat that is till wired is running off a 1/4 inch probe. you need to find out how to BYPASS the original thermostat so the new one will actually control the compressor.
Somebody has done this, please wake them up and have them help.

In his case it is not a problem.
Since he broke off the capillary tube the thermo switch is always on.
As long he turns his temp setting to the highest # on his dial the compressor runs forever.
Using a Ranco type controller will now work, using a Love requires removing the thermostat wires.

Cheers,
ClaudiusB
 
Thermostat with and without capillary tube.
Pictures by Schnitzengiggle same model.
Posted without his permission;)

IMG_04021.jpg


keggy_004.jpg


Cheers,
ClaudiusB
 
In his case it is not a problem.
Since he broke off the capillary tube the thermo switch is always on.
As long he turns his temp setting to the highest # on his dial the compressor runs forever.
Using a Ranco type controller will now work, using a Love requires removing the thermostat wires.

Cheers,
ClaudiusB


Batter swings and hits it out of the park.

Compressor will run all the time when turned to high. He's on the right path.

:off:
Black is 110V from wall plug to t-stat.
blue is switch leg back to comp.
Orange is 110 to door switch for light control.
Yellow is 110V from door switch to light.
White wire is neutral from light back to wall plug.
Green is our friend, Ground.

If you take a close look the terminals are labeled as to where they go. (H = hot, L=light, C=comp) Verified using a multi-meter.

Now the disclaimer: That info and a lack of respect for electricity could be dangerous.
 
i have this same model and converted it in about an hour. i didnt bother with a tower, i have two taps on the front of it. this is my first kegerator and is definitely a conversation piece. most of my friends were at first like 'what the hell is that?' until i pour a glass of golden goodness.
 
Thanks to everyone for all the info on the conversion. Got mine done a few months back and works great. I have since changed my taps over to the Perlick and love them... Thanks again...

100_1424.jpg
 
Saw this post and thought I'd add my throw in my penny. By coincidence I installed a tower on this very fridge today. The front 4" doesn't have any coils in it. No need to remove the top if you want the tower in the front.

After hole drilled.
attachment.php


Inside of fridge after tower installation.

attachment.php


The unit seems pretty solid. I didn't see the need for a reinforcement plate on the inside. But, I'll monitor it and add if needed.

Finished product.

attachment.php


First pint poured. Not really a pint, more like 12oz.

attachment.php

Sorry! I think my class is warped.

Still room for a drip tray. Easiest install ever. only took 1 hr from start to finish.

With this set up I don't see where there is room for a drip tray. I have same frig but with a dual tap tower and it seems as thought with the extension of the faucets that it will pour over the edge. I am now leaning towards the more invasive taking the top off and carefully exposing the coils and mounting in the back. I know I have seen that done once before with this fridge but didn't know if there was any more info out there I am missing.
 
Thanks for referencing my pics above.

After using this setup for about a year, everyone who uses the tap hasn't spilled a drop. I will admit there isn't a lot of room for a drip tray, but there's only a few drops after each pour so a tiny tray is all that needed. My wife bought a styling soap tray that fits nicely and doesn't hang over the edge.
She's also only 5'-2" and didn't want to reach very far to operate the tap. She's kinda funny that way.

So, with that said. If you desire to place the tap farther back and use a regulation drip tray, go for it. It's a little more work but doable. Just do your research and be careful of the coils.

Search this thread again, I think the instructions are in there somewhere.
 
She's also only 5'-2" and didn't want to reach very far to operate the tap. She's kinda funny that way.

My wife is 5'1" and has no trouble reaching the back of the fridge. Did you put this on a pedestal or something? How can a 5'2" tall person have difficulty reaching the taps that are shorter than she is?

I need a homebrew
 
My wife is 5'1" and has no trouble reaching the back of the fridge. Did you put this on a pedestal or something? How can a 5'2" tall person have difficulty reaching the taps that are shorter than she is?

I need a homebrew

No, It is not on a pedestal. If anything is on a pedestal it's the wife.
.
I didn't say she had difficulty. I said she didn't want to reach very far to operate the tap. She's kinda funny that way.:D

She has made numerous comments that she is glad that the tap is in the front. Since it's the only tap I have ever had I can't say I prefer having the tap farther back. The beer pours just as cold just as fast.

Some put the potato in the front and some put the potato in the back.:confused:


Cheers!:mug:
 
My build of the Fridgedaire...
4962648968_20a29dcb8a.jpg

4962055785_18a89f6ed4.jpg

4962056105_2677d245ab.jpg


Although I don't have pictures of the top off and the excavation of the foam I can share that I only took it down to the coils in a very small area. I cleared an area of maybe 1"x2.5" large enough to sink two beer lines through. I was hesitant to gamble and continue digging at the coils for fear I would poke one.

This was a much easier DIY project than the exterior door I tried and failed to hang yesterday. Thanks to this and other threads for the guidance.
 
Hey folks,
This has been a totally awesome and incredibly helpful thread about this fridge. Just a note that I picked up this 4.4 cf Frigidaire model from Lowes this week. Frigidaire has changed the interior shelving molded onto the front door and getting two cornys to fit is a tad more challenging. I had to play around a bit so I could get the door shut. Attacking all the new molded can holders and shelving will be in my future soon. I'll post a pic and confirm the model number.

Edit: Ah, I missed this one from June 2010: https://www.homebrewtalk.com/f51/fr...tor-conversion-89013/index30.html#post2120916

This is the same model number I have: LFPH44M4LM
 
It's really just the two middle "ridges" (one on the top and one on the bottom) that hold the shelfs/can holder that hit the kegs when closing. I have the same model and I just took a hacksaw to make them more flush with the rest of the door and then sealed with duct tape. Problem solved. Two cornies fit beautifully and the door shuts solid.
 
I have read this thread and saw that someone mentioned that they can fit two 5 gallons and 1 3 gallon keg with the CO2 tank mounted externally. Does anyone have pics available of their setup like this? I'm looking to up grade my current kegerator and if I can fit 13 gallons in a mini fridge it's always better than 10 gallons. Thanks
 
I just converted the same fridge; I bought the stainless steel version. I am going to keg my first batch on Sunday. I'll post some pictures of my conversion later. I wanted to thank you for the post since it helped me decide on this fridge. I purchased it from Best Buy.
 
best thread ever. I saw a couple posts mentioning the possibility of a 1/6 keg/corny combo, but never saw any photo evidence. What's the final word...possible? What mods need made to accommodate?

:edit: - nevermind - page 34! Would like to see pics of kegs inside though if anyone can help
 
Guys,

I have been following this one for awhile. I have the older style frig, is it possible to fit a 3 gallon keg on the back hump and run three taps up?

I have not seen any pictures of you guys mounting a gas maniflod in your figirators can I screw it in to the inside above the light?

Also I am starting on my bar soon and plan on running the lines through the bar top and mount the draft tower to the bar. Any suggestions on doing that?

Thanks,
MrLucky13
 
Thanks to everyone for all the info on the conversion. Got mine done a few months back and works great. I have since changed my taps over to the Perlick and love them... Thanks again...

100_1424.jpg

That mug is ugly and won't look good with Perlick's... you should send it to me quickly as to not offend anyone with it :mug:
 
Back
Top