You are using an out of date browser. It may not display this or other websites correctly.
You should upgrade or use an alternative browser.
You should upgrade or use an alternative browser.
ebay aquarium temp controller build
- Thread starter android
- Start date

Help Support Homebrew Talk - Beer, Wine, Mead, & Cider Brewing Discussion Forum:
This site may earn a commission from merchant affiliate
links, including eBay, Amazon, and others.
Zacharomyces
Well-Known Member
Just wired mine up (the simple one outlet for cooling, one for heating way) and it works perfectly! Way easier than I thought it would be.
JuanMoore
Getting the banned back together
this is probably the 100th time someone has said this, but has anyone come across a step by step (in laymans terms) where they've provided pictures mounting in the collar PLUS adding an AC 110V fan inside the keezer? there are just too many pages to read and i'm going cross-eyed..
thanks for your help this is great info
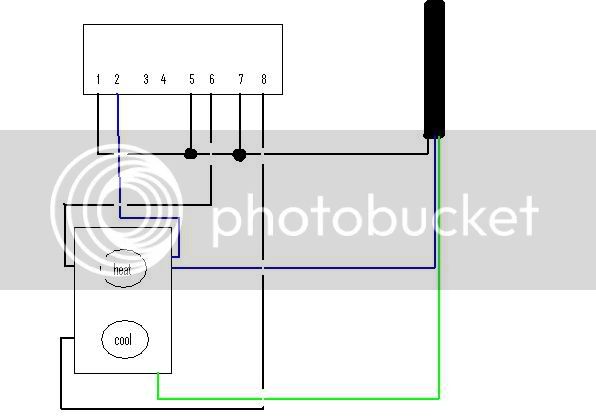
Will the keezer be indoors where it won't need heating? If so, and assuming you want to run the fan continuously (since that's really the only way it's effective for a keezer), and assuming you have the STC-1000 controller, here's a wiring diagram you might find helpful.

The first couple posts of this thread have some pretty detailed instructions. You'll just be mounting the controller in the collar of your keezer instead of in a plastic project box. Where you mount the outlet is up to you. I mounted a controller in the collar of my keezer, and put the outlet in an exterior single gang electrical box that I tuck into the compressor area. There's not much in the way of instructions, but there are a couple of pictures in the build in my sig.
JuanMoore
Getting the banned back together
I wish a mod would sticky a post or two with the best info on this topic. Seems like every week someone has the same problem.
With more than 200 pages thread? No wonder! I second to previous post. Wiki or sticky!!")
There are a lot of variations for the wiring depending on what it's being used for and what features people want. There's also a couple different controller models. This makes it difficult to have one simplified set of instructions that will work for everyone. The first couple posts of this thread give some pretty detailed instructions, with pictures and a wiring diagram. I really feel like anyone tackling this simple project should be able to figure out how to use that set of instructions and add an outlet, or mount it somewhere else, or make whatever other modifications they want, but that doesn't seem to be the case.
Got mine Friday. Finally had time this afternoon to get it wired up. Took about 1/2 hour. Used two outlets, one always on for my fan and one split to heat/cool. Seems to be working like a champ.
Do you have the wiring diagram for how to have a split heat/cool plust two always on? This thread is so long, I don't know where to look.
Lastly does anyone know if it would be good to use a fuse to protect the temperature controller from getting too much power. I don't have my unit yet, so I don't know what its rated for, and I don't know much about these sorts of projects so what fuse should I buy?
Do you have the wiring diagram for how to have a split heat/cool plust two always on? This thread is so long, I don't know where to look.
The "always-on" outlet(s) would be wired directly to your incoming power (cord) whereas the others would have one leg to power cord, the other to their switched slot on STC
Would be possible to repost the information for your webpage here in English. I like what I saw but am interested in the description provided.
Yes. it's here: https://www.homebrewtalk.com/f51/ebay-aquarium-temp-controller-modifing-ssr-361644/#post4506403
Well, the eBay ad/listing said 5A, the one-page "manual" that came with it said 10A, and, when I slipped the housing off, the actual component said 15A! I'm going with the assumption that I'm golden, and quietly hoping they're not using factory seconds or some such nonsense in the construction of these high-dollar contraptions.
-j
Happy to report that the keezer is finally plugged in and the $16 eBay single stage, 110V, display-in-F temp controller appears to be working. Temp controller said 71 when I plugged it in at midnight, and was down to 56 this morning when I left for work. (old craigslist 14.8 cu ft freezer, 1x6 collar, insulated, no fan yet, probe taped halfway down to a keg full of water with a towel over it.) I had expected it to cool more quickly, but it has 4 kegs full of water, 3 empty kegs, and still a good amount of empty space (I could fit 1 or 2 more kegs in there)... Hoping to be able to keg a dry irish stout and a best bitter tonight, and a Texas bock (Shiner Mock?) early next week (thus the 3 empty kegs) and get 'em carbonating. Hoping to be able to pour some pints for my 40th bday on Nov 10. Those of you with experience - does that sound reasonable?
Thanks for all the awesome info on these forums; I'll post pics to the "show us your kegerator" thread in a couple of weeks.
-jeff
eryk4381
Well-Known Member
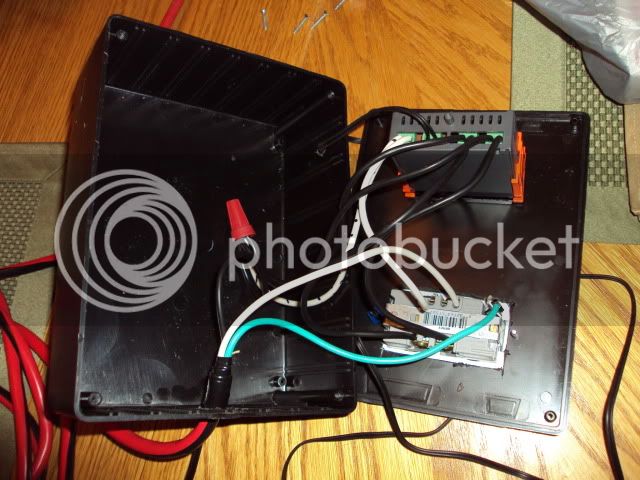
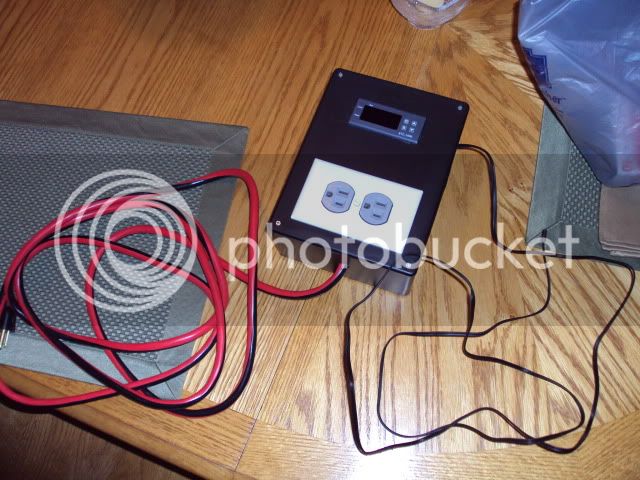
i was excited about the prospect of this temp controller, so i got one from ebay and put the whole thing in a project box from radio shack. one plug is switched for heating and the other for cooling. i have yet to build up my fermentation chamber that i'll use this on, but preliminary tests confirmed that the unit worked great. there is a 0.3 deg C differential on this thing, so it is pretty accurate and easy to set. i used a 14 gauge extension cord for all the wires. it does read in celcius, but that's OK by me.
all of the parts:
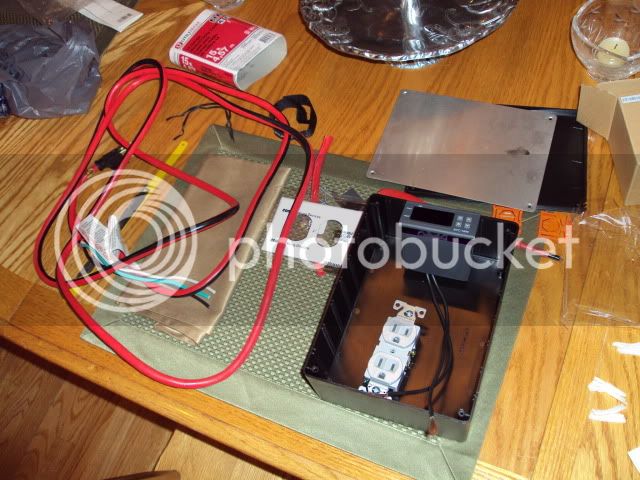
did some sloppy cut outs and wired it up:
power cord and sensor gives plenty of slack:
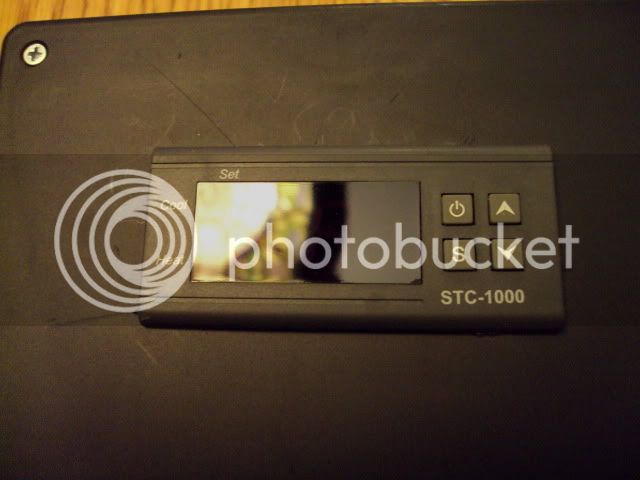
close up of the temp controller:
powered up:
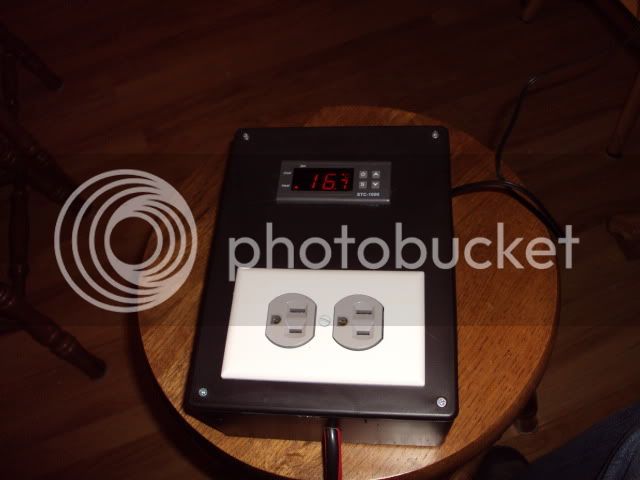
my wiring diagram (sloppy also). i only used one wire nut to join the hot wires as you can see in one of the pics above. also, very important to break off the jumper tab on the hot side so you can control each outlet independently.
So i guess I'm confused about the Heating part.
I get the wiring and such and cooling makes sense but how is the fridge or mini fridge supposed to heat? Am i just missing the step where you need to add an element of some sort?
user 103238
Well-Known Member
- Joined
- Jan 8, 2012
- Messages
- 569
- Reaction score
- 62
The heating portion of the outlet would provide power to the heating element of your choice (light bulb, reptile heater, etc.).
eryk4381 said:So i guess I'm confused about the Heating part.
I get the wiring and such and cooling makes sense but how is the fridge or mini fridge supposed to heat? Am i just missing the step where you need to add an element of some sort?
You need an external heat source. I purchased a ceramic reptile heater bulb (Zoo Med brand) and a clip-on work light from lowes and gave that a shot. My problem though is that freezer and bulb continuously cycle on and off and the temperature swings back and forth by at least five degrees instead of staying steady.
Does anyone have a solution to this problem? I have a 100 watt bulb - I think it may be too strong and the ceramic bulb retains heat for too long after being turned off by the controller so when the chamber heats up to the right temp, the bulb turns off but continues to heat up the space, requiring the freezer to kick on and cool it down but not before it heats up an extra number of degreees. I have the controller settings at what was recommended in this thread. I'm thinking a lower watt incandescent bulb would be better - maybe with a fan also?
Does anyone have a solution to this problem? I have a 100 watt bulb - I think it may be too strong and the ceramic bulb retains heat for too long after being turned off by the controller so when the chamber heats up to the right temp, the bulb turns off but continues to heat up the space, requiring the freezer to kick on and cool it down but not before it heats up an extra number of degreees. I have the controller settings at what was recommended in this thread. I'm thinking a lower watt incandescent bulb would be better - maybe with a fan also?
You need an external heat source. I purchased a ceramic reptile heater bulb (Zoo Med brand) and a clip-on work light from lowes and gave that a shot. My problem though is that freezer and bulb continuously cycle on and off and the temperature swings back and forth by at least five degrees instead of staying steady.
Does anyone have a solution to this problem? I have a 100 watt bulb - I think it may be too strong and the ceramic bulb retains heat for too long after being turned off by the controller so when the chamber heats up to the right temp, the bulb turns off but continues to heat up the space, requiring the freezer to kick on and cool it down but not before it heats up an extra number of degreees. I have the controller settings at what was recommended in this thread. I'm thinking a lower watt incandescent bulb would be better - maybe with a fan also?
You shouldn't have to heat unless there is a specific fermentor you want warmer than everything else. I use a FermWrap to heat fermenting beer while I keep the rest of the chamber at about 40F (for serving).
You shouldn't have to heat unless there is a specific fermentor you want warmer than everything else. I use a FermWrap to heat fermenting beer while I keep the rest of the chamber at about 40F (for serving).
I have a dedicated freezer that I use as a fermentation chamber. In the winter my basement gets pretty cold, so I don't see how I could avoid using heat if I wanted to keep the beer above 55ish (except the first few days when it's aggressively fermenting and throwing off heat).
zachattack
Well-Known Member
- Joined
- Mar 6, 2012
- Messages
- 2,808
- Reaction score
- 323
You need an external heat source. I purchased a ceramic reptile heater bulb (Zoo Med brand) and a clip-on work light from lowes and gave that a shot. My problem though is that freezer and bulb continuously cycle on and off and the temperature swings back and forth by at least five degrees instead of staying steady.
Does anyone have a solution to this problem? I have a 100 watt bulb - I think it may be too strong and the ceramic bulb retains heat for too long after being turned off by the controller so when the chamber heats up to the right temp, the bulb turns off but continues to heat up the space, requiring the freezer to kick on and cool it down but not before it heats up an extra number of degreees. I have the controller settings at what was recommended in this thread. I'm thinking a lower watt incandescent bulb would be better - maybe with a fan also?
A fan would help tremendously. Also, where's your temperature probe?
If it were me I would just use the heating or cooling, depending on ambient. At least until you get the overshoot figured out. Dual-stage temperature control has its place, but in this case it'll probably just lead to oscillations.
Here is a picture of mine with a ceramic heater I bought at Walmart. I have no holes drilled incase I want to make it a freezer again. The heater has a fan in it and it maintains temp great.


Also if you insulate your temp prob slightly it may cut down on the cycling.


Also if you insulate your temp prob slightly it may cut down on the cycling.
Bjornbrewer
Well-Known Member
- Joined
- Jul 31, 2008
- Messages
- 417
- Reaction score
- 3
Dual-stage temperature control has its place, but in this case it'll probably just lead to oscillations.
Haven't replied on this in awhile, but if you keep the probe in or right upto the fermentor, you wont' overshoot you're temp. The large termal mass will slow down the response enough to prevent it. That's what I do anyways.
Haven't replied on this in awhile, but if you keep the probe in or right upto the fermentor, you wont' overshoot you're temp. The large termal mass will slow down the response enough to prevent it. That's what I do anyways.
Thanks for the replies, fellas. Admittedly when I tested mine I just had my temp probe hanging in the middle of the freezer so I'll give it another whirl with the probe up against a carboy with bubble wrap duct taped around it. I have a muffin fan that I haven't installed yet so I'll do that as well.
marshallwms
Junior Member
I would say yes to an "always on" fan and suggest dropping to a 40 or 60 watt bulb. I use a 45 watt old soldering iron in a "professional" holder which is designed to hold an iron left on all day along with a fan. Someday I will change out the iron for a bulb so I can get the holder back.
Let us know how things work out.
Let us know how things work out.
morbothegreat
Member
Thanks for the replies, fellas. Admittedly when I tested mine I just had my temp probe hanging in the middle of the freezer so I'll give it another whirl with the probe up against a carboy with bubble wrap duct taped around it. I have a muffin fan that I haven't installed yet so I'll do that as well.
Also, one of the settings is a time limit for cycling on/off. So you could increase that time and it should slow down the cycling. I'm not sure if that works between the hot/cold though.
It's F3 "Compressor Delay Time" So, I assume that only works on the cooling side.
If you want it to cycle less, increase that time.
barryfine
Well-Known Member
With my probe taped to the side I get very little short cycling. I have my buffer set to 0.5*C, too.
Same here.
With my probe taped to the side I get very little short cycling. I have my buffer set to 0.5*C, too.
+1.

zachattack
Well-Known Member
- Joined
- Mar 6, 2012
- Messages
- 2,808
- Reaction score
- 323
MY STC is up and running. I went the light bulb route as a heater and concerned will light leaking effect fermentation I thought I read it would not as its a different type uv level????
A standard incandescent light shouldn't have any effect.
jeepinjeepin
Well-Known Member
zachattack said:A standard incandescent light shouldn't have any effect.
Yes? No? Better safe than sorry?
https://www.homebrewtalk.com/f163/uv-rays-incandescent-bulb-151362/
zachattack
Well-Known Member
- Joined
- Mar 6, 2012
- Messages
- 2,808
- Reaction score
- 323
Yes? No? Better safe than sorry?
https://www.homebrewtalk.com/f163/uv-rays-incandescent-bulb-151362/
Here's another one:
https://www.homebrewtalk.com/f39/light-bulb-light-fermentation-170185/
I really don't think it's a concern, but nevertheless I was under the impression that OP had his in a paint can or something similar since he mentioned he was afraid of "leaking" light. And either way I think it's always good practice to cover glass carboys with a T-shirt. But I use a standard desk lamp with a 40W bulb to maintain the temp sometimes with no problem. If you feel uncomfortable with it, there's always the "reptile heater" light bulbs.
jeepinjeepin
Well-Known Member
I use a small ceramic heater with fan. I tested it once in an empty fridge. It will get close to 100F before it pops a safety switch. Works for me. I need to get at least one more for the garage fridge now that winter is upon us.
zachattack
Well-Known Member
- Joined
- Mar 6, 2012
- Messages
- 2,808
- Reaction score
- 323
Nice. Last time I used the "aquarium heater in a tub of water" method and it worked really well. Having a temperature controller is awesome. I had the carboy in a tub of water and started off cooling (swamp cooler, used the controller to power a fan) then after active ferm was over I hooked up the aquarium heater to warm it up a bit.
sinisterkid
Well-Known Member
I used metal duct tape to cove the holes and gaps on my shop light coffee can heat set up
MY STC is up and running. I went the light bulb route as a heater and concerned will light leaking effect fermentation I thought I read it would not as its a different type uv level????
stevescott123
Well-Known Member
Here's my controller. Control Products from Amazon - $60 plus a few bits - maybe $15 - from Lowe's and Home Depot. It's a 2 stage unlike most sold in the brew stores which only cool OR heat to a set point. Getting the freezer soon.


ianoconnor
Member
How hard was it to wire that bad boy? I have no wiring knowledge but I've been looking at that exact same controller.Here's my controller. Control Products from Amazon - $60 plus a few bits - maybe $15 - from Lowe's and Home Depot. It's a 2 stage unlike most sold in the brew stores which only cool OR heat to a set point. Getting the freezer soon.
frod1963
Well-Known Member
Thank you for this thread, This controller has been running my fermentation fridge and kegerator for over a year now without issues.
stevescott123
Well-Known Member
How hard was it to wire that bad boy? I have no wiring knowledge but I've been looking at that exact same controller.
Well...I'm not an electrician by trade but I'm pretty handy. I'd say it was fairly easy. About on par with taking a table lamp that doesn't work, rewiring it and adding a new plug. But it's important note this is all 120V so if in doubt...
Any difficulties I encountered were not so much in the correct wiring methods - or following the diagram - as to the physicality of the parts and getting it all to fit.
I'm British and though I've been US resident for 10+ years I still get wiring colours mixed up with the US (brown, blue and green/yellow) and even the terminology (live, neutral, earth). I even get the spelling of "colour" mixed
up...
But that's what the internet is for. Double checking my colors/colours. You'll also find that way other people who have done this and other pertinent information.
The Amazon price is as good as any other (free shipping too) but you can go to the manufacturers website and see the operating manual and wiring diagram before you buy. The wiring diagram did not come with the hard copy of the instructions I received with my controller.
Wiring: http://www.protectedhome.com/documents/HV Wiring Diagram.pdf
Instructions: http://www.controlproductsonline.com/documents/TC-9102 Manual 42420054A.pdf
This is a two stage controller. It can heat OR cool to a set point - some controllers are only single stage; they can do one or the other. One thing I realised quickly from the diagram and the comments I'd read online was that the two outlets (heat and cool) obviously need seperate hots (lives) but can share the common (neutral) and ground. Thus 4 wires: L1, L2, C and G. The duplex outlet comes with a metal tab pairing the hots and the commons. You can leave the common tab but have to cut the hot (use a Dremel with a cutting wheel) to seperate the two outlets so they can function independently. 4 core cable is expensive so I bought 14 gauge 2 core and used 2 pieces. 14G is actually thicker than you need but I wasn't sure about the current draw, didn't want to take chances and went big for safety. If you go to HD near my house don't expect much help from cable guy. He was a bit dismissive "I'll cut whatever you tell me to cut" but wouldn't tell me what I needed. But if I did this again I'd get smaller guage. Remember the higher the number the thinner the conductor. Take a look at what's feeding your freezer now; it might have the guage printed on the cover.
Of course, the problems the fat cables presented to me were getting them in to the box and making the connections in the terminal strip. That's why you see wire nuts in the photos. I couldn't get 2 x 14G conductors under one screw so used a jumper out of the strip and and and the wire nut.
Technically one of my colors is not correct for its function. Across my 4 conductors I used black for L1, black for L2, white for common and had to use the other white for ground. You might want to put temp labels on them as you go. Or meter them when you've finished. Maybe I got those blacks and whites the wrong way round (from memory) but it doesn't matter as long as you know what each is doing. (Electricians reading this are now shuddering)
The controller doesn't have or need a ground connection but you need to preserve that from your house wiring through to the freezer. So just pass it though the controller with a wire nut and then on the the duplex.
To get the two cables thru the bottom hole of the controller to the duplex I re-routed the thermistor cable that had come prewired though that hole to a smaller (existing) hole next to it. Thermistor cable is screw connections. I used rubber grommets on these holes.
My power cable from the wall to the controller comes thru the top hole. I had a very difficult time finding a strain relief that would fit though I had one that was a little big. I ended up reaming the hole in the box with a flat drill bit centred on a block clamp under the hole. I have a bench press but it was a little scary with all the electronics inside the box. A quick ream with the Dremel and I got the strain relief in.
Final touches, an MDF backboard, a Harbor Freight grounded plug and some P-Touch labels.
I still haven't got my freezer (long story) but I know it works because I set it up with a lamp in each outlet held the probe in my hand and watched the lights change over as the temp increased.
I know the pics are not that great, if you need anything specific let me know.
Hope this helps. Good luck!
stevescott123
Well-Known Member
Thank you for this thread, This controller has been running my fermentation fridge and kegerator for over a year now without issues.
The Control Products version or one like it? Do you ever need or use a heat source? If so, what?
Thank you for this thread, This controller has been running my fermentation fridge and kegerator for over a year now without issues.
Since this thread is about the STC-1000 controller, I would assume that is the one he is talking about. To date, there has yet to be a confirmed failure of one of these units- so long as you don't order the 220V version thinking you got one ~$5 cheaper than everyone else.The Control Products version or one like it? Do you ever need or use a heat source? If so, what?
RE: the Control Products controller- I don't see any advantage to this controller over the STC-1000, especially when you can buy close to 3 STC-1000 controllers for the price of one of those.
The Control Products allows for independent control of each stage, but only has one sensor input. This still limits the controller to controlling only one space. For about the same money, there are 2 stage Love controllers that allow combined (heat & cool) or independent control of the stages, along with 2 sensor inputs. This allows one controller to control 2 separate spaces (single stage for each), if an additional sensor is used.
P.S.- Don't forget to configure the 'short cycle' setting on you Control Products controller. Factory default is 5 minutes, which is around the minimum suggested time. 10 minutes is more common, and the max on that controller is 15 minutes. Even at 15 minutes, the short cycle delay should not come into play for normal ferm or serving situations. You might want to check that the short cycle delay is enabled on power up to ensure protection during power outage situations.
jeepinjeepin
Well-Known Member
I have had one STC-1000 in constant service in a serving fridge for close to a year now and 2 others recently put into service on fermentation fridges. I really like them. If I was going to go to something else it would be a PID controller for more intelligent switching.
frod1963
Well-Known Member
The Control Products version or one like it? Do you ever need or use a heat source? If so, what?
I have a hanging light bulb separate from the fridge light to run if I need. When I initially was using it the fridge was just used to temp control fermenters and was on my screen porch. So I used to use the hot side more during Vermont winters. Now it lives tucked away in a 8x8 furnace room.
Most commercially available PID controllers are inappropriate for use with compressor based cooling, or for slow responding systems (like large thermal masses with relatively small cooling/heating inputs- sound familiar?).If I was going to go to something else it would be a PID controller for more intelligent switching.
Using a BCS or Arduino controller with some custom code is one of the few ways to get better performance than these simple on/off controllers provide, and for the most part, that only applies for heating inputs.
Similar threads
- Replies
- 14
- Views
- 1K
