You are using an out of date browser. It may not display this or other websites correctly.
You should upgrade or use an alternative browser.
You should upgrade or use an alternative browser.
Easy & Cheap Stainless Vent Hood
- Thread starter ballz50401
- Start date

Help Support Homebrew Talk - Beer, Wine, Mead, & Cider Brewing Discussion Forum:
This site may earn a commission from merchant affiliate
links, including eBay, Amazon, and others.
stickyfinger
Well-Known Member
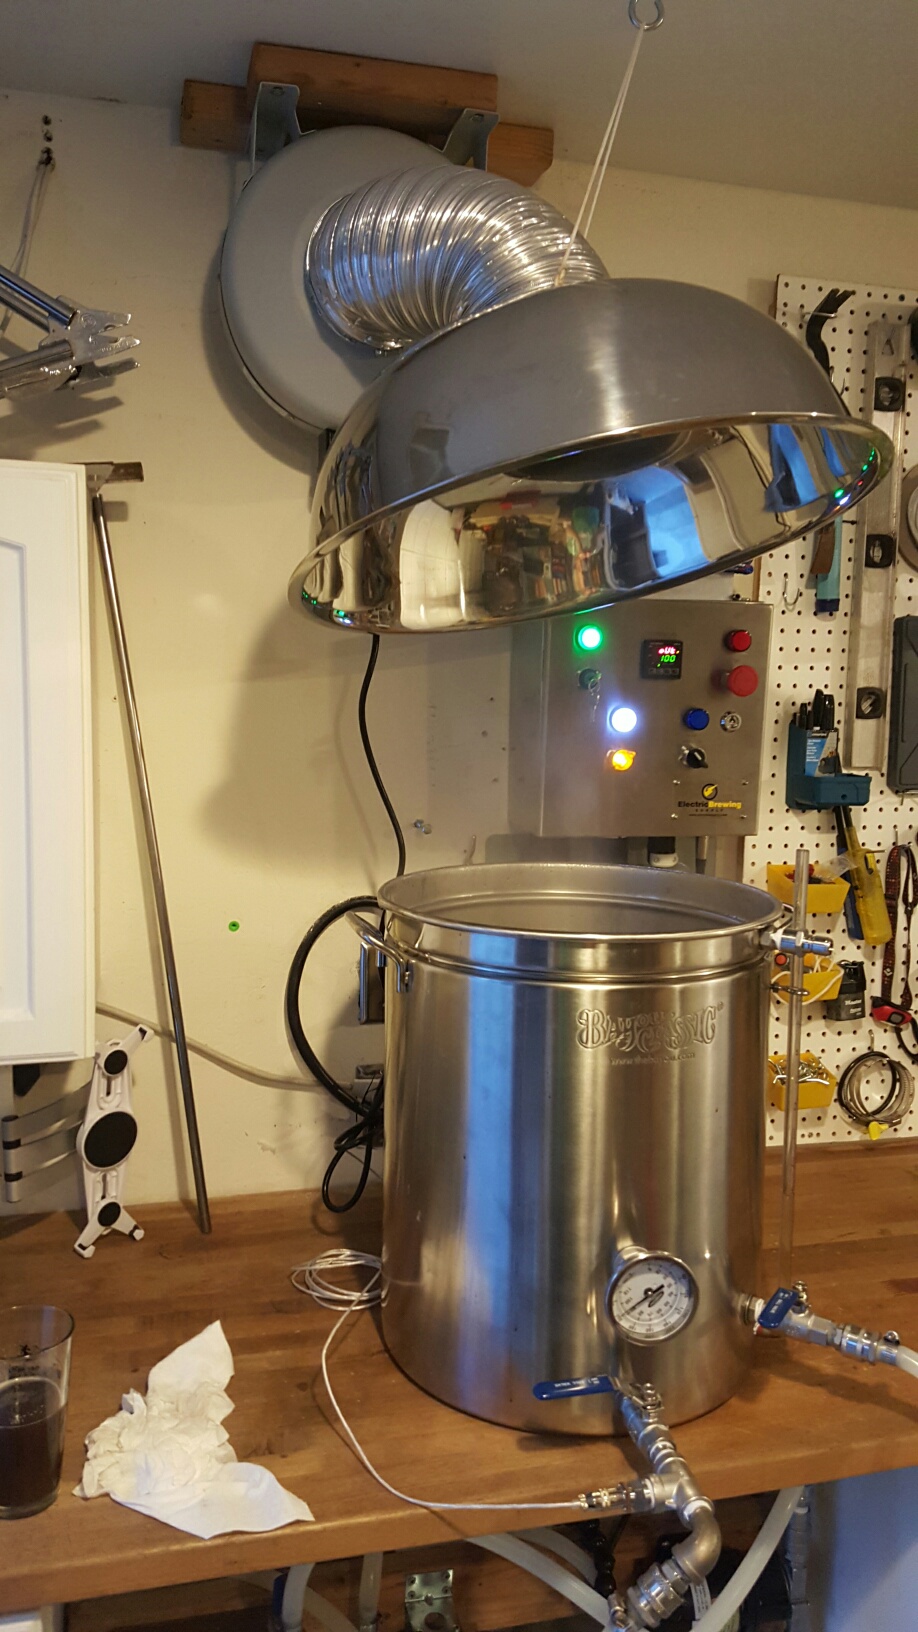
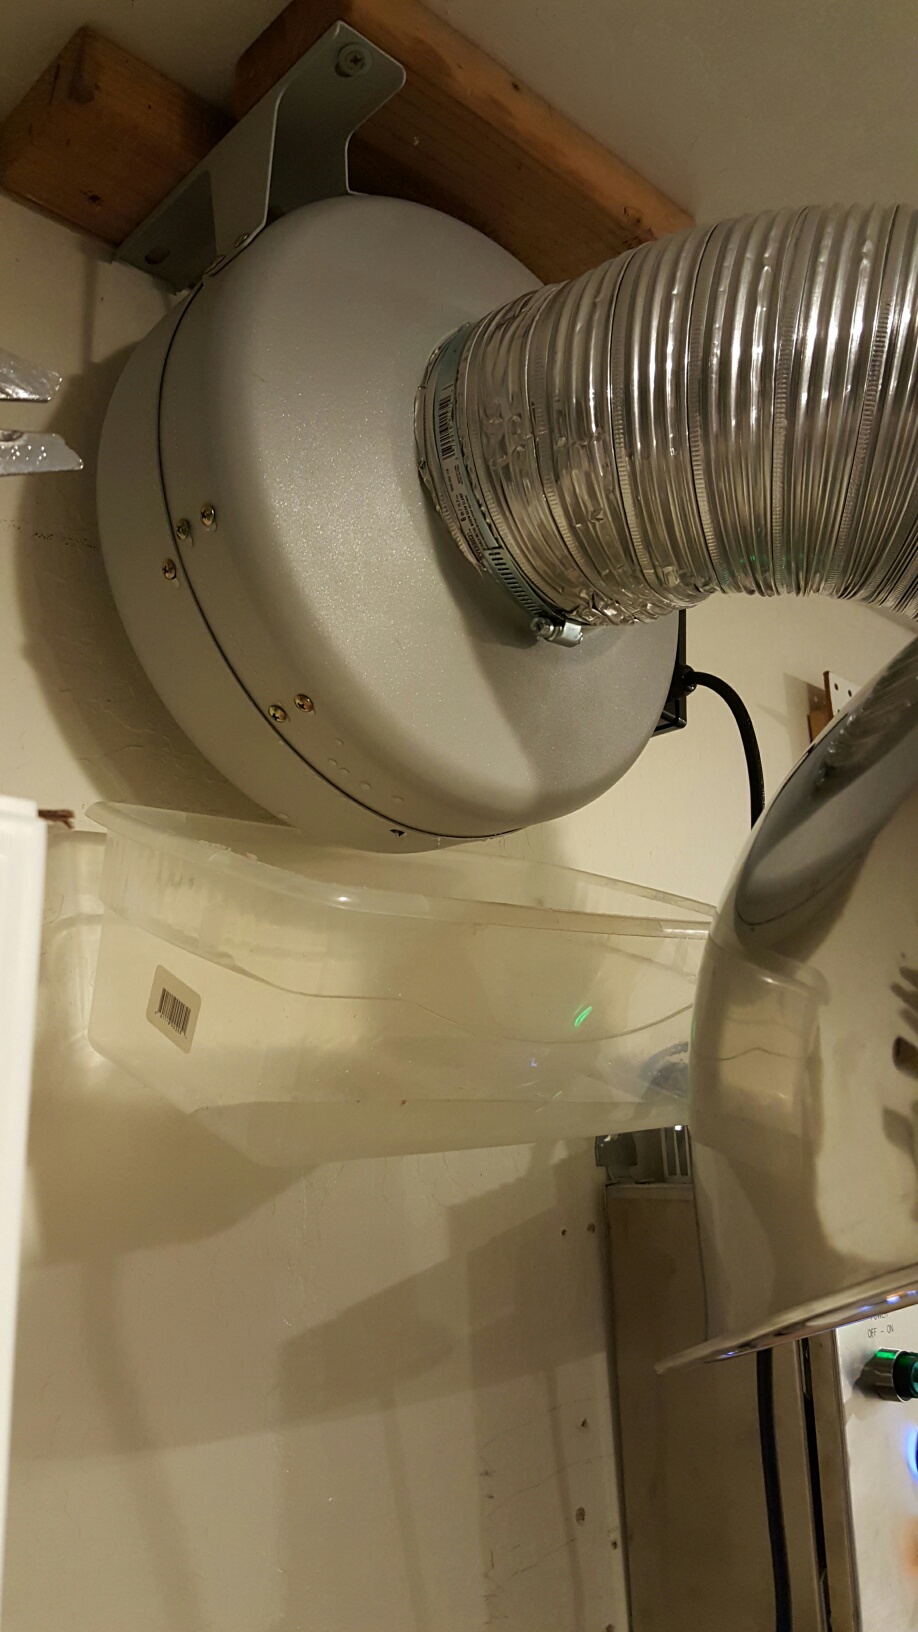
I don't know what other people do when they mount it vertically for condensation removal. They must have a solution. I did mine horizontally, so I just let it drip out of the seam in the bottom into a small tray. You could try it horizontally and see how it goes.
I really like your setup....is it still working for you? Would you change anything? I'm thinking about doing this T as well...and is that 6 in duct? Fan size?I just finished my build based off the SS mixing bowl. No idea why it uploads the image sideways.
Thanks!
Mark C.
It works great, even on the coldest/hottest days I only have to run it at about 40% power.
Its all 8" duct and Im using this fan
http://www.amazon.com/iPower-GLFANXINLINE8-Ducting-Hydroponics-Applications/dp/B00CAHM75W/ref=sr_1_2?ie=UTF8&qid=1438086858&sr=8-2&keywords=iPower+8%22+inch+INLINE+DUCT+FAN&pebp=1438086864016&perid=1MEKT2V8YVFGZTJPMTXP
Its all 8" duct and Im using this fan
http://www.amazon.com/iPower-GLFANXINLINE8-Ducting-Hydroponics-Applications/dp/B00CAHM75W/ref=sr_1_2?ie=UTF8&qid=1438086858&sr=8-2&keywords=iPower+8%22+inch+INLINE+DUCT+FAN&pebp=1438086864016&perid=1MEKT2V8YVFGZTJPMTXP
Last edited by a moderator:
wow...I knew that had to be larger than 6 inches (I know...that's what she said!)....I did a 6in hole and and plan on running a Vortex VTX600 inline fan with a variable controller. I think I am only running mine over the boil kettle to reduce bulkiness of system in my small brew room. Again, your system looks bullet-proof. I've attached where I am with mine. I'll update with pics as I'm starting to move more quickly.
Cheers!
Mark C.
![IMG_20150802_203834258[1].jpg](https://cdn.homebrewtalk.com/data/attach/250/250055-IMG-20150802-203834258-1-.jpg "IMG_20150802_203834258[1].jpg")
Cheers!
Mark C.
OP
OP
ballz50401
Well-Known Member
Hey everyone. Keep your eyes open for October's issue of Brew Your Own magazine. I wrote an article for the "Projects" section about my SS Vent Hood. 
Peruvian802
Well-Known Member
^^^I'll look for the article authored by 'ballz'.
OP
OP
ballz50401
Well-Known Member
^^^I'll look for the article authored by 'ballz'.
I used to play a lot of billards.
Can't wait to see some pics once you have everything setup and running.
wow...I knew that had to be larger than 6 inches (I know...that's what she said!)....I did a 6in hole and and plan on running a Vortex VTX600 inline fan with a variable controller. I think I am only running mine over the boil kettle to reduce bulkiness of system in my small brew room. Again, your system looks bullet-proof. I've attached where I am with mine. I'll update with pics as I'm starting to move more quickly.
Cheers!
Mark C.
steveoatley
someone has to fail, so the rest of you look good
Hey guys
Have any of you tried mounting the fan on a Movable arm?
Something where you could swing the fan out of the way ?
I have all my parts, and i am starting assembly, and i was wondering if anyone had tried?
I would like to mount mine so it could Move up - out of the way - when the kettle is not steaming
I was think if something like Drawer Pulls, but they would need to lock
in the up position.
Thx
S
Hey guys
Have any of you tried mounting the fan on a Movable arm?
Something where you could swing the fan out of the way ?
Thx
S
Designing the most appropriate system will vary with need. If being able to move the fan out of the way is a priority for you, then go for it. Just remember that to achieve that flexibility you will probably need flexible ducting, which isn't the most efficient (lowest impedance) for moving air through it, so you may need a higher cfm motor or larger diameter ducting (plenty of previous comments in that area alone).
My system is a fixed 6" fan, 6" sheet metal ducting, 2x 45 deg bends, 1x 90 deg bend and it is very quiet and 'sucks' big time, way quieter than the furnace unit next to it. There's a lot of great experience, with examples, to be found in this thread and that helped me design something appropriate for my two primary objectives: efficiency and quietness.
So I don't think there's anything wrong with your plan, just make sure the primary goal of moving that steam out of there is achieved.
Best of luck on your journey.

stickyfinger
Well-Known Member
I have a Tjernlund M-6 from amazon.com:
http://www.tjernlund.com/Tjernlund_M-Series_Corded_High_Pressure_Fans_8504147_REV_B_0210.pdf
It sucks like a beast, but the system is a bit loud for me. I guess I'm picky. I use 6" metal duct with one 90-degree bend. It does the job completely, but there is condensation in the fan. I would go with 6" duct if possible. Flex duct is not ideal but can work. Why do you have to move it around? I just set mine up at the right height and leave it there all of the time. It's nice to have a solid, smooth-wall build that is just in place and ready to go.
I have a Tjernlund M-6 from amazon.com:
http://www.tjernlund.com/Tjernlund_M-Series_Corded_High_Pressure_Fans_8504147_REV_B_0210.pdf
It sucks like a beast, but the system is a bit loud for me.
Hello stickyfinger,
I'm also using the Tjernlund M6 fan. If you were to suspend the fan in free air, unless there is a distorted blade I think you'll find the unit is balanced and pretty quiet considering the volume of air it is moving, at least this is the case for my unit. Noise is often inadvertently added when mounting to a structure (structure borne) and terminating into a complex impedance (ducting with bends). Minimizing structure borne noise could be achieved by suspending the unit via wire rope (my choice) or by using a floating isolation mount. Creating a gradual (air flow) path from the collection area into the fan is in my opinion the greatest challenge. Air turbulence around the duct/bowl entrance is what I'm hearing the most on my rig, while there is barely any mechanical noise or vibration coming from the fan housing.
Air turbulence at the bowl/duct connection is the price for utilizing this very cost efficient solution. Sharp transitions create noise. Professional condensing units would offer reduced noise for significantly greater investment but for me the bowl solution strikes a great balance between inconvenience vs investment (and it looks cool).
Note: I attempted to do some noise level measurements of a Panasonic bathroom exhaust vs my home brew exhaust but it looks like my sound pressure level meter is out of calibration, sorry.
stickyfinger
Well-Known Member
I think you're right about the bowl being the culprit. The fan itself is pretty reasonable. The system is a bit loud for me. It is acceptable though. I can still play music and have conversations fine. It just is a bit louder than I'd like. I like the simplicity and low cost, so it is fine for me. I also could just run it a little slower and put up with a little extra condensation.
steveoatley
someone has to fail, so the rest of you look good
Designing the most appropriate system will vary with need. If being able to move the fan out of the way is a priority for you, then go for it.
So I don't think there's anything wrong with your plan, just make sure the primary goal of moving that steam out of there is achieved.
Best of luck on your journey.
Ihop2many
I would be using the Flexible duct just for the section that the Fan would move.
I only need it to move about 24 inches up & down.
In the lowered position - it comes in right about EYE height for me.
When no in use, i'd like to move it up toward the ceiling - for storage
And so i don't bang my head into it......
I am thinking of Drawer Pulls, on a Ladder like frame to be able to raise and lower the Fan & Bowl into place
Just wondering if anyone else had luck with moving the vent/fan around.
Thanks
Steve
steveoatley
someone has to fail, so the rest of you look good
something like this would be cool

steveoatley
someone has to fail, so the rest of you look good
ballz50401
Where did you get the cool Home Brewer Sticker ?
S
Where did you get the cool Home Brewer Sticker ?
S
something like this would be cool
You must contact Walter White for this setup...
OP
OP
ballz50401
Well-Known Member
ballz50401
Where did you get the cool Home Brewer Sticker ?
S
I purchased the small 2" x 6" Home Brewer decal from Brew Hardware.
https://www.brewhardware.com/product_p/decalhomebrewer.htm
steveoatley
someone has to fail, so the rest of you look good
You must contact Walter White for this setup...
Here is what i came up with.
Allows me to move the fan up about 10 inches
In the "low" position it is about Eye height to me
So I don't walk into it every time i am Not brewing - i wanted to be able to move it up - out of the way.
It works pretty well - i have not tried a Brew yet - to see if Condensation is a problem or not.
( don't know why it posts sideways )
Steve

steveoatley
someone has to fail, so the rest of you look good
I want a Sticker of my own
Thanks to ballz50401 for the thread - give credit where credit is due
S
Thanks to ballz50401 for the thread - give credit where credit is due
S
JB_Brewing2
Well-Known Member
Something where you could swing the fan out of the way ?
I used metal duct work for terminations and the 90 degree bend and then insulated flexible ducting in between. Attached a small pulley with a rope to a floor joist and just tie it off above head height when not in use. Has worked quite well.

This thread is great and I was able to get my hood all setup!!
Did anyone who used the M6 fan have issues with condensation leaking by the electrical box? I'm thinking I need to try and rotate the fan so the box isnt on the bottom anymore.
Did anyone who used the M6 fan have issues with condensation leaking by the electrical box? I'm thinking I need to try and rotate the fan so the box isnt on the bottom anymore.
stickyfinger
Well-Known Member
Mine definitely leaks from the bottom. The electrical box on mine is on the side, so it does not leak through there. Definitely rotate it and then just put a small condensation pan under it to collect the moisture. the pan will dry out between brews. if you want to get fancy you can seal the fan, drill out a hole for a drain line and plumb it down into a bucket or something.
Need some help setting my exhaust up. I'm not really sure what parts to buy.
I will be exhausting the steam out of my basement. The hole for the exhaust is level with the ceiling. It goes in about 4 feet. I figured it would be easiest to use a rigid pipe since I could hold it steady while I push it through the hole in the siding. I couldn't figure out how to attach the non-tapered end since a 4" pipe is the same size as the 4" to 6" reducer.
So I bought this:
http://www.homedepot.com/p/Speedi-P...ite-with-11-in-Tail-Pipe-EX-HLWT-04/202907375
I also have some 4" flexible piping. Two 6" to 4" reducers.
I'm hoping I can attach the tail pipe from the plastic hood to the flexible pipe and push that through the joists and find the hole. Then attach the reducer to the flexible pipe and that to the fan. The other reducer to the other side of the fan and more flexible pipe. That goes to the stainless bowl.
Did I make this too complicated? I just couldn't figure out how to use this stuff since the non-tapered ends don't fit 4" parts. I guess thinking about it now, I could have just used 6" flexible lol I do need a reducer to get a 4" pipe through the joists and in the hole to the vent.
stickyfinger
Well-Known Member
Need some help setting my exhaust up. I'm not really sure what parts to buy.
I will be exhausting the steam out of my basement. The hole for the exhaust is level with the ceiling. It goes in about 4 feet. I figured it would be easiest to use a rigid pipe since I could hold it steady while I push it through the hole in the siding. I couldn't figure out how to attach the non-tapered end since a 4" pipe is the same size as the 4" to 6" reducer.
So I bought this:
http://www.homedepot.com/p/Speedi-P...ite-with-11-in-Tail-Pipe-EX-HLWT-04/202907375
I also have some 4" flexible piping. Two 6" to 4" reducers.
I'm hoping I can attach the tail pipe from the plastic hood to the flexible pipe and push that through the joists and find the hole. Then attach the reducer to the flexible pipe and that to the fan. The other reducer to the other side of the fan and more flexible pipe. That goes to the stainless bowl.
Did I make this too complicated? I just couldn't figure out how to use this stuff since the non-tapered ends don't fit 4" parts. I guess thinking about it now, I could have just used 6" flexible lol I do need a reducer to get a 4" pipe through the joists and in the hole to the vent.
One option that may not be kosher but that will probably work fine is to just butt the two pipes up to each other and then put metal duct tape around them. I can't imagine it wouldn't hold will if you put like three pieces overlapping around the joint.
I went back to Home Depot this morning and took a better look at what they had. So I think what I'm going to do is have the vent connected to a hard 4" pipe. At the other end of the pipe is a 4" to 6" reducer. Then I bought 6" semi rigid pipe which will connect the reducer to the exhaust fan. On the intake port I'm not sure if I will use semi rigid or flexible 6" pipe to the bowl.
Mine definitely leaks from the bottom. The electrical box on mine is on the side, so it does not leak through there. Definitely rotate it and then just put a small condensation pan under it to collect the moisture. the pan will dry out between brews. if you want to get fancy you can seal the fan, drill out a hole for a drain line and plumb it down into a bucket or something.
Thanks!! Problem solved!!
steveoatley
someone has to fail, so the rest of you look good
Thanks!! Problem solved!!
Ampsman
How much water comes out of your fan in a 1 hour boil?
1 cup
1 quart ?
thanks
S
what you are looking at is after about 45 minutes of a test boil.
steveoatley
someone has to fail, so the rest of you look good
thanks, looks to be about a Cup
Are you concerned ?
Steve
Are you concerned ?
Steve
Its not ideal but from what I understand it shouldn't cause any issues.
I'll probably eventually take it apart and seal it and install a drain tube.
I'll probably eventually take it apart and seal it and install a drain tube.
JB_Brewing2
Well-Known Member
thanks, looks to be about a Cup
Are you concerned ?
Steve
Have you considered insulating your duct? I used insulated duct with what looks to be a somewhat longer run and have just a few drops on the floor. Just trying to help.

JB_Brewing2
Well-Known Member
Its not ideal but from what I understand it shouldn't cause any issues.
I'll probably eventually take it apart and seal it and install a drain tube.
Whoops, previous post meant for ampsman.
Its not ideal but from what I understand it shouldn't cause any issues.
I'll probably eventually take it apart and seal it and install a drain tube.
Just my 2c.
Why is the steam condensing?
1) Not enough velocity?
2) High impedance ducting?
3) External air keeping the motor and duct cold?
I'm guessing it's mainly #3, but that's only an opinion as that is one helluva motor there and the run is quite short.
I've seen a lot of comments about sealing the motor housing and can only believe that's not what you want, who needs a pool of water sitting in the housing waiting to evaporate. If there's water condensing get it out as quickly and efficiently as possible without causing an additional air leak.
Good luck.
Straight forward physics here. If the surfaces of your blower and duct are less than the temperature required for steam, you're going to get condensation. The colder it is and the more contact time, the more condensation.
#1 and #2 are inversely related. The less restriction in the duct, the lower the pressure drop, the higher pressure differential, and thus the higher the velocity will be. Higher velocity will reduce your contact time, but you're still going to get some condensation. You cannot eliminate it 100%.
So your options are:
1. Heat all pipes, blowers, etc, that come into contact with the steam so that all your steam stays "dry".
2. Drain the condensation you get.
Also, sealing the blower is fine, but if you have a horizontal orientation you want to add a drip hole at the low point and drain it from there. In a vertical installation it'll run back down and into your kettle (which is what mine doe).
stickyfinger
Well-Known Member
Thanks!! Problem solved!!
Nice! I want to put a condensation line in mine, but it's been a year and the bread pan is still working, so it stays for now!
stickyfinger
Well-Known Member
I'm getting a little more condensation now that it is winter. I have about 5" of rigid 6"-duct attached to my SS bowl, then an elbow, then the fan, then maybe 18" to my hole in the window and out. That is about as short as you can get.
The problem, as has been stated, is that there is HUGE amount of moisture going through the fan for minutes and minutes, and it is obviously colder than 212F inside of there so you will get water. I have a few tablespoons in my "bread pan" condensation pan after 90 minutes of boiling this time of year. It's like 35F outside and like 55-60F in my basement.
Today is actually the first day it's had an issue in 1 yr. I noticed some water dripping out of one of my metal-duct-taped connections, running down my bowl, accumulating on the lip and then dripping down. I guess I need to put on more tape when it dries. It's no big deal.
Straight forward physics here. If the surfaces of your blower and duct are less than the temperature required for steam, you're going to get condensation. The colder it is and the more contact time, the more condensation.
#1 and #2 are inversely related. The less restriction in the duct, the lower the pressure drop, the higher pressure differential, and thus the higher the velocity will be. Higher velocity will reduce your contact time, but you're still going to get some condensation. You cannot eliminate it 100%.
So your options are:
1. Heat all pipes, blowers, etc, that come into contact with the steam so that all your steam stays "dry".
2. Drain the condensation you get.
Also, sealing the blower is fine, but if you have a horizontal orientation you want to add a drip hole at the low point and drain it from there. In a vertical installation it'll run back down and into your kettle (which is what mine doe).
Thanks for the info! I'm going to try and insulate my pipes somehow.
As a sidenote, I had been brewing at night when it was about 50 degrees out, but brewed this weekend during the day with temps around 70 and had no condensation.
Similar threads
- Replies
- 11
- Views
- 2K
- Replies
- 27
- Views
- 1K
- Replies
- 1
- Views
- 544
- Replies
- 4
- Views
- 633
