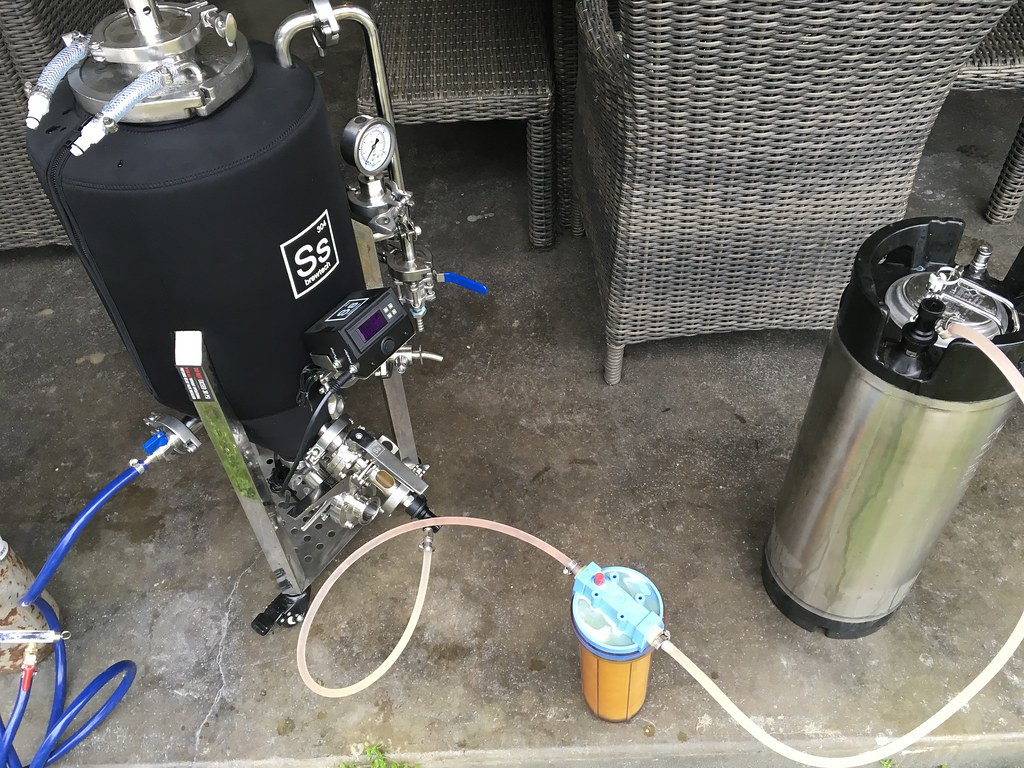
Doubling Down: SS Brewtech Conical + FTSS + Glycol Power Pack

Homebrew Talk - Beer, Wine, Mead, & Cider Brewing Discussion Forum

Help Support Homebrew Talk - Beer, Wine, Mead, & Cider Brewing Discussion Forum:

This site may earn a commission from merchant affiliate links, including eBay, Amazon, and others.
That’s a 1.5”TC designed to fit on a wide mouth Ball or Mason style glass canning jar. The jar’s band holds it in place. I ordered it from NorCal Solutions who is a sponsor here on HBT. This device makes harvesting yeast so easy and effortless.
 
I meant the other one. The one on your racking port.

But the jar connection looks good too, I've ordered one.
You can get that from brewhardware.com however you might instead consider getting a tri clamp to quarter inch MFL. One less thing to have to take apart and have Gunk up still ultimately gets the same objective and you're shutting it off with a valve so you really don't need the quick shut off of the ball lock. That way you can just have a hose with a swivel MFL connector on one end and a ball lock quick disconnect on the other that you can put on to the liquid outpost on your corny keg to transfer Under Pressure without oxygen. That's what I do
 
As @martianpc mentioned, you can go the MFL route, or use the option you saw on my Uni which came from BrewHardware.com. I do several dumps prior to racking as mentioned previously, then use a sight glass to make sure I am picking up clear beer as I rotate my racking arm downward. I mention this since I have not had any issues with trub and gunk clogging up my liquid out post.
 
Thanks! Yes, the MFL method is what I am using now, and it works perfectly.
I was just curious. The liquid out post on TC is something I hadn't seen before.
 
I am working on a concept for CO2 flushed dry hop additions for my 7 Gal BME Chronical. Parts list and process are below.

Parts Required
1.5” to 3” Cap Style TC Reducer
1.5” TC Butterfly Valve
1.5” to 3” Bowl Style TC Reducer
3” TC Blowoff Cane for BME Chronical
Clamps / Gaskets

Setup
1) Attach Cap Style Reducer to BME Lid.
2) Attach Butterfly Valve to Cap Reducer.
3) Attach Bowl Style Reducer to Butterfly Valve.
4) Attach Blowoff Cane to Bowl Reducer.

Process
1) Butterfly Valve remains open during fermentation to allow blowoff as usual.
2) When ready to add dry hops, close Butterfly Valve (sealing fermenter temporarily).
3) Remove 3” TC Blowoff Cane.
4) Add dry hops to Bowl Reducer.
5) Re-install 3” TC Blowoff Cane.
6) Push 1-2 psi CO2 up through Blowoff Cane and flush dry hops using integrated PRV. Repeat 2-3 times.
7) Continue pushing 1-2 psi CO2 up through Blowoff Cane and open Butterfly Valve to force CO2 flushed hops into fermenter.
8) Continue fermentation as usual with Butterfly Valve remaining open.

Thoughts? Suggestions? I’ve priced the parts out at around $150 (I already have the 3” TC Blowoff Cane and did not include that in my total).

If you're using whole hops, I don't think this is going to work. I imagine you'll get whole hop cones touching each other as the 3" reduces down to 1 1/2", and further, the butterfly valve splits that in half, so you have 2x .75" crescent openings (actually, slightly less than .75), and even a single large hop cone will get stuck.

If you're using pellets, I think this will work and you won't need to use any CO2 to push.

Pellets only. Typical rate for a 5 gallon IPA batch is 6-8 oz across two dry hop charges. So no more than 3-4 oz of pellets at once.

Essentially replicating something similar to this but on a scale practical for the 7 Gallon BME.

https://marksdmw.com/products/mini-dry-hop-cannon
 
Pellets only. Typical rate for a 5 gallon IPA batch is 6-8 oz across two dry hop charges. So no more than 3-4 oz of pellets at once.

Essentially replicating something similar to this but on a scale practical for the 7 Gallon BME.

https://marksdmw.com/products/mini-dry-hop-cannon

Just a thought, you could start with the first charge already in that chamber and the butterfly valve just ever so slightly ajar. The oxygen in that butterfly valve should be replace with CO2 from fermentation by the time you're ready to do the first dry hopping, then you just open the valve all the way and get one dose of dry hopping "for free".
 
Just a thought, you could start with the first charge already in that chamber and the butterfly valve just ever so slightly ajar. The oxygen in that butterfly valve should be replace with CO2 from fermentation by the time you're ready to do the first dry hopping, then you just open the valve all the way and get one dose of dry hopping "for free".

Hell, you could technically stack the setup you're talking about and put one dose in each level of the stack, open the bottom valve when you're ready for the first dose, open the second valve when you're ready for the second dose, and you don't need to blast or purge anything. I might work out a setup like that myself.
 
Just a thought, you could start with the first charge already in that chamber and the butterfly valve just ever so slightly ajar. The oxygen in that butterfly valve should be replace with CO2 from fermentation by the time you're ready to do the first dry hopping, then you just open the valve all the way and get one dose of dry hopping "for free".

Nice idea! Is there any risk of hop aroma blowing off as the fermentation gas passes through the chamber and into the cane?

I’m working towards zero (or negligible) amount of O2 introduction once the yeast is pitched. Without having to transfer back and forth between multiple vessels and attempting to use as little CO2 as possible.

My rudimentary “back of the napkin” sketch is below.

EFE06745-931_C-434_F-_BE40-5_F7_EF5562162.jpg
 
Nice idea! Is there any risk of hop aroma blowing off as the fermentation gas passes through the chamber and into the cane?

I’m working towards zero (or negligible) amount of O2 introduction once the yeast is pitched. Without having to transfer back and forth between multiple vessels and attempting to use as little CO2 as possible.

I'd think any loss of hop aroma would be negligible as the major source of hop aroma loss in beer during fermentation is the binding of volatile compounds to yeast cell walls. Don't think you'd lose much since the hops don't touch the yeast, and the temperature in the hop chamber should be close to the fermentation temperature.
 
Also thinking, if you could find a tube like tee with 1.5" TC connections, you could orient the tee such that you could have the dry hopping additions in the chamber above the T and then connect a separate blow off through the end of the T perpendicular to the ground. Then the blow off wouldn't be through the hop chambers at all. In case that is of concern...
 
Ok I have a question’s for you guys that own the ss unitank and the cip spray ball. I am looking at buying the 1/2 bbl unitank and using the large cip ball to clean with. So my question is what are you all doing to clean the butterfly valves and sample port . But my specific concern was cleaning the carbstone and the valve attached to it. Also do you remove all the fittings when your done with the cip and clean them separately or do you leave some on?
 
Ok I have a question’s for you guys that own the ss unitank and the cip spray ball. I am looking at buying the 1/2 bbl unitank and using the large cip ball to clean with. So my question is what are you all doing to clean the butterfly valves and sample port . But my specific concern was cleaning the carbstone and the valve attached to it. Also do you remove all the fittings when your done with the cip and clean them separately or do you leave some on?


Others may have differing results and techniques, but I'll share mine:

I have a 14G and a 7G and use a Chugger 7 GPM pump in my system. I use a micro spray CIP ball since Ss suggested a larger nano GPM pump with the full sized spray ball.

I bought a 6" to 3" TC adaptor to get the coils out of the way when spraying. I soak the coils and clean separately, otherwise the coils seemed to break up the spray pattern.

You want to clean as soon as you rack off the beer and don't let all the crud dry out and harden. After a hot PBW spray (15-30 min) followed by a clean water rinse, I drain and remove all fittings from the tank including the carb stone you mentioned. The faces of the TC ports or ferrules will have gunk all over then since the spray cant get to that area. Soak the fittings, valves, gaskets (everything you can take off the tank) and use a soft brush to clean. I use a bottle brush soaked in star san to push into each port/opening to clean well.

This cleaning is probably the PITA all systems seem to have in some fashion or another. If not done properly, you may be inviting an infection in your beer. I spray the inside with star san and then reassemble well sanitized. I then pressurize the tank with CO2 and leave pressurized with a few psi until ready for the next use. Keeping pressurized with CO2 maintains sanitized integrity.

Thanks Morrey , I plan on doing the same with the 3 to 6 cap reducer and cip ball with a 14 gpm pump this will be my 3rd conical. My first 2 were fermenators a 14 gal and a 42 gal and they were both a pain to clean and assemble. My goal is to make things simpler and more enjoyable and I think this unitank is the ticket. If anyone else had any tips I would love to hear them.
 
I've been using the larger CIP ball (3" TC) on my 7 Gal and 1/2 BBL BME Chronicals for a while.
I can't compare the pumps, as Chugger & Co. are not available over here in Europe.
I am using quite a large but inexpensive (~120$) immersion pump (one of those usually used for emptying out garden ponds or pools) inside a ~30 liters plastic bucket/tub, along with 2 TC to 1" hose barb adapters and some 1" tubing for recirculation into the bucket.

It is important that the diameter of the hose between pump and CIP assembly isn't too narrow, so you won't lose too much pressure.
3/4" ID works fine, along with a 3/4" to 1/2" reducer for the CIP assembly.

I then do 15-20 minutes with PBW first, at ~120F (50˚C), then 5-10 minutes with cold water, then another 5-10 minutes with SaniClean (non-foaming version of StarSan) to pre-sanitize everything.
The vessel will be clean by then so you won't have to discard the SaniClean solution, but instead unmount all the TC connections and soak all the valves and gaskets in there for a few minutes.

Then, reassemble while still wet, but keep dump valve open so it can dry out without anything falling into the fermenter.
It can be stored ready to be used again by then, usually. To make sure, I give it a good spray with 70% Ethanol just before filling it up with wort again.

I have no experience CIPping the Unitank so far, but the chiller coils of the Chronicals turn out spotless this way, without having to take them out and clean/sanitize separately.

This is basically the gist of what we came up with as best practice on the German homebrewers forum.
 
Last edited:
For those of you who have the @PenguinChillers Glycol Chiller (or any knowledge pertaining to refrigeration compressors in general).

I only brew every 4-6 weeks. With a 14-21 day fermentation timeline, that leaves 2-3 weeks between batches with nothing in the conical and no need for the glycol chiller.

Is it better for the longevity of the chiller to:

1) Unplug it for these 2-3 weeks.
2) Leave it running with no load at the standard 28-32*.
3) Leave it running but increase the glycol bath temperature to reduce the need for compressor cycling.
 
I have never done CIP with a spray ball but I do have 4 conicals which I do clean in place with a sponge and find it only takes about 2 -3 minutes tops to wipe them clean with warm water and a non abrasive scrubby sponge and then another minute or two to spray them down with star san.. I clean my valves and spray them with sanitizer in the sink. I am honestly trying to figure out whats so appealing about and why so many go through such efforts to use a CIP system on such a small and easily accessible sized conical? It just seems to be more work and time than it saves?
I thought maybe it was because many seem to use cooling coils inside instead of a jacket solution but then I read above where people are removing and cleaning the coils manually anyway so what am I missing? Is this more for the fun engineering aspect of it? are you guys cleaning your boil kettles and mash tuns the same way?
I just bought all the cip equipment to do so in large 4bble plastic conicals but that is because those are not easily accessible to wipe clean. but even those from what Ive read are often just cleaned with a pressure washer in a pro environment.

Just wondering if theres some other appealing benefit of having it on a homebrewing level. I guess for cleaning corny kegs would be a good use as they are hard to clean manually without skinny arms.
 
Last edited:
For those of you who have the @PenguinChillers Glycol Chiller (or any knowledge pertaining to refrigeration compressors in general).

I only brew every 4-6 weeks. With a 14-21 day fermentation timeline, that leaves 2-3 weeks between batches with nothing in the conical and no need for the glycol chiller.

Is it better for the longevity of the chiller to:

1) Unplug it for these 2-3 weeks.
2) Leave it running with no load at the standard 28-32*.
3) Leave it running but increase the glycol bath temperature to reduce the need for compressor cycling.


I have thought about and tried each of your listed options. I have come to the conclusion that in periods of down time in that I have no beer in fermenter(s) needing temp controlling, I simply unplug and leave the chiller idle. Then when I am brewing my next batch, I plug the chiller back in and it is down to 28F (my set point) in a very brief time.
 
I have thought about and tried each of your listed options. I have come to the conclusion that in periods of down time in that I have no beer in fermenter(s) needing temp controlling, I simply unplug and leave the chiller idle. Then when I am brewing my next batch, I plug the chiller back in and it is down to 28F (my set point) in a very brief time.
Do you worry about nasties growing in the glycol water while room temperature?
 
I have never done CIP with a spray ball but I do have 4 conicals which I do clean in place with a sponge and find it only takes about 2 -3 minutes tops to wipe them clean with warm water and a non abrasive scrubby sponge and then another minute or two to spray them down with star san.. I clean my valves and spray them with sanitizer in the sink. I am honestly trying to figure out whats so appealing about and why so many go through such efforts to use a CIP system on such a small and easily accessible sized conical? It just seems to be more work and time than it saves?
I thought maybe it was because many seem to use cooling coils inside instead of a jacket solution but then I read above where people are removing and cleaning the coils manually anyway so what am I missing? Is this more for the fun engineering aspect of it? are you guys cleaning your boil kettles and mash tuns the same way?
I just bought all the cip equipment to do so in large 4bble plastic conicals but that is because those are not easily accessible to wipe clean. but even those from what Ive read are often just cleaned with a pressure washer in a pro environment.

Just wondering if theres some other appealing benefit of having it on a homebrewing level. I guess for cleaning corny kegs would be a good use as they are hard to clean manually without skinny arms.

When I bought my first Uni-tank, I was "sold" on the concept I was going to need a CIP spray ball cleaning system. And it wasn't Ss that sold me on the concept....it was current owners of the tanks weighing in on the importance of having this CIP cleaning system in place.

I have a good piece of cash tied up in the CIP gear, and frankly, I find the CIP a bit on the cumbersome side to manage. But since I have all this gear, of course I am using it.

I have a large dome shaped brush that is designed to go down into a corny keg for cleaning. Had I not been so eager to jump on the CIP based on the word of others, I would have skipped the CIP and done the conical cleaning with this brush. I agree that the CIP is basically more work (not to mention cost) than it saves to simply swab the tank out and be done with it. All the fittings, valves and clamps have to be disassembled anyway, so ditching the CIP is actually probably good advice. I have a buddy who is eyeing a new conical, so I'll share this post with him.
 
Do you worry about nasties growing in the glycol water while room temperature?

Good question. Does glycol support bacterial growth at room temp? Cant answer that but good point. Of course the glycol is self contained and not in contact with the beer, but I'd still be concerned if this was a bacterial breeding ground.

Hope your answers.....
 
I have thought about and tried each of your listed options. I have come to the conclusion that in periods of down time in that I have no beer in fermenter(s) needing temp controlling, I simply unplug and leave the chiller idle. Then when I am brewing my next batch, I plug the chiller back in and it is down to 28F (my set point) in a very brief time.
I do the same .. glycol keeps the "nasties from growing" so ive been told anyway.. 3 years and no issues to date.
 
I do the same .. glycol keeps the "nasties from growing" so ive been told anyway.. 3 years and no issues to date.

I just read on the Dow Chemical website, that glycol concentrations in excess of 20% inhibit bacterial growth.

I'm running my mix at 33% glycol.
 
The cip aspect of the unitank intrigued me as I currently run a cip for my kegs and old Ss brew buckets. Just got do e with my first real cleaning, I had run a test cleaning with the chuggerpump previously only to find out it was underpowered. Sooooo, bought a 1/5 hp sump pump and put a ball valve on the outlet side of that to dial down pressure to the big ball cip from Ss. Within 10 min the inside was spotless including the cooling coils. Didn’t have to pre treat anything. The biggest pia is taking all of the 1.5” fittings off to soak after. Then having to put them back on after cleaning the fronts of the tcs on the tank.

Hey it is what it is for sure....I feel better knowing the cold side will always be clean. Felt the same way with the Ss brew bucket and cleaning that was 1000 times easier using the same cip that I used for my kegs.

My first brew tastes a lot sharper (loss for words here) than previous attempts of the same recipe in the Ss buckets. Nice that it was almost completely carded as well. Maybe it was due to the ability to dump trub and yeast? Maybe it’s because I threw the dryhops right into the unitank. Or maybe it’s because I transferred via co2 thru a 1 micron filter to the keg? Maybe because after the first week after dumps it finished up under pressure. I think the ability to control internal fermenter temps is the main reason for this better batch of pliney.

40072793562_e24023a2e3_b.jpg
 
When I bought my first Uni-tank, I was "sold" on the concept I was going to need a CIP spray ball cleaning system. And it wasn't Ss that sold me on the concept....it was current owners of the tanks weighing in on the importance of having this CIP cleaning system in place.

I have a good piece of cash tied up in the CIP gear, and frankly, I find the CIP a bit on the cumbersome side to manage. But since I have all this gear, of course I am using it.

I have a large dome shaped brush that is designed to go down into a corny keg for cleaning. Had I not been so eager to jump on the CIP based on the word of others, I would have skipped the CIP and done the conical cleaning with this brush. I agree that the CIP is basically more work (not to mention cost) than it saves to simply swab the tank out and be done with it. All the fittings, valves and clamps have to be disassembled anyway, so ditching the CIP is actually probably good advice. I have a buddy who is eyeing a new conical, so I'll share this post with him.

I use CIP for my conicals and I find it pretty worthwhile and low maintenance. I fill up a bucket of PBW, drop a pump into it, and attach my hoses. I let it run for 20 mins - which, while longer than a hand cleaning, is also hands free. Next I rinse it and optionally do an acid wash. Finally, I run my saniclean cycle. I do remove my fittings between PBW and any of the next cycles. That ensures that they are getting cleaned and sanitized thoroughly (which I would do by hand anyway). Aside from the few mins spent filling buckets, there is not much you need to have your hands on. I like to do it while doing other things in the background. Low stress and I can run it for as long as I like to get it clean.

I like CIP for the same reason I like Mark's Keg Washer for Carboys - hands free, pretty easy, effective.
 
Does anyone use Mark’s Keg washer to clean their conical as a poor man’s CIP? In principle, it seems like you could take off the yeast dump port, and plop the conical on the keg washer.
 
Does anyone use Mark’s Keg washer to clean their conical as a poor man’s CIP? In principle, it seems like you could take off the yeast dump port, and plop the conical on the keg washer.

Yes, I tried, but it was hard to use. You needed to build a stand somehow for the legs to sit on and I ended up having to buy an extension to make the pipe reach up into the conical. I gave up on that pretty quickly and used the spray ball and life was much easier (and less messy).
 
I think hands free cleaning is the allure of CIP to many folks. There are pro's and con's to both sides.
I hate cleaning. In lab I have to clean so much glassware it's a large annoyance of mine.

So buy a ball, use the pumps I already have and larger volumes of solutions that aren't too expensive. It's game over I was sold after it took me 30 minutes of scrubbing after a lazy night of keggin, when I could've just hit a switch and had a beer
 
I think hands free cleaning is the allure of CIP to many folks. There are pro's and con's to both sides.
Having 4 different kinds of conicals I can tell you , The finish inside makes a pretty substantial difference on how easy they are to clean as well.. I have two no name conicals, an ss brewtech and a stout 12.5 gallon and hands down the polished finish it the easiest to keep clean on the stout.. Surprisingly the ss brewtech has the worst uneven finish inside out of all my conicals with rough grinding marks for the krausen to really take hold in and since it has the cooling coils instead of the discharge hose wrap jacket I used on my other conicals its even more of a pain to clean compared to them. the ball valves also require a lot more work to disassemble making me wonder again why people often prefer this style over the ones that come apart with 2 wrenches in seconds. also I think its odd that the cheap conicals are sanitary with real TC ports and valves and the ss has there crappy threaded fittings and valves? where excatly does the extra cost go? because if the finish isnt as nice and the components arent as good and the walls arent as thick ... well you get my point... I do like the locking mechanism for the lid on the SS conical and the neoprene jacket and built in thermowell in the lid is nice..
 
I hate cleaning. In lab I have to clean so much glassware it's a large annoyance of mine.

So buy a ball, use the pumps I already have and larger volumes of solutions that aren't too expensive. It's game over I was sold after it took me 30 minutes of scrubbing after a lazy night of keggin, when I could've just hit a switch and had a beer


I have been using my 7 GPM Chugger pump with a micro CIP ball for cleaning my uni tanks. I also have a 1/5 HP sump pump I bought at HF that I use to pump beer line cleaner in my keg system. To avoid the hassles of priming, clamping off hoses and such, I think I'll try dropping the sump pump down in a bucket of PBW and see how that goes. Got to be more than one way to skin this cat.
 
I use a 1/5HP sump pump in a bucket. I use a cross pattern of pvc pipe to set my keg (upside down) on the bucket with a section of cpvc to get the spray ball way up into the keg, then just cycle hot caustic for about 30 minutes. I remove the dip and gas tubes and clean them separately.
 
Or maybe it’s because I transferred via co2 thru a 1 micron filter to the keg?

40072793562_e24023a2e3_b.jpg


For all the reasons you listed in your post, you are getting better beer. And many of the reasons you listed relate to eliminating O2 exposure in your finished product.

Interested in your filter setup. Did you need to stop the transfer and clean out the filter...or did you get a stable flow for the entire transfer?
 
Where is everyone getting that little shelf the stss controller sits on. Mine didn't come with that and I can't find it on their website.
 
I didn't get one either. It used to be an optional accessory you could buy when I bought mine awhile ago.

My 14G and 7G uni tanks both have FTSs heat and cool, and neither came with a controller mounting bracket. Ss doesn't list this part to be included in the package, and the pic of the FTSs heat/cool kit is very specific not showing the bracket.

You can order a powder coated black controller bracket from Ss, but it specifies this bracket is not for use with the Uni tank series. It works only with the conicals that have a threaded nut on the thermowell. Looks like this device won't fit around the TC ferrule and nothing is there to hold it in place. It is possible that some of the owners are fabricating their own from sheet metal stock or similar.

They do look convenient and I hope someone weighs in to tell us more.
 
Back
Top