Doubling Down: SS Brewtech Conical + FTSS + Glycol Power Pack

Homebrew Talk - Beer, Wine, Mead, & Cider Brewing Discussion Forum

Help Support Homebrew Talk - Beer, Wine, Mead, & Cider Brewing Discussion Forum:

This site may earn a commission from merchant affiliate links, including eBay, Amazon, and others.
Yeah I bought a TC to .75" or 1" hose barb adapter, cant remember which. Guess I'll just use that for now. Would much rather have it high enough to throw a container under. I have some large casters (not the threaded kind), maybe need to just make a little wood base.


That's a good idea with the wood base. I also bought a 1.5" TC with a 1" barb to direct the trub into a catch basin of some sort. I doubt I'll attach a hose to the barb, rather I'll just use it as a directional spout.
 
If I posted in the wrong forum and this should be in the DIY forum, Mods please move it for me!


So for the last 4 months or so I’ve been using my chest freezer/keezer as a chill water source for my SS Brewtech 14 gallon conical with FTSS temp control system. Essentially I rigged it up as displayed in the picture; by installing customized bulkheads through the freezer wall and locating the pump in a 5 gallon corny keg. Since I’m located in Southern California, my fermentation area fluctuates between the high 60s and mid-to-high 70s ambient, depending on the season and time of day/night.


IMG_1194_zpsl7o62eaw.jpg~original


As a result, holding ale fermentation temps has not been a problem, as I can easy maintain a low 60’s primary fermentation point for cleaner ales or hefes etc. The problem came about when I attempted to crash cool or hold lager temps. Furthermore, now that were moving into the spring/summer months the load on the freezer and subsequent “compressor cycles” have been more and more frequent.


Since I would keep the freezer/chill source on the edge of freezing, the initial temp drop I received was fantastic. But upon further use, I found that the freezer wasn’t able to produce a recovery rate that was sufficient enough to keep the conical at lower temps for extended periods. I even tried adding crappy vodka in an attempt to lower the freezing temp of the chill water, and therefore the freezer thermostat, but I experienced very little incremental gain. The problem is obviously more structural.


Since the evaporator coils are merely chilling the air inside the freezer, and that in turn would remove heat from the chill water inside the keg, the cycle in which to maintain and recover a low enough temp simply took too long. The other problem is that I only have 5 gallons of chill water to cool 12ish gallons of beer. Plus the smaller compressors in most chest freezers, 1/8-1/6 HP, could not provide the BTUs/Hr to remove the heat that was absorbed by the chill water.


I found that the compressor ran much longer and more often since it was naturally not designed to remove any more heat than was lost naturally by the freezer’s insulation. I should preface that by saying that I think most users with the brew bucket and 7 gallon Chronical should be able to get by with this setup, but for the 14 gallon/half barrel Chronicals, there is no way the freezer can handle the load.


So my goals for a new system were essentially two-fold:

1) I wanted to invest in a long term solution that I can use for all the potentially necessary fermentation/cellaring functions, including lagering, crash cooling… etc.


2) I wanted the system to be expandable so that I can potentially daisy-chain more fermenters, so excess cooling capacity was a consideration


I looked at a ton of the DIY window A/C unit glycol chillers on HBT but I felt that they were never designed to serve the intended purpose, and through my eyes they appeared in pictures to be inefficient, clunky, and just plain god-awful looking. I know that many will disagree, yet its common knowledge that refrigerant high/low pressure configurations in addition to compressor, evaporator, and condenser size/configuration are designed with inherent efficiencies for a specific application.


So I started researching alternatives and decided to use a trunk-line power-pack type glycol chiller, which in turn provides more than enough BTU’s/Hr to chill and crash cool 3-4 times the amount of beer I was seeking to ferment. Just to verify my hunches I jetted over to probrewer.com to read up on the amount of BTU’s/hr that many commercial breweries were using to maintain and crash their insulated conicals. Now I realize that the SS Brewtech’s conical neoprene jacket doesn't have the same insulation factor that a double-wall jacketed poly-injected conical does, but it’s a point of reference worth researching.


Using this type of calculation (http://amchiller.com/size-brewery-chiller/ ) I would need at least 213 BTUs/Hr to pull down the fully-loaded fermenter by 41 degrees (75 minus 34) over 24 hours. Which isn’t very much, but that doesn’t factor in active fermentation and/or insulation loss very precisely… So I figured I would triple that figure and I could essentially turn the conical into a block of ice within 12 hours.


Looking at most of the glycol power packs on the market, they are extremely oversized and also extremely expensive for this purpose. I didn’t need to have a 7-10 gallon glycol bath, I didn’t need 5000+ BTUs/Hr, and I didn’t want to spend over $1K. Moreover, I was concerned about energy efficiency, and hoped that due to decreased compressor runtime and cycling, the chiller would be just-as or more energy efficient than my chest freezer rig.


IMG_1294_zps5ow2ievn.jpg~original


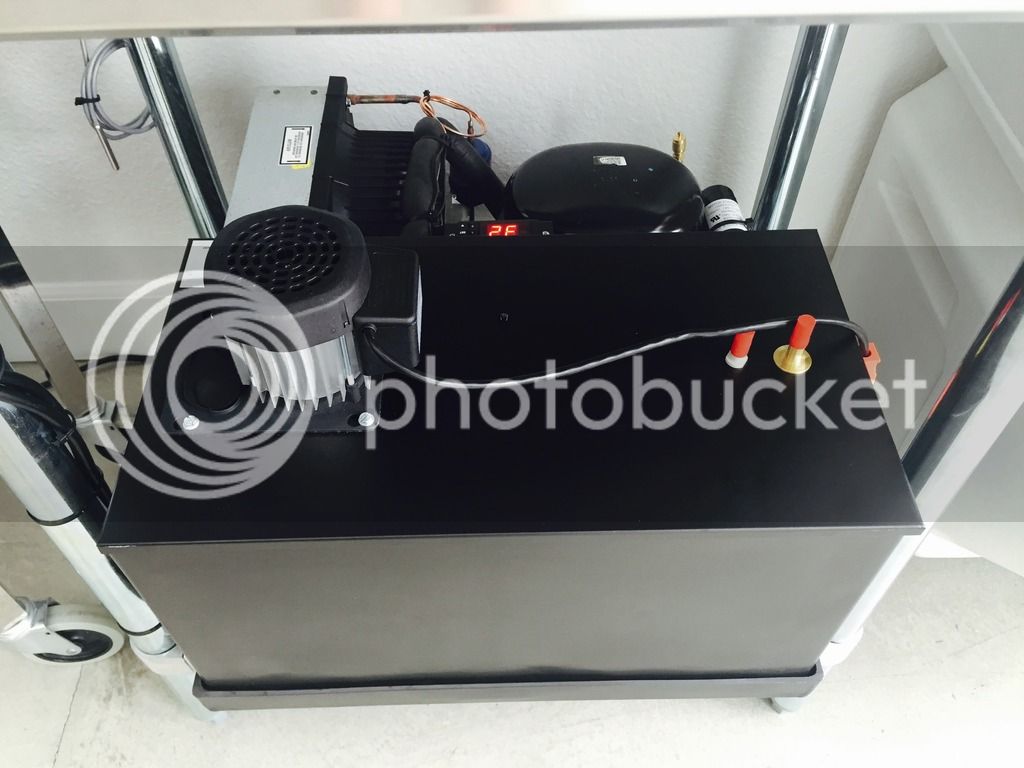
So I scoured the interweb and chose what I thought was the best price when calculated at dollars per BTU/Hr. I purchased the BVL Controls Eco 33, 1/3 HP 3 gallon bath chiller from Rapids Wholesale (no sales tax plus free shipping!). For those that don’t know, or think that BVL is a no-name brand, they are a Canadian company that has been an OEM supplier of Micro Matic’s for forever and a day…. So the quality and fit-and-finish was everything that I expected for the price. For a point of reference the compressor/condenser pack was nearly the same Tecumseh units that UBC are using in their chillers.


The Eco 33 unit provides 2300 BTU/Hr of cooling capacity, and also has a pump (50GPH) that can actually be utilized in place of the small FTSS system 12v pump. The flow rates align pretty well, and it wasn’t extremely oversized for this purpose.


IMG_1296_zpsxifaid1c.jpg~original


IMG_1297_zpsjntgmhli.jpg~original


(In the pics I have it configured for the FTSS pump)


After receiving the chiller, I rewired the pump from a “constant on” configuration to a Johnson A419 temp controller, with the Johnson controls thermocoupling fitting perfectly into the supplied FTSS thermowell. That way the Chiller’s thermostat will maintain the glycol temp in the high 20s-low 30s and the Johnson will maintain the conical’s temp at any desired factor within about 5-10 degrees above the glycol temp. I also have some added peace of mind since the chiller’s pump is designed to be run constantly; so I don’t have to worry about long run times (except for the fact that I don’t want the beer to freeze in the conical). The only downside is the pump is louder since its not dampened by being submerged in the glycol bath. I’m still running tests on which pump and thermostat combo I prefer more.


IMG_1295_zpsqofk5rm4.jpg~original


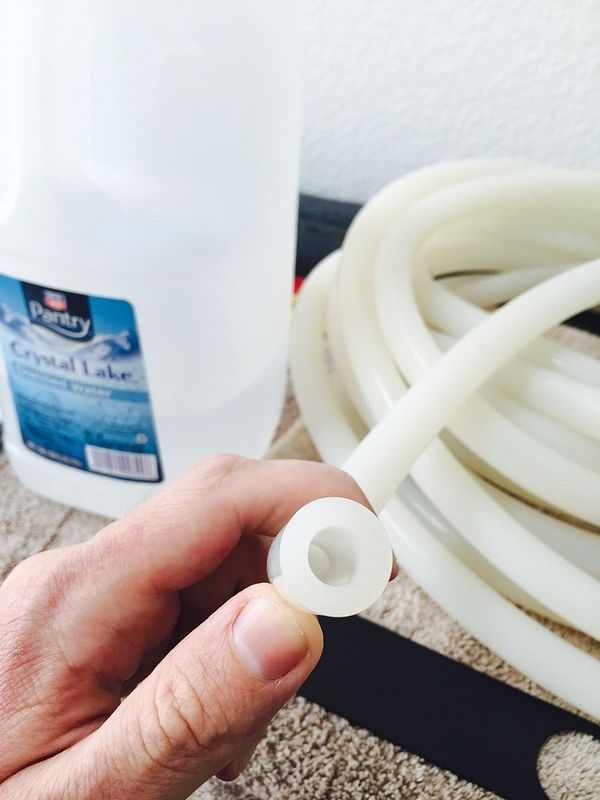
The other convenient feature of this chiller is that it came “plumbed” from the factory with 3/8” barbs (more than likely for a glycol draught tower), so the chiller links right up to the FTSS coil, no modifications needed. I chose to go with thick wall silicone tubing (3/16” wall), due to the fact it remains extremely flexible even at sub-freezing temps, plus it’s an added layer of insulation. It won’t harden like PVC or vinyl tubing.


IMG_1293_zpsccyoaqrs.jpg~original


Although I’ve only processed one batch through the new system, my initial impressions are extremely positive. The compressor barely has to cycle in comparison to the chest freezer to maintain temps, and the temp drops extremely rapidly in a crash-cool scenario. In my tests using just water, it can drop the temp 30+ degrees inside of an hour if I’m really pushing it! Although it may be just one man’s opinion, this system is a must have for warm weather climates, or for homebrewers fermenting inside a garage where ambient temps can spike into the 80s and 90s.


The only downside is the added noise, which sounds like an average run of the mill hermetically sealed compressor on top of a good sized bedroom fan running at the same time. Ideally, this would be in a garage, so you wouldn’t ever notice the sound, and the plus side is that it doesn’t have to run very long.


I realize that many homebrewers will think this design is crazy overkill, and that I could have achieved the same results for less than half the cost. Yet those same people should identify with the fact that I’m pretty picky when it comes to my brewing equipment, and realize that there are countless other home brewers that would be interested in emulating my setup. Furthermore, I think this system will offer me a good amount of expandability.


I’m happy to field questions or run additional tests for anyone interested. Yet, I think that for what I’m seeking to accomplish with my home brewery that it couldn’t get any more perfect. Cheers!


I fixed the photos by adding ‘~original’ after .jpg.
 
I was under the impression putting the shelf on the legs would add stability. Is this necessary or just a place to put things like the controller?

I think I should know what an "Oktober" is that you pictured, but I have no clue. I am not above asking what it is and how it is used?

OK...I looked it up, Can sealer as in a Crowler machine! Awesome...that is super cool!!
 
I didn’t see any lack of stability w/o the shelf. I just couldn’t figure out what benefit there was to it! You nailed it on the can seamer. I have grown tired of filling growlers much easier and I can have cans pre filled for friends.
 
Is there any concern about the pressure gauge being at the same vertical height as the blow-off? I don't have any experience with them.

Mike.
 
Getting ready to use my new 10 gal Unitank this weekend. I scrubbed down the inside with TSP. I just filled the tank with PBW and will let that sit for a few hours. I tried to use my riptide pump with the CIP ball but the pump won't even start drawing liquid out of the bucket. Not impressed with the riptide so far, had a lot of issues. I will need to get a submersible pump to try out the CIP next time.

Overall I like the design. One problem area though is the bottom where the 2 butterfly valves are. There is not a lot of room down there. I think maybe on the larger tanks its not an issue but on the 10 gallon space is at a premium, you really need to maneuver things to get the valves lined up and functional.

I got the optional heating and cooling kit. Not glycol chiller yet so going to use a cooler with ice water for now. Should be more than sufficient for the winter months. Mostly need the heating this time of year unless I try to cold crash. Sounds like that should be doable with the ice water but will see.

Everything seems well built. Cant wait to give it a go on Sunday. Biggest thing is going to be figuring out the trub. The valve to transfer from is real close to the bottom leaving maybe room for 1/2 gallon of trub at most. Usually in a 5 gallon batch of NE IPA I have at least a gallon. This will be used for 10 gallon batches. So I will need to remove a lot of trub but try not to waste to much beer. I might start using a hop tube to cut down on the mess the dry hops created and reduce the trub.
 
I filled my new tank last night with a NE IPA. All went really smoothly. It was really nice to be able to use the carb stone for oxygen.

I filled from the dump valve as recommended, I hadn’t done that before with my BME fermentors but will from now on. Two small learnings: 1. ALWAYS check the pressure gauge before opening the 3 inch top port. Just pumping wort in tor a few min built up enough pressure to pop the prv plate up a bit when I removed the tri clamp. 2. This sucker is really heavy and a bit awkward when full. Even lifting it over the door frame took some work.

Only one minor complaint is that it is really hard to see the measurement etchings through the 3 inch port.

I have yet to read up on fermenting under pressure. I would be interested to hear everyone’s thoughts on this. Would you just close off the blow off port with a point or so of gravity left?
 
One problem area though is the bottom where the 2 butterfly valves are. There is not a lot of room down there.

Install the valve above the elbow (horizontally) or at the end of a sight glass after the elbow? No idea how that would affect overall function, but it should give more space.

Mike.
 
Getting ready to use my new 10 gal Unitank this weekend. I scrubbed down the inside with TSP. I just filled the tank with PBW and will let that sit for a few hours. I tried to use my riptide pump with the CIP ball but the pump won't even start drawing liquid out of the bucket. Not impressed with the riptide so far, had a lot of issues. I will need to get a submersible pump to try out the CIP next time.

Overall I like the design. One problem area though is the bottom where the 2 butterfly valves are. There is not a lot of room down there. I think maybe on the larger tanks its not an issue but on the 10 gallon space is at a premium, you really need to maneuver things to get the valves lined up and functional.

I got the optional heating and cooling kit. Not glycol chiller yet so going to use a cooler with ice water for now. Should be more than sufficient for the winter months. Mostly need the heating this time of year unless I try to cold crash. Sounds like that should be doable with the ice water but will see.

Everything seems well built. Cant wait to give it a go on Sunday. Biggest thing is going to be figuring out the trub. The valve to transfer from is real close to the bottom leaving maybe room for 1/2 gallon of trub at most. Usually in a 5 gallon batch of NE IPA I have at least a gallon. This will be used for 10 gallon batches. So I will need to remove a lot of trub but try not to waste to much beer. I might start using a hop tube to cut down on the mess the dry hops created and reduce the trub.


I have had that issue with the BMEs too for the super hoppy beers with dry hopping. I have a rig that allows me to force co2 at a very low volume up the blow off tube to help push the trub out.
 
I filled from the dump valve as recommended

Do you mean filled the fermenter? Or transferred to keg? Dump valve I assume is the very bottom one? Also did you put your hops in loose?
 
I think I am going to remove the shelf too. It gets in the way. I assume it was/is for stabilization. But will give it a try.
 
I think I am going to remove the shelf too. It gets in the way. I assume it was/is for stabilization. But will give it a try.

I found my shelf was restricting the valve setup too much and is basically in the way so I removed it too. There are several ways to configure the valves and accessories/fittings with one example being to tri clamp the trub dump valve directly to the tank, then the 90 degree elbow after that....or vice versa with the elbow on the tank first. I did find that it made the valve problem worse the latter way and putting the valve directly on the tank seemed to keep it out of the way for me. Bottom line....space is at a premium on the lower end.

I had figured on transferring (Chugger pumping) beer into the uni tank from boil kettle up thru the racking arm. I saw another post saying they went up thru the trub dump valve. Looks like 6 of one, half dozen of another unless there is something I need to consider...so please fill me in.
 
Received my 14g Unitank this week! Thank you all for the tips for cleaning. I found TSP (Savogran) at Home Depot for $4 for a 16oz box in the paint isle. I used a blue sponge and scrubbed her down in the tub while soaking the parts in the same solution. I rinsed her and the parts with water then starsan. Then I filled her up to the brim with starsan for a good soak using 3x5g buckets as I did spill some too. Will let her air dry to passify.

My plan is to run PBW & IO Star Sanitizer to test out the CIP before brew day. Figured it would certainly be clean then and my brew day is a little shorter knowing how to run the CIP. Although, thank you to the crew for listing the parts for the CIP cart as I do hope to make cleaning a bit easier.

I found the shelf useless as well and the legs a little narrow. Anyone considering leg extensions?

The more I read this forum, the more I wish for a glycol chiller for Xmas!
 
Last edited:
Finally got my 14 gal Unitank this week,,,,fires in Santa Rosa delayed delivery a couple weeks. Ran 2% Caustic + TSP for about an hour using a submersible pump and the rotating spray ball....filled with StarSan for the 30 minutes and dumped....running cooling trials now with 12 gallons of water and the glycol chiller.....looks like it cools about 6F per hour

Love the setup, can't wait for my next brew day.
 
Received my 14g Unitank this week! Thank you all for the tips for cleaning. I found TSP (Savogran) at Home Depot for $4 for a 16oz box in the paint isle. I used a blue sponge and scrubbed her down in the tub while soaking the parts in the same solution. I rinsed her and the parts with water then starsan. Then I filled her up to the brim with starsan for a good soak using 3x5g buckets as I did spill some too. Will let her air dry to passify.

My plan is to run PBW & IO Star Sanitizer to test out the CIP before brew day. Figured it would certainly be clean then and my brew day is a little shorter knowing how to run the CIP. Although, thank you to the crew for listing the parts for the CIP cart as I do hope to make cleaning a bit easier.

I found the shelf useless as well and the legs a little narrow. Anyone considering leg extensions?

The more I read this forum, the more I wish for a glycol chiller for Xmas!


Congrats! You are gonna love it.
 
View attachment IMG_0025.jpg
At first I did a light wash down with TSP using a white light duty scotch brite pad, but that’s wasn’t enough. I needed to work a little harder to remove all the oil from the TC fittings with a terry cloth towel. So be thorough when cleaning to get all the gunk.
 
For anyone using FTSs how wide is the temp range by default? I set the device to 66.5 but the temp has been hovering in the lower 66 degrees range. It has not hit 66.5. I am assuming there is some sort of variance and it is not precise?
 
I have a SS head regular (not nano) Chugger pump that delivers 7GPM. I mistakenly ordered the full size CIP spray ball thinking this was what I needed. In conversations with Ss, I discovered I needed the micro CIP spray ball to use with my 7GPM pump instead. They were kind to allow me to return the unused full size ball and then order micro ball. Another item I am using is the 6" to 3" TC reducer which is allowing me to use the 3" micro CIP ball and get the cooling coils out of the way. I may be totally wrong, but it seemed the coils would break up the force of the spray pattern which would limit cleaning efficiency.

May I ask to most effective way to sanitize prior to each use? I have finishing passivating the tank, and my thoughts are to have all the valves, gaskets, coil and TC clamps soaking in a bucket of star san. Spray bottle with star san and thoroughly spritz the interior of the tank with no fittings in place. Then assemble the fittings as I am preparing to rack wort into the tank. Is this a reasonable approach?
 
For anyone using FTSs how wide is the temp range by default? I set the device to 66.5 but the temp has been hovering in the lower 66 degrees range. It has not hit 66.5. I am assuming there is some sort of variance and it is not precise?

You can set the hysteresis and various other settings. I think you have the heating option(?) so there is 5 minute delay built in to the controller so it wont cycle rapidly between heat and cool. You'll see the word "working" flashing on and off when the timer is counting down. You can go on the Ss site and find the information to change the settings, and I have done that with other controllers. But by and large, I found the factory settings work well for me and the system just needs a bit of time to stabilize the wort temps....especially when you just add it in.
 
Awesome. What kind of tubing are you using for your cooling lines?

It's from here: https://www.siliconehose.com/silicone-heater-hose/

I saw it recommended either earlier in this thread or another one, that it was insulated and wouldnt sweat. Well... it still does, lol. Less so than just regular silicon tubing though. Might be able to get some radiator hose or something cheaper locally?
 
View attachment 418183
At first I did a light wash down with TSP using a white light duty scotch brite pad, but that’s wasn’t enough. I needed to work a little harder to remove all the oil from the TC fittings with a terry cloth towel. So be thorough when cleaning to get all the gunk.

Lol I forgot to test it with a white towel after cleaning. Why you gotta get me all paranoid about my beer now?
 
Lol I forgot to test it with a white towel after cleaning.

Ditto.

I scrubbed with TSP then filled it with PBW and let that soak. I also soaked all parts in PBW. But then I brewed yesterday with a few friends over, we had a few beers, got distracted and I completely forgot to sanitize it! Never done that before. So its going to be interesting to see how it comes out. Hopefully it will be fine. Yeast it grinding away and was a fast starter so hoping its good
 
One nice thing about these being pressure rated. I cleaned and sanitized a couple days before and then sealed it up. Brewday didnt have to worry about that. Just popped it open and went on with the bidness.
 
Lol I forgot to test it with a white towel after cleaning. Why you gotta get me all paranoid about my beer now?


My persnickety nature gets the best of me. Not meant to cause anxiety. My other fermenter were never that oily. It was a fluke. [emoji6]
 
Now that you have the unitank, does anyone else feel like they are part of a secret society while in this forum?
 
Now that you have the unitank, does anyone else feel like they are part of a secret society while in this forum?

Heh if anything I wonder if Im foolish and should have just gone with fermenting in kegs for a tenth of the price. Worrying about clogged diptubes and **** though? Fugg that. Plus where da bling?
 
Anyone else feel the transfer port is too low? Really going to have to get the trub removal right. I wish it was a little higher up. I am even thinking about drawing the first keg off the sample port to make sure its clean.
 
Anyone else feel the transfer port is too low? Really going to have to get the trub removal right. I wish it was a little higher up. I am even thinking about drawing the first keg off the sample port to make sure its clean.

Maybe dump the trub a couple of times to keep the layer from building up too much? Dump a few days into fermentation, then a again a few days later? Also consider your racking arm can be rotated upward during racking which adds a couple of inches above the valve.

Now that you have the unitank, does anyone else feel like they are part of a secret society while in this forum?


I think we are part of the double naught uni tank underworld that only WE know about. Sssshhhhhh
 
One nice thing about these being pressure rated. I cleaned and sanitized a couple days before and then sealed it up. Brewday didnt have to worry about that. Just popped it open and went on with the bidness.


Excellent idea. I was thinking my brew day was going to get longer fumbling with assembling all the TC's and such. I'll just sanitize, prep and pressurize the tank for use the day before and get ready to roll on brew day. Thanks for the good tip!
 
Also consider your racking arm can be rotated upward during racking which adds a couple of inches above the valve.

Not sure this is actually doable. The butterfly valves are too tight to be able to rotate it and still open it from what I can tell. It will bump into the dump port valve or the leg. At least that is what it seemed like when i played around with it.
 
Not sure this is actually doable. The butterfly valves are too tight to be able to rotate it and still open it from what I can tell. It will bump into the dump port valve or the leg. At least that is what it seemed like when i played around with it.


I played around with the way I set up my TC's and valves. I oriented the valve handle (not the racking arm inside) so it points upward when closed, then it opens to the front allowing the TC to be loosened and rotated. You can play around with the way you orient valves and fittings and I got my setup so this feature allows rotation.

Also, you can position the dump valve right onto the tank with the 90 elbow after the valve...or vice versa. Several ways to do this and I got all mine to work but it is really tight.
 
Just took a hydro sample and then dropped a few dryhops in. Any of you planning on using a basket or anything? I used to do bags in my old conicals but they'd sometimes block the racking valve. I'd tie it with some floss and run it up the lid, reach in and grab that out if it happened. Dont really want to do that since no O2 on dank eepahs is the goal. My experience with dryhops settling during cold crash is pretty hit or miss. Think Ill just go for it and see if I wind up with any clogged dip tubes.

7719305886964589159%253Faccount_id%253D1
 
Not sure this is actually doable. The butterfly valves are too tight to be able to rotate it and still open it from what I can tell. It will bump into the dump port valve or the leg. At least that is what it seemed like when i played around with it.

Wanted to show you how I set my racking valve so I could rotate the arm. Shown in the closed position, unlock and swing the valve butterfly arm toward the front to allow flow. If the racking arm (inside) is pointing to the left or at a perpendicular 270 degree orientation, rotating the valve handle upwards (CCW) moves the arm inside downward toward the yeast cake. I have a sight glass to watch keeping it off the trub.

Second pic shows the dump valve completely out the way. You could even orient the dump nozzle to come out to the other sides or back if you had room.

tank 1.JPG


tank 2.JPG
 

Latest posts

Back
Top