
I'm building a Bare Bones Keezer so figured I'd share my process. If someone is like me and wants a keezer that will hold 2 Corny's, one 5 gallon carboy for lagering, and a 5# CO2 tank and wants to do it with new stuff but for as little as possible, then you may want to follow this thread.
A couple of notes first, building a Keezer out of all new parts (Corny kegs refurb but new to you from a vendor) is expensive, plain and simple. By far the cheapest way to get into Kegging if you don't already have an extra frige or freezer is to find a complete Kegerator setup on CL. I see them come up frequently for 250.00 or even less with everything included. So if you just want to do it on the cheap that's the way to go. Also you can probably find a used freezer on CL so that can save you a few dollars as well, but this thread is about avoiding the hassel/headaches that can come with dealing with CL purchasing and is using all new parts from scratch.
I decided to go with a Keezer over a Kegerator for a few reasons. First, I just like the look of a taps through a wood collar better than a mini-frige tower based Kegerator. Second, I wanted to build something that would retain it's function for my family if I suffer some terrible turn of events like I stop drinking beer. This build is completely reversable into a garage chest freezer. Since I already have a bunch of refrigerators I didn't want another mini-frige. Also a Keezer is more energy efficient than a Mini-frige tower system.
Here's the parts list and where I bought stuff from:
2 Faucet Refrigerator Conversion Keg Kit, Standard Kit, BALL LOCK upgraded faucets to perlick ss 525, 285.00 Shipped
http://stores.kegconnection.com/Detail.bok?no=330
Notes: I got this at Kegconnections since they seemed to have the best price/quality combo. I'm sure the other vendors are comparable. This kit is pretty much what you will need for reliable components. The price includes everything plus upgraded faucets to Perlick SS and comes already assembled. I did see recently that the 7.95 flat rate shipping is on hold so cost may be going up.
Also note you will want to go with Ball lock kegs even though pin lock are cheaper, since they have smaller diameter and easier connectors. Warning, If you follow this build with the GE 5.0 cf Pinlocks wont fit!!
Freezer: GE 5.0 cf freezer. Sams Club. 155.00.
http://www.samsclub.com/sams/shop/product.jsp?productId=145054&navAction=push
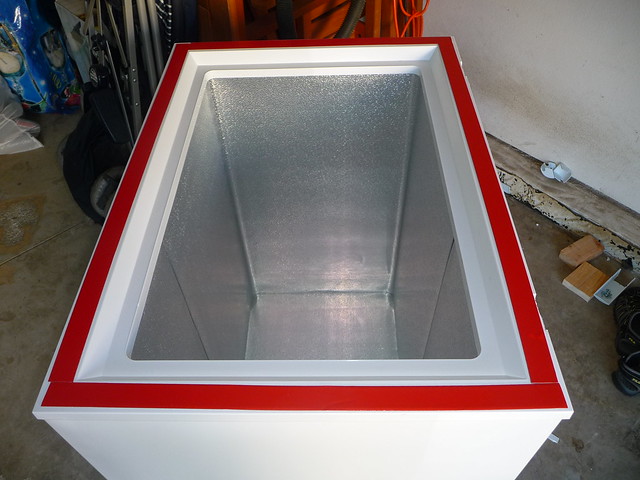
Notes: I'll post a pick below but basically this is the perfect size for 2 ball lock Corny kegs in the main compartment and a 5 gallon carboy and 5# CO2 tank on the compressor hump. You might be able to find a sale price on a 5.0-5.5 Freezer for a few dollars less, but a few things I liked about this one is reviews seem to suggest GE have a little better reliability than some of the other cheap freezers. Also it has a metal interior as opposed to plastic and the top where the lid closes is flat rather than having a lip like the frigidaire and others which makes it simpler to attach the collar.
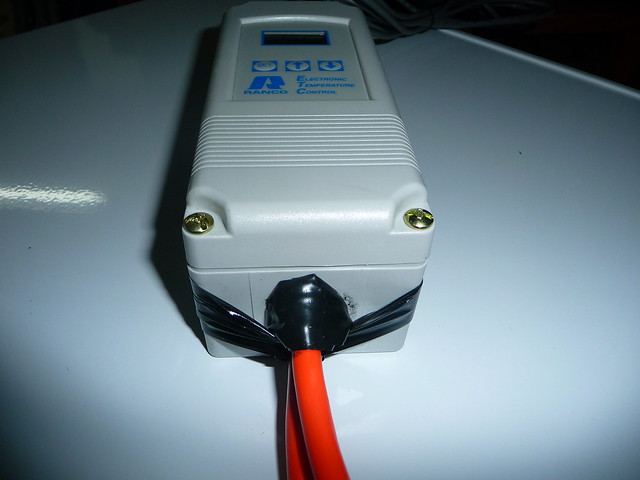
Electronic Temp Controller: Ranco ETC-111000-000. Patriot Supply (EBay) 58.00 Shipped
http://www.patriot-supply.com/products/showitem.cfm/RANCO_ETC_111000_000
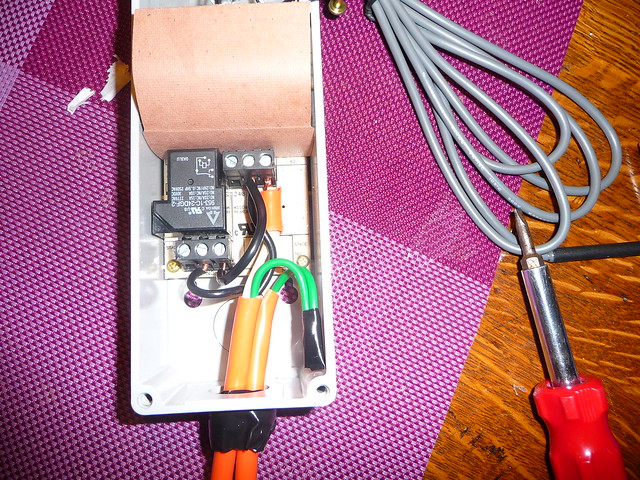
Notes: This is pretty much the cheapest new digital ETC I could find. In fact even the analog Johnson units are just as much or more new and a used Johnson Analog unit I was watching on EBay sold for the same price as this after shipping. The benefit of this unit is it gives you a digital display with your current internal temp and has a lot of features that you cant get with an analog unit. You can buy this directly from Patriot but if you order from their ebay listing the total price is a dollar less. This unit is not pre-wired so you will have to wire it which you can do easily with a grounded extension cord. I'll post detailed instructions with pics later, however keep in mind, to cover my ass, please note electricity can be dangerous and instructions that come with the unit recommend professional installation. I already had an extra extension cord so I didn't include that in the price, but if you dont have one it will cost you about 5 dollars more.
Collar Build Items from Home Depot: One 8 ft 2x3 Douglas fir stud $1.87, 4 L-brackets 2.40 total, Heavy Duty 2 sided tape $15.96.
http://www.homedepot.com/h_d1/N-5yc...splay?langId=-1&storeId=10051&catalogId=10053
Notes: You also need a drill and various size bits. For the shank holes you need a large bit which can be size 7/8th, 15/16's or 1 inch. I think the 15/16 is actually the preferred size but since I already had a 1 inch that is what I used. I also already had the wood screws so didn't spend anything on them. The reason I went with the 2x3 instead of a larger stud is that the hinge holes on the back of the GE 5.0 are exactly 2.5 inches from the lower to the upper and the 2x3 is exactly 2.5 inches wide so all you have to do is remove the hinge and move it up so that the lower screw holes are now screwed into the upper holes, then drill your collar where the upper hinge holes line up, and the top will fit perfectly with absolutely no measuring or adjusting required. Look for pics below that will explain this better later. One final note on this, you do have to trim the plastic cap on the top freezer so the hinge will sit flush against the back but this doesn't affect the function of the freezer at all. The double sided tape might not be needed but I didn't want to do anything that permanently attached the collar so it remains completely reversible. The tape added more cost than I wanted, but I bought the long roll which is 37.5 feet since I use it for other stuff. You need 8 feet and the next smaller size at my HD is 6 feet so you would need 2 rolls that size which costs $6.00 per roll, so for 4 dollars more you get about 30 ft of tape extra. On the website there is a 27.5 ft roll for $10.00 in stores only but they didn't have that one at my HD.
Insulation/weather stripping from home depot:
http://www.homedepot.com/h_d1/N-5yc...splay?langId=-1&storeId=10051&catalogId=10053
I have my total cost which is :
285.00 Kegs and Hardware
155.00 Chest Freezer
58.00 ETC
20.00 Collar
15.00 CO2
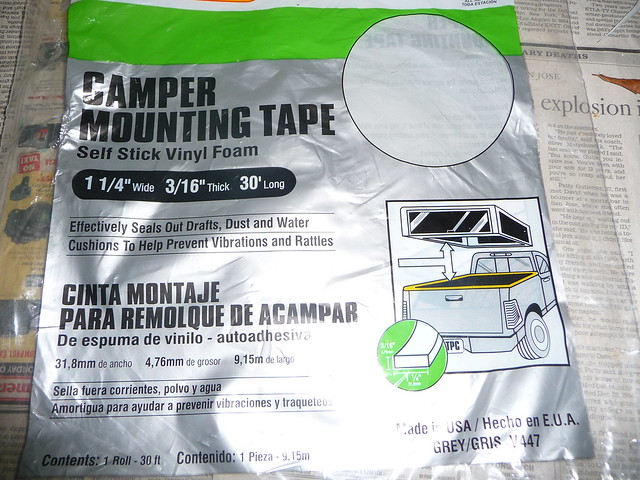
5.77 Camper tape for insulation
Equals approx. $480.00
On to the build.
Step One: Buy all the stuff above plus or minus wood screws, drill, drill bits, etc
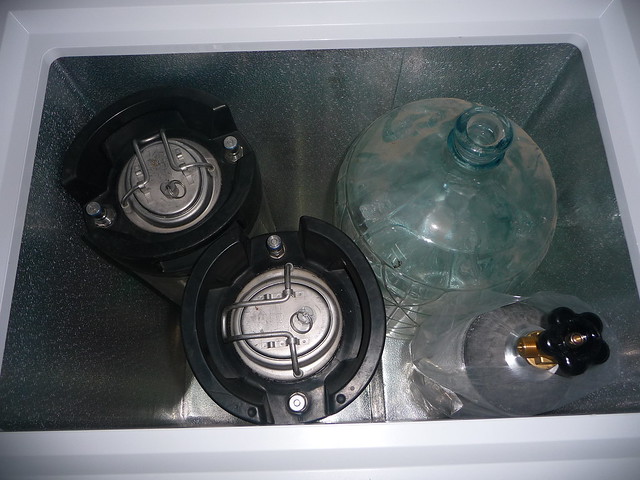
Step Two: Plug in the freezer and let it run a couple of days. You definitely want to test it before you get started since even though you won't be affecting its function, you will be cutting the upper plastic cap so want to make darn sure it works before you do that. Here is the pic of the GE freezer with the 2 kegs, carboy, and CO2 tank. Perfect fit.
Step Three: Remove the freezer top and hinges. This is as simple as removing the 4 small screws that hold on the plastic trim hinge covers then remove the covers. There is an upper and lower cover on each hinge. Next unsrew the 4 upper machine screws from each side that hold the lid to the hinge, set the lid aside. Next remove the remaining 4 machine screws from each hinge and remove the hinges. An important note here is that the screws are made of very cheap soft metal so I recommend using a hand held screw driver to first losen each screw before using a power drill to remove them because I didn't do this and my power driver stripped one of the screw heads and it was a real ***** to get that one out.
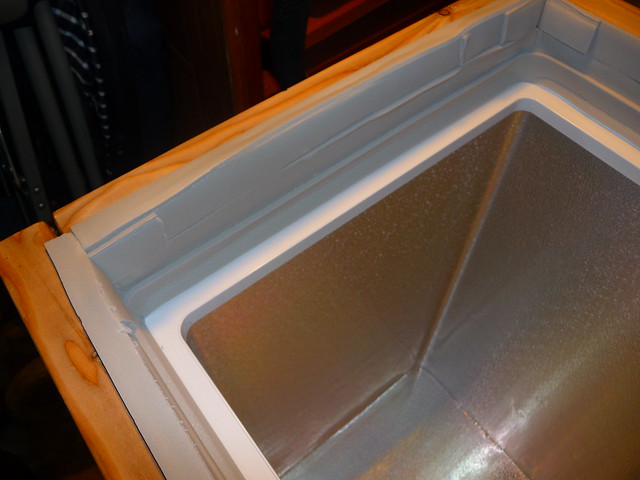
Step Four: Cut the freezer top cap so that the hinge can be screwed back on in its new upper position and sit flush against the metal back of the freezer. If you have a dremmel multi-tool you will be able to do a perfect job of this and could even save the piece you cut out and glue it back later. I don't have one so used a serrated kitchen knife, hence the sloppy job, but it doesn't matter since you can't see it once the collar and top are back on. You use the hinge as a template to mark where you will cut and make sure to cut it slightly wider than the hinge so it will fit perfectly. Here's a pic of this:
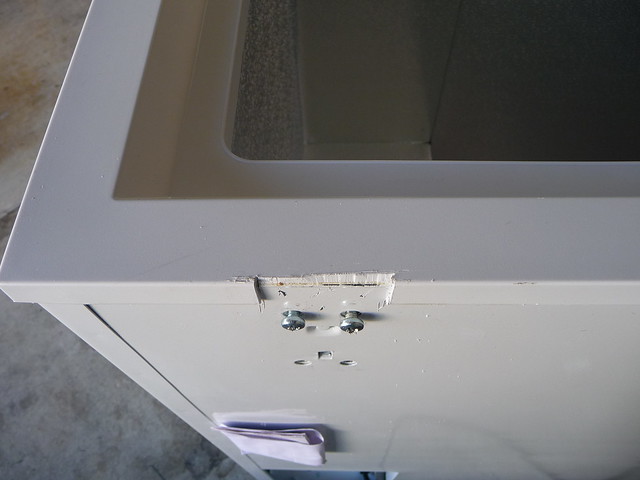
The above pic also shows how the top of this particular freezer is completely smooth without a lip which makes it neat and easy to get a perfect seal.
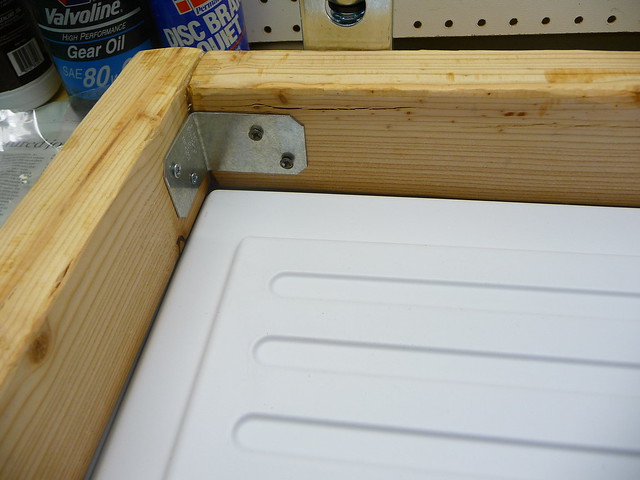
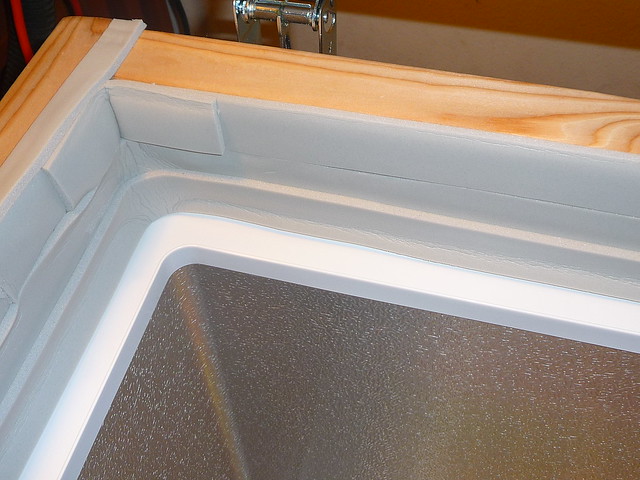
Step Five: Make the Collar. I don't really have any pictures of the process but it is pretty simple. I also didn't do a great job at all so you can likely do better. I will give a couple of tips though. When you go to buy the 2 x 3 look at a bunch of them by staring straight down it to get a nice straight one. I had to check like 20 of them or so to get a very straight one that also have no mars and a very nice grain on one side since I'm not going to paint it. Check your measurements yourself but basically you want one 28 1/4 inch piece for the front, one 25 1/4 inch piece for the back, and two 19 inch pieces for the sides. I didn't have the right saw for this so used a regular tree saw so my cuts were not very good. I nailed the 4 pieces together then attached the L-Brackets, but when I screwed down the brackets I got some separation of some of the joints so will definitely need some insulation on the inside of the collar. Heres a pic of the collar with the lid attached. I did sand the collar and rounded the edges to decrease the risk of splinters, get a smooth surface for the lid seal gasket and mating surface to the freezer cap, and to make it look better:
More later.
A couple of notes first, building a Keezer out of all new parts (Corny kegs refurb but new to you from a vendor) is expensive, plain and simple. By far the cheapest way to get into Kegging if you don't already have an extra frige or freezer is to find a complete Kegerator setup on CL. I see them come up frequently for 250.00 or even less with everything included. So if you just want to do it on the cheap that's the way to go. Also you can probably find a used freezer on CL so that can save you a few dollars as well, but this thread is about avoiding the hassel/headaches that can come with dealing with CL purchasing and is using all new parts from scratch.
I decided to go with a Keezer over a Kegerator for a few reasons. First, I just like the look of a taps through a wood collar better than a mini-frige tower based Kegerator. Second, I wanted to build something that would retain it's function for my family if I suffer some terrible turn of events like I stop drinking beer. This build is completely reversable into a garage chest freezer. Since I already have a bunch of refrigerators I didn't want another mini-frige. Also a Keezer is more energy efficient than a Mini-frige tower system.
Here's the parts list and where I bought stuff from:
2 Faucet Refrigerator Conversion Keg Kit, Standard Kit, BALL LOCK upgraded faucets to perlick ss 525, 285.00 Shipped
http://stores.kegconnection.com/Detail.bok?no=330
Notes: I got this at Kegconnections since they seemed to have the best price/quality combo. I'm sure the other vendors are comparable. This kit is pretty much what you will need for reliable components. The price includes everything plus upgraded faucets to Perlick SS and comes already assembled. I did see recently that the 7.95 flat rate shipping is on hold so cost may be going up.
Also note you will want to go with Ball lock kegs even though pin lock are cheaper, since they have smaller diameter and easier connectors. Warning, If you follow this build with the GE 5.0 cf Pinlocks wont fit!!
Freezer: GE 5.0 cf freezer. Sams Club. 155.00.
http://www.samsclub.com/sams/shop/product.jsp?productId=145054&navAction=push
Notes: I'll post a pick below but basically this is the perfect size for 2 ball lock Corny kegs in the main compartment and a 5 gallon carboy and 5# CO2 tank on the compressor hump. You might be able to find a sale price on a 5.0-5.5 Freezer for a few dollars less, but a few things I liked about this one is reviews seem to suggest GE have a little better reliability than some of the other cheap freezers. Also it has a metal interior as opposed to plastic and the top where the lid closes is flat rather than having a lip like the frigidaire and others which makes it simpler to attach the collar.
Electronic Temp Controller: Ranco ETC-111000-000. Patriot Supply (EBay) 58.00 Shipped
http://www.patriot-supply.com/products/showitem.cfm/RANCO_ETC_111000_000
Notes: This is pretty much the cheapest new digital ETC I could find. In fact even the analog Johnson units are just as much or more new and a used Johnson Analog unit I was watching on EBay sold for the same price as this after shipping. The benefit of this unit is it gives you a digital display with your current internal temp and has a lot of features that you cant get with an analog unit. You can buy this directly from Patriot but if you order from their ebay listing the total price is a dollar less. This unit is not pre-wired so you will have to wire it which you can do easily with a grounded extension cord. I'll post detailed instructions with pics later, however keep in mind, to cover my ass, please note electricity can be dangerous and instructions that come with the unit recommend professional installation. I already had an extra extension cord so I didn't include that in the price, but if you dont have one it will cost you about 5 dollars more.
Collar Build Items from Home Depot: One 8 ft 2x3 Douglas fir stud $1.87, 4 L-brackets 2.40 total, Heavy Duty 2 sided tape $15.96.
http://www.homedepot.com/h_d1/N-5yc...splay?langId=-1&storeId=10051&catalogId=10053
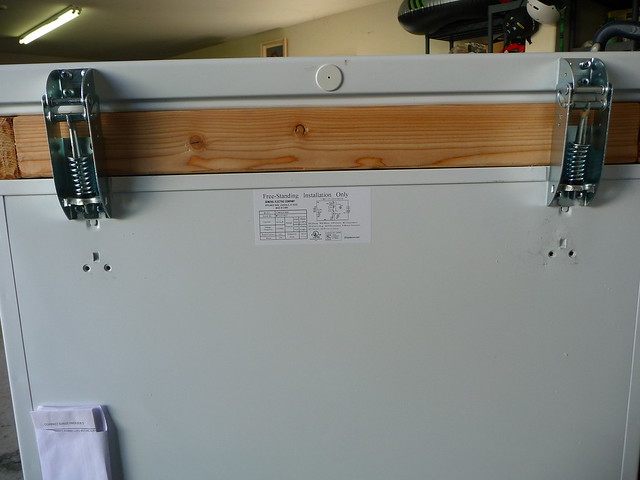
Notes: You also need a drill and various size bits. For the shank holes you need a large bit which can be size 7/8th, 15/16's or 1 inch. I think the 15/16 is actually the preferred size but since I already had a 1 inch that is what I used. I also already had the wood screws so didn't spend anything on them. The reason I went with the 2x3 instead of a larger stud is that the hinge holes on the back of the GE 5.0 are exactly 2.5 inches from the lower to the upper and the 2x3 is exactly 2.5 inches wide so all you have to do is remove the hinge and move it up so that the lower screw holes are now screwed into the upper holes, then drill your collar where the upper hinge holes line up, and the top will fit perfectly with absolutely no measuring or adjusting required. Look for pics below that will explain this better later. One final note on this, you do have to trim the plastic cap on the top freezer so the hinge will sit flush against the back but this doesn't affect the function of the freezer at all. The double sided tape might not be needed but I didn't want to do anything that permanently attached the collar so it remains completely reversible. The tape added more cost than I wanted, but I bought the long roll which is 37.5 feet since I use it for other stuff. You need 8 feet and the next smaller size at my HD is 6 feet so you would need 2 rolls that size which costs $6.00 per roll, so for 4 dollars more you get about 30 ft of tape extra. On the website there is a 27.5 ft roll for $10.00 in stores only but they didn't have that one at my HD.
Insulation/weather stripping from home depot:
http://www.homedepot.com/h_d1/N-5yc...splay?langId=-1&storeId=10051&catalogId=10053
I have my total cost which is :
285.00 Kegs and Hardware
155.00 Chest Freezer
58.00 ETC
20.00 Collar
15.00 CO2
5.77 Camper tape for insulation
Equals approx. $480.00
On to the build.
Step One: Buy all the stuff above plus or minus wood screws, drill, drill bits, etc
Step Two: Plug in the freezer and let it run a couple of days. You definitely want to test it before you get started since even though you won't be affecting its function, you will be cutting the upper plastic cap so want to make darn sure it works before you do that. Here is the pic of the GE freezer with the 2 kegs, carboy, and CO2 tank. Perfect fit.
Step Three: Remove the freezer top and hinges. This is as simple as removing the 4 small screws that hold on the plastic trim hinge covers then remove the covers. There is an upper and lower cover on each hinge. Next unsrew the 4 upper machine screws from each side that hold the lid to the hinge, set the lid aside. Next remove the remaining 4 machine screws from each hinge and remove the hinges. An important note here is that the screws are made of very cheap soft metal so I recommend using a hand held screw driver to first losen each screw before using a power drill to remove them because I didn't do this and my power driver stripped one of the screw heads and it was a real ***** to get that one out.
Step Four: Cut the freezer top cap so that the hinge can be screwed back on in its new upper position and sit flush against the metal back of the freezer. If you have a dremmel multi-tool you will be able to do a perfect job of this and could even save the piece you cut out and glue it back later. I don't have one so used a serrated kitchen knife, hence the sloppy job, but it doesn't matter since you can't see it once the collar and top are back on. You use the hinge as a template to mark where you will cut and make sure to cut it slightly wider than the hinge so it will fit perfectly. Here's a pic of this:
The above pic also shows how the top of this particular freezer is completely smooth without a lip which makes it neat and easy to get a perfect seal.
Step Five: Make the Collar. I don't really have any pictures of the process but it is pretty simple. I also didn't do a great job at all so you can likely do better. I will give a couple of tips though. When you go to buy the 2 x 3 look at a bunch of them by staring straight down it to get a nice straight one. I had to check like 20 of them or so to get a very straight one that also have no mars and a very nice grain on one side since I'm not going to paint it. Check your measurements yourself but basically you want one 28 1/4 inch piece for the front, one 25 1/4 inch piece for the back, and two 19 inch pieces for the sides. I didn't have the right saw for this so used a regular tree saw so my cuts were not very good. I nailed the 4 pieces together then attached the L-Brackets, but when I screwed down the brackets I got some separation of some of the joints so will definitely need some insulation on the inside of the collar. Heres a pic of the collar with the lid attached. I did sand the collar and rounded the edges to decrease the risk of splinters, get a smooth surface for the lid seal gasket and mating surface to the freezer cap, and to make it look better:
More later.


 . I'll make a thread once i start on the project. Thanks again!