Brew Bucket by SS Brewing Technologies

Homebrew Talk - Beer, Wine, Mead, & Cider Brewing Discussion Forum

Help Support Homebrew Talk - Beer, Wine, Mead, & Cider Brewing Discussion Forum:

This site may earn a commission from merchant affiliate links, including eBay, Amazon, and others.
For the *bucket*, the FTS coil goes through the lid; the neoprene cover should not come into play, as it covers everything but the lid.


Silly question and I hate to ask, but you're not putting the neoprene cover over the top of the bucket, are you? It should be installed so that it covers up from the bottom, as opposed to pulling it over from the top.


Yeah I am talking about that temperature coupler that comes on the brewmaster bucket. I emailed SSBrewtech and they instructed me to make a small incision in the neoprene in order to let it poke through and slide the thermometer over the temperature coupler.

No I am putting the neoprene on the correct way. Just needed to know how to make the coupler work with the neoprene other wise I would have a hole in the bucket.
 
Has anyone bought the standard and wished they got the version with the thermowell? I'm on the fence. It might be nice to put my freezer controller probe in there for accuracy but I'm not sure it is worth it. I think I'd rather spend that money on the blow off kit they sell.
 
Has anyone bought the standard and wished they got the version with the thermowell? I'm on the fence. It might be nice to put my freezer controller probe in there for accuracy but I'm not sure it is worth it. I think I'd rather spend that money on the blow off kit they sell.

If you're in doubt, you can always add the thermowell at a later point. For me I went with the Brew Master version as the thermowell + shipping was about the same price. I love being able to use my Inkbird's temperature probe for monitoring in the fermentation chamber.
 
Has anyone bought the standard and wished they got the version with the thermowell? I'm on the fence. It might be nice to put my freezer controller probe in there for accuracy but I'm not sure it is worth it. I think I'd rather spend that money on the blow off kit they sell.
I bought without the thermowell because I wanted to add one from the top, which is better from a sanitation standpoint and allowed me to locate it wherever I choose. Plenty of discussion of the how-to's in this thread. Just drill a hole in the lid with stepped bit, insert silicone grommet, then add stainless thermowell sized for standard temp probes.

I prefer thermowells instead of taping the probe to the fermenter. Personal preference.
 
Yeah I am talking about that temperature coupler that comes on the brewmaster bucket. I emailed SSBrewtech and they instructed me to make a small incision in the neoprene in order to let it poke through and slide the thermometer over the temperature coupler.

No I am putting the neoprene on the correct way. Just needed to know how to make the coupler work with the neoprene other wise I would have a hole in the bucket.

Ah, does your thermowell fit into the side of the bucket? If so, my misunderstanding. My thermowell goes in through the top of the lid, not through the side.
 
Has anyone bought the standard and wished they got the version with the thermowell? I'm on the fence.
Keep in mind that the temp probe they include sticks out pretty far which may affect where you want to put the Brew Bucket (i.e. might not fit in some smaller bar fridges with largish compressor humps unless you turn it sideways, making the temp probe somewhat useless if you can't see it). YMMV

brewmaster_angle_copy_1024x1024.jpg


Kal
 
I bought without the thermowell because I wanted to add one from the top, which is better from a sanitation standpoint and allowed me to locate it wherever I choose. Plenty of discussion of the how-to's in this thread. Just drill a hole in the lid with stepped bit, insert silicone grommet, then add stainless thermowell sized for standard temp probes.

I prefer thermowells instead of taping the probe to the fermenter. Personal preference.

+1 to this, I prefer the lid as well. If for no other reason than it's one less hole that's subject to leaks directly from the liquid.

I punched a hole in the lid with my GreenLee and used this thermowell, I think it's a pretty good option:

https://www.amazon.com/gp/product/B00JSYNN80/?tag=skimlinks_replacement-20
 
Last edited by a moderator:
+1 to this, I prefer the lid as well. If for no other reason than it's one less hole that's subject to leaks directly from the liquid.

I punched a hole in the lid with my GreenLee and used this thermowell, I think it's a pretty good option:

https://www.amazon.com/gp/product/B00JSYNN80/?tag=skimlinks_replacement-20

It might sound silly but I think I'd prefer the hole to be in the lid so the thermowell doesn't get in the way of cleaning. Stupid thinking but just something that irked me.

I'll probably never get around to drilling a hole for my own thermowell but it does sound like a decent option if I get brave down the road. And you bring up a good point - a small leak in the lid is much easier to deal with, if at all.
 
Last edited by a moderator:
I'll probably never get around to drilling a hole for my own thermowell but it does sound like a decent option if I get brave down the road.

I understand your apprehension to drill into your nice SS lid, been there... but with a knockout punch the hole is the perfect size, and is perfectly clean. You only need to drill the pilot hole (which is not too bad in the relatively thin metal of the SS lid), attach the two sides of the punch on either side of the hole, and ratchet them together until the hole punches out. Easy peasy. And if you ever decide to ferment without using the thermowell hole, It's easy enough to just put a cheap rubber stopper in the hole.

I invested in a nice GreenLee knockout punch, and I've used it many times over for my mash tun and to make a HERMS. It's really nice to be able to create your own weldless fitting wherever you need to in your equipment.

Here's a link to the one that makes the "standard" 1/2" holes, highly recommend:

https://www.amazon.com/gp/product/B002NQWZWU/?tag=skimlinks_replacement-20
 
Last edited by a moderator:
I'll probably never get around to drilling a hole for my own thermowell but it does sound like a decent option if I get brave down the road. And you bring up a good point - a small leak in the lid is much easier to deal with, if at all.
Do it! Easy peasy.

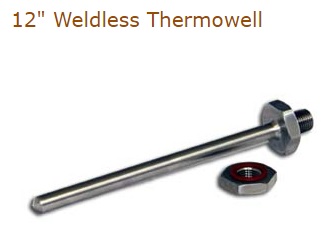
1) Thermowell, 12" - brewers hardware $12
2) Grommet for thermowell (amazon, silicone- Bunn 2536 $9 or similar)
3) Stepped drill bit - Neiko 10193A, amazon $12 or similar.

Those are the parts I used, so I can confirm they work together perfectly.

Pic from this thread (not my pic):
https://www.homebrewtalk.com/showpost.php?p=5932022&postcount=486
 
I have both the 3.5G and the 7G version of this. When I bought the 3.5G my main issue was the lack of a Thermowell hole so I took it to my local shop and had them punch me a hole in the lid. I made it just big enough to take a rubber stopper that has a Thermowell in it so I could use what I already had.

When I bought the larger version, I opted for the Thermowell installed. I just couldn't see losing my ability to temp control and I'm glad I went with these options.
 
This has been an interesting read, I just don't know if I could justify two buckets when that cost encroaches on a 14 gal conical with a bit of saving.. I wish they had a brew bucket XL... instead of the mini.

I am hating the idea of splitting up 1/4 keg batches a lot, having to mix two separately fermented buckets or carboys, double the possibility for error.

Edit: I have a collection of sanke kegs usually have 2 x 1/4 talls in the kegerator and a 1/6 keg for large brews

So im thinking I may have to go with two brew buckets instead of a single 14g conical. Yeah the cost will be hte same, but I just dont have the space to do viable temperature control on a 14g conical. I have a fridge already that im pretty certain will fit two buckets (or a chest freezer that I have as well).

Also kind of considering the buckets because a lot of times I dont do 10g batches and have been doing MORE 5g batches since Ive moved into kegging a lot more heavily now.

Just wish the bucket had a few more features or better valve options.
 
So im thinking I may have to go with two brew buckets instead of a single 14g conical. Yeah the cost will be hte same, but I just dont have the space to do viable temperature control on a 14g conical. I have a fridge already that im pretty certain will fit two buckets (or a chest freezer that I have as well).
Two buckets gives you the flexibility to do split batches too (different yeasts/temps/dry hops/etc).

Kal
 
Two buckets gives you the flexibility to do split batches too (different yeasts/temps/dry hops/etc).

Kal

Yeah its probably what im going to end up doing, wish that thermowell was welded though, ah well cant have it all.

Two of these side by side will fit perfectly in my fridge. It fits 2 6gal carboys easily.
 
Just wish the bucket had a few more features or better valve options.

I love my bucket, but I'm with you on the better valve option. I've been keeping an eye out for a proper 3-piece ball valve (or heck, even a butterfly) that would fit this thing, so that I could keep it properly cleaned/sanitized. I've considered punching a bigger hole in the bottom, but I'm afraid a full size valve would be almost too big and would go too low to the table/floor. If anyone is aware of something, please let me know...
 
FWIW, I have the 7G Brewmaster Bucket with the Thermowell already installed. It fits my STC-1000 probe just fine (if that helps).
 
I love my bucket, but I'm with you on the better valve option. I've been keeping an eye out for a proper 3-piece ball valve (or heck, even a butterfly) that would fit this thing, so that I could keep it properly cleaned/sanitized. I've considered punching a bigger hole in the bottom, but I'm afraid a full size valve would be almost too big and would go too low to the table/floor. If anyone is aware of something, please let me know...

I've also wished for a better valve option, but wonder if putting a full size 1/2" after market valve is viable. The things that immediately come to mind are:
1) Wouldn't a larger diameter valve suck up more trub especially without a movable racking arm?
2) Are there after market racking arms you can use as I hate the idea of reducing a 1/2" valve down to a 3/8" racking arm. Seems like reducing would defeat the purpose.
3) Like you I'm thinking leg extensions would be needed since adding a 1/2" valve + barb fitting will add another 2-3" in length

I wonder why Brewtech also includes this valve as a sampling valve in their upscale Chronical Brewmaster series? If I dropped enough money to get a jacketed fermenter with butterfly valves and TC fittings, I would be bummed out to see this valve included. Surely I am not alone in being paranoid in my concern about not being able to fully disassemble and clean ball valves.
 
How do you sanitize the valve before racking to the keg? Or do you not worry about it?

Just sanitized the valve tonight before bottling by:
1) Sticking a towel underneath the spigot
2) Spraying StarSan up into and onto the spigot
3) Let it sit for 5 minutes
4) Take a cotton swab and make sure there no residue inside the spigot
5) Hit the spigot with another round of StarSan
6) Rinse the Brew Bucket out after bottling to get rid of the trub
7) Let the PBW and water drain out through the spigot
8) Every 5-6 brews, I disassemble the spigot and do a PBW soak for 15 then Star San after another 15

This method seems to work pretty well for me, but your milage may vary...
 
Last edited by a moderator:
I suppose the bartender measuring cup thing would work too if you already have one.

Absolutely, great point. Those little cups are 6 bucks and change for a dozen of them though, and I also get great use out of them for premeasuring hops, wort samples for pre-boil SG, etc etc etc... so certainly :off: but I wanted to share.
 
Well, bit the bullet this morning and ordered two of these, Brewmaster versions so I'd already have the thermowell inside. Now time to start getting parts to hack together my own FTSS for them.
 
Surely I am not alone in being paranoid in my concern about not being able to fully disassemble and clean ball valves.

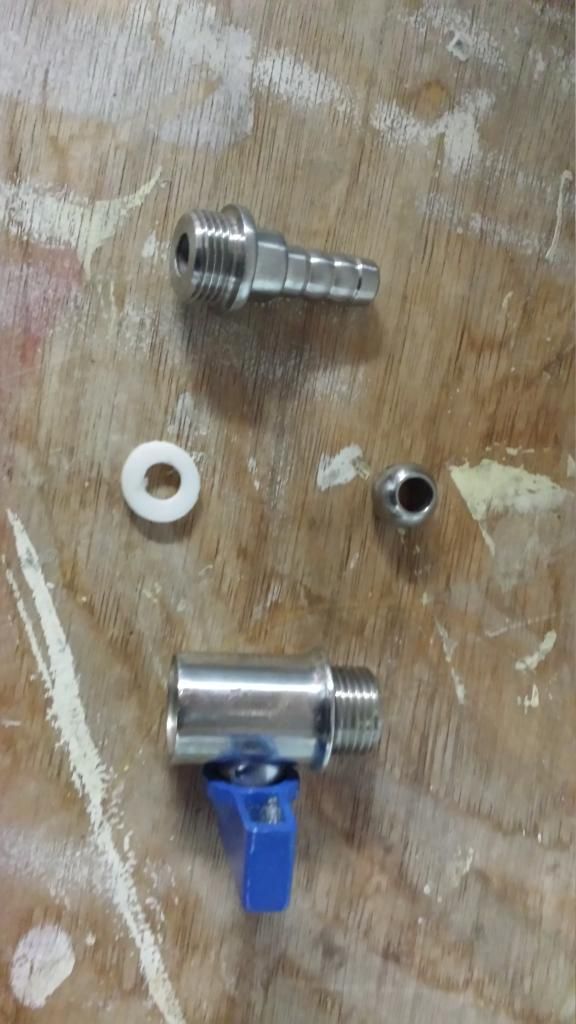
I take mine apart. The out seal gets a little bunged up, but that's just to provide a tight fit. It doesn't actually seal anything. See post 813 in this thread for more information.

20140807_183543_zpsyxmz7n50.jpg
 
I take mine apart. The out seal gets a little bunged up, but that's just to provide a tight fit. It doesn't actually seal anything. See post 813 in this thread for more information.

20140807_183543_zpsyxmz7n50.jpg

Thanks! This is exactly the info I was looking for. The SS Brewtech website shows that the barbed nipple side can be taken off. However, unlike your photo, they don't show that the one side of the seal and the ball can be removed for cleaning.
 
To this day, I still can't figure out how Spartan1979 gets the ball out of the valve. I'd do it too, but can't figure out how. So I just break it down into two pieces (by unscrewing the barb) after every fermentation. This is mandatory.

Before racking, I just spray the outside with StarSan, and brush out the inside with a thin brush with StarSan.
 
Ball came out for me, make sure you have it closed, push with screw driver or other blunt object. You can do it, put your back into it
 
I just got my brew bucket, and put my first batch in it. I chilled my wort to 75, and was gonna let the ftss do the rest. I hit the set button and selected 68 degrees. I added some more ice to the cooler and now the temp cont. reads 64.5. Im trying to figure out why it over shot. I did add cubed ice as I thought I didnt have enought frozen bottles in the chill tank.
I'm still waiting to pitch as my target temp was 68f. Does anyone have any advice here?
Thanks!

I've had this happen when chilling down to pitching temps as well. The key I've found, is at it is pumping the ice water through the coils, gently rock the bucket back and forth to stir up the wort. It helps evenly cool it down.

Once fermentation is active, the yeast will be stirring things up, and will keep it at the temp you have it set at.

*Also, make sure your set point differential is set to 1 degree.


Great tip! Thank you.

I just checked my set point differential and it is at 1. Right now my set point is at 68 and it has been between 67.5 and 68.5 all day.
So, since the differential is at one does that mean that at 68 the pump will not kick on until I hit 69?
Have you ever found the need to adjust the time delay setting?
 
I just got my brew bucket, and put my first batch in it. I chilled my wort to 75, and was gonna let the ftss do the rest. I hit the set button and selected 68 degrees. I added some more ice to the cooler and now the temp cont. reads 64.5. Im trying to figure out why it over shot. I did add cubed ice as I thought I didnt have enought frozen bottles in the chill tank.
I'm still waiting to pitch as my target temp was 68f. Does anyone have any advice here?
Thanks!
Overshooting is common -- I use a freezer as a ferm chamber and typically overshoot 2-3F when cooling from room temp to 50F. The only ways to avoid are to either constantly stir the wort (no thanks!), chill slowly like with a fridge instead of a freezer (no thanks!), or use a high-powered heater to get warm again quickly (which also risks overshooting the other way).

But overshooting 2-3F is just fine -- Germans do this intentionally! They pitch a couple F cooler than ferm temp.

Regarding differential -- set it as low as possible that doesn't over-cycle the compressor. With a thermowell, I run 0.5F differential and it works fine for me.
 
Regarding differential -- set it as low as possible that doesn't over-cycle the compressor. With a thermowell, I run 0.5F differential and it works fine for me.
FWIW, he's running the SSbrewTech FTSS system with a picnic cooler or similar - no compressor.

Otherwise I'd agree that with a compressor (fridge/freezer, or even SS's own glycol chiller) you don't want a differential that is too small as it'll short cycle the compressor. You should try and have at least 10 mins of off time between compressor cycling.

Kal
 
Interesting on the 10 min thing, Kal. I'll check my Keezer settings... Thanks.

A quick point about the temp probe placement. IME, internal probes don't offer much over a probe tapped to the outside of the fermenter (and insulated on the outside with a rag or foam pad). I only saw one degree difference on some testing I did on temp controller sour mashes that lasted 24-48 hours. One less thing to clean too. This is only true for the small volumes were talking about here.
 
In regards to hitting your initial temp and not overshooting, i would just set it a couple degrees warmer than your target. When you see its close, adjust temp to target and it shouldn't swing as much.
 

Latest posts

Back
Top