60qt. Ice Cube Mash Tun Build - $cheap and simple

Homebrew Talk - Beer, Wine, Mead, & Cider Brewing Discussion Forum

Help Support Homebrew Talk - Beer, Wine, Mead, & Cider Brewing Discussion Forum:

This site may earn a commission from merchant affiliate links, including eBay, Amazon, and others.
Turns out I had this exact igloo cooler buried in my garage. I've been wanting to make the jump to AG and this looks like the route I'll take. At this point, I'll just need to buy the bulkhead and the CPVC parts. The only downside is my cooler was spray
painted and a lot of it is chipping off. I don't want any paint chips to be mashed in, so I'm scrubbing off the dried paint first (at least the sections that pose a threat to flaking into the mash).
 
Did you check to see how much wort your going to lose? I built a similar manifold for my 48 qt cooler and found that I lose almost 1/2 gal. :mad:

I'm thinking of making a copper false bottom and a custom fitting filter bag that I'll be able to remove after sparging.

Maybe I'm crazy

Bull

Should drain all wort until siphon "vacuum" is broken wherever air is allowed to enter system first as wort level falls. Might be tricky if vacuum is lost while sparging. Looks like the first point of air leakage will be either at the top of the slots or at the connection to the bulkhead valve assuming that's not sealed, whichever is highest.

But this looks like a nice clever and efficient design. Bravo!
 
With mine (water testing not full mash) and a rather chunky PEX manifold I lose precisely 900ml (2 pints).
 
Should drain all wort until siphon "vacuum" is broken wherever air is allowed to enter system first as wort level falls.!

Put this concept in mind is there a certain amount of the CPVC pipe that you want to cut the slots in? Is it half is it less than half is it creates just wondering what everyone else is doing?
 
What is everybody using two cutlass C

PVC pipes?


I haven't built mine yet, but I have a CPVC cutter (something like this http://www.amazon.com/dp/B000HSAPR8/?tag=skimlinks_replacement-20). It makes cutting the pipe super easy and clean. The only hard part will be finding it in my cluttered garage.

Also, is 1/2" CPVC the way to go? I already have lots of 3/4" pipe but that may be too big plus it's PVC. On that note, would a thinner pipe (1/4") create a better vacuum?
 
Last edited by a moderator:
I haven't built mine yet, but I have a CPVC cutter (something like this http://www.amazon.com/dp/B000HSAPR8/?tag=skimlinks_replacement-20). It makes cutting the pipe super easy and clean. The only hard part will be finding it in my cluttered garage.

Also, is 1/2" CPVC the way to go? I already have lots of 3/4" pipe but that may be too big plus it's PVC. On that note, would a thinner pipe (1/4") create a better vacuum?

I used a coping saw

I would not use pvc personally, high temps
 
Last edited by a moderator:
1/2 or 3/4 is good, just make sure it's Cpvc and not regular PVC, or you could use copper or stainless steel tubing $$$. I can't answer your question about the 1/4 pipe...
 
What is everybody using two cutlass C
PVC pipes?

I used something like this.

pipe_cutter-64689.jpg
 
Well I was originally going to use my old Igloo Cube cooler for this build to save some money, but I found the Island Breeze 60qt cooler on sale today at Dick's for $30. I like that the spout seems to be lower than the main floor of the cooler plus it's brand new and doesn't shed paint flecks every time I move it like my old spray-painted cube cooler does.
 
My first manifold design didn't work with the Island Breeze 60qt version. The drain comes up at a 30 degree angle and there was no way to connect the drain to the closest perpendicular pipe. Geometry was against me, so I found a design someone else on here had used and after careful measurements it fit. I had to run a pipe to the drain off a T joint on the middle pipe with a 45 elbow.
View attachment ImageUploadedByHome Brew1421895395.507148.jpg
This is the test run result: about 2 cups of water left over. Good enough for me.

Now I'm all set for All Grain, equipment-wise. No clue what the maiden brew will be yet.
 
I've been using this cooler for the last 4 years and I get 85% efficiency. Used 1/2" copper with a tee, 90 degree elbow, and threaded connector. Here are a couple of pics:

PICT0017.jpg


PICT0016.jpg


PICT0011.jpg


PICT0010.jpg

I have been looking all over the place for this. Do you use for batch sparge?
I'm coping this totally
 
Anyone have any suggestions for putting a DIY fly sparge arm for the 60qt igloo cube cooler? Possibly some links?
 
Is everyone using gravity to drain?
Is anyone using a RIMS with this by chance?

I've switched to a pump & RIMS setup while still using the cooler as the mash tun. My results have never been as good as they were before. However, I also moved so my water is different as well. So, I'm trying to figure out all the variables. Thinking of changing out the mash tun for a SS kettle w/ false bottom now that I have a RIMS setup. But I haven't had the time/money/resources to make the switch. The next batch I may try it the "old" way and just leave it sit for the whole hour and gravity drain to see if I get back to where I was before.

I use this with a pump and RIMS. What do you mean your results are not as good? Do you mean your getting poor extract efficiency?
 
Thanks for the links @thekraken
I guess I should have been more precise in my request...is there any links of a diy circulating fly sparge arm for the "cube"??? Been unable to find anything on hbt
 
Yep. Efficiency has dropped (still use the same mill with the same gap). The flow rate always slows way down, and seems to compact the grain bed and only drawing from around the sides of the cooler rather than through the mash. My manifold is about 1 1/2" away from the walls of the cooler. And I do start the pump slow (after the grain sets for about 5-10 minutes) and never throttle it more than 1/2 way open (on the output side of the pump).
 
Thanks for the links @thekraken
I guess I should have been more precise in my request...is there any links of a diy circulating fly sparge arm for the "cube"??? Been unable to find anything on hbt

:confused: Is that not what those are? Those are on the 60qt Ice Cube MLT. Maybe I'm still not understanding the question.
 
Yep. Efficiency has dropped (still use the same mill with the same gap). The flow rate always slows way down, and seems to compact the grain bed and only drawing from around the sides of the cooler rather than through the mash. My manifold is about 1 1/2" away from the walls of the cooler. And I do start the pump slow (after the grain sets for about 5-10 minutes) and never throttle it more than 1/2 way open (on the output side of the pump).

Half way open might be too fast for you. I have to start slow at first too. I have a digital read out of flow rate and I usually try and start flow <0.5 gpm, then after 5 or so minutes I start to gradually work my way up to ~1.2 gpm which I'm guessing is 1/3 open on my ball valve. Usually it'll recirculate steadily for the rest of the mash. Some times I have trouble, but I'm still new to it and still working out the kinks.

You said you just moved? Maybe it's your new water source. I always had crappy efficiency with my tap water no mater what tricks I tried to pull. This last brew I used the super simple RO water recipe from the primer and my efficiency magically shot into the 80's. My eyes have been opened.
 
I'm apparently doing something wrong, as the ball valve that I got won't close all the way. Anyone else had to use an extension on the outside?
 
I've been planning the transition to all-grain for quite some time and I finally was able to put together everything. My goal was to keep this mash tun as simple and cheap as possible while being big enough to handle 10 gallon batches. The cooler I decided on was the 60 quart Igloo Ice Cube cooler with 'ultratherm insulation'. This cooler is plenty big enough to handle large 10 gallon batches and easy on the budget at $25. Hopefully the 'ultratherm' insulation will keep the temps in range for the full mash time. Here is a picture of the cooler:
IMG_6626.JPG

IMG_6625.JPG

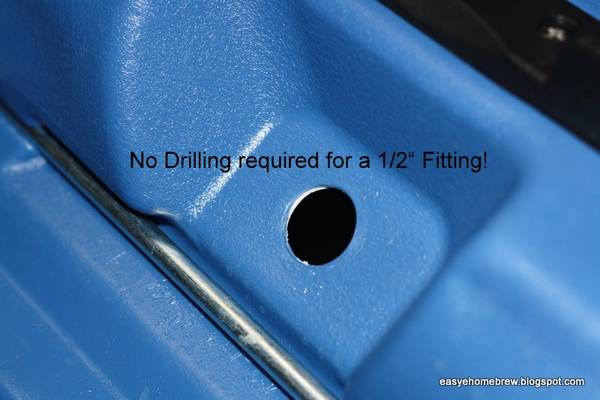
I discovered from a few other posts that the stock bulkhead could be removed and the hole was the perfect size for a 1/2” MPT coupling. This keeps me from having to drill a hole in the cooler, and I kept the stock bulkhead around in case I decide to use this for a cooler in the future. Another plus about this cooler is that there is no insulation where the bulkhead is. This allowed me to keep my bulkhead fittings very simple (and cheap). Hopefully, this lack of insualation in this area won't result in heat loss.
IMG_6632.JPG


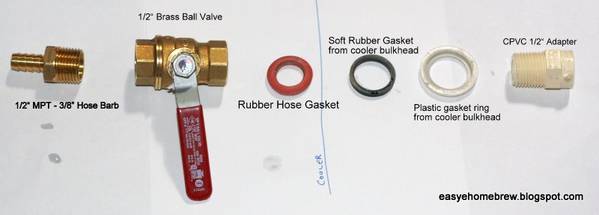
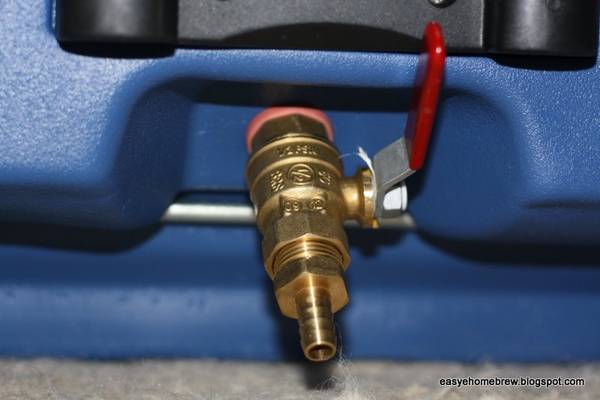
For the bulkhead fitting, I reused the stock igloo bulkheads soft rubber gasket, and plastic gasket ring. If this worked for the stock bulkhead, I figured it would work for my purposes. Since I am going to use a CPVC manifold. I used a 1/2” CPVC MPT adapter as the male portion of the bulkhead. I also used rubber hose gasket on the outside portion of the bulkhead, and screwed the valve on the end. I tested this out, and it doesn't leak! I am happy with this set up because it was super cheap:
Valve $6
Hose Gasket $1.50 / 10 pack
CPVC 1/2” MPT $.50
3/8” Hose Barb $2.50
IMG_6629.JPG

IMG_6627.JPG


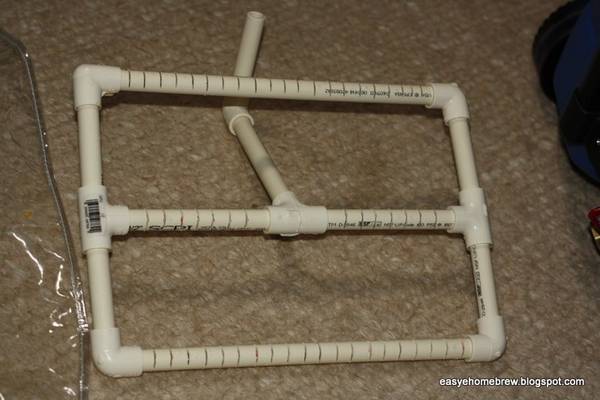
On this inside I fitted a pretty basic CPVC manifold. I had to put a 90* fitting in because the bulkhead comes in at a funky 45* angle. I tested this out as is and it drains all the water out except for an inch or so at the bottom.
IMG_6633.JPG

IMG_6624.JPG


The bottom line for everything was $40. I can't complain with the price tag, lets just hope this thing will make some beer! My next job is to the drink the beer on tap so that I can make room in my fermentation chamber for my first all-grain batch. Let me know if anyone has any recommendations or comments.

-Erik

i am wondering if you can fit 12" diameter false bottom?:cross:
 
People don't used galvanized metal in your mashtun. Do not use brass fittings in your mashtun. If you like introducing lead into your beer then go ahead and do it. I watched one of the videos and the girl was using galvanized wire in the SS braid. For what it's worth get some 14 gauge house wiring and use that if you feel the need to do that to your braid.
 
Well, I just built mine too, with a quick water test I'm losing about 3 degrees over an hour with a spray-insulated lid in a very cold garage.

About 350ml (1.5 cups) left in bottom after draining.

Thanks for all the good suggestions here...
 
So... after having reviewed a lot of the builds in this thread, I have a question about my CPVC manifold.

I cut the slits in the bottom about 1/3rd of the way through the diameter of the pipe, which was just enough to get in to the void of the pipe and get about 1/4 - 3/8" opening for each slot. My reasoning being:

1- The "shallower" the openings, the more liquid I'd drain off the bottom of the tun before sucking air and losing my prime and suction

2- The whole thing would seem slightly sturdier

3- It's plenty of flow... with 77 slots, it draws as much water as my mini-ball valve will pass.

4- I can always cut them deeper, but can't uncut them...

It seems like a lot of folks went ~1/2 thru the depth of the pipe.

Having done a bunch O' reading here, I'm wondering if I'm setting myself up for a stuck sparge/grain bed?

While the smart thing to do would be to go spend $10 on some grain and do a test run, I'm not sure I'm gonna have time to do that before my upcoming double-batch this weekend, and I'd hate to screw up a $65 grain bill...

Pics below. Any thoughts, cautions, or outright derision?

Thanks.

2016-02-17_001821829_5006A_iOS.jpg


2016-02-17_001837638_F8F1B_iOS.jpg


2016-02-17_001903585_3F4AB_iOS.jpg
 
I have found that a mash will break a siphon much sooner than a cooler filled with water. While most here report very little dead space loss while testing with water, I did notice an earlier poster losing 1/2 gallon while mashing.

My cooler has the drain at the bottom, and will continue to slowly drain long after the siphon is broken.

For this reason I would suggest drilling this cooler out the front to avoid the large siphon needed to drain out the stock bulkhead. Jmo and experience. Seems the front would be more convenient to use as well...idk.
Perhaps a little more difficult to build as drilling the cooler is required.

Interestingly, somebody earlier commented that they expected me to lose LESS liquid once I had a mash in there. I ended up with about 350ml (1-1/2 cups) with my water test. It looked like only about 1/8" of liquid on the bottom of the cooler... which is about how far I'd guess the slots are off the bottom.

I'll see how it performs before modifying further, as I like the "cleaner" approach of using the existing plumbing holes. And, quite frankly, given that the bottom cooler curves slightly where it meets the cooler wall, I can't imagine being able to get a bulkhead washer/locknut positioned on the flat surface any closer than 1/8" from the bottom anyway?

Plus it's already "done"... :) ... that whole "ain't broken, don't fix it" thing until I use it at least once.
 
Last edited:
I drilled holes in my CPVC manifold instead of cutting slits and I have had no problems with stuck sparges. It's possible that one hole (or slit) could clog up with wet grain, but with so many holes (slits) and with water entering from beneath the manifold rather than on top, I think you should be okay.
 
More grain.... I like that attitude... ;)

Another question for folks who have trudged down the Ice Cube path previously:

Any issues with using something like PBW to clean it? I want to make sure it won't negatively interact with the cooler plastic, the CPVC manifold/cement, vinyl tubing, etc...

Thanks.

-sc

PBW or Oxi clean unscented should be fine for cleaning a MT.

FWIW, real men don't bother cleaning a MT but just rinse well, as it is all pre boil.... j/k sort of not really :mug:

Denny's Mash Tun...

http://hbd.org/clubs/cascade/public_html/dennybrew/braid.jpg
 
I shall uphold the inevitable drips, spills, discoloration, and stains as a badge of honor!

OooGAH!

Seriously though... ya I'm down with that. My keggle has been around the block a bit. I just want to purge all the construction flotsam and jetsam first. I don't mind my wort having a hint of the last brew... I just want to avoid the lovely aroma of CPVC cement or whatever oils and gunk that may be sitting on the surfaces of all the new stuff.

Thanks.

Oh, and Denny's unit is impressive in length, although it does curve somewhat, and looks like it's seen plenty of action too... ;)
 
I build one of these about 6 months ago from an older style of the cooler that recently got retired from our softball team. Same basic layout as these, but a different geometry around the wheel base, and a poorer lid. About 10 batches in I had my first batch break the siphon. There was a multitude of problems that day, so it's unclear if this will be a semi-regular problem or not. It started with me forgetting to screw on the CPVC coupler to my valve assembly. That fell off mid-mash, and I had to shovel all my hot grain out just to find the stupid thing. Don't be like me and forget.

Anyway, it really wasn't a problem. I let gravity do it's thing off the patio to the waiting boiling kettle. If the siphon breaks, you can restart it with your mouth. Given that this is pre-boil, I don't worry about contamination.
 
The engineer in me says more holes/slots=less suction per hole=less chance of clogging
 

Latest posts

Back
Top