10 tap passthrough maintaince

Homebrew Talk - Beer, Wine, Mead, & Cider Brewing Discussion Forum

Help Support Homebrew Talk - Beer, Wine, Mead, & Cider Brewing Discussion Forum:

This site may earn a commission from merchant affiliate links, including eBay, Amazon, and others.

Budd0413

Member
Joined
Sep 23, 2009
Messages
13
Reaction score
0
Location
Cazenovia
I recently bought an old 10 tap brass passthrough beer tower. The brass faucets need to be removed and thoroughly cleaned but i am having a really hard time figuring out how to remove them. Does anyone have any idea how it is done without destroying the faucet/shank. in one of the pics i have one disassembled but i damn near destroyed it and still don't know how i got it apart.

image(1).jpeg


image.jpeg
 
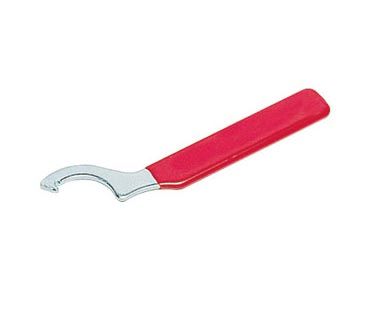
were you using one of these?

tn375_large_hdwrench070809124747.jpg


Beer faucet wrench is the tool if you aren't, they are designed to "effortlessly" remove the retainer collar that holds the tap on. Beyond that, you might need to use a gentle solvent on the threads to get them to work loose, just make sure to clean them really well afterwards if you do.

Once the faucet is removed, a box wrench should be used to loosen the nut to minimize scratching and deformation.
 
Spray them with some WD-40 and let them soak for a few hours, re-spraying them every 30 mins or so. Then use that faucet wrench mentioned above. That's the best way I've found. I had to do this with my 8 tap tower.
 
Spray them with some WD-40 and let them soak for a few hours, re-spraying them every 30 mins or so. Then use that faucet wrench mentioned above. That's the best way I've found. I had to do this with my 8 tap tower.

+1 I had a faucet so frozen I bent the faucet wrench trying to remove it. Hit it with Liquid Wrench for under an hour and then it came off so easily it was almost silly.

When reassembling put a bit of keg lube on the shank threads and a little more on the shank o-ring inside the faucet. Once I started doing that it was way easier to seat the faucets on the shank and have them seal tight without reefing on the faucet nut, which makes them way easier to remove for periodic maintenance...

Cheers!
 
Yes I'm using the faucet wrench. That is not really the problem. The problem seems to be the small lock ring on the shank side. It is not accessible when assembled and holds everything together. Iwhat I am talking about is located on the picture on the right near the top 3/4 of the shank, it is a little circular metal oring of some sort like a lock ring?
 
You should be able to put a wrench on the faucet side, then hold the other side with some vice-grips or something similar. Again, some sort of anti-sieze or lubricant and time will be your friend.
 
try silicone or teflon based lubricants, instead of petrolium lubes like WD40. if you use WD40, you should replace all o-rings that it comes in contact with, as rubber/nitrile quickly absorbs pertochemicals and causes the seals to break down over time.
 
Yes I'm using the faucet wrench. That is not really the problem. The problem seems to be the small lock ring on the shank side. It is not accessible when assembled and holds everything together. Iwhat I am talking about is located on the picture on the right near the top 3/4 of the shank, it is a little circular metal oring of some sort like a lock ring?

Are you talking about the snap ring that keeps the coupling nut from spinning off the shank? That you can't even see without removing the faucet? If so, that wouldn't keep you from removing the faucet unless it was rusted to it.

Have to ask because I've seen it before: are you sure you are rotating the coupling nut the right direction?

Cheers!
 
Back
Top