You are using an out of date browser. It may not display this or other websites correctly.
You should upgrade or use an alternative browser.
You should upgrade or use an alternative browser.
Keezer build under way
- Thread starter TWS22
- Start date

Help Support Homebrew Talk - Beer, Wine, Mead, & Cider Brewing Discussion Forum:
This site may earn a commission from merchant affiliate
links, including eBay, Amazon, and others.

$50 GE found on Craigslist. Honestly don't remember the cubic footage, but it'll hold 8+ cornies.
some scratches and dings. and dirty. when the former owner opened her front door it was like a wall of cats hit me. really strong. so it came to me pretty rough.

after some soap and water and a little judicious application of goo gone, it came out pretty decent.

two coats of chalkboard paint.

i'm going with an inner collar of straight 2x4s. the home depot guys cut them to the wrong length, so i've got to do some adjusting there. that's to come this week.
and outer collar will be 1x8 of solid oak. pre-treated oak looks good enough on it's own.

stain's drying while i apply a third coat to the keezer.

2puttbird
Well-Known Member
Those are great boards you selected ... my wife just rolls her eyes when I pull out several boards at the store and try to find some that match, but the guy at Menards got it, and he even helped me pull some more out and find boards that looked good together.
Blue and golden brown will look good together.
Blue and golden brown will look good together.
Nice. I just finished mine this weekend. What taps did you buy?
2puttbird
Well-Known Member
Crappy lighting in the basement is credited for the blue vibe. The paint is actually black. [snip]
Ah ... black is even better!
Where did you get them?
Not too much accomplished this weekend. Woke one of the kids up from a nap while drilling a hole through the collar. Figured I'd better call it quits.
That said, trimmed up the 2x4s for the inner collar (since the home depot doofus couldnt get it right. Drilled holes for the shanks, and got two kegs carbing (arrogant bastard clone and a dobblebock). The keezer and the carbing should be done at the same time.
Any recommendations? The holes for the shanks are about 1/4 bigger than they need to be. Recommendations on how best to fill that gap?
last weekend only had enough time to really get the inner collar drilled out.
basic 2x4s


today i found some time and made some progress. lined up the inner and outer collars and drilled shaft holes through the oak.

then attached outer to inner with a few bolts about 1/5 distance from each edge


basic 2x4s


today i found some time and made some progress. lined up the inner and outer collars and drilled shaft holes through the oak.

then attached outer to inner with a few bolts about 1/5 distance from each edge


front view of the outer collar attached

managed to talk son #1 into helping out...

once the outer collar was connected, i completed the inner collar and ran some weather stripping around the bottom


took the hinges off to slide the collar on (pot belly extra stout featured)


managed to talk son #1 into helping out...

once the outer collar was connected, i completed the inner collar and ran some weather stripping around the bottom


took the hinges off to slide the collar on (pot belly extra stout featured)

rough view of what this thing'll look like - just sitting on, not attached.

last weekend i miss drilled a couple holes. so filled those in with some foam insulation. these holes will become the insertion points for the temperature regulator lead and possibly gas lines.

lid off - two kegs currently on gas (though my tank ran out - gotta get a refill)

connecting the pieces of the outer collar with brackets - going for a bit of a harder look. bolt heads and hammered metal.

side view


this afternoon i reattached the hinges. i have to figure out a solution for the bottom screws. top screws are into the lid, middle into the collar. need to find a way to confidently drill the bottom into the freezer without risk of damage.

cut out the insulation boards. ensured a nice tight fit. once the dimensions were right, i cut shank holes through.


once the shanks were in, i attached the perlicks.


cut out the insulation boards. ensured a nice tight fit. once the dimensions were right, i cut shank holes through.


once the shanks were in, i attached the perlicks.

Attachments
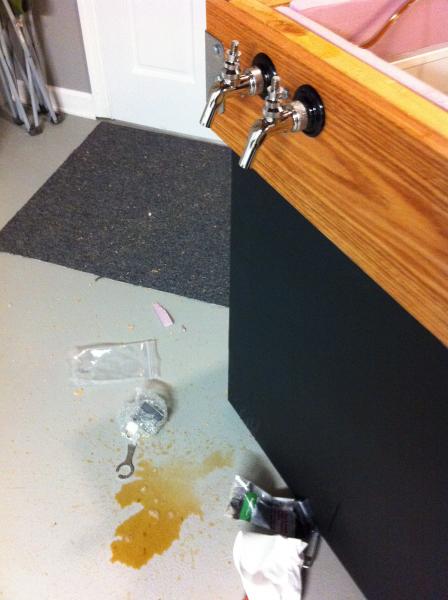
once the faucets were tight, attached the lines.
note to self, check that the faucets are closed before attaching in the future.

tossed the handles on there and away we go.


only step left is to find my painters tape and get around the lid handle. going to spray paint it with some hammered metal look paint to match the brackets and bolts.
pulled a couple pints (though they're not completely carbed). two of the best beers i've brewed so far. loving it.
:rockin:
Nice work! I can't believe how many times i've connected a beer line while the tap was open...nice to have concrete floors!
wedge421
Well-Known Member
Looks awesome man. Are you going to write the beer names on the front of the keezer?
Wedge - definitely, probably on the lid. Have a dobblebock on the left and an arrogant bastard cline on the right. Bottle options are scrawled on the right side of the lid.
Didn't have chalk on hand when I finished up.
Didn't have chalk on hand when I finished up.
What did you use to cut your insulation foam? Look really great....As I cut mine, it doesn't look near as clean.
