• Please visit and share your knowledge at our sister communities:
  • If you have not, please join our official Homebrewing Facebook Group!

    Homebrewing Facebook Group

Yet Another eBIAB Build

Homebrew Talk

Help Support Homebrew Talk:

This site may earn a commission from merchant affiliate links, including eBay, Amazon, and others.
I'm confused how is the element sealed without the O-ring? Did you silcone or jb Weld up the crap of joint? Also did your element have short threads, and thus could not accommodate the oring and washer?

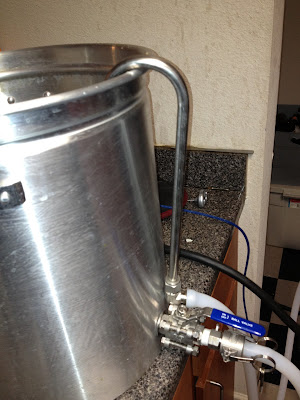
Sorry for the confusion. My element is mounted through the electrical box and electrical cover. The cover has a small hole (large enough for the threads to fit through, but small enough for the locking nut at the end of the threads doesn't), and box has a larger one (this one doesn't matter as much.) The cover and box are JB-welded together, nothing holds the element to the box. The element is then feed through the hole in the kettle, where it is secured from the inside with an o-ring and a stainless steel locking nut. (The o-ring is on the inside between the wall of the kettle and the nut.)

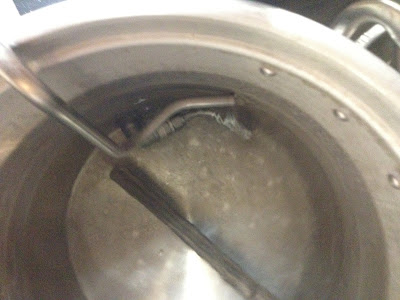
I attempted to use the black o-ring (?) that comes with the element on the outside of the kettle, but I could only use on or the other and the black one alone leaked. I am thinking that my element's threads are shorter. I picked up my element from Home Depot, and they did not have the one he recommends.

Hope that helps.
 
The element is mounted almost exactly like Kal's. The only differences are that I do not have a washer or o-ring between the kettle and electrical box (didn't have the room), and I used a single gang (rather than a double) weather-proof electrical box. I still need to silicone the inside of the box, I just wanted to make sure everything worked properly first.

Pics?

What Kal has done is just incredible so I hope people (especially him) don't take this the wrong way, but that method of mounting a heating element sucks. Really there is no good way to mount an element. If only the threads came off the back of the element and were about an inch long we would be in fantastic shape. The Kal method is just one of the many crappy ways to do it. Again, thank you Kal for everything you have done here, not your fault as an unorthodox use for a heating element requires and unorthodox method to mount it.

I think I may use the Kal method for now, that is until I find a better way to do this.

I will get some for you tonight. Of the methods I have seen, his seems to be the cleanest. It also makes it easy to replace the element, in the inevitable case that is dry fires, etc. It does take a little trickery to get it working properly though.

The only way I think that could be better is if you welded a threaded connector to the kettle so that you could screw the element in and then secure it from the inside. But this was the easy (relatively....), and protects the electrical connections. Overall I am pleased with it.

There are so many problems with all methods.

The Kal method, and those like it require silicone to prevent leakage. Not a reliable seal by any means. Plus it does not at all guarantee a good ground. This is the most troubling part about the method. In my opinion it is a must to verify a good ground path with a multimeter. Plus you have to redo the silicone every time you take the element out.

Welding a fitting to the keg is a much better solution except it requires that a ground be welded or bolted on the kettle. This method is very easy with keggles but much more difficult for us with Blichmann's or turkey fryer pots. It also requires that the wires are potted or covered in some reliable manner.

I just wish someone made elements with threads going toward the rear. Man would that make things easy.

I actually haven't put the silicone on my element yet, and it has not leaked at all. I think the silicone is just there for insurance. I did verify that I had a ground on the kettle before powering up the system. I will verify that again when I pull it back out. I do agree, however, that not having a ground attached directly attached to the kettle is a little bit disconcerting.
 
I actually haven't put the silicone on my element yet, and it has not leaked at all. I think the silicone is just there for insurance. I did verify that I had a ground on the kettle before powering up the system. I will verify that again when I pull it back out. I do agree, however, that not having a ground attached directly attached to the kettle is a little bit disconcerting.
I agree that silicone is just there for insurance. I have used the Kal method without the silicone for about 20 batches. No leaks. The silicone is not required for a good seal. I test the ground prong on the cord for continuity with the kettle before each batch.
 
I agree that silicone is just there for insurance. I have used the Kal method without the silicone for about 20 batches. No leaks. The silicone is not required for a good seal. I test the ground prong on the cord for continuity with the kettle before each batch.

I have not noticed any leaks in the two brew sessions, I have already done. However, I did notice, during my pre-brew checklist, that this time I did not have a good ground on the pot, even though I did last time. I am not sure what caused the change. For this session I temporarily ran a ground wire to a screw on the box cover. I will have to remedy this for the future though.

Today's bew was a big beer with 17 lbs of grain and a 1.083 OG. All of the grain fit nicely in the kettle, I probably could have gotten an even 20 lbs in their. I had some issues with hitting my numbers this time around, though. I ended up boiling off about 1-1.25 gallons more than estimated, so I ended up with only ~4 gallons in the fermenter. I hit the estimated OG though, which means my mash efficiency sucked.

All things considered though it was a successful brew day. Much better than last week's. I also tried my steamer basket + big grain bag "hop stopper". It does not work very well for pellet hops, because the boil causes the bag to bubble up. I think this would probably work better for whole hops since they will soak up more wort and weigh down the bag. I will test it the next time I use whole hops.
 
So after my last brew session, I decided it was time to get a pump. I had been eying the Chuggers for a while, and when they came back in stock I snagged one.

Along with the pump I also ordered a whole new set of fittings and a custom pickup tube from Bargain Fittings. The pickup tube is removable and sits over the side of the kettle. I got the idea from another thread here. Here are some pics:

Outside Portion of the Whirlpool Fitting (I bought the wrong camlock so I have to stretch the tube over the threads of the elbow.)
2012-02-02%252002%253A40%253A46%2520%252B0000.jpg


Whirlpool Fitting inside of the Kettle (Sorry for the crappy pic, the steam kept fogging the lens.)
2012-02-02%252002%253A41%253A19%2520%252B0000.jpg
 
All things considered though it was a successful brew day. Much better than last week's. I also tried my steamer basket + big grain bag "hop stopper". It does not work very well for pellet hops, because the boil causes the bag to bubble up. I think this would probably work better for whole hops since they will soak up more wort and weigh down the bag. I will test it the next time I use whole hops.

Grab a couple all stainless nuts or something and toss 'em in the bag.
 
Ugh, it should would be nice to have a brew day that goes off without a hitch. Today was the first day that I brewed with my pump, and did a recirculating mash. Well, it turns out the bag and steamer basket greatly restrict the flow from the top of the kettle to the bottom. I ended up overflowing the pot during the mash today, probably lost about 1/2 a gallon. That, with a low mash temp, led me to have a HORRIBLE mash efficiency. Boiling right now.
 
Make the drain holes in the steamer basket a lot larger and your problem will go away.

There is a thread about that issue on here somewhere. The brewer used a punch set to increase the drainage.

Thanks P-J, I had a feeling I was going to have to do that. I am just not looking forward to it, because that is going to be a lot of work.
 
Voltin,

How do you like your setup now that you've used it a bit? I'm thinking of building something similar. Do you find yourself using the alarm? Anything you would change? Thx
 
Voltin,

How do you like your setup now that you've used it a bit? I'm thinking of building something similar. Do you find yourself using the alarm? Anything you would change? Thx

I love my setup. I am still tweaking my process because I keep adding components to the system. Recently it was the whirlpool fitting and pump, and soon a water filter. I will be brewing 2-3 batches next week so I will have plenty of time to dial in that process.

If I had to change something, I would probably get a bigger stainless steel pot. I have about hit the limit of my current kettle. My next setup will also have couplers welded to my kettle, weldless fittings are a bit of a pain to get water-tight.
 
I was finally able to brew on my system again. I think I am finally starting to get things dialed in. For this brew I decided to up my batch size to 6G, in case I miss my numbers or I want to leave a little bit of extra wort for clarity. The only problem is that I sized my kettle for 5G batches, so I can not do full volume BIAB.

In order to overcome this oversight, I heated up the remaining water on my stove top and did a mini-sparge. This was the first time brewing when I met or exceeded all of my numbers. My pre-boil SG and OG were spot on, and I had a little bit more wort than was estimated.

The only pitfall today was that pump was working, so I wasn't able to whirlpool, and had to do a gravity chill which took a while but worked just fine. I got one more brew day tomorrow, so lets hope I can replicate the results.

EDIT: Forgot to mention that I ended up modding my steamer basket to give it that swiss cheese look. It seems to help the flow, but like I said my pump isn't working so it remains to be seen how much it helped.
 
Voltin (sorry, don't ever see a name),

Hope grad school is going well and that you're finding time to brew. I've cut and polished a keg my son got free from his bottleshop boss and ordered weldless ball valve and sight glass. Gonna use propane first. We just put a contract on a house; the rental we're in doesn't have a convenient way to get 220V outside (wife won't let us brew indoors).

voltin said:
The only problem is that I sized my kettle for 5G batches, so I can not do full volume BIAB.

In order to overcome this oversight, I heated up the remaining water on my stove top and did a mini-sparge.

So, you're doing what the guys on the BIAB Forum call "Maxi-BIAB". http://biabrewer.info/viewtopic.php?f=89&t=352

If your kettle can't hold the entire volume of water, then you keep out a certain portion and mash with as much as you can for your kettle. Then you perform 1 or 2 dunk sparges. If your kettle will allow the full boil volume, you add it at the boil. If not, you add it throughout the boil as your volume decreases.

The reason I'm thinking about this is that I'm planning on purchasing a 40-44qt kettle and will likely need to do this for beers over 1.060.

voltin said:
EDIT: Forgot to mention that I ended up modding my steamer basket to give it that swiss cheese look. It seems to help the flow, but like I said my pump isn't working so it remains to be seen how much it helped.

Todd (thughes) was the one who posted the pics of his swiss cheese basket. He has since omitted the basket from his process because it would never allow the recirculation. Not being an engineer, I'm thinking that, when raising the bag by itself as most seem to do, the tiny holes in the weave actually stretch a little allowing it to drain more quickly. When using the basket, the bag is fully supported and doesn't stretch, so the flow will always be a bit slower. Admittedly, it just looks neater and easier to use the basket.

Regarding recirculating, I'm wondering if part of the problem is that folks are trying to recirculate too quickly. Perhaps, it should be a rather slow flow.

I'm agonizing about how to put the element onto the kettle. I don't weld, and I don't know anyone who does. I don't have a drill press to use to make Kal's mount. I may just purchase one of his pre-assembled for the keg.

Gotta get ready for work,
Keith
 
Finally got around to brewing again, after a move, new job and school (still...) Everything went smoothly, hit all my numbers and the Swiss cheese mod to the basket definitely made an improvement in circulation. I ran the pump at full bore from the moment I turned the element on to heat the strike water until the boil started, and then again in the last 10 minutes of the boil to sanitize with no problems what so ever with it. I do think that some of my equipment, specifically the temperature probe and/or its cable got damaged in the move. I have a feeling I will have to replace them both. Got another brew slated for tomorrow, so I will update then.
 
Hey Voltin, awesome build. I am going to replicate your build as I slowly acquire peices to do a full 3V build similar to Kals. Last night I purchased a fiberglass enclosure a little bigger then yours off ebay for $10! Well it seems it was to good to be true as the enclosure did not include a sub-panel. Question, as the box is fiberglass is it insulated enough that I do not need to ground the ground bus to metal? Can I just ground all my components to the ground bus that is just screwed onto the fiberglass? I saw your build and you have it grounded to the sanded away metal sub-plate. Please let me know if you don't understand my question.
 
Hey Voltin, awesome build. I am going to replicate your build as I slowly acquire peices to do a full 3V build similar to Kals. Last night I purchased a fiberglass enclosure a little bigger then yours off ebay for $10! Well it seems it was to good to be true as the enclosure did not include a sub-panel. Question, as the box is fiberglass is it insulated enough that I do not need to ground the ground bus to metal? Can I just ground all my components to the ground bus that is just screwed onto the fiberglass? I saw your build and you have it grounded to the sanded away metal sub-plate. Please let me know if you don't understand my question.

Nice find on the enclosure! Most enclosures do not come with sub-panels unless it is explicitly specified, so that is to be expected. Grounding all the components to the bus bar would be fine. The major advantage to the a sub-panel is that you can mount all of your parts to something other than the case itself. So you don't have to poke any holes in the back of the enclosure, keeping it as water resistant as possible. It also makes it easy to assemble the control box, because you can work on the sub-panel and then drop it into the case and screw down. I think a sub-panel is a good investment.
 
Thanks for the tip. Where can I look for a customizable sub-panel? HD or Lowes? I'm not sure there is one out there already that fit's my specifications.

If anyone else is interested in the same enclosure, here is the link. The guy was nice and very fast to ship. I ordered Thursday and will have it on my door tonight.
 
They sell pre-made back panels for the enclosures. According to the manufacturer's website, you enclosure uses a BP1412 back panel. I didn't see any on eBay, but you could try Googling for it. You could of course make one your self. They have the dimensions for it in the enclosure data sheet (http://www.stahlin.com/web_size_img/PDF/StahlinAccessories.pdf, see pages 6 and 7.)

You will have to drill into the back panel to mount all of your accessories. They come as a solid metal plate, so you just layout your components mark them, and go to town.
 
Mine is stainless steel. I would recommend either stainless steel or aluminum, as those will be easiest to work with.
 
Voltin,
I am making a build very similar to yours and had a quick question. I have an 82 qt and 44qt kettle which I plan to run both off the same control box, would it be possible to do the same with a 2.5 gallon batch size kettle, of course with a smaller element? Or will all the components of the control box be way to over powering for the smaller element? If it is fine, what size element would you recommend? I want to be able to brew more ofter and try test batches out before commiting to a 5 or 10 gallon batch.
 
The element will only pull as much current as it needs. You don't really have to worry about pulling too little current, just too much. I have to turn down my 5500W element to about 60% when boiling about 6.5 gallons. For a 3-4 gallon boil (for a batch size of 2.5) you could probably get away with a 2500W or similar sized element, if you can find one. You might be able to use a 4500W element, you will just have to make sure the duty cycle is turned down during boiled.
 
Umm...this doesn't reduce the draw. It draws 100% power 60% of the time... I'm just saying.

Right, sorry I didn't make that clear. I meant that since I have to turn my 5500W element down to 60% duty cycle to maintain a boil, you can probably get away with a smaller element for 2.5G batches.
 
Back
Top