Yeast washing layers

Homebrew Talk - Beer, Wine, Mead, & Cider Brewing Discussion Forum

Help Support Homebrew Talk - Beer, Wine, Mead, & Cider Brewing Discussion Forum:

This site may earn a commission from merchant affiliate links, including eBay, Amazon, and others.

DrFuggles

Well-Known Member
Joined
Jan 25, 2014
Messages
55
Reaction score
22
Location
London
Hi all,

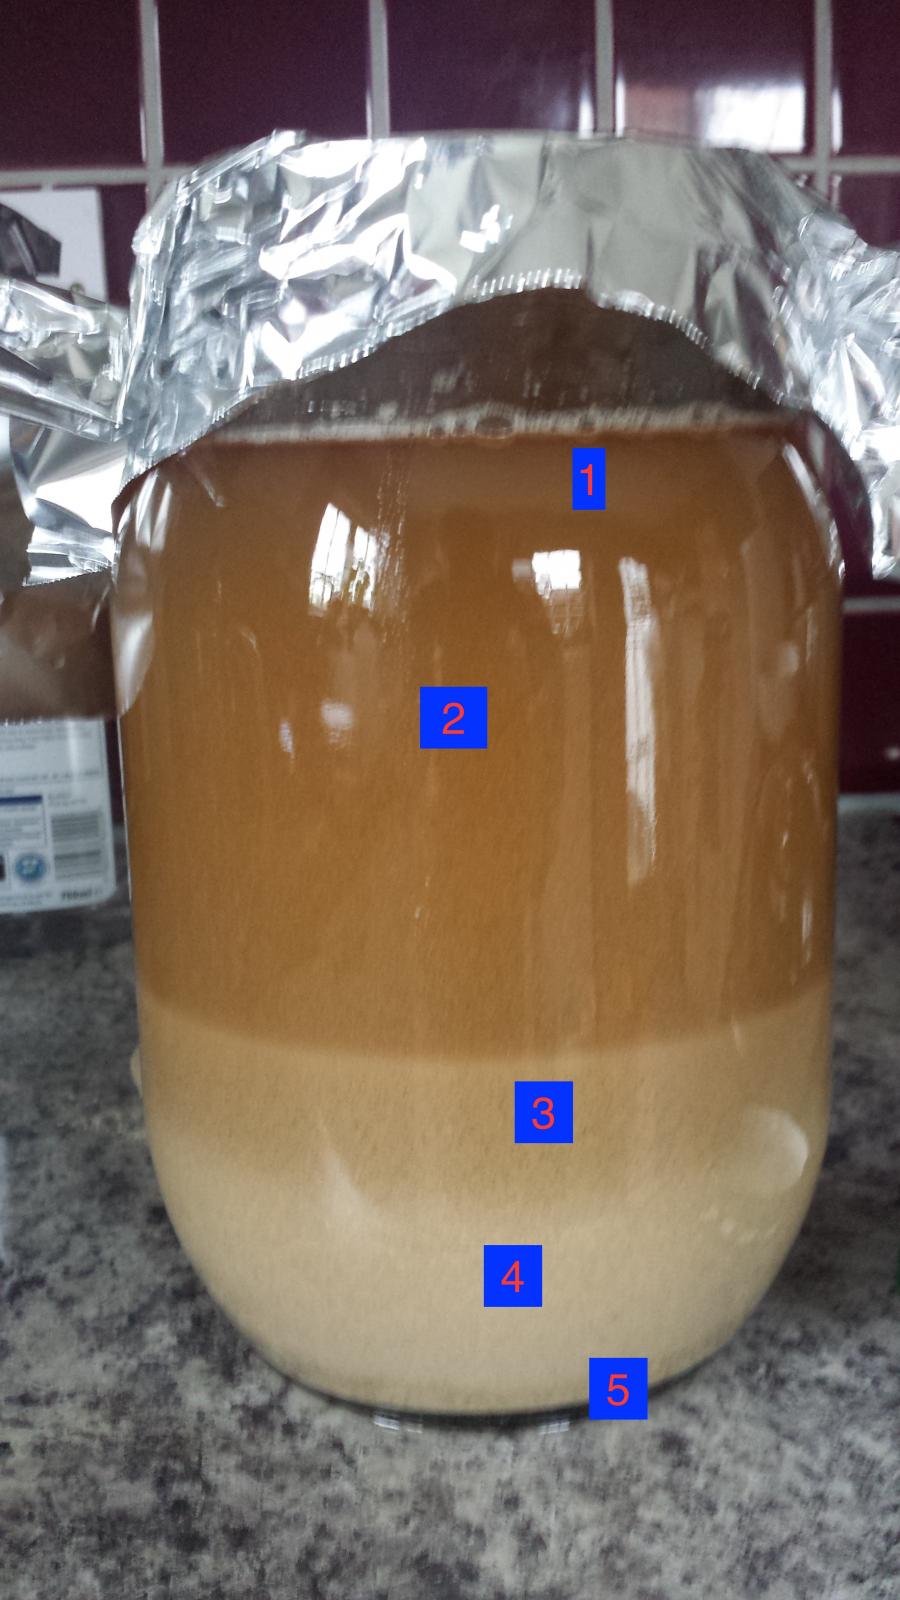
I've gelatined to fine my latest batch of beer and am trying to wash the yeast. I'm watching these layers and after 45 minutes I can see what looks like 5 layers.

I'm assuming layers 4 and 5 are to go, but should i be keeping 1-3?

There isn't much difference between 1 and 2 and I'm semi wondering if it's a trick of the light...
20170925_143715.jpg
 
There's a whole bunch of yeast in all of them tbh. You can use it all but want to avoid anything that might impart unwanted flavor to your new beer. typically leave the trub and usually leave the beer. Happy beer and dark beer media can really mess with your new beer.
 
Thanks - which is which though of each of the layers. 4 is 'creamier white' than the others. Is the lightest layer always the yeast?

It's WLP005 if that helps.
 
Normally if you want to harvest and wash yeast, you don't fine with gelatin first. The gelatin will drag the yeast to the bottom, making it hard to separate from the other stuff.

Typically you shake the liquid to mix it, then place it in a cold space to drop. The heavier break and solids will sink first, while the yeast will remain suspended. The cloudy liquid, containing the suspended yeast, is then decanted into a clean jar (that's the "washing" part). Then you let that settle. Most likely everything in the second jar which settles will be yeast.
 
Great thanks.. I've filled 4 300ml jars with layers 1 and 2. I'll leave these to settle.

I had some more liquid in the fermenter, which I've re-added and will try to get some of layer 3 as well. I'll leave all these for a few days in the cold and see where I am.

Re the gelatin - I saw a bunch of people say this doesn't have an effect, so I'm assuming anything 'liquid' will have *some* yeast in. I'll ditch all the gloopy stuff :)
 
My first attempt at harvesting yeast. Nottingham from a cream stout. I did not add any water to the bucket, just stirred the trub and poured into sanitized jars. Loose lids and 35* refrigeration. This is about four days later. No yeast?

I see beer and I see trub, but I don't think I see any yeast.

So should I try to make a starter with this? I have a good supply of sanitized weak wort, so I'll probably try just to see what happens. Any thoughts or advice?

Thanks,

Tom

IMG_20171005_113046397.jpg
 
You may not see the yeast, but that jar is full of it. Assuming its not more than a few weeks or so old, you can skip the starter and dump the whole shebang into your next batch of wort and see what happens (spoiler alert: you'll get beer!)
 
If you were to mix this in a clean gallon pickle jar, with a half gallon of boiled and cooled water, Shake it up, then let it start to settle, you would see stratified layers and more creamier yeast. Your yeast is tinted darker because of the stout it is in.
 
Sorry, old post. I was not paying attention to the date as I weaved my way through a yeast bunny hole.
 
C16CF221-23BA-46A7-8E34-30397052704E.jpeg

It’s frustrating that there is no clear answer on this. Some say yeast will be on the top layer and the dark trub sinks to the bottom, other say it’s the bottom layer you want. I’m getting different layers For different yeast. This is Vermont IPA but when I washed San Diego super yeast I got the white layer on top of the darker trub. Confusing!
 
It seems that some people wait too long for the layers to stratify, which paradoxically makes it more difficult to accomplish this.

The idea is to first fully homogenize the slurry by mixing/shaking it, then you let it sit for only 15-20 minutes or so. During that time, the heaviest non-yeast trub should sink unceremoniously to the bottom. You then pour off everything on top of it, which will be murky and probably have some color gradation, into another sanitized container. You don't look for clean separation at that point, other than the very bottom layer of trub.

Once in the new container, most of what you've saved is now yeast and beer and/or water. There's likely to be a little gunk, but it's not worth worrying about. Or, if you really care, you can repeat the process noted above and try to "rack" off the smaller layer of trub that will now settle.
 
It’s frustrating that there is no clear answer on this. Some say yeast will be on the top layer and the dark trub sinks to the bottom, other say it’s the bottom layer you want. I’m getting different layers For different yeast. This is Vermont IPA but when I washed San Diego super yeast I got the white layer on top of the darker trub. Confusing!

This is why overbuilding starters or top cropping is way easier!
 
It seems that some people wait too long for the layers to stratify, which paradoxically makes it more difficult to accomplish this.

The idea is to first fully homogenize the slurry by mixing/shaking it, then you let it sit for only 15-20 minutes or so. During that time, the heaviest non-yeast trub should sink unceremoniously to the bottom. You then pour off everything on top of it, which will be murky and probably have some color gradation, into another sanitized container. You don't look for clean separation at that point, other than the very bottom layer of trub.

Once in the new container, most of what you've saved is now yeast and beer and/or water. There's likely to be a little gunk, but it's not worth worrying about. Or, if you really care, you can repeat the process noted above and try to "rack" off the smaller layer of trub that will now settle.

So which layer is yeast?
 
Jim,

That's the point - it's hard to tell for sure after the layers have cleanly settled. You are better off judging by the rate of settling, which you can only determine by performing the procedure in a brief period of time, as described. Take one of your jars, shake it up, and do what I explained.
Ok cool. Thanks. I’ll post back in 30min. 👍
 
Just remember, don't look for clean lines other than (most of) what settles to the bottom in that first 15-20 minutes. Trust the process, and pour off the remaining stuff into a fresh container. Then you'll be able to compare the jars and hopefully recognize the yeast. Good luck. ;)
 
^It's not, really, especially if you re-use the yeast relatively soon. But trub is a four letter word around here, isn't it? And sometimes, even often, most of the slurry is trub.
 
Trub is all of the proteins, dead yeast, hop matter, etc, that you don't want to keep with your happy, creamy yeast in the clean jar. Given, it may take a couple rounds to get it all out, but you should end up with just yeast and minimal trub. I have a half gallon mason jar that has boiled, room temp water in that I pour my harvested yeast into(I decant most of the liquid off before I pour it in). Then I give the lid and ring a spray with Starsan, seal it up and shake the heck out of it for a minute. Then I set it down and forget about it for 15 minutes. Remember the trick is to let the heavy crap settle out long enough to keep the yeast suspended. From there, I pour the suspended yeast into another sanitized half gallon mason, leaving the settled stuff in the bottom of the jar I'm pouring from. Once I've got that done, I seal that new jar up and fridge it to see where I'm at. Usually I only have to do this process once or twice. Once I am happy with the results I crash the supernatant, decant and pour the settled yeast into a sanitized 4oz mason jar. Then label with the yeast strain, date of harvest and which generation(how many times I've reused the yeast) it is and put it in the fridge to store until I need it.
 
Ok cool. Thanks. I’ll post back in 30min. 👍

3A58C579-99C5-4813-BF9E-E71F6730881F.jpeg


So here it is after 25min, the lighter material is sinking while the darker material is staying suspended. I’ll try to pour off the dark stuff and see what happens. This feels off, but I’m game for experimenting.
 
Understood. At the very least, you'll have the two substances largely separated and can make a call. I know it works well when the slurry is not already ultra cold and well-settled, i.e. when it's fresh out of the fermenter. You might also have a clearer result with a larger volume of water, into which the yeast can remain suspended.
 
^It's not, really, especially if you re-use the yeast relatively soon. But trub is a four letter word around here, isn't it? And sometimes, even often, most of the slurry is trub.

Well, it's not like the trub killed your yeast. And in particular if you intend to store it for longer, you will start off with a small volume starter for the resurrection anyway, so the amount of trub carried over is insignificant. So what's the benefit here?

All in all it seems to me like you're mostly just throwing some yeast cells out with the trub while simultaneously running the risk of an infection pouring stuff around. Hardly worth the hassle imho.
 
View attachment 713323
It’s frustrating that there is no clear answer on this. Some say yeast will be on the top layer and the dark trub sinks to the bottom, other say it’s the bottom layer you want. I’m getting different layers For different yeast. This is Vermont IPA but when I washed San Diego super yeast I got the white layer on top of the darker trub. Confusing!
Hi Jim, I’ll just add to the confusion by saying I’ve been brewing now for over 30 years. I started washing yeast a little ove 5 years ago, experimenting with it and how long it will last in the refrigerator. I have used ale yeast that was as long as 9 months in the refrigerator and it turned out great. I’ve washed the same yeast 4 times and all turned out great and better than I expected. I’ve also have done the same with lager yeast but not with as good of results. The picture you have show’s the two layers. The one one the bottom is what I would use. Whenever i would use it to pitch, I would decant the portion on top, about half of the liquid and sweral the rest in the jar and pitch. Normally I don’t get the cloudiness in my pint jars like the picture you have posted. I wash my yeast at least twice. Once by pouring a gallon of boiled or distilled water at room temperature. swerling it for about 2 minutes and letting it sit on its side for about 20-30 minutes. Then.carefully pour into a sanItary 1gallon jug and let it sit for about 20-30 minute. i usually get 5 pint jars full and dump the rest. Now I only pour 2 pints as it start to become overwhelming with how much yeast you will accumulate. Don
 
I have only ever seen 3 layers referred to from academic sources.
For ale yeast the 3 layers consist of the following:
Top - Flocculated yeast carried to the top by CO2. Includes trub particles, polyphenols, proteins, and bitterness compounds
Mid - Healthy yeast cells
Bottom - Trub and poor flocculating yeast

Each layer has yeast, but your layer 4 from the first pic is what you want to isolate if possible.
 
When I started harvesting yeast I changed my end of boil routine. I cool my wort in the boil kettle and allow it to settle over night and then add just clear wort to the fermenters. This then allows the direct reuse of the fermenter yeast sludge without all the work and potential contamination risks of washing the yeast. Yea yea alot of old dead yeast gets recycled which limits the reuse cycles to a couple of times, really just once for me. Though this process is a wee bit wasteful leaving some fermentable wort in the BK, it doesn't even come close to the cost, ~$20, of purchasing new yeast. Another great advantage is the extra space in the fermenter not taken up by the kettle trub. And if you use kveik, you'll see nice clear yeast glass when it's dried.
Another phenomena I've noticed in a fermenter without the presence of trub particles, which the yeast cling on to, is the vertical motion is greatly reduced which in turn has eliminated fermenter eruptions.
 
^I do the same, only I drain the kettle without aeration into a holding vessel and let it settle in a temp-controlled fridge set for pitching temp. Anywhere from 2 hours to overnight later, I'll siphon off the trub into the fermenter, aerating only at that point.

I do this not only to harvest clean yeast, but to enable practices like ferment-and-serve in the same keg, spunding without trub transfer, etc.
 
Trub is all of the proteins, dead yeast, hop matter, etc, that you don't want to keep with your happy, creamy yeast in the clean jar. Given, it may take a couple rounds to get it all out, but you should end up with just yeast and minimal trub. I have a half gallon mason jar that has boiled, room temp water in that I pour my harvested yeast into(I decant most of the liquid off before I pour it in). Then I give the lid and ring a spray with Starsan, seal it up and shake the heck out of it for a minute. Then I set it down and forget about it for 15 minutes. Remember the trick is to let the heavy crap settle out long enough to keep the yeast suspended. From there, I pour the suspended yeast into another sanitized half gallon mason, leaving the settled stuff in the bottom of the jar I'm pouring from. Once I've got that done, I seal that new jar up and fridge it to see where I'm at. Usually I only have to do this process once or twice. Once I am happy with the results I crash the supernatant, decant and pour the settled yeast into a sanitized 4oz mason jar. Then label with the yeast strain, date of harvest and which generation(how many times I've reused the yeast) it is and put it in the fridge to store until I need it.

A good write-up. I just want to add that a little proteins and dead yeast is a *good* thing, so don't get too carried-away removing them. When you repitch the yeast, they will use that stuff as a source of nitrogen. The goal should be to remove a lot of the trub and dilute the alcohol -- and be able to store the yeast in much smaller jars.

I usually don't wash my yeast, but I have a couple of jars that I do want to clean up because they are taking up too much room in the fridge. :) And I want to try freezing some of the yeast. I'm wondering if a gravy separator would be good for pouring off the trub layer?
 
View attachment 713337

So here it is after 25min, the lighter material is sinking while the darker material is staying suspended. I’ll try to pour off the dark stuff and see what happens. This feels off, but I’m game for experimenting.

That's still too thick to separate properly; you need to add more water (about a quart) and try again. :)
 
^I do the same, only I drain the kettle without aeration into a holding vessel and let it settle in a temp-controlled fridge set for pitching temp. Anywhere from 2 hours to overnight later, I'll siphon off the trub into the fermenter, aerating only at that point.

I leave the wort in the kettle because it's already sanitized. I do lower the post boil/whirlpool wort temperature as low as possible, usually < 60F, for maximum cold break to occur. The next day the clear wort is gravity fed through the RIMS for reheating and enters the fermenter at pitching temperature. Crystal clear wort at temperatures up to 98F for kveik NEIPA's. It's also nice leaving the wort sitting on all those whirlpool hops overnight. I prefer to oxygenate the wort after it's in the fermenter too, I feel there's much better control and I use the opportunity to mix the yeast in at the same time.
 
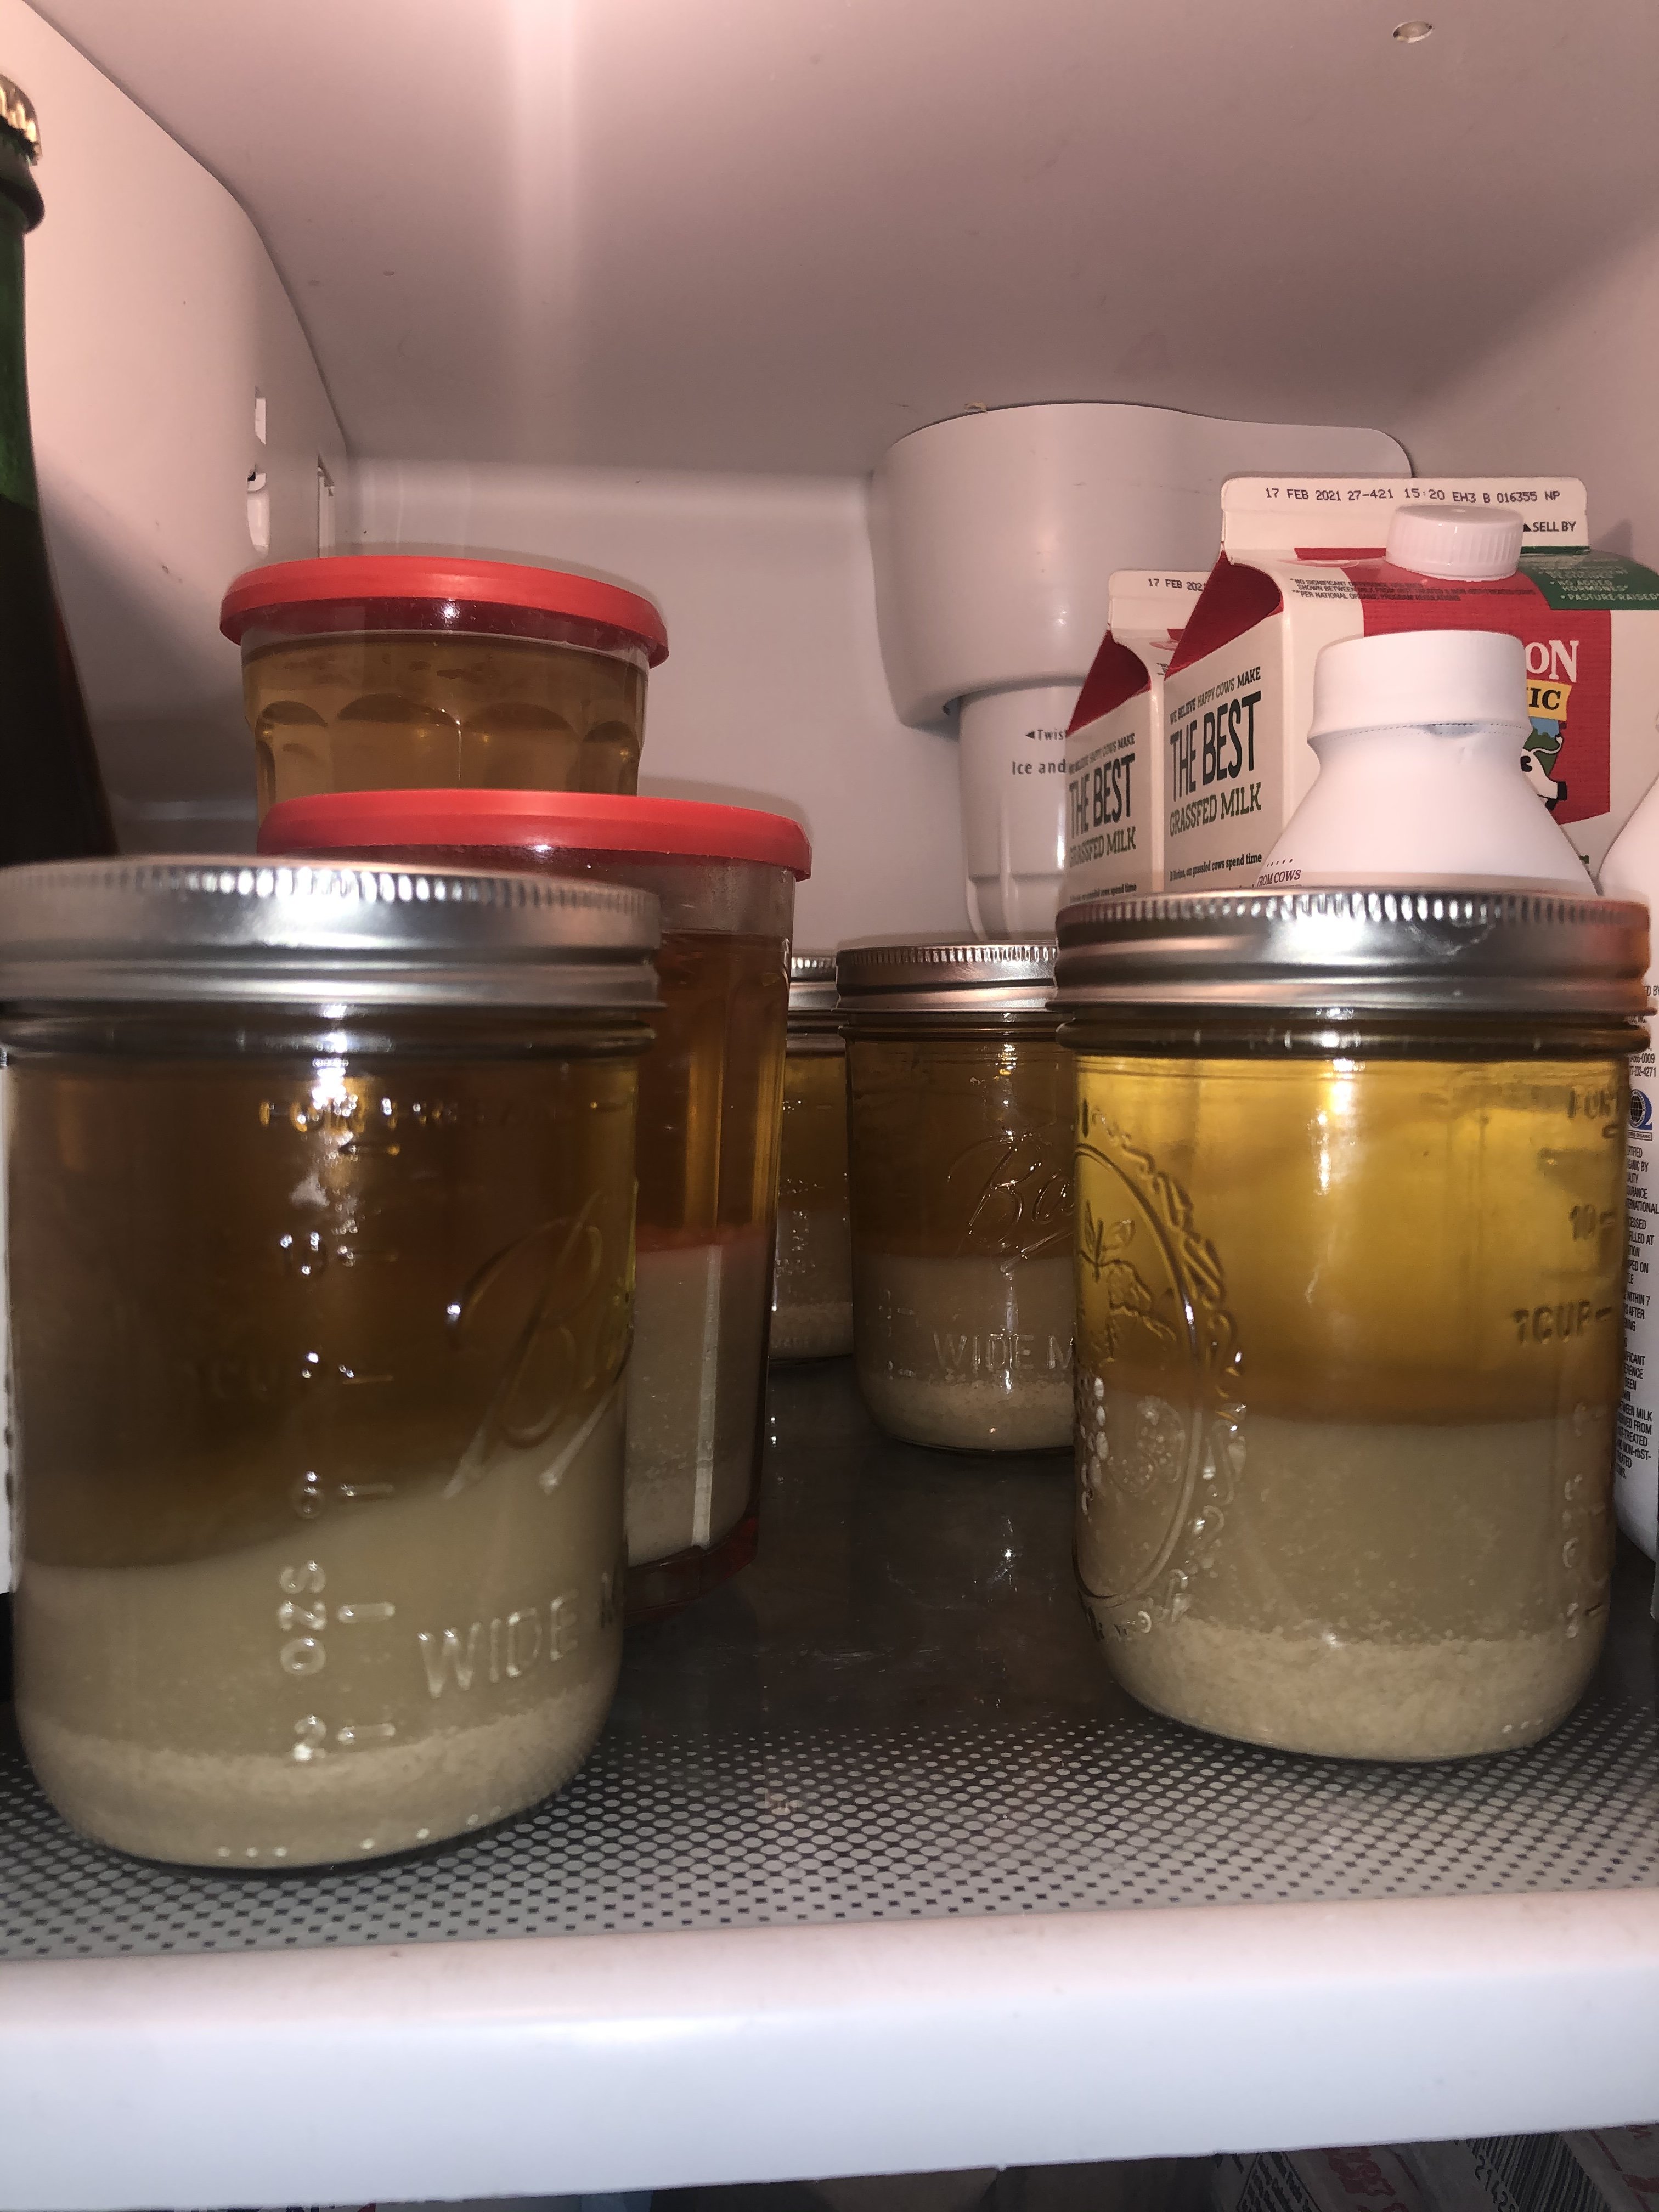
I washed two of the jars of yeast in my fridge. They were the same strain, one jar used in beer and one in cider, both recently, so I dumped them together into a half gallon jar and filled it with water. I let it sit out for 20 minutes or so and poured off a jar of the clean yeast still suspended in the water. I tried to pour a second jar but started getting crud from the bottom way too quickly while there was still a lot of yeast left. So I poured the second jar back and mixed it up again and let it rest for a half hour. (and I should have added a little more water because it was pretty thick) When it separated, instead of trying to pour off the top layer I used a big turkey baster to suck out most of the bottom gunky layer (which also was starting to get a thin line of clean yeast on top) When there was just a little of that left, I poured everything into the smaller jar.

I still have 2 jars in my fridge, the same size as before. But in a day or two when all the clean yeast is settled out (it has already started settling) I can pour off most of the water, and transfer the yeast to several tiny jars.

Next time I will use the turkey baster without trying to pour off anything first.

I really didn't need to keep this yeast; it is K-97 and I have a jar full that I harvested off the top of the primary. But this was good practice, and it didn't matter if I screwed it up :)
 
Back
Top