
Hi RollE2K
I have a question (or two) about the design. I have spent some time building out the schematic, in an attempt to understand what you have done. There are a couple of questions I have. More of an understanding the hardware side of it all...
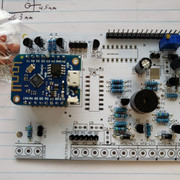
The buttons have cap for three lines connected to P0-P2 of the PCF. Why does the fourth button not have a cap?
The diodes between the GND side of the actuators and the input power. I don't understand the reason for these. I assume it is to protect against feedback of any sort, but they are connected to the GND terminal. Reverse polarity would still be an issue here, as the current would flow through the diode.
Probably not exactly the correct forum. Sorry about that
Thanks
Rhys
I have a question (or two) about the design. I have spent some time building out the schematic, in an attempt to understand what you have done. There are a couple of questions I have. More of an understanding the hardware side of it all...
The buttons have cap for three lines connected to P0-P2 of the PCF. Why does the fourth button not have a cap?
The diodes between the GND side of the actuators and the input power. I don't understand the reason for these. I assume it is to protect against feedback of any sort, but they are connected to the GND terminal. Reverse polarity would still be an issue here, as the current would flow through the diode.
Probably not exactly the correct forum. Sorry about that
Thanks
Rhys


![Craft A Brew - Safale S-04 Dry Yeast - Fermentis - English Ale Dry Yeast - For English and American Ales and Hard Apple Ciders - Ingredients for Home Brewing - Beer Making Supplies - [1 Pack]](https://m.media-amazon.com/images/I/41fVGNh6JfL._SL500_.jpg)


