• Please visit and share your knowledge at our sister communities:
  • If you have not, please join our official Homebrewing Facebook Group!

    Homebrewing Facebook Group

Wort cooler question

Homebrew Talk

Help Support Homebrew Talk:

This site may earn a commission from merchant affiliate links, including eBay, Amazon, and others.

tahoetavern

Well-Known Member
Joined
Jul 24, 2013
Messages
109
Reaction score
0
I have seen two types of copper wort Emersion coolers. One where the coil is put in an ice chest, and the wort goes through the inside of the pipe. And one where you hook up the chiller to a hose and run cold water through it while swirling it inside your container (bucket, job cooler, keggle etc). I feel like running the wort through the chiller would cool it faster, but harder to clean the residue from the inside of the copper pipe. Pros and cons? Thanks
 
As long as u clean correctly and sanitize after using the immersion as a counterflow (pumping wort thru the coil while thats submerged in ice), ur fine. Alot of people do that with great success and it works well and efficiently with minimal water wasted. As far as cleaning it, most people pump PBW thru it after they use it, to get any hop particles or anything else out of it. Then pump some star san thru it before using it again on the next brew day.

As far as just putting the coils in ur wort, that will sterilize the coils if u do it while its boil. Most people just give it a quick rinse after they take the coils out and they are good to go until the next brew day. The only real difference from one to the other is the need for additional things (bucket, bags of ice, pump).
 
I would think that because its hard to clean the inside of the coils you would risk infection running the wort through it. I have two coils. The first one sits in an ice bath and is connected to the second in the wort so it pushes super cool water through.
 
A couple things to consider.

In many peoples eyes, chilling to get to pitching temperature is secondary to chilling it below a specific temperature where bad things can happen. Being able to get it down to pitching temperature is the bonus.

Immersion chiller chills the whole wort and takes how ever long it takes. The entire wort cools at once. So the entire wort is above the magic temperature you are trying to get below while it is cooling. It is simple and effective. If you want to increase the efficiency, you can use a cheap pond pump and recirculate ice water through it.

The chiller in the ice, the last wort through it is at full temperature and won't be chilled until it passes through the chiller. It also has to be provided with wort that can pass through it so it doesn't clog. That's probably going to require a screen, a spigot and maybe a pump. If it matters to you, cold break isn't going to happen until the wort is in the chiller and on it's way to your fermenter.

I guess it boils down to where is your magic temperature number? Do you care that all of the wort gets chilled more slowly or that some of the wort will be above some temperature X where bad things can happen? Do you have the equipment to get the wort through the immersed chiller?

BTW, there are a few other common ways to get there. Counter flow chiller with a hose in a hose. The outer hose carries cooling water; the inner carries the wort. Pre-chilled immersion chiller like sfgoat outlined are used to speed up the cooling or getting below tap temperature.
 
For what its worth...I have done ice baths, (slow) immersion chillers (tap water only) dual stage immersion chillers (one in ice, one in wort) and all of the above are a relatively long process to get to pitching temps. Then came the plate chiller. Make the investment in a pump and a plate chiller. Use your old immersion chiller in a bucket of ice to cool the tap water as low as possible, put a valve on the outflow of the pump to regulate flow, and the cooling process goes from hours to minutes. I am able to take 5 gallons of rested, whirlpooled wort from 205 degrees to 68 degrees with one pass in about 8-10 mins. Aerate as you go and pitch away! This one step drastically changed not only the time and effort required, but more importantly the quality of the finished product.
 
I will have to look into all of these. Looking at making it to possible save money. thanks for the info
 
IMHO, the price of copper has gone up just enough that it is cheaper to just pick up one from amazon or such. I paid $46 for mine and by the time I priced 50 ft of pipe, fittings and factored in time and pipe bender (an absolute must have!) I was not saving much at all.
 
I'm going to guess that brewkinger got a 25' and not a 50' one from Amazon.

If you have the ability and patience to make one, you can make one and save a few bucks. Washing machine supply hose fits very well onto 3/8" copper tubing. You will need to solder if going over 25'.

A tip to forming the coil. Get a one gallon paint can. Take the roll of 3/8" tubing out of the box and set it on the counter around the paint can. Don't unwind it. Stack the coils so you have a spiral and start tightening the spirals around the can. It takes 3 hands but make it really easy and only takes about 10 minutes. Do use a tubing bender to get the tubing bent at the top if at all possible.
 
I'm going to guess that brewkinger got a 25' and not a 50' one from Amazon.

No, I actually got really lucky last year and found a 50' for $46 (and free Prime shipping). But dgr is correct, a 50' will cost you a little more than that.
Still not worth the hassle of wrapping that sucker around a a paint can or corny keg. That was the one DIY I was willing to forego.
 
tahoetavern said:
Any issues cleaning the plate chiller?

Since it has been a couple of days and no one has chimed in, I will take a shot.
Keep in mind that I do not have a plate chiller, BUT I have read a great number of posts and brewing info, so this is an informed opinion.
I have read that hop junk and trub can cause issues with a plate chiller, especially with leaf hops.

I am pretty sure that a bazooka screen helps but others can and will hopefully chime in on this.

I would think that there must be some additional info available on the forum or from plate chiller users wih regard to care and maintenance of plate chillers
 
that's my question too. I have heard you back flush them to remove any hop particles. But since you can't see inside there is no way of knowing that it is clean. again I don't own one, but have heard good things.
 
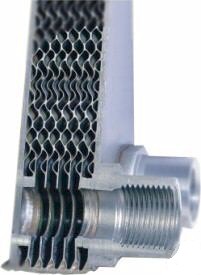
Theres more then a few threads here about people asking about the BEST way of cleaning plate chillers. Some horror stories of infected batches of brew thanks to mold or other germies clinging to hop particles stuck inside the plate chillers. I know that some people boil them in a pot of water afterwards or prior to using them. There are also people that will bake them in the oven. But the interior of the plate chiller is really bad with regards to keeping little pieces of stuff stuck there. I'm attaching a photo of what the interior looks like from one that was cut in half.

Some of the best advice that i've read on here is to back flush it with a mix of PBW and hot water immediately after using. Some people like to pump it thru their BK and chiller to clean multiple pieces of equipment at one time. After that, rinse it with clean water, let it air dry and store it in a dry place. Then on brew day, use another hot water/PBW rinse for a few minutes, then rinse with fresh water and then hit it with some star san to sanitize. That usually gets most of the remaining pieces out but there will always be a chance of some hop material remaining in there. At least if u follow this process ur gonna kill anything bad and hopefully there won't be a chance of an infected batch.

But you could also go the route of the CFC or Immersion Chiller. The interior of the copper pipping is smooth and there is very little chance of anything getting stick in there if u flush it real good after using it. It all comes down to how much u want to invest as well as how much time and effort you want to put into cleaning and preparing the chiller your going to go with.

Plate-Chiller_cutaway.jpg
 
I used to sit my IC chiller in my kettle for allmost an hour in the summer. In the winter months, about a half hour and thought I was doing good. Then I saw a vidio on YouTube and some Guy was constantly stiring his wort and lifting it up and down. So I tryed it out, and I got my wort from 212 - 68 degrees in fifteen minutes! I Was amazed!
 
I used to sit my IC chiller in my kettle for allmost an hour in the summer. In the winter months, about a half hour and thought I was doing good. Then I saw a vidio on YouTube and some Guy was constantly stiring his wort and lifting it up and down. So I tryed it out, and I got my wort from 212 - 68 degrees in fifteen minutes! I Was amazed!

recirculating the wort with a pump while u do that is supposed to help alot as well
 
Back
Top