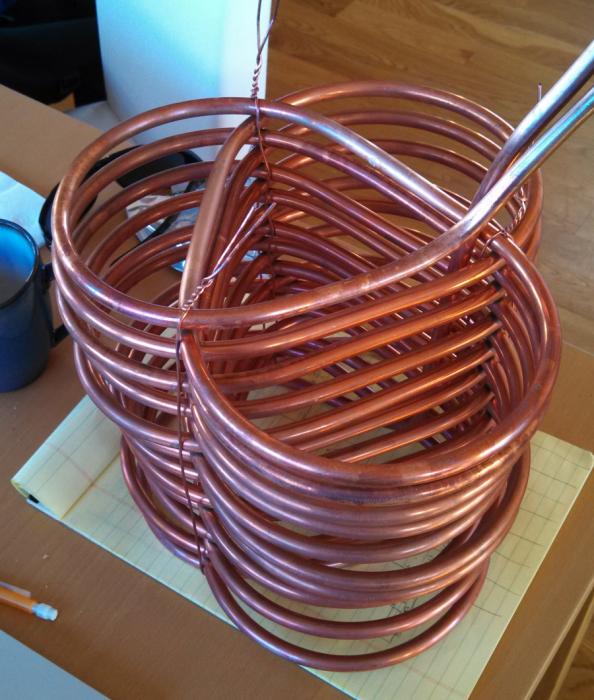
Wort Chiller - Loose or Tight Coils

Homebrew Talk - Beer, Wine, Mead, & Cider Brewing Discussion Forum

Help Support Homebrew Talk - Beer, Wine, Mead, & Cider Brewing Discussion Forum:

This site may earn a commission from merchant affiliate links, including eBay, Amazon, and others.

NTXBrauer

Well-Known Member
Joined
Sep 18, 2013
Messages
1,132
Reaction score
152
Location
Dallas
I have seen some discussion on this topic, and would like to find out where everyone stands on this. I made my wort chiller (3/8" 20'), which is currently loosely coiled, with around 1 inch gap between each coil. In my mind, this allows for more surface contact with the wort, when moving it around in the brew pot, which equates to a quicker cool down.

When looking at wort chillers on the market today, the all seem to be tightly coiled with little or no gap between the coils.

Is there any reason to believe that one style of chiller is more effective than the other. What are your thoughts?
 
Seems obvious to me that you want to allow wort to pass between coil loops, but it doesn't require a 1" gap for that to happen. Imo anything more than a 1/4" means a lost opportunity to get more copper loops in the wort. My IC is 50' long and all but a couple of loops will be submerged even in a five gallon batch...

Cheers!

I actually boil mostly in an 8.5 gallon pot, and have sized my chiller such that all the coils are underneath the wort line. ( It would be nice to have 5' more and the coils would have to be tighter to achieve this)
 
I have seen some discussion on this topic, and would like to find out where everyone stands on this. I made my wort chiller (3/8" 20'), which is currently loosely coiled, with around 1 inch gap between each coil. In my mind, this allows for more surface contact with the wort, when moving it around in the brew pot, which equates to a quicker cool down.

When looking at wort chillers on the market today, the all seem to be tightly coiled with little or no gap between the coils.

Is there any reason to believe that one style of chiller is more effective than the other. What are your thoughts?

I agree with you, you want some gap between the copper coils. Consider a shell and tube heat exchanger.

For mine, I fashioned a 50 ft. copper coil into a conical shape, with strings supporting it between the coils as required. The long tubes run from bottom to top ending tall and close to each other. These are tied securely to the bottom coil and the entire heat exchanger is easily lifted with one hand while being properly supported. There is a gap both vertically and horizontally between each tube. The hot wort rising up the cone causes natural convection currents, further enhancing heat exchange.

The conical shape is an interesting concept. I have not seen one used. Have you noticed any improvement with cooling time over a standard cylindrical shape?
 
Spacing the coils is a tradeoff between allowing more circulation and packing more coils in. I've not compared them, but I would guess that more coils with cold water in them would equate to lower chill times. If you're making your own, packing them together means you can stitch it all together solid instead of a wibbly wobbly bunch of tubing that's easy to bend and kink. Mine was packed together and worked great.
 
I used a self-overlapping cloverleaf kinda pattern, with the coils offset from one another and only touching where they cross... it's tough to explain, but it allows me to (almost) submerge 50 feet of tube in six gallons of wort with almost no contact between the coils. It's a bit like the "ribcage" design, but with the advantage that the water travels up the entire chiller instead of down one side and up the other.

Aw, heck, worth a thousand words:

chiller.jpg
 
mpcluever said:
Spacing the coils is a tradeoff between allowing more circulation and packing more coils in. I've not compared them, but I would guess that more coils with cold water in them would equate to lower chill times. If you're making your own, packing them together means you can stitch it all together solid instead of a wibbly wobbly bunch of tubing that's easy to bend and kink. Mine was packed together and worked great.
Correct, however at some point additional length is only a waste. Once the cooling water warms to the temp of the wort, then you aren't exchanging any heat. This is why two 25' coils in a parallel layout will work better than one 50' coil.
 
The conical shape is an interesting concept. I have not seen one used. Have you noticed any improvement with cooling time over a standard cylindrical shape?

I do think it cools better. It was patterned after an ACE gas fired water heater copper fin tube coil (use to sell them) that has a cone shape. I didn't make it a steep cone just more towards the top.
 
I used a self-overlapping cloverleaf kinda pattern, with the coils offset from one another and only touching where they cross... it's tough to explain, but it allows me to (almost) submerge 50 feet of tube in six gallons of wort with almost no contact between the coils. It's a bit like the "ribcage" design, but with the advantage that the water travels up the entire chiller instead of down one side and up the other.

Aw, heck, worth a thousand words:

Man that is AWESOME. Makes my coil look sad...

However, you may want to reverse your flow direction. Coldest water starting at the top and working down. This would be coldest seeing hottest first. Better than coldest seeing coldest first.
 
If one is circulating the hot wort to dramatically increase efficiency, it matters not which way the cooling water flows...

Cheers!
 
I used a self-overlapping cloverleaf kinda pattern, with the coils offset from one another and only touching where they cross... it's tough to explain, but it allows me to (almost) submerge 50 feet of tube in six gallons of wort with almost no contact between the coils. It's a bit like the "ribcage" design, but with the advantage that the water travels up the entire chiller instead of down one side and up the other.

Aw, heck, worth a thousand words:

That's beautiful. A high surface area to volume ratio. Has a sort of Celtic look about it. Bet it chills fast.
 
I used a self-overlapping cloverleaf kinda pattern, with the coils offset from one another and only touching where they cross... it's tough to explain, but it allows me to (almost) submerge 50 feet of tube in six gallons of wort with almost no contact between the coils. It's a bit like the "ribcage" design, but with the advantage that the water travels up the entire chiller instead of down one side and up the other.

Aw, heck, worth a thousand words:

Nice..I really do like your cloverleaf ribcage design. :mug:
 
I used a self-overlapping cloverleaf kinda pattern, with the coils offset from one another and only touching where they cross... it's tough to explain, but it allows me to (almost) submerge 50 feet of tube in six gallons of wort with almost no contact between the coils. It's a bit like the "ribcage" design, but with the advantage that the water travels up the entire chiller instead of down one side and up the other.

Aw, heck, worth a thousand words:

That is way cool, as others have said. How did you make the coils? I used a corny keg to wrap the copper around to get the curve without kinking. Using that method I wouldn't have had any way to get that type of overlap. How did you get those meshed coils to work?

For mine, I fashioned a 50 ft. copper coil into a conical shape, with strings supporting it between the coils as required... The long tubes run from bottom to top ending tall and close to each other. These are tied securely to the bottom coil and the entire heat exchanger is easily lifted with one hand while being properly supported. There is a gap both vertically and horizontally between each tube. The hot wort rising up the cone causes natural convection currents, further enhancing heat exchange.

That sounds like a badass design as well. When you said you secured the coils with "strings" do you really mean "strings"? Or another medium, like what seems to be copper wire in feinbera's design

Spacing the coils is a tradeoff between allowing more circulation and packing more coils in. I've not compared them, but I would guess that more coils with cold water in them would equate to lower chill times. If you're making your own, packing them together means you can stitch it all together solid instead of a wibbly wobbly bunch of tubing that's easy to bend and kink. Mine was packed together and worked great.

This is certainly true. But I'm presuming that OP had the amount of tubing he had, and was just asking about optimum coiling. If instead he spaced the coils in a specific way, and stopped when the coil reached a certain height, I agree that was not ideal. But I'm betting he just had the 20' so that's what he used.
 
Correct, however at some point additional length is only a waste. Once the cooling water warms to the temp of the wort, then you aren't exchanging any heat. This is why two 25' coils in a parallel layout will work better than one 50' coil.

Unless you increase the water flow... 2 chillers in parallel does work very well.
 
Back
Top