You are using an out of date browser. It may not display this or other websites correctly.
You should upgrade or use an alternative browser.
You should upgrade or use an alternative browser.
Wireless Brewpi Via Wifi
- Thread starter thekraken
- Start date

Help Support Homebrew Talk:
This site may earn a commission from merchant affiliate
links, including eBay, Amazon, and others.
I just changed over from DSL to our new high(er) speed National Broadband Network.
New router and new IPs all round.
Had to reflash the D1 wifi module with esp-link. I think I fried one unit in the change over, thank goodness for spare. Then had to get the new IP and make it static.
Then on the Wheezy box had to update the network interfaces. Type in SSID and Passwork for my psk string....... find out my wifi dongle doesn't do 5khz so the computer can't connect to the network. Get new psk string with correct SSID.... of course I type in a 7 instead of a 2 somewhere in there and it takes ages to find that mistake..... Computer finally connects.
Can see brewpi page.
Change the brewpi config to new D1 module IP. all good so far. Hang on wait say cant read version and to re-flash Arduino..... Reflash it 5 times not working. Resest EEPROM reflash, not working.
....
...
...
OH, Wait!!! UFW ...... remind myself how UFW works, fix permissions.
Ok working.
Configure temp probes. Back online.
What a mission. I realised just how much of what I learned the 1st time I set it up that I forgot. Took me the best part of a day to get it all working with all the faffing about and the dead time looking up all the steps I had taken to get this thing running. Happy it is working again.
ElChangoGuero
Well-Known Member
- Joined
- Jul 29, 2016
- Messages
- 123
- Reaction score
- 22
Just bought this UNO+WiFi R3 ATmega328P+ESP8266, going to try an all wifi brewpi. Does anyone have any experience with this board?


thekraken
Well-Known Member
None. But that's an interesting board, nice find. The project in this thread uses the esp8266 as a transparent wireless serial bridge, meaning that you can flash the standard brewpi avr code without any modification. I wonder if this board can still easily be used in that fashion.
ElChangoGuero
Well-Known Member
- Joined
- Jul 29, 2016
- Messages
- 123
- Reaction score
- 22
None. But that's an interesting board, nice find. The project in this thread uses the esp8266 as a transparent wireless serial bridge, meaning that you can flash the standard brewpi avr code without any modification. I wonder if this board can still easily be used in that fashion..
Yes! Thats exactly what i am trying to do, flash without modifying any of the brewpi code, hopefully it should be something like @mattrox installation (fingers crossed) ill let you guys know how it works out when it arrives
Yes! Thats exactly what i am trying to do, flash without modifying any of the brewpi code, hopefully it should be something like @mattrox installation (fingers crossed) ill let you guys know how it works out when it arrives
The only issue that may arise is which pins the esp uses at boot up, I suggest reading through both pocketmon and thorak's threads on wireless brewpi.

$53.24
1pc Hose Barb/MFL 1.5" Tri Clamp to Ball Lock Post Liquid Gas Homebrew Kegging Fermentation Parts Brewer Hardware SUS304(Gas MFL)
Guangshui Weilu You Trading Co., Ltd

$22.00 ($623.23 / Ounce)
AMZLMPKNTW Ball Lock Sample Faucet 30cm Reinforced Silicone Hose Secondary Fermentation Homebrew Kegging joyful
无为中南商贸有限公司

$58.16
HUIZHUGS Brewing Equipment Keg Ball Lock Faucet 30cm Reinforced Silicone Hose Secondary Fermentation Homebrew Kegging Brewing Equipment
xiangshuizhenzhanglingfengshop

$53.24
1pc Hose Barb/MFL 1.5" Tri Clamp to Ball Lock Post Liquid Gas Homebrew Kegging Fermentation Parts Brewer Hardware SUS304(Liquid Hose Barb)
yunchengshiyanhuqucuichendianzishangwuyouxiangongsi
![Craft A Brew - Safale S-04 Dry Yeast - Fermentis - English Ale Dry Yeast - For English and American Ales and Hard Apple Ciders - Ingredients for Home Brewing - Beer Making Supplies - [1 Pack]](https://m.media-amazon.com/images/I/41fVGNh6JfL._SL500_.jpg)
$6.95 ($17.38 / Ounce)
$7.47 ($18.68 / Ounce)
Craft A Brew - Safale S-04 Dry Yeast - Fermentis - English Ale Dry Yeast - For English and American Ales and Hard Apple Ciders - Ingredients for Home Brewing - Beer Making Supplies - [1 Pack]
Hobby Homebrew

$719.00
$799.00
EdgeStar KC2000TWIN Full Size Dual Tap Kegerator & Draft Beer Dispenser - Black
Amazon.com

$479.00
$559.00
EdgeStar KC1000SS Craft Brew Kegerator for 1/6 Barrel and Cornelius Kegs
Amazon.com

$33.99 ($17.00 / Count)
$41.99 ($21.00 / Count)
2 Pack 1 Gallon Large Fermentation Jars with 3 Airlocks and 2 SCREW Lids(100% Airtight Heavy Duty Lid w Silicone) - Wide Mouth Glass Jars w Scale Mark - Pickle Jars for Sauerkraut, Sourdough Starter
Qianfenie Direct

$76.92 ($2,179.04 / Ounce)
Brewing accessories 1.5" Tri Clamp to Ball Lock Post Liquid Gas Homebrew Kegging Fermentation Parts Brewer Hardware SUS304 Brewing accessories(Gas Hose Barb)
chuhanhandianzishangwu

$176.97
1pc Commercial Keg Manifold 2" Tri Clamp,Ball Lock Tapping Head,Pressure Gauge/Adjustable PRV for Kegging,Fermentation Control
hanhanbaihuoxiaoshoudian

$44.99
$49.95
Craft A Brew - Mead Making Kit – Reusable Make Your Own Mead Kit – Yields 1 Gallon of Mead
Craft a Brew

$20.94
$29.99
The Brew Your Own Big Book of Clone Recipes: Featuring 300 Homebrew Recipes from Your Favorite Breweries
Amazon.com

$7.79 ($7.79 / Count)
Craft A Brew - LalBrew Voss™ - Kveik Ale Yeast - For Craft Lagers - Ingredients for Home Brewing - Beer Making Supplies - (1 Pack)
Craft a Brew

$49.95 ($0.08 / Fl Oz)
$52.99 ($0.08 / Fl Oz)
Brewer's Best - 1073 - Home Brew Beer Ingredient Kit (5 gallon), (Blueberry Honey Ale) Golden
Amazon.com
The only issue that may arise is which pins the esp uses at boot up, I suggest reading through both pocketmon and thorak's threads on wireless brewpi.
This is an interesting device, because it seems to have both the Atmel (Arduino) chip and the ESP8266 chip. That makes me think that it's actually hiding the ESP8266 functionality behind the Arduino WiFi libraries (for the WiFi shield, etc). Assuming that's the case, I doubt that the ESP's pins would really be exposed.
The irony of this is that the ESP8266 is actually the more powerful chip -- and the cheaper implementation. You lose out on exposed GPIO pins, but gain in most other areas. It's hard to argue with an established (if de facto) standard though - hence why so many of the ESP8266 chips are implemented in arduino like form factors/implementations.
EDIT - I was wrong. The pins for both are exposed, and selectable. Interesting!
ElChangoGuero
Well-Known Member
- Joined
- Jul 29, 2016
- Messages
- 123
- Reaction score
- 22
thekraken
Well-Known Member
Apparently there is an official Arduino UNO WiFi with esp8266... Shows how much I pay attention.
Apparently there is an official Arduino UNO WiFi with esp8266... Shows how much I pay attention.
Yeah - it looks like that uses the official Arduino wifi stack, which means that the wifi capability won't be utilized by a standard BrewPi sketch.
That said, I'm guessing you could use my modified BrewPi stack with a firmware tweaked similarly to how I tweaked the firmware for the ESP8266 to get a working WiFi BrewPi out of this hardware. At that point though I'd just suggest using my version of the firmware - but I'm biased. Heavily.
Again - that's assuming that I'm correct in how these inter operate. It could be that the ESP on this comes with some kind of serial bridge firmware in which case all bets are off.
ElChangoGuero
Well-Known Member
- Joined
- Jul 29, 2016
- Messages
- 123
- Reaction score
- 22
Interesting... So when you have the Atmega328<-->ESP8266 connection what pins are connected to which?
Not sure but I emailed the manufacturer to see if they have any documentation for the board
Yes! Thats exactly what i am trying to do, flash without modifying any of the brewpi code, hopefully it should be something like @mattrox installation (fingers crossed) ill let you guys know how it works out when it arrives
I wonder what's the benefit instead of using Thorrak's solution. Please shed some light on me.
thekraken
Well-Known Member
There is no porting of the original avr code so theoretically all of this will work
Currently Unsupported/Untested
Rotary Encoder Support
Door Sensor Support (Note - May work, untested)
Buzzer Support
OneWire "actuators"
There is no porting of the original avr code so theoretically all of this will work
Unfortunately, I can't edit the post any more so the only one of those still true is rotary encorder support.
Admittedly though - that's a big one for some people.
thekraken
Well-Known Member
Unfortunately, I can't edit the post any more so the only one of those still true is rotary encorder support.
Admittedly though - that's a big one for some people.
I assume you're talking about your original post in your thread? The thought did occur to me, just fyi I pulled that off of the github page.
I assume you're talking about your original post in your thread? The thought did occur to me, just fyi I pulled that off of the github page.
...oops. :smack:
I've been focused on Fermentrack (the replacement web interface) and need to go back through and update the controller documentation. Sorry about that, and thanks for noticing it!
ElChangoGuero
Well-Known Member
- Joined
- Jul 29, 2016
- Messages
- 123
- Reaction score
- 22
I wonder what's the benefit instead of using Thorrak's solution. Please shed some light on me.
what @thekraken explained but also if it didnt work i could go with a USB Fuzze approach lol!
If you can buy a zero w for 10, go with ame's solution. If I could buy a zero for $5, I wouldn't have created brewpiless.
The irony is, with a wifi (or other non-hard wired-serial connection) you could easily run BrewPi in a free virtual machine with VirtualBox.
Of course, if it provides what you want, with BrewPiLess there's no need.
thekraken
Well-Known Member
The irony is, with a wifi (or other non-hard wired-serial connection) you could easily run BrewPi in a free virtual machine with VirtualBox.
Of course, if it provides what you want, with BrewPiLess there's no need.
I was doing exactly that until the old pc's hard drive kicked the bucket.
ElChangoGuero
Well-Known Member
- Joined
- Jul 29, 2016
- Messages
- 123
- Reaction score
- 22
If you can buy a zero w for 10, go with ame's solution. If I could buy a zero for $5, I wouldn't have created brewpiless.
that future iSpindel integration to Brewpiless though...awesome! :rockin:
that future iSpindel integration to Brewpiless though...awesome! :rockin:
Damn straight. Looking forward to seeing how it works out!
mostly so I can steal it for Fermentrack, because I think @pocketmon is on to something.
Seriously though - it's exciting stuff!
Damn straight. Looking forward to seeing how it works out!
mostly so I can steal it for Fermentrack, because I think @pocketmon is on to something.
Seriously though - it's exciting stuff!
It's almost done. The difficult things are
first, making a iSpindle. Fortunately, I will get one from a really kind friend.
second, designing a good user interface. I am sort of making-it-work-first type. It always can be refined afterward.
A friend asked me about TILT support, and I just told him to go with RPI zero W. It's simpler to support Bluetooth(BLE to be exact) on RPI. Buy a Bluetooth dongle, install the bluetooth stack, and start to get the gravity data.
Well, it is possible to support on ESP8266 by using a HM-10 BLE module. Configure it as a center device(AT+ROLE1, AT+IMME1), and read the data form iBeacon packet (AT+DISI?). However, a right version of the HM-10 is necessary, and I was forced to stop because of bricking my HM-10 module after issuing a sequence of commands. It would have been easier on RPI.
Necroposting for a teaser (gonna xpost this into the regular mega thread as well since it's part of the Master branch):

Posting here for a technical discussion if anyone is interested.
Code:
pi@brewpi:/home/brewpi/logs $ tail -f std*.txt
==> stderr.txt <==


==> stdout.txt <==

tail: stdout.txt: file truncated
2019-03-16 15:43:08   Opening serial port.
2019-03-16 15:43:08   Notification: Script started for beer 'My First Legacy BrewPi Run'
2019-03-16 15:43:23   Checking software version on controller.
2019-03-16 15:43:24   Found BrewPi v0.2.10 build unknown, running on an Arduino Uno with a revC shield on port socket://192.168.168.143:23
2019-03-16 15:43:25   {"BeerTemp":null,"BeerSet":null,"BeerAnn":null,"FridgeTemp":null,"FridgeSet":null,"FridgeAnn":null,"State":0}
Posting here for a technical discussion if anyone is interested.
[ETA: In order to "Future-Proof" this post, I've made a version on the BrewPi Remix website which I will be able to update as needed. Please see it here.]
I wanted to be able to support BrewPi Remix over WiFi, and this thread gave me some great ideas. The script support for this has been in BrewPi Remix since 0.5.1.2 I think, it's definitely in the current 0.5.2.0 release. Here's how to pull it off:
Buy yourself one of these fancy UNO R3 (ATmega328P) + WiFi (ESP8266) cards currently priced at $6.49 ... get a couple just in case. I expect any of the others out there will work as well with some changes but you are on your own if you go a different direction:
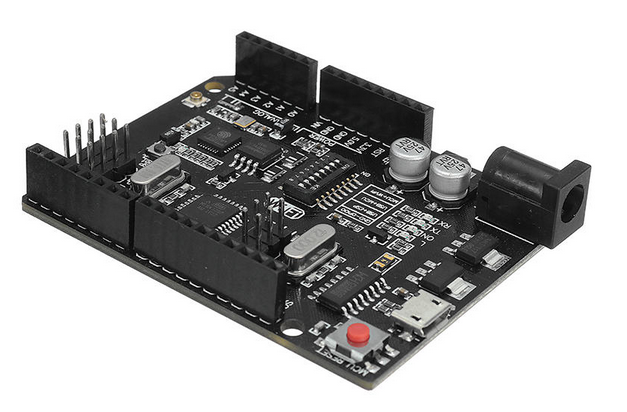
UNO+WiFi R3 ATmega328P+ESP8266 Module 32Mb Memory USB-TTL CH340G Compatible For Arduino
You might need to Google up some drivers for the CH340 chip if you are using your PC, unless you've messed with one of the Uno clones before. The "official" drivers appear to be on this page in Chinese. You can either translate or click on the very obvious download button and throw caution to the wind.
Install those drivers, and find yourself a USB micro cable because this board ditched the HUGE type "B" plug. Before you plug it in, you need to set the DIP switches to let the CH340 talk to the ESP8266.
Switch configuration to allow CH340 to connect to ESP8266 (upload sketch to the ESP8266):
Now you will need some firmware for the ESP8266 side. First, download "esp-link" version 2.2.3 from the releases page. I should point out that this is not the most current and right now I can't tell you WHY I used this version. I'll probably try one of the 3.x versions later on but for now, I know this works.
You will also need the esp_init_data_default.bin file from the Expressif Systems GitHub.
Go ahead and execute the NodeMCU Firmware Programmer and set up the following firmware images at the addresses indicated on the "Config" tab:
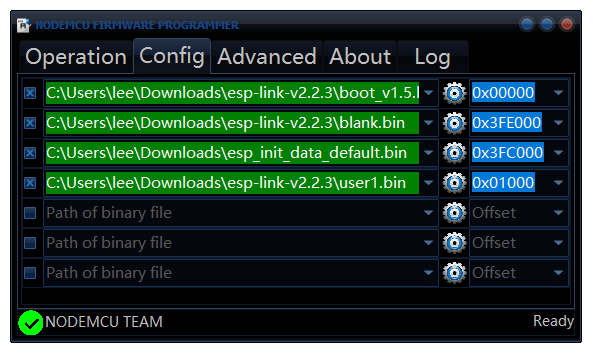
If you are curious about the "Advanced" tab, I did not make any changes. The settings were:

When complete, go ahead and close, unplug, and set the switches to connect the CH340 to the ATmega328:
Switch configuration to allow the CH340 to connect to the ATmega328 (upload sketch to the ATmega328):
Switch configuration to allow the ESP8266 to connect to the ATmega328 (normal operation):
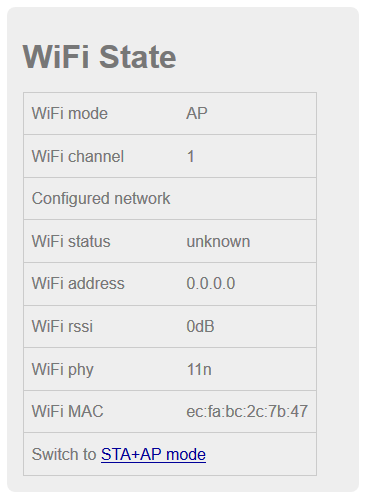
Go to the "WiFi Station" tab, and follow along. Click the link under "WiFi State" to switch to STA+AP Mode:
Select your desired wireless network (if they do not show up, refresh the page) and provide the proper password. When done click the Connect! button:
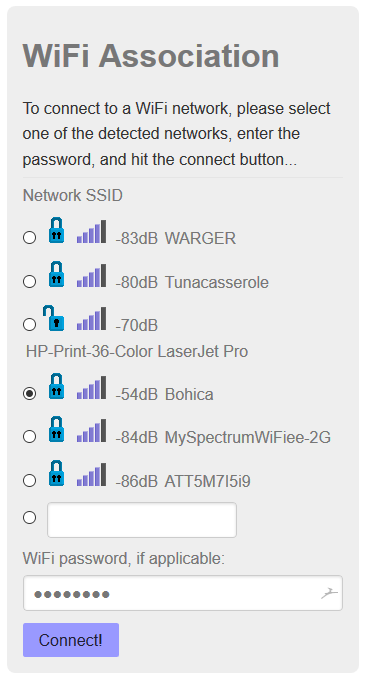
After it connects successfully, record the WiFi IP Address under "WiFi State." For the purposes of demonstration, we'll assume it's 192.168.168.143.
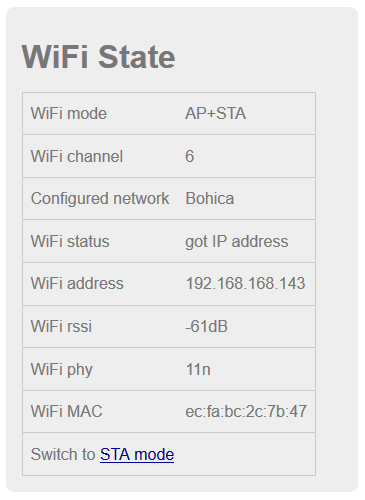
Now connect your PC to your normal network and connect to the board again via it's new address (192.168.168.143). Go to the µC Console tab and set the following:
Switch Baud Rate to 57600
Click the Reset µC button to commit the change.

Now press the MCU RESET button on the controller (or simply power-cycle.) If you left it on the µC Console tab, you should see json from the controller in the console window after reset is complete. Success!
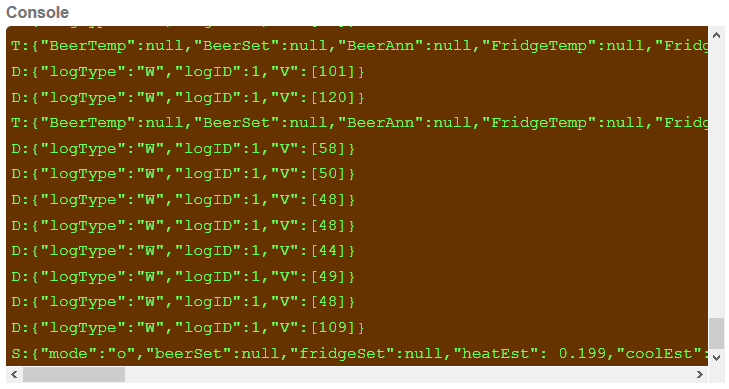
The last step is to configure your BrewPi instance for the controller. Assuming you are using a custom config (config.cfg), change the port to point to your board's IP address and port 23 like this:
Re-start your script and you should be connected via WiFi!
One thing I came across which requires a small hardware change: If you are using one of @CadiBrewer's shields with the LCD you will notice that the LCD does not work. This is because the shield attempts to separate the power for the shift register and LCD from the rest of the board by taking it off the ICSP header. This header does not line up with the combo board. So, you must jumper 5v and ground off the header on the shield to the ICSP header on the shield and all will be well.
I wanted to be able to support BrewPi Remix over WiFi, and this thread gave me some great ideas. The script support for this has been in BrewPi Remix since 0.5.1.2 I think, it's definitely in the current 0.5.2.0 release. Here's how to pull it off:
Buy yourself one of these fancy UNO R3 (ATmega328P) + WiFi (ESP8266) cards currently priced at $6.49 ... get a couple just in case. I expect any of the others out there will work as well with some changes but you are on your own if you go a different direction:

UNO+WiFi R3 ATmega328P+ESP8266 Module 32Mb Memory USB-TTL CH340G Compatible For Arduino
You might need to Google up some drivers for the CH340 chip if you are using your PC, unless you've messed with one of the Uno clones before. The "official" drivers appear to be on this page in Chinese. You can either translate or click on the very obvious download button and throw caution to the wind.
Install those drivers, and find yourself a USB micro cable because this board ditched the HUGE type "B" plug. Before you plug it in, you need to set the DIP switches to let the CH340 talk to the ESP8266.
Switch configuration to allow CH340 to connect to ESP8266 (upload sketch to the ESP8266):
- Off
- Off
- Off
- Off
- On
- On
- On
- Off (Do Not Use)
Now you will need some firmware for the ESP8266 side. First, download "esp-link" version 2.2.3 from the releases page. I should point out that this is not the most current and right now I can't tell you WHY I used this version. I'll probably try one of the 3.x versions later on but for now, I know this works.
You will also need the esp_init_data_default.bin file from the Expressif Systems GitHub.
Go ahead and execute the NodeMCU Firmware Programmer and set up the following firmware images at the addresses indicated on the "Config" tab:
- boot_v1.5.bin @ 0x00000
- blank.bin @ 3FE000
- esp_init_data_default.bin @ 0x3FC000
- user1.bin @ 0x01000

If you are curious about the "Advanced" tab, I did not make any changes. The settings were:
- Baudrate: 230400
- Flash size: 4MByte
- Flash speed: 40MHz
- SPIO mode: DIO

When complete, go ahead and close, unplug, and set the switches to connect the CH340 to the ATmega328:
Switch configuration to allow the CH340 to connect to the ATmega328 (upload sketch to the ATmega328):
- Off
- Off
- On
- On
- Off
- Off
- Off
- Off (Do Not Use)
Switch configuration to allow the ESP8266 to connect to the ATmega328 (normal operation):
- On
- On
- Off
- Off
- Off
- Off
- Off
- Off (Do Not Use)
Go to the "WiFi Station" tab, and follow along. Click the link under "WiFi State" to switch to STA+AP Mode:

Select your desired wireless network (if they do not show up, refresh the page) and provide the proper password. When done click the Connect! button:

After it connects successfully, record the WiFi IP Address under "WiFi State." For the purposes of demonstration, we'll assume it's 192.168.168.143.

Now connect your PC to your normal network and connect to the board again via it's new address (192.168.168.143). Go to the µC Console tab and set the following:
Switch Baud Rate to 57600
Click the Reset µC button to commit the change.

Now press the MCU RESET button on the controller (or simply power-cycle.) If you left it on the µC Console tab, you should see json from the controller in the console window after reset is complete. Success!

The last step is to configure your BrewPi instance for the controller. Assuming you are using a custom config (config.cfg), change the port to point to your board's IP address and port 23 like this:
Code:
port = socket://192.168.168.143:23One thing I came across which requires a small hardware change: If you are using one of @CadiBrewer's shields with the LCD you will notice that the LCD does not work. This is because the shield attempts to separate the power for the shift register and LCD from the rest of the board by taking it off the ICSP header. This header does not line up with the combo board. So, you must jumper 5v and ground off the header on the shield to the ICSP header on the shield and all will be well.
Last edited:
I received an email via my website from a "Rob S" but the email address given was invalid so I can;t reply. Rob, if you wan to go over what's happening here that's fine, or you can try the email again.
Hey Lee
Not sure why the email got bounced sorry. I can't figure out what I'm doing wrong. I can flash the esp firmware files fine (3.0.14), I can even setup the WiFi part at the end. but the pi will not flash the hex file to the ATmega328 portion. However I noticed in the post above your using older files compared to web page (2.2.3). I tried those also but was not able to flash the esp_init_data_default.bin file from the Expressif Systems GitHub.
Any ideas would be great.
Last edited:
I was able to flash the newer esp firmware, that's what's on my test bench right now. I updated that on my website, can't edit the above anymore.
How is it you are trying to flash the Arduino? What position are your switches in and what errror(s) are you getting?
How is it you are trying to flash the Arduino? What position are your switches in and what errror(s) are you getting?
1. OFF
2. OFF
3. ON
4. ON
5. OFF
6. OFF
7. OFF
8. OFF
pi@brew-pi:~ $ sudo /home/brewpi/utils//updateFirmware.py
Arduino program script started.
Settings will not be restored
Devices will not be restored
2019-04-23 18:24:39 Opening serial port.
Loading programming settings from board.txt
Checking hex file size with avr-size.
Program size: 27954 bytes out of max 32256
Programming Arduino with avrdude:
/usr/share/arduino/hardware/tools/avrdude -F -e -p atmega328p -c arduino -b 115200 -P /dev/ttyUSB0 -U flash:w:"brewpi-arduino-uno-revC-0_2_11.hex" -C /usr/share/arduino/hardware/tools/avrdude.conf
Result of invoking avrdude:
avrdude: stk500_recv(): programmer is not responding
avrdude: stk500_getsync() attempt 1 of 10: not in sync: resp=0x00
avrdude: stk500_recv(): programmer is not responding
avrdude: stk500_getsync() attempt 2 of 10: not in sync: resp=0x00
avrdude: stk500_recv(): programmer is not responding
avrdude: stk500_getsync() attempt 3 of 10: not in sync: resp=0x00
avrdude: stk500_recv(): programmer is not responding
avrdude: stk500_getsync() attempt 4 of 10: not in sync: resp=0x00
avrdude: stk500_recv(): programmer is not responding
avrdude: stk500_getsync() attempt 5 of 10: not in sync: resp=0x00
avrdude: stk500_recv(): programmer is not responding
avrdude: stk500_getsync() attempt 6 of 10: not in sync: resp=0x00
avrdude: stk500_recv(): programmer is not responding
avrdude: stk500_getsync() attempt 7 of 10: not in sync: resp=0x00
avrdude: stk500_recv(): programmer is not responding
avrdude: stk500_getsync() attempt 8 of 10: not in sync: resp=0x00
avrdude: stk500_recv(): programmer is not responding
avrdude: stk500_getsync() attempt 9 of 10: not in sync: resp=0x00
avrdude: stk500_recv(): programmer is not responding
avrdude: stk500_getsync() attempt 10 of 10: not in sync: resp=0x00
avrdude done. Thank you.
There was an error while programming.
BrewPi script will restart automatically.
I Also tried XLoader from a windows box but it just locks the program up.
If you try this on Windows you will need to make sure you have the CH340 drivers installed. If it shows up as a COM port then you have that part handled. If you are comfortable with the Arduino IDE, you can try flashing a blank sketch or even the Blink one to see if that goes.
Basically it's a communications issue. Do you have anything else connected to the board when you try this? If you have anything connected other than the USB, it could be that you have it connected in the wrong spot and it's interfering with the upload. You mentioned in your email that you have multiple boards, did you try one of the other ones?
You'll also want to make sure nothing else is trying to communicate out that port while you flash. Make sure BrewPi is stopped and the do_not_run_brewpi file is being created in your /var/www/html directory, or you issue the command 'sudo systemctl stop brewpi'.
I'm assuming a single chamber here. If you have a multi-chamber then some of the above will need to be modified.
Morning Lee
CH340 is installed and was working according to the NodeMCU Firmware Programmer. I agree its a communications thing, before i gave up last nite, I did try to flash using the Arduino IDE. It failed but I don't remember the exact message. I have a feeling its something really silly I'm doing wrong, but because i have so little time to play with this I'm always rushing.
I found this page in my searches. https://www.instructables.com/id/How-to-fix-bad-Chinese-Arduino-clones/
"In some cases the board might still not work. This is because there is no bootloader installed on the Atmel microcontroller chip."
What do you think
Funny thing i noticed when using NodeMCU Firmware Programmer, 2 of the three boards have the same MAC address.
Have you tried your other boards as well? I bought several and had no issues. You never know of course.
I was under the impression that no boot loader would cause the script to fail to detect the board but I may be wrong on that. Never came across one to test it.
Do you have the ability to flash the boot loader?
I was under the impression that no boot loader would cause the script to fail to detect the board but I may be wrong on that. Never came across one to test it.
Do you have the ability to flash the boot loader?
Similar threads
- Replies
- 12
- Views
- 4K
- Replies
- 7
- Views
- 2K
- Replies
- 5
- Views
- 4K


