• Please visit and share your knowledge at our sister communities:
  • If you have not, please join our official Homebrewing Facebook Group!

    Homebrewing Facebook Group

Will this cheap 3500 watt induction burner work?

Homebrew Talk

Help Support Homebrew Talk:

This site may earn a commission from merchant affiliate links, including eBay, Amazon, and others.
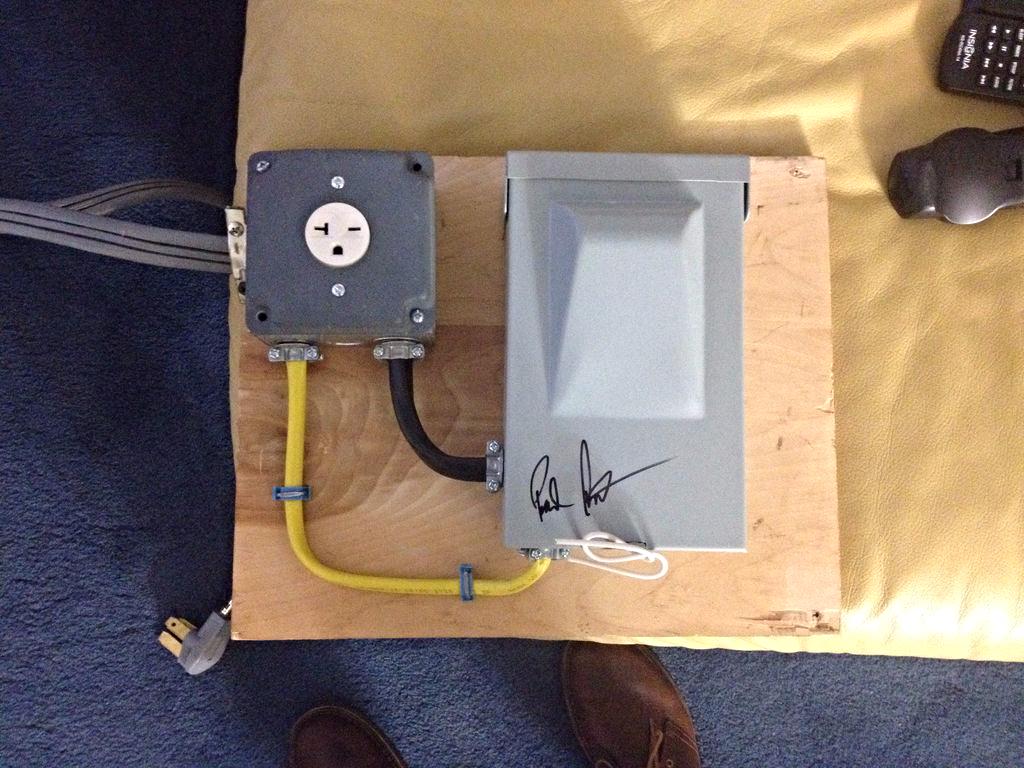
Electric converter for my range plug is all buttoned up! Forced my buddy to sign it as a gag haha.

fontZBs.jpg


If my ingredients come in the mail in the next few days, I'll likely be giving the setup a try this weekend. Pretty excited.

If you get a chance, you might want to show some inside pics of the pieces saying "this is how I did it"
 
If you get a chance, you might want to show some inside pics of the pieces saying "this is how I did it"

Will do! I have zero knowledge of anything electrical (my friend did all the work), but I can take pics and give some details.

Basically : My range plug is a 40A 220V outlet. Used the A/C Disconnect box with fuses and certain wire to step it down to 20A.

I'll get some pics up soon.
 
I haven't read through the entire thread but I just wanted to add a tip for those wanting to try induction who have non-magnetic or aluminum brew pots; find a cheap, shallow pan that is induction capable and matches the diameter of your induction coil, drill out the rivets to remove the handle, and place it inside your pot flat on the bottom. The induction field will pass right through your brew pot and heat the pan effectively turning it into a heating element with 100% efficiency. A more professional approach would be to call around metal shops and get a disc cut from suitable magnetic stainless, the thicker the better. I don't know if the small area of trapped wort under the disk would scorch, but this could be remedied by drilling holes in the plate and elevating it slightly with ss washers soldered to the bottom, convective current would provide circulation.
 
It took me forever, but I have read through this entire thread. Thanks everyone for the great info!

I'm ready to pull the trigger and order the Avantco IC3500. I'm talking to electricians now about getting an outlet wired up in my basement. I want to get something that will work with the IC3500, but will also be as upgradeable as possible if/when I decide to go to something like a BrewEasy or Colorado Brewing Systems Nano.

This is what the electrician has spec'ed out (including some extra outlets that I need for a pump, fan, etc..)

1) Install a 30 amp (future) dedicated circuit with a 20 amp breaker and outlet NEMA-6-20 outlet
2) Install a 20 amp circuit for (2) new outlets
3) Provide (1) twin 20 breaker for new circuits

Does this look correct?
 
I haven't read through the entire thread but I just wanted to add a tip for those wanting to try induction who have non-magnetic or aluminum brew pots; find a cheap, shallow pan that is induction capable and matches the diameter of your induction coil, drill out the rivets to remove the handle, and place it inside your pot flat on the bottom. The induction field will pass right through your brew pot and heat the pan effectively turning it into a heating element with 100% efficiency. A more professional approach would be to call around metal shops and get a disc cut from suitable magnetic stainless, the thicker the better. I don't know if the small area of trapped wort under the disk would scorch, but this could be remedied by drilling holes in the plate and elevating it slightly with ss washers soldered to the bottom, convective current would provide circulation.

The inductor can't be too high up. The induction field only reaches about 1/2 above the glass plate. It may not transfer all the energy at that height.

I would be worried about scorching between the bottom and the inductor though. Maybe someone has tested this.
 
It took me forever, but I have read through this entire thread. Thanks everyone for the great info!

I'm ready to pull the trigger and order the Avantco IC3500. I'm talking to electricians now about getting an outlet wired up in my basement. I want to get something that will work with the IC3500, but will also be as upgradeable as possible if/when I decide to go to something like a BrewEasy or Colorado Brewing Systems Nano.

This is what the electrician has spec'ed out (including some extra outlets that I need for a pump, fan, etc..)

1) Install a 30 amp (future) dedicated circuit with a 20 amp breaker and outlet NEMA-6-20 outlet
2) Install a 20 amp circuit for (2) new outlets
3) Provide (1) twin 20 breaker for new circuits

Does this look correct?

All you need is a 20A GFCI and a 20A 120/240VAC receptacle. It is a NEMA14-20R. Have him run 12/3 to it. Easy peazy.

You can run a 30A circuit. Not sure what you would need it for. The GFCI is about the same cost, but the wire is more. You'll need 10 gauge for 30A.

I outlined a number of ways to get 240VAC into a kitchen without pulling new wire in this thread. https://www.homebrewtalk.com/showthread.php?t=600713 If you have a stove receptacle, just wire up a converter box with a GFCI in it.

Edit: I'm recommending 12/3 and a 3 pole + ground plug (NEMA 14) in case you upgrade to a panel that requires 120VAC as well as 240VAC. If your electrician pulls 12/2 and you upgrade to a 120/240VAC panel, you'll have to provide the 120VAC via a 2nd 120VAC plug. If you pull 12/3, you've got everything you need: 120 and 240VAC.
 
Electric converter for my range plug is all buttoned up! Forced my buddy to sign it as a gag haha.

fontZBs.jpg


If my ingredients come in the mail in the next few days, I'll likely be giving the setup a try this weekend. Pretty excited.

The cord should go straight into the panel, not via the device box.

You have a GFCI inside the panel, right ?
 
I haven't read all of this thread, but I thought I would share something that may be of interest to those of you suffering scorching issues.

The temperature attained by a piece of metal heated by induction depends on two things, for a given magnetic field - the skin current depth and the resistance of the metal.

The skin current depth is the *lessor* of the actual material thickness and the skin depth of the magnetic field, due to frequency and material properties. Where this can come into play is if some of these tri clad pots have very thin skins due to having 3 layers.

Tin foil, for instance, will melt immediately if placed on an induction cooktop between a coil and an inductive pot. Why ? The induction pot will give the coil sufficient induction to operate the circuit. The resulting magnetic flux will induce a current in the aluminium. Because the aluminium is so thin, the current density will be extremely high and it will actually melt. Aluminum has a melting point of about 1400F !

So if your triclad kettles have very thin SS, you could be seeing very high current density in those layers.

The other thing to consider is that 3500 watts in an 8" coil has a pretty high heat density: 3500/ (8^2 pi/4) = 3500/50.26 in^2 = ~70 watts/in^2. The ULHD elements are less than 50 watts/in^2.

Good points!

Actually, the heating area inside my heavy duty, tri-ply bottomed pots (8 and 15 gallon) is only 6"! And yes, I occasionally get some sticky gray residue on that area. No real scorching though. Now the thick bottom will diffuse some of the heat generated.
 
I love the concept of induction heating, but I don't feel the Advantco is the right tool for the brewing application. Induction is a very versatile heat generator. Things could be so much better if a unit was actually engineered for the application.
 
I love the concept of induction heating, but I don't feel the Advantco is the right tool for the brewing application. Induction is a very versatile heat generator. Things could be so much better if a unit was actually engineered for the application.

Just keep in mind, for $180 there simply is NO alternative. I'm looking at buying a 2nd one (don't tell SWMBO).

So what do you envision would make a better brewing induction heater?
 
Just keep in mind, for $180 there simply is NO alternative. I'm looking at buying a 2nd one (don't tell SWMBO).

So what do you envision would make a better brewing induction heater?

More surface area and a control system ! Among other things... more power, variable power levels.
 
I just purchased and used for the first time an induction cook-top for my 5-gal BIAB setup. I purchased the Adcraft ind-c208v from JES restaurant supply.

http://www.jesrestaurantequipment.com/manual-control-induction-cooker-constructed-heavy-duty-stain-p-1052240.html

I purchased this unit because it had a manual control which means that later I can automate using a PID and an SSR to control the power to the unit. The actual heated surface area is the same as the Avantco unit. I did get a little gray residue in the bottom of the kettle but it was easy to clean out. My time to get to mash temps was longer as well as my time to get to boil. The boil was vigorous enough but I didn't boil off as much as I did with propane so I will have to adjust for that. Overall after using it for the first time I am happy with it. It's $30 more or so but it seems very sturdy and as i said I think I can automate with it somewhere down the road.

Oh and you can't beat brewing inside when it is cold and windy outside! :ban:
 
I purchased this unit because it had a manual control which means that later I can automate using a PID and an SSR to control the power to the unit.

... as i said I think I can automate with it somewhere down the road.
Have you tried unplugging and plugging it back in to confirm that it could be manually controlled? The problem with the IC3500 and perhaps all or most induction units is that they reset to low/zero power when power is removed.

[This electrical engineer plans to try to figure out a way to control the power on an IC3500, but no telling how long that will take. :mug:]
 
I'd hold off on spending a bunch of money and time on these things... I'm guessing that some pretty whiz bang induction equipment is going to be released to the market in the near future.
 
Have you tried unplugging and plugging it back in to confirm that it could be manually controlled? The problem with the IC3500 and perhaps all or most induction units is that they reset to low/zero power when power is removed.

[This electrical engineer plans to try to figure out a way to control the power on an IC3500, but no telling how long that will take. :mug:]

I have actually. There is a 2-3 second delay between restoring power to the unit and it turning on the coil/generating heat(also an annoying beep that would have to be dealt with :)). I am assuming that it needs to confirm a pot is on the unit before it will fire the coil. This delay would definitely add some hysteresis when trying to control it. Also when you shut it down correctly, with the control knob, the fan continues to run for a period of time, presumably to cool the unit down. Not sure if it is possible to control the coil via some other means and keep the fan running. It's too new for me to tear it open just yet! I'll get a couple more brews in before I consider looking into modifications. Hard thing for this electronics engineer to do!

Cheers!
 
I'd hold off on spending a bunch of money and time on these things... I'm guessing that some pretty whiz bang induction equipment is going to be released to the market in the near future.
That sounds great, unless it's at a whiz bang price point.
It's too new for me to tear it open just yet! I'll get a couple more brews in before I consider looking into modifications. Hard thing for this electronics engineer to do!
Yeah, I'm right there with you.
 
If you're planning on going PID control, then why bother with the induction setup? The fittings and element for your kettle would cost less.
 
If you're planning on going PID control, then why bother with the induction setup? The fittings and element for your kettle would cost less.
The problem with an element is that you can't directly heat a mash with it. It will scorch any grain that comes in contact with it. So then you need to set up RIMS or HERMS, with their inherent disadvantages.

Directly heating a kettle with induction is a much better option.
 
You can use an element in a mash, you just need to keep the grain off of it and a relatively rapid recirculation. I do it all the time in my eBIAB rig.

If you think that induction is any safer in a mash, you're probably mistaken. The watts/surface area is higher and you still need to keep the grain away from the heating area.

I'm only offering advice based on my own experiences. I started with induction, realized that I'd have far more control with an element in the kettle and a DSPR120.

Don't get me wrong; induction works but trying to convert it to a temp control option isn't really cost effective or viable. Besides that, a kettle element is higher wattage and nearly 100% heat transfer, so much faster temp rises and shorter time-to-boil.
 
You can use an element in a mash, you just need to keep the grain off of it and a relatively rapid recirculation. I do it all the time in my eBIAB rig.
Sure you can. The issue is if you want to do a conventional mash in a mash tun. Most elements are pretty big. If you put one under the false bottom, you end up with a lot of dead space.

If you think that induction is any safer in a mash, you're probably mistaken. The watts/surface area is higher and you still need to keep the grain away from the heating area.

The watts per surface area are whatever the designer of an induction system makes them.

A false bottom works quite nicely for keeping grain away from heat sources. People have been direct heating mash tuns with flame for ages.

I'm only offering advice based on my own experiences. I started with induction, realized that I'd have far more control with an element in the kettle and a DSPR120.
That is great if you want to BIAB.

Don't get me wrong; induction works but trying to convert it to a temp control option isn't really cost effective or viable.
Really ? And you've tried all the methods of doing that on all the induction systems out there ?

Besides that, a kettle element is higher wattage
How many Kw would you like ? 2,3,5,10, 15, 20... ?

and nearly 100% heat transfer, so much faster temp rises and shorter time-to-boil.
Wanna race ?
 
Well, this isn't a penis size measuring contest.

I was referring to using off-the-shelf, *affordable* induction units. Specifically, the IC3500. The heating circle is pretty small. It's also very unforgiving if there's a lack of thermal movement in it's heating area, scorching happens pretty instantly.

The more powerful units are extremely cost-prohibitive.

You can use a RIMS system with an element if you're not BIAB.

An average DIYer cannot design and build an induction setup for brewing. That's the complete opposite of what can be done with resistance heating, PID/DSPR120/SSVR which is downrigth simple, by comparison.

Induction works. You can brew with it. If you're looking for fine temperature control it's not the most cost-effective way to get there.
 
An average DIYer cannot design and build an induction setup for brewing. That's the complete opposite of what can be done with resistance heating, PID/DSPR120/SSVR which is downrigth simple, by comparison.

I consider myself an average DIYer and my plan has been to slowly build up my system to the point of using an induction element.

My system is setup somewhat similar to the BrewEasy, except right now I heat my water with my gas stove and maintain my temps using a pos salton heating element. I made an insulated jacket with 0.5" styrofoam rolls. As of now I lose at most 2f an hour and have to turn on my heating element once.

The next step is to introduce the adcraft cv-208v and in time maybe the hosehead UNO.

I should add that I boil and ferment in the same vessels, so having one induction burner at this point seems a bit more cost effective.
 
If you're planning on going PID control, then why bother with the induction setup? The fittings and element for your kettle would cost less.
A big advantage of induction over an internal element is that there's no element inside the kettle to clean or disinfect. Yes, there are disadvantages, but less crap to deal with is significant.
 
FYI, there is no issue with high heat density in a properly designed induction system.

A 13" coil has an area of 133 in^2. If it delivers 5 Kw, that is a heat density of 38 watts/ in^2, well in the ULHD arena. Plus you can turn it down to 1, 2 or 3 Kw as needed during the mash itself.
 
CBier60 - I used to use induction. I know how it works. Honestly, it takes me about the same time to clean my element as it did to clean the gunk off the bottom of the kettle from where the induction hob was, especially with the all-stainless elements.

brewman - Again, this thread is about the Avantco 3500. It's hob is around 6-6.5 inches in diameter if I remember right.

I'm not bashing induction. I'm merely stating that it has limitations.
 
Happy to say I just completed my water test, and everything seems to be working. I was able to heat 2.5 gal to over 160 F in what seemed like a short amount of time (I forgot to time it).

One hiccup along the way was that I had the electrician add the outlet before I had the burner, because I wanted to make sure it was doable before buying the burner. Though we both checked it, he wound up putting in the wrong outlet. I ordered the correct outlet from Amazon ($10) and installed it myself.

Also new to me is the chugger pump, so I got that all hooked up and working too (thanks to Bobby at brewhardware.com for helping me with that).

All that is left is to add a range hood, and I should be set to brew inside.

Link to photo:
https://drive.google.com/file/d/0B3ZbdM_ui41PR0p5bWZSMXExWE0/view?usp=sharing
 
Last edited:
I'm not bashing induction. I'm merely stating that it has limitations.

Respectfully, you've got it wrong. Induction doesn't have many limitations. The Advanco 3500 is what has the limitations.

I'm subscribed to this thread because the Advanco users are probably the most advanced brewers using induction.
 
Back
Top