Where do I find fitter for my wort chiller? 3/8" copper, 3/8" tubing. Help

Homebrew Talk - Beer, Wine, Mead, & Cider Brewing Discussion Forum

Help Support Homebrew Talk - Beer, Wine, Mead, & Cider Brewing Discussion Forum:

This site may earn a commission from merchant affiliate links, including eBay, Amazon, and others.

mcfire12

Well-Known Member
Joined
Dec 25, 2013
Messages
110
Reaction score
10
Hi guys, getting everything around for my first brew and I just need to get my chiller finished. I have a chunk of 3/8" copper 50' long that I bent, I just need to find some fittings to attach it to. I was planning on running cold well water to it and back down the drain. Just need to find a way to hook this thing to an outside faucet and back to the drain. Can anyone point me in the right direction please?
 
Compression fitting to threaded, threaded to 3/8" barb, barb fits inside 3/8" ID tube, tube then fits outside barb on barb to female hose fitting.

You CAN attach the 3/8" ID tube directly to your copper with a hose clamp, which will probably save $8 or so, but be careful of leaks. Some people put bends so the inlet and outlet of the copper hang outside the pot for this reason.

Edit: when I say threaded, I don't actually know what threads/pitch to use...I just bought them together at Lowe's so I knew they would fit.
 
go to the hardware store and buy a few feet of vinyl tubing that fits tight on the copper, four hose clamps and a garden hose repair kit for the end fittings. Make sure that the hose is rated for at least 150 degrees. Keep the plastic hose short so that it does not get in the way when you are sanitizing the chiller during the last 15 minutes of your boil

A handy tip is to disconnect the feed line after you finish cooling your wort and turn off the water. The discharge line will siphon most of the water out of your chiller so that you can store it dry.

photo x.JPG


photo y.JPG
 
I've liked working with the compression fitting or soldiered fitting. You can do a 3/8 to 1/2" compression fitting and a 1/2 male to 3/4" brass female, or solder a screw fitting on.

My old setup used a compression to 1/2" female, a 1/2" barbed nipple, and then attached a 1/2" reinforced vinyl hose on the nipple with a female hose connection on the other end. Worked nice an clean, no drips.

Now I use a 1/2" chiller with 3/8 soldier fittings to cam locks. Refrigerator tubing takes a smaller soldier fitting.
 
I personally like putting garden hose fittings directly onto the copper. It's nice to have nothing hanging off the chiller when you want to put it away. It also keeps from putting hoses anywhere near a burner where they can get melted. Lastly, clamping low temp rated tubing over smooth tubing is a great way to spring a leak. The tubing softens, the clamps loosen, and you find that it's been pissing hose water into your beer for 20 minutes.
 
I personally like putting garden hose fittings directly onto the copper. It's nice to have nothing hanging off the chiller when you want to put it away. It also keeps from putting hoses anywhere near a burner where they can get melted. Lastly, clamping low temp rated tubing over smooth tubing is a great way to spring a leak. The tubing softens, the clamps loosen, and you find that it's been pissing hose water into your beer for 20 minutes.

+ 1 to what Bobby said

But I like camlocks even more than hose fittings :)

thanks Kevin


20131219_234749.jpg
 
I personally like putting garden hose fittings directly onto the copper. It's nice to have nothing hanging off the chiller when you want to put it away. It also keeps from putting hoses anywhere near a burner where they can get melted. Lastly, clamping low temp rated tubing over smooth tubing is a great way to spring a leak. The tubing softens, the clamps loosen, and you find that it's been pissing hose water into your beer for 20 minutes.

I agree with all of the above, but for simplicity and cost savings, you can't beat a washer hose. Mine is actually vinyl tubing clamped on with a garden hose fitting on the in side. I've never had a leak, but a friend was using it once and accidentally let his burner melt a hole in one of the tubes. It was an easy 2 min fix, but wouldn't have happened with real fittings.

When I finally make a larger chiller, I'll sweat some permanent fittings on and give my smaller chiller to my buddy for use as a pre-chiller with his never-cold-enough tap water. Now if only I could track down some of that clearance Home Depot copper.
 
Ok, i know this is a few years late, but I'm in a similar situation (at least i was until today). I'm not sure everyone is on the same page as to what the OP is asking, but at least one response was to address the situation i was in (which i don't think is the same situation as the OP). My situation is
- 3/8" OD soft copper (homemade) chiller
- 3/8" ID vinyl tubing

As one poster stated, you can slip the tubing straight over the copper, but you have to worry about leaks. Also, i'm using a closed system which consists of a cooler full of ice, a submersible garden pump (~300-800 GPH), the tubing and the chiller. The water is recirculated over the ice. You can also let it free run, i.e. dump the chiller output on the driveway, for the first 5-10 min to let most of the heat run off, then put the out flowing water tube back in the cooler to recirculate the rest of the cooling process. Anyhow, I was using 2 zip ties per tube-to-chiller connection as anything less would have a tendency to leak (as a previous post mentions). That got to be a pain in the butt. I wanted to used a barbed fitting so i could use a simple spring clamp (or maybe none at all).

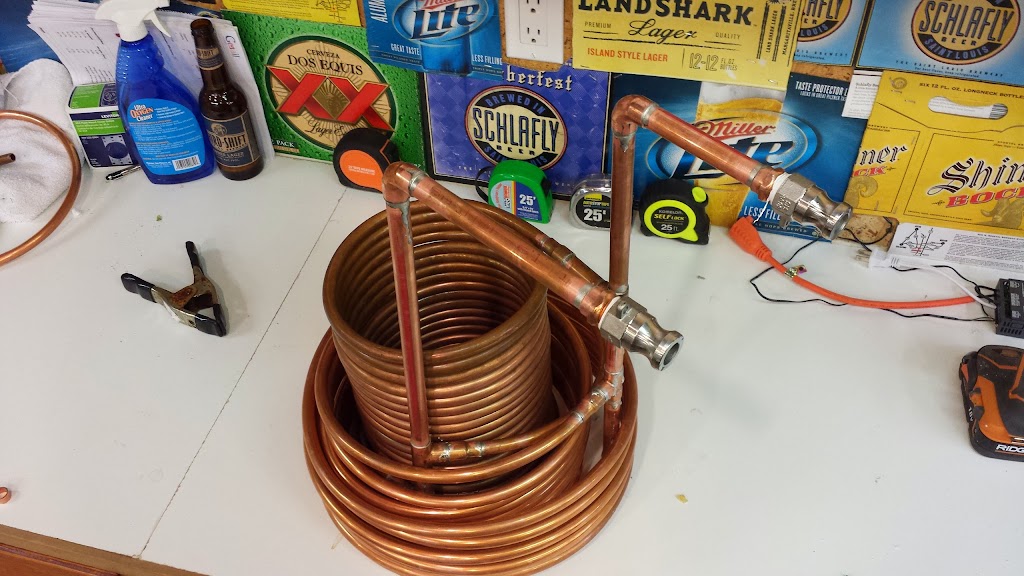
The solution is to use a 1/4" rigid coupler, the type that connects 1/4" rigid copper to 1/4" rigid copper (like to splice a new section in a line). This fits over the 3/8" soft copper like it was meant to do so. Then, this coupler slips nicely into a brass 3/8" ID x 3/8" MIP fitting. Last step is to solder it all together. Both of these pieces are available at most home depots. The pics below show the two pieces. Not shown is the final product with the chiller. When i get it finished, i will try and post those pics as well. And yes, i'm sure this has been figured out and posted on homebrewtalk previously... i just didn't find it.

20170311_200430[1].jpg


20170311_200518[1].jpg


20170311_200616[1].jpg
 
Back
Top