What else is needed in an upgrade?

Homebrew Talk - Beer, Wine, Mead, & Cider Brewing Discussion Forum

Help Support Homebrew Talk - Beer, Wine, Mead, & Cider Brewing Discussion Forum:

This site may earn a commission from merchant affiliate links, including eBay, Amazon, and others.

Scout

Well-Known Member
Joined
Apr 13, 2016
Messages
265
Reaction score
99
Location
Fort Wayne
Going from extract to all grain, and I have all the big pieces I believe I need. What I don't know is what about the small things, like a mash paddle, ph meter, maybe a scale for hops or something. So let's hear it, what small bits of equipment will I need?
 
A water analysis is first,then you know if it can be used or what treatment is needed, I have a buddy that made good to real good kit beers but since his move to all grain they are off and cloudy. I keep suggesting he try RO and minerals ,or get a Ward Labs report and a pH meter,but you know what they say about falling on def ears. Oh, screw the paddle and get an 18" whisk,you'll thank me later. I also use a bag in my mash tun so I can leave the mill(you'll need one of those too) set for 5 gal BIAB (10 gal MIAB), I like to share.
 
Of the items you mentioned, a pH meter would be my last purchase. I also don't see a lot of need for a scale for hops unless you are going to buy in bulk. Most of the hops I use are in 1 or 2 ounce bags and I can get reasonably close to the correct additions just by estimation. So what if I get 28 IBU's instead of 26 or 30. I can't reliably taste the difference. Instead get a scale for the grains.

You didn't list the bag for BIAB and that would be the first purchase if you don't have one. With BIAB you can start out with full volume, no sparge all grain which makes life so much simpler. Second purchase (at the same time as the bag) would be a grain mill so you have control over the crush which in turn controls the mash efficiency. We so often see people complain about not hitting their expected OG which usually comes down to using the grain as the LHBS crushed it (too coarsely) and getting an inconsistent OG as the LHBS mill get worn or the setting changed.

i love having a refractometer so I can quickly check the gravity without waiting for a hydrometer sample to cool for a reading. Had I had one to start with, I might have known that I was overshooting the expected OG in time to make adjustments.

An accurate thermometer, whether instant read or not, is essential.
 
I agree with the whisk, I use a 24 inch French whip from A#####. A little cheaper than a stainless mash paddle and I feel works better.

Start with Distilled or RO water and build appropriate water from there. An inexpensive gram scale for building your water and weighing hops is a good investment. Mine was around $10. Some basic brewing salts and Lactic acid for building water as well.

While a pH meter is a good investment, using one of the online water calculators can get you close enough for now. save the meter for later. Check out Bru'n water, ez water, Brewers Friend or Mash Made Easy. All free and can get you somewhere close for mash ph

One of the biggest improvements in my beers came when I stated building my water from distilled, then RO after investing in a under sink unit. I can not emphasize enough how important your water profile is when going all grain.
 
It wasn't stated but a previous post of yours shows a 3 vessel 2 pump electric system, not BIAB.

I find a one gallon pitcher is handy in general.

Scale and mill for grains as mentioned is useful.

I have a circular manifold for recirculation during the mash. Some use locline.

I fly sparge with a rotating arm. The one I use is a Phil's. You probably won't find one if interested. I bought a different new one recently but it was crap.

You could add a tee on your wort out of your Therminator to add inline oxygen if you wanted. Would look like this
20220318_213654.jpg
 
Lots of good things I hadn't thought about, especially about water profiles. I moved out to the country and have well water, so a water test is going to be done.
 
It wasn't stated but a previous post of yours shows a 3 vessel 2 pump electric system, not BIAB.

I find a one gallon pitcher is handy in general.

Scale and mill for grains as mentioned is useful.

I have a circular manifold for recirculation during the mash. Some use locline.

I fly sparge with a rotating arm. The one I use is a Phil's. You probably won't find one if interested. I bought a different new one recently but it was crap.

You could add a tee on your wort out of your Therminator to add inline oxygen if you wanted. Would look like this
View attachment 763471
Yeah its a 3v system I bought a few years ago. Life and other projects happen, and well...
 
I fly sparge with a rotating arm. The one I use is a Phil's. You probably won't find one if interested.

Wow Flashback!
I had some Phil's stuff that I donated to a coworker when he was just starting up.
It wasn't fancy but it all worked just fine for its intended purpose.
I wasn't doing all-grain when I acquired the stuff so I never got the sparge arm.
 
Wow Flashback!
I had some Phil's stuff that I donated to a coworker when he was just starting up.
It wasn't fancy but it all worked just fine for its intended purpose.
I wasn't doing all-grain when I acquired the stuff so I never got the sparge arm.
I had one from when I was brewing 20 years ago and took a hiatus. It was slowly wearing down so I bought the only available replacement, a rotating arm attached to a cutting board describes it. Whoever makes these in China, they aren't well made. Fortunately, someone listed a Philxs one here and I scooped it up. I found directions to make one but I would probably be all right with my manifold or perhaps the one of those arms that projects the water off the small disk if the new ever breaks.
 
Yeah its a 3v system I bought a few years ago. Life and other projects happen, and well...
No worries, I was just confused as BIAB came up and I didn't see anywhere you said what kind of all grain system you were working with. I started wondering if you might have said it on another thread so I was checking your recent posts and saw the picture of your system.

The manifold I use in my mash tun is an SS Brewtech by the way. I had a silicone hose on the return but felt I was loosing some efficiency so added that piece in.
 
In addition to gear, you're going to need some new ingredients. An RO filter is a handy thing to have if you want to clean up tap water or you will also need Campden tablets to neutralize chloramines and free chlorine. Regardless of what you start with you're going to need salts and acids to adjust your water profile and whirllfloc tablets or Irish moss comes n handy. You going to want Rubbermaid bins to hold grain and I assume that a roller mill is part of the equipment you've already gotten.
 
I wouldn’t say a pH meter should be the last thing you need, since water profile is in my opinion the most important variable after the grain bill. But it might be best to save all that for after a couple all grain batches.

As for other stuff, assuming BIAB and assuming you already have fermentation and sanitization supplies:

- Kettle with a lid
- Brew bag
- Spring clamps for attaching bag to kettle sides
- Sleeping bag/blankets/jacket for mash insulation
- Instant read thermometer
- Long spoon
- Stainless hop spider
- sturdy wire rack for setting the bag of spent grains on (borrow one from a grill or baking pan)
- Kitchen scale (for hops and mineral additions)

My process has evolved quite a bit from this. But if I was to put together a “starter kit” for someone doing all grain brewing, it would contain no more or no less than the above list.
 
That would be nice, but I'd have to get out my old 5g boil kettle because my MLT doesn't have heat.

You don't have to boil them all at once. The first one into the boil pot gets a 30 minute boil, then dump it into a non heating container to start chilling while you boil the second, then repeat for the third. You could start them all at the same time and do a 30, 60, and finally, a 90 minute mash.
 
You should consider if you need to use the KISS principle. You'll have quite a few things happen you never thought of. The simpler and more basic you keep everything the less frustrated you will be on your first few brew days with all grain.

A hydrometer and accurate instant read thermometer were all I started with. As I got better handling the different processes, I added more complication.
And thats the reason for this post, my LHBS closed and the next nearest real homebrew shop is at least 90 minutes away.
 
I wouldn’t say a pH meter should be the last thing you need, since water profile is in my opinion the most important variable after the grain bill. But it might be best to save all that for after a couple all grain batches.

As for other stuff, assuming BIAB and assuming you already have fermentation and sanitization supplies:

- Kettle with a lid
- Brew bag
- Spring clamps for attaching bag to kettle sides
- Sleeping bag/blankets/jacket for mash insulation
- Instant read thermometer
- Long spoon
- Stainless hop spider
- sturdy wire rack for setting the bag of spent grains on (borrow one from a grill or baking pan)
- Kitchen scale (for hops and mineral additions)

My process has evolved quite a bit from this. But if I was to put together a “starter kit” for someone doing all grain brewing, it would contain no more or no less than the above list.
All grain does not automatically mean BIAB. Most of your suggestions are fine anyway but I am wondering why people are assuming this.

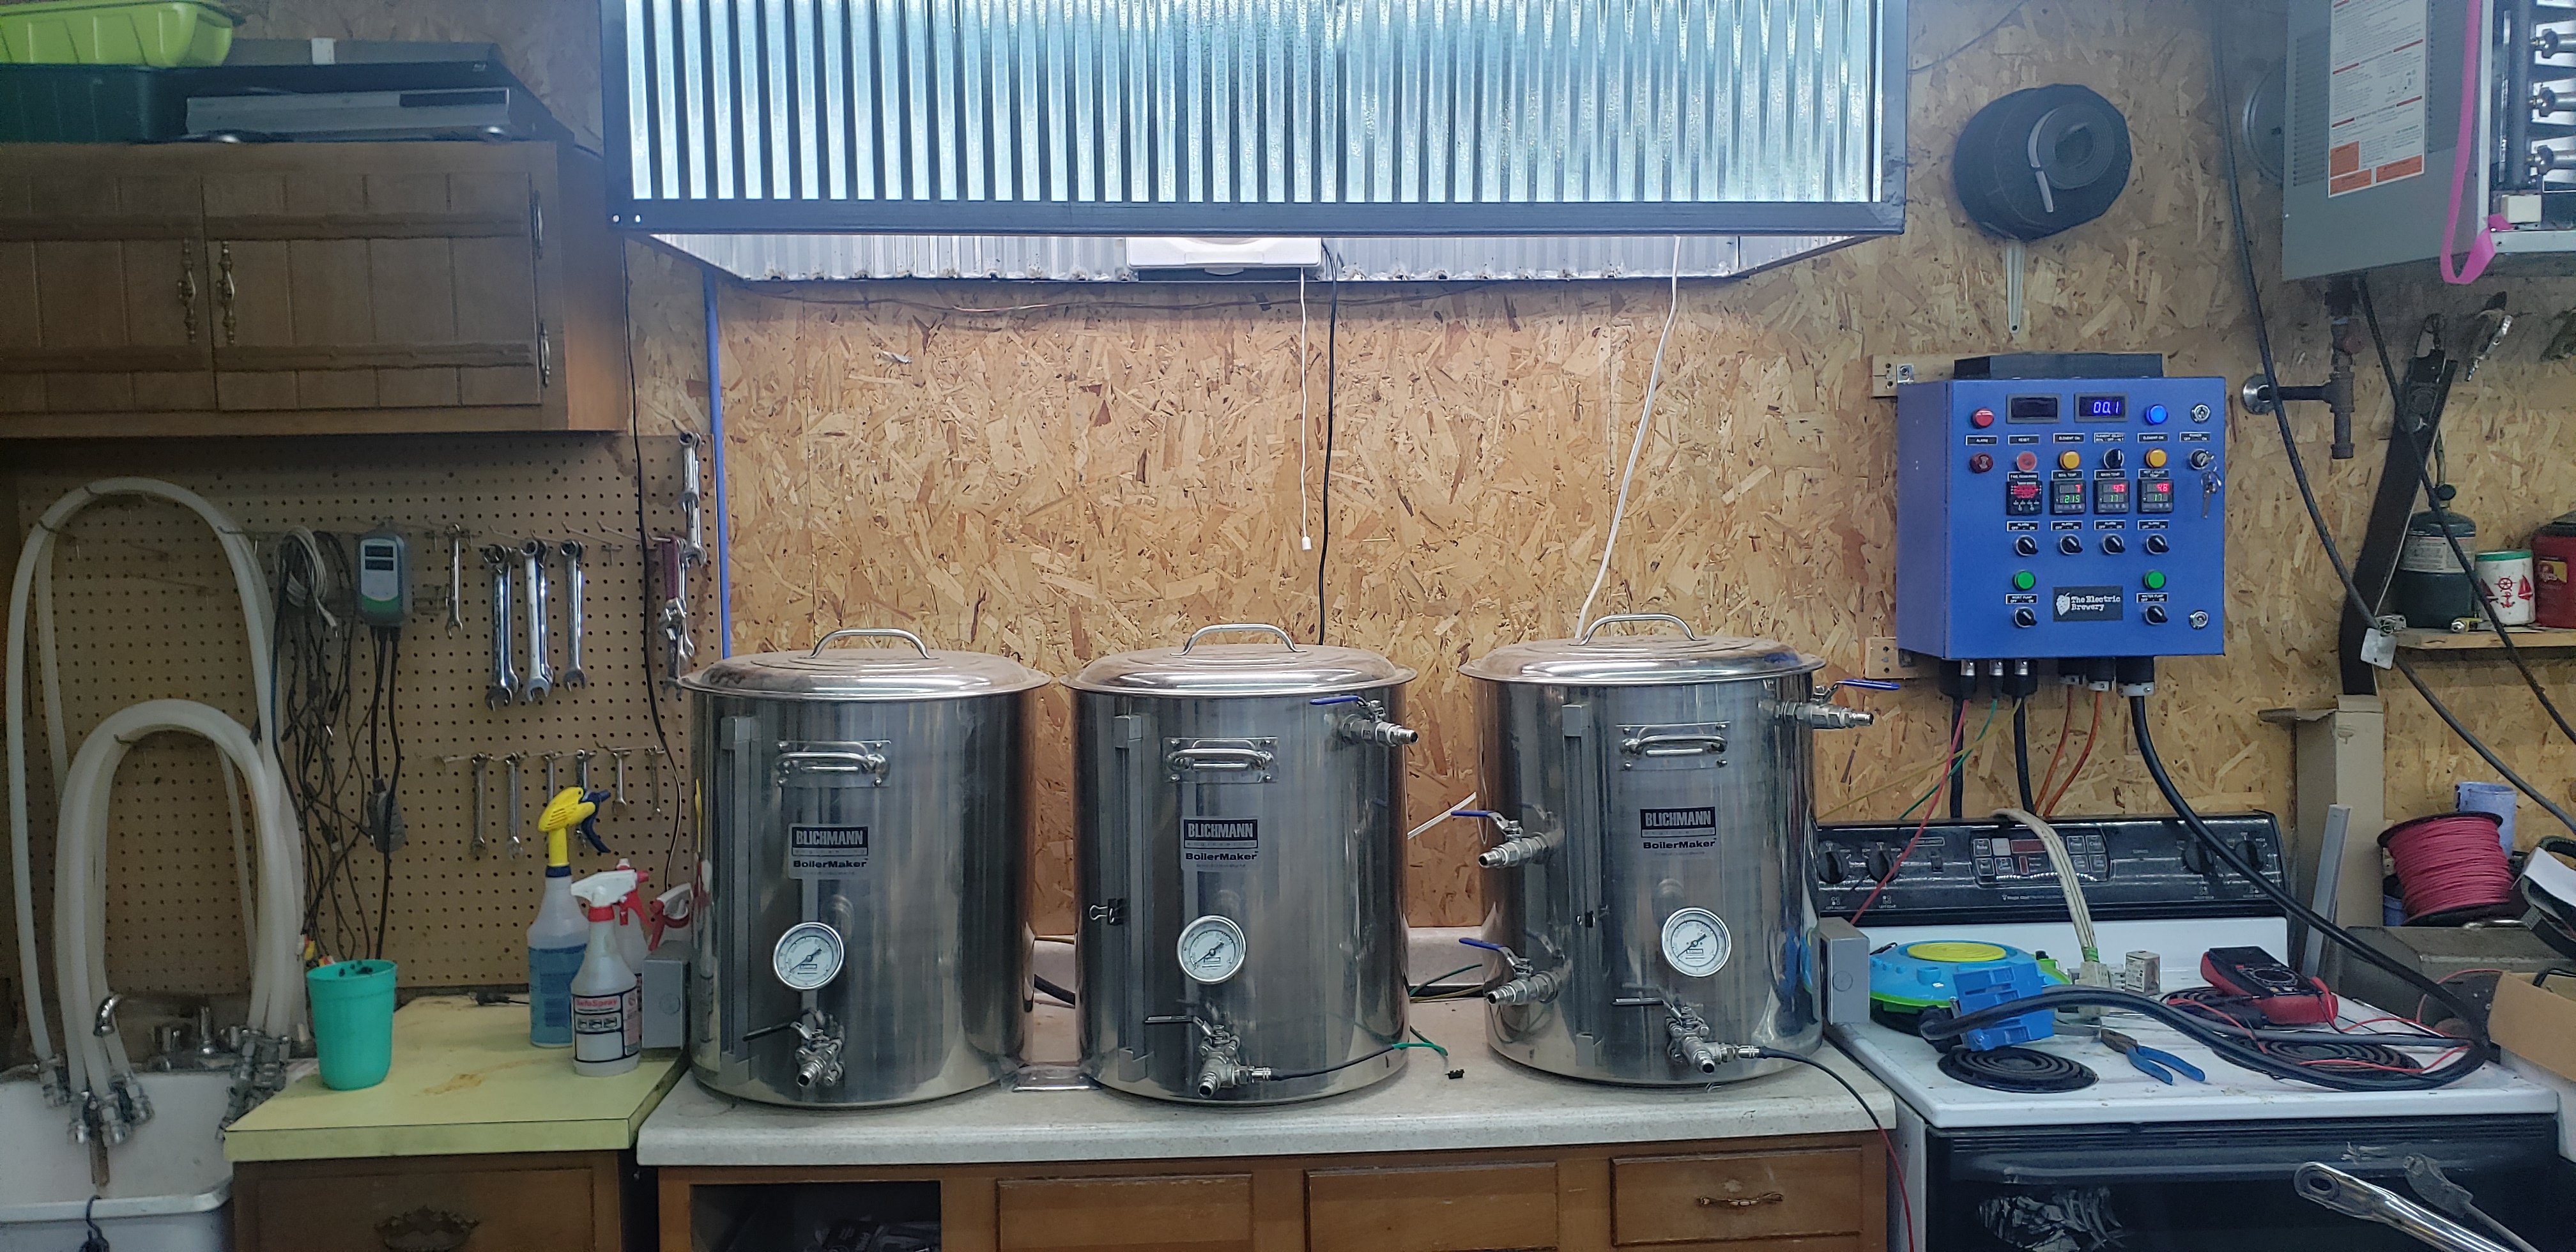
On his profile, @Scout has an older picture of his system, which looks to be a 3 vessel (Blichmanns) EHERMS with a 50 amp panel. They all have lids. Sometimes people use a bag in the mash tun for easier cleaning but I'd be real surprised if it doesn't have a false bottom in it already. Throwing a bag into the HLT with the HERMS coil would be messy to clean. Looks like there are two multimeters at the top which is why I believe it is a 50 amp. I can't quite tell but I think his BK is at least 20 gallons. If it is and the system is 50 amps, he could brew two 15 gallon batches back to back in a brew day, or at least 2 tens. Given he's new to all grain brewing, it seems to me it would make more sense to brew some batches using his system as it is designed.

I'd suggest a quick dry run to determine your hose layouts, making sure your pumps can reach all the ports properly and that you have the fittings and quick disconnects that you want. I can't tell if you have a whirlpool port on the BK, but if so, consider that tubing too. Also, the tubing to and from your plate chiller.

Regarding the plate chiller, I have bought these Garden Hose quick disconnects twice. The first time they only had five pieces and I needed another pair so I bought the newer 6 piece set. They are handy to attach a spray wand for cleanup, another useful item. I liked the first set a lot and had no problems with it and I hope the quality is still good. You can use these on your Therminator. Around a 15 minute hop addition is when I start to set up for chilling and sometimes I don't have enough time like I need to sanitize a fermenter or something pops up. Saves having to screw the connections on and off plus I can swap in my sprayer to begin cleanup.

A hop spider can be something like a cylindrical mesh or it can be a three spoked ring. The spoked version needs a mesh bag. I've used both, I find the cylindrical one useful, mine's 6" diameter and fits my mash paddle nicely which I use to stir the hops. Either spider is helpful because any bits will get into the Therminator and will need flushing. Your false bottom may work better than mine, but I vorlauf before sparging to keep the bits to a minimum. You could just use a mesh bag without the spoked spider if you wanted to wait. You will get tired of that after burning your fingers fishing it out with multiple hop additions.

Note also that the inline oxygen tee I mentioned is attached by a SS union for ease of cleaning if that was something you were interested in at some point. It's not always easy to find stainless steel fittings locally. You may want a street 90 or two or three for your pumps, they help to prevent kinks in silicone tubing.
I was sure to include a caveat that it was an assumption. People assume it will be BIAB because it’s the cheapest and easiest entry into all grain brewing.
 
Going from extract to all grain
All grain does not automatically mean BIAB. Most of your suggestions are fine anyway but I am wondering why people are assuming this.

Going from extract to all grain leaves one with plenty to think about without adding the complexity of a new 3 tier system at the same time. Use a bag and one pot, make beer. See what goes wrong. Use bag again, make beer, correct what went wrong the first time, learn other things that can go wrong. Along about batch 4 or 5 one could use more of the system. The learning curve for all grain is steep enough, don't make it go straight up!
 
Going from extract to all grain leaves one with plenty to think about without adding the complexity of a new 3 tier system at the same time. Use a bag and one pot, make beer. See what goes wrong. Use bag again, make beer, correct what went wrong the first time, learn other things that can go wrong. Along about batch 4 or 5 one could use more of the system. The learning curve for all grain is steep enough, don't make it go straight up!
I was simply making recommendations for the system he owns (3 vessels, 2 pumps, 1 tier) and not trying to push any philosophy about it. I have the same system practically but keggles not pots. A fair assumption is that the buyer is intending to brew in the manner the equipment is designed for. In fact, it is more confusing to try to brew three recipes at once as you suggested on a system designed for a different process than to brew one recipe the way the system is designed.

Flip the situation around. If someone had a BIAB system and was asking the same question, it would be kind of pushy to suggest they need to buy a HLT, MT, and some pumps because it will be more efficient plus easier on your back and why learn the process differently than the "better" way. There are different ways to brew beer and I am not trying to push one here because the OP didn't ask that.
 
In fact, it is more confusing to try to brew three recipes at once as you suggested on a system designed for a different process than to brew one recipe the way the system is designed.
I guess you didn't see my tongue in cheek when I posted that but BIAB is so simple that by the second or third brew it could be done. Heat water while milling grains, put the bag in and stir in the grains. Heat water in the second pot while milling grains. Repeat. The mash period could be 30, 60, or 90 minutes. Pull the bag and let it drain while heating the water to a boil, one pot at a time.
 
I guess you didn't see my tongue in cheek when I posted that but BIAB is so simple that by the second or third brew it could be done. Heat water while milling grains, put the bag in and stir in the grains. Heat water in the second pot while milling grains. Repeat. The mash period could be 30, 60, or 90 minutes. Pull the bag and let it drain while heating the water to a boil, one pot at a time.
Tongue in cheek may have been the first time but you doubled down on it in post #17 then went on to selectively quote my post and not answer point I raised while you continue trying to promote BIAB. It wasn't the OP's question in the first place, which is mainly my point, there's an agenda on your part, but since you keep saying how easy it is these instructions pop up relatively right away when searching.
From step #1
Here’s a general rule of thumb for water volume using The Brew Bag®. An average five gallon batch grain bill (total amount of grain to be used) with pre-boil gravity of 1.035 will call for ten pounds of grain. Each pound of grain will absorb approximately 15 ounces of water. You'll squeeze the bag of grain to regain about 8 ounces, so you'll toss about 7 ounces with with the spent grain, so it’s a loss of volume.

A five gallon batch calls for 5.25 gallons into the fermenter which equals 672 ounces

Over a sixty-minute boil, based on a number of factors, evaporation will be ten to twenty percent, but you’ll also lose water volume to evaporation heating up and cooling down, so it’s a bit more than that. Trub (proteins and other matter) loss in the kettle, plus in the fermenter will be two to four quarts. So added to the fermenter volume, that’s roughly 7.5 gallons of water. The rule of thumb is: add 8.25 gallons of water to your kettle for an average (OG - 1.035-1.050) five gallon batch. The extra water 3 quarts compared to the chart below is to compensate for the differences in water surface area (which affects evaporation) for all the different kettles used, and trub loss variations, both in the kettle and the fermenter.
I'm not saying this is complicated, but it's a lot different than the way you are portraying BIAB. Seems like it has its own set of procedures and calculations. Essentially though, as far as concepts, isn't BIAB a no sparge all grain method? That would mean you have to understand the rest. There are differences in the mechanics too, pros and cons to the methods of course. @Scout seems mechanically inclined, he built a nice hood for instance, works with power tools, I have faith in his abilities to operate the pumps and panel. If he was asking, this part of the thread would be more germane but he already has faith in himself he bought the system already. We could suggest he use that pot to extract brew and extol the ease of doing so too but I won't suggest a can opener.
 
General rule of thumb can be discarded. For 10 pounds of grain I expect an OG of nearer double what is mentioned. Evaporation is a fixed number, not a percentage. I expect to boil off about half a gallon on a 5 gallon batch. There are so many generalizations in that list. They don't fit what I do and do regularly. I'm glad I didn't find those instructions when I started. Even his table that shows the temperature ranges of enzyme activity is wrong.
 
On his profile, @Scout has an older picture of his system, which looks to be a 3 vessel (Blichmanns) EHERMS with a 50 amp panel. They all have lids. Sometimes people use a bag in the mash tun for easier cleaning but I'd be real surprised if it doesn't have a false bottom in it already. Throwing a bag into the HLT with the HERMS coil would be messy to clean. Looks like there are two multimeters at the top which is why I believe it is a 50 amp. I can't quite tell but I think his BK is at least 20 gallons.
Yes, Blichman 20g pots with a 30 amp Electric Brewery panel. One meter is for volts and the other is for amps. It wouldn't be hard to convert to 50 amps and run both elements, but I'd have to check the wiring could handle it.

I'd suggest a quick dry run to determine your hose layouts, making sure your pumps can reach all the ports properly and that you have the fittings and quick disconnects that you want. I can't tell if you have a whirlpool port on the BK, but if so, consider that tubing too. Also, the tubing to and from your plate chiller.
done some dry runs to check my layout, done some wet runs to check for leaks and found the hoses were only hand tight. The only thing I havent checked is whether or not I have enough ventilation.

Regarding the plate chiller, I have bought these Garden Hose quick disconnects twice. The first time they only had five pieces and I needed another pair so I bought the newer 6 piece set. They are handy to attach a spray wand for cleanup, another useful item. I liked the first set a lot and had no problems with it and I hope the quality is still good. You can use these on your Therminator.
i dont know of i have room for those on the water in port. The wort out port has a T with a thermometer and its already tight for the silicon hose I use. Its a good idea though, I'll keep it in mind.

Either spider is helpful because any bits will get into the Therminator
Are you talking about using it during the boil? I figured the mesh screen would take care of that, but I can see your point.
It's not always easy to find stainless steel fittings locally. You may want a street 90 or two or three for your pumps, they help to prevent kinks in silicone tubing.
I had 90°s on the pump outlets, but took them off for some reason I dont remember. There's only one hose that kinks, and I've got a place to set it so it doesn't.

I should post a current picture of the setup with the hood and lights installed.
20220323_082533.jpg
 
Last edited:
Looks like you can afford a really good pH meter and a whisk! I'm thinking a bag in the tun would be easier to clean, and Bobby M has the wire mesh screen on legs for a better recirc.
 
@Scout Looks like you have already figured out the water lines for the Therminator if those two long hoses are for that. If you decide to reconfigure for some reason, notice in my picture above there's a union and tee on mine so it is possible although not 100% because you mentioned a thermometer.

Regarding the hop spider, I don't know what you mean by mesh screen? Do you have a mesh screen on your BK out valve perhaps or something else at the bottom? I just have a pickup tube on my BK out so I would put my hops either in a bag attached to the spoked spider or in the mesh hop spider. Something to keep hop bits out of the therminator is a good idea. I ended up preferring the mesh one because when I am done brewing, I pump PBW from the BK through the Therminator and HERMS coil and return it back to the BK through the hop spider. I back flush the Therminator separately first. It's a small amount really, hence "bits".

Ah that's a closer pic of the panel. Mine's a little more bare bones, just 2 PIDs and a boil controller, no timer, a multimeter instead of the amps and volts. The box is smaller. I bought it half finished, it was already laid out but I had to wire it. Couldn't tell you how involved it might be to upgrade it. Looking at their site however, the 30 and 50 amp panels are only slightly different in the second row. They add in a dial so that the power is on/off for the HLT and BK separately vs the dial for power to be one of off, HLT, or BK. That's a $400 difference on the pre-assembled 30 and 50 amp panels but only $100 on the DIYs. I guess drilling that extra hole really pisses them off! The box is the same size though.

Looks like you are ready to go and any little changes you can make as needed. I'll make this post even longer with a tip and throw in a relatable story to boot! You want to make sure your PIDs are calibrated and that's where the instant read thermometer is real helpful. I can barely make out the reflection but it looks like you have the adjustable nut on the back of your dial thermometers, calibrate those too. Your HLT PID could be calibrated by boiling water and then checking to see the actual temp that water boils at your elevation. I can't say that's the best way or not. I suggest using however a calibrated instant read instead. The bigger tip I am offering is that you always make sure you are recirculating the water in the HLT when reading the temperature. Your temp probe, like mine, is on the outflow of the HLT. Like you, I built a hood, which I recently completed. I wanted to recalibrate my PID against my new thermometer and also test my new inline fan. I set the PID to mash temp (I think it was 152). I turned my 6" Cloudline to low (2 or maybe 4 out of 8). I put the water in the HLT and that's when I got called to dinner. I returned from dinner and the glass on the door to the garage was steamed over! The hood was a wet mess! I am pretty sure the water was boiling. I hadn't gotten to connecting the HLT to the pump. I wasn't brewing so I didn't think of it, but even brewing, about 1 out of 4 times I'll fill the HLT, forget to connect the pump, and go mill grain maybe grab something to eat, only to come back to an overshoot on the strike temp. Point is, the temp probe is on the outflow and can be grossly off if not recirculating.

You can't calibrate your MT temp directly to the HLT temp because there will be a temperature differential, your mash tun loses heat and the heat source is in the HLT. It's equipment driven. If you keep the room environment stable, once you know the differential, it may be relatively constant and you can account for that in your PID settings. This is another place where the instant read is useful, you can calibrate the MT PID and dial thermometer to it. My apologies in advance if you knew most of that.
 
@Scout

Regarding the hop spider, I don't know what you mean by mesh screen? Do you have a mesh screen on your BK out valve perhaps or something else at the bottom? I just have a pickup tube on my BK out so I would put my hops either in a bag attached to the spoked spider or in the mesh hop spider. Something to keep hop bits out of the therminator is a good idea. I ended up preferring the mesh one because when I am done brewing, I pump PBW from the BK through the Therminator and HERMS coil and return it back to the BK through the hop spider. I back flush the Therminator separately first. It's a small amount really, hence "bits".
Here's a picture of the inside of the bk and the screen i was talking about. Yeah thats rust, these kettles were assembled before stainless elements were available, so I'll have to swap those out.

Ah that's a closer pic of the panel. Mine's a little more bare bones, just 2 PIDs and a boil controller, no timer, a multimeter instead of the amps and volts. The box is smaller. I bought it half finished, it was already laid out but I had to wire it. Couldn't tell you how involved it might be to upgrade it. Looking at their site however, the 30 and 50 amp panels are only slightly different in the second row. They add in a dial so that the power is on/off for the HLT and BK separately vs the dial for power to be one of off, HLT, or BK. That's a $400 difference on the pre-assembled 30 and 50 amp panels but only $100 on the DIYs. I guess drilling that extra hole really pisses them off! The box is the same size though.
I had to assemble my panel. Im sure if I wanted to upgrade to 50a I could replace the yellow indicator lights with lighted switches and avoid drilling another hole.

Looks like you are ready to go and any little changes you can make as needed. I'll make this post even longer... Point is, the temp probe is on the outflow and can be grossly off if not recirculating.

You can't calibrate your MT temp directly to the HLT temp because there will be a temperature differential, your mash tun loses heat and the heat source is in the HLT. It's equipment driven. If you keep the room environment stable, once you know the differential, it may be relatively constant and you can account for that in your PID settings. This is another place where the instant read is useful, you can calibrate the MT PID and dial thermometer to it. My apologies in advance if you knew most of that.
Good point about circulating.
I think Kal on his website says something about having the HLT warmer than the MT due to heat losses.

The last time I brewed was at my old house on a half ass single vessel electric system and I had so much water vapor it was condensing on the ceiling and dripping back down onto the counter, even though I had both garage doors and the window open. I understand how much it can build up without a fan.
 

Attachments

  • 20220323_155830.jpg
    20220323_155830.jpg
    1.5 MB · Views: 13
Ok I've seen a bottom strainer like that. That's probably better actually because it wouldn't interfere with whirlpooling. I can whirlpool decently (hops) but it does sit towards the side as it fits in the crook of my element so it is slowed down but the stream is directed into it. It does go round but suspect I would need to remove it to whirlpool the trub to the middle. I never want to wait the 20 minutes though. A plus to the mesh spider is that if you want to whirlpool hops, you can dump your bittering hops out easily. You could do that with a mesh bag though if your recipe called for it. My mesh spider may be a little finer(?) but on the bottom that might clog. You'd get a fuller hop utilization without the spider from what other people have reported. If I brew something and it's not hoppy enough I tweak the recipe a little next time. Pros and cons but that will definitely keep bits out.

Good idea on not needing another hole if you decided to upgrade. I can wire these things and put the parts together but I have to constantly reread to retain what it is each component is doing and how it all goes together. I'm like a kindergardner trying to read when it comes to wiring diagrams. I can sound it out!
 
Should you need any help with what is required to upgrade your panel, let me know. I have designed multiple variations of electric brew control panels. You can find them scattered throughout the "Electric Brewing" forum, or if you are looking for something specific, ask me and I'll send a copy if I have something similar.

Brew on :mug:
 
You should consider if you need to use the KISS principle. You'll have quite a few things happen you never thought of. The simpler and more basic you keep everything the less frustrated you will be on your first few brew days with all grain.
Too late for that, the OP's got a 3 vessel system using pumps and a bunch of other stuff. No way KISS will ever apply to that rig.
But back to the OP's question, since your LHBS is 90 minutes away, you should get a simple scale, a 2 roller mill and grain in bulk if you can, or 10 lb lots from More Beer. With current gas prices and the time savings, you'll get your $ back on those items quickly. Some plastic buckets to store your grain and you're almost there. As someone already noted, a BIAB bag in your mash tun can solve a bunch of problems and make clean up faster, yeah you need a mash paddle. I've been brewing for years without a PH meter, but get one if you are going to brew often.
 
Too late for that, the OP's got a 3 vessel system using pumps and a bunch of other stuff. No way KISS will ever apply to that rig.
But back to the OP's question, since your LHBS is 90 minutes away, you should get a simple scale, a 2 roller mill and grain in bulk if you can, or 10 lb lots from More Beer. I've been brewing for years without a PH meter, but get one if you are going to brew often.
I've been wondering where o order grain hops and yeast from, I dont mind the drive (road trip) but if I'm going im goingnto spend a lot. I just don't know how often I'm going to brew yet. Before I moved, I only had two cases of bottles and couldn't brew until they were empty. I dont know how many cases I have now, plus 7 kegs and a 4 tap keezer. (One tap and keg are devoted to water)
 
Check with your LHBS first and see if they'll sell you whole sacks and at what price, then buy your specialty malts in 10 lb lots from More Beer. I hunt around for hops on sale by the pound, there are many suppliers.
 
I've been wondering where o order grain hops and yeast from, I dont mind the drive (road trip) but if I'm going im goingnto spend a lot. I just don't know how often I'm going to brew yet. Before I moved, I only had two cases of bottles and couldn't brew until they were empty. I dont know how many cases I have now, plus 7 kegs and a 4 tap keezer. (One tap and keg are devoted to water)

I get most of my ingredients from morebeer, they have plenty of brew accessories too, if one wants a mostly one stop shop. If one needs advice getting set up with major gear and want to buy, maybe try Bobby_M, a vendor on this forum.

More fun to shop in person, but if you have to drive a long way, or maybe take a boat & then drive, perhaps call ahead & make sure they got what you want.
 
I've been wondering where o order grain hops and yeast from [...]
Do you have a (semi) local homebrew store? If so, ask for pricing, per pound and if they sell per sack, get prices on those too.
Pricing on malt/grain has gone up the past few months to a year, so be prepared for some sticker shock right now.

For reference, at our group grain buy, the last one 3 years ago (damn, time flies!), we would pay $50-65 per sack of regular base malts, Briess, Rahr, Weyermann, etc. British malts, such as Golden Promise or Maris Otter, $5-10 more.

I'd start with 5 gallon batches. At least until you get used to your system and AG brewing. You may use a "simplified sub-system," not using all 3 vessels until you brew larger batches. Batch sparging is fast, easy and there's no sin doing that.

You'll use around 12 pounds of malt/grain for a 5-5.5 gallon batch of around 1.060.
For most ales 60-80% or more, will be some base malt or a mix of base malts. The rest adjuncts, crystal/caramel/specialty malts, and/or dark malts depending on what style you're brewing.
A 50# or 55# sack of base malt would be enough for 5-8 5-gallon batches.

So get at least 1 or 2 sacks of base malts. The farther you need to drive the more you want to buy per trip.

You also need hops. Bulk hops, e.g., HopsDirect or Yakima Valley Hops. Best if they have some sale going on. There are others.

And you need yeast.
 
You also need hops. Bulk hops, e.g., HopsDirect or Yakima Valley Hops. Best if they have some sale going on. There are others.

This is how you end up with a "hops freezer" with 35-50 lbs of hops that you "Hope to get through".. You see you favorite hops on sale for ~$11.99/lb, and say to yourself "That's a great deal, I should order 2 or 3 to mitigate shipping". On that note, another "upgrade" that isn't super expensive is a vacuum sealer for re-packaging bulk hops.
 
I just don't know how often I'm going to brew yet.
I've been wondering where o order grain hops and yeast from
Do an order online for what you think you will need in the next 2-3 weeks. After you have brewed a few batches you will have a better idea of how often you will brew and can then decide if bulk hops and yeast are for you. My thought are that if I happen to pass by the 90 mile away LHBS, I can buy a few hops and packets of dry yeast and some base malts because the cost of shipping base malts gets expensive where I live. After that I will order hops and yeasts online as I need them.
 
Back
Top