You are using an out of date browser. It may not display this or other websites correctly.
You should upgrade or use an alternative browser.
You should upgrade or use an alternative browser.
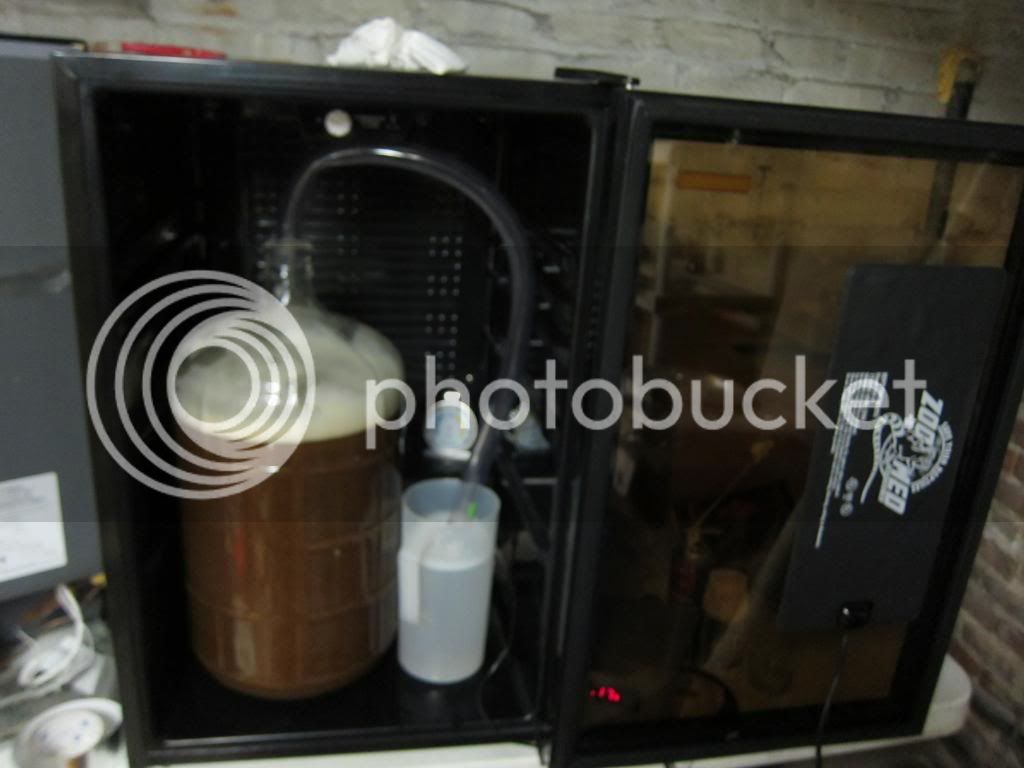
Vissani Fermentation Chamber
- Thread starter ingchr1
- Start date

Help Support Homebrew Talk:
This site may earn a commission from merchant affiliate
links, including eBay, Amazon, and others.
Thunder1
Member
What are you using for your heat source? I need to figure out the best/easiest thing to use.
BobTheFourth
Well-Known Member
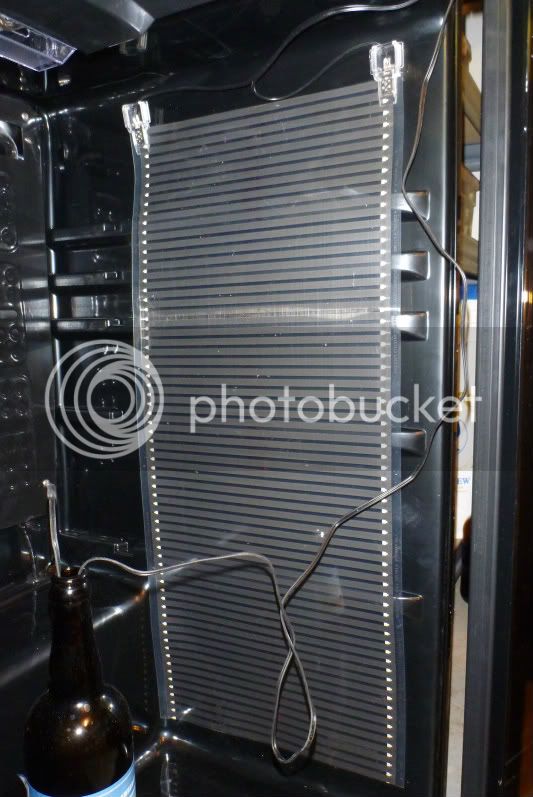
It looks like he's using a reptile heat pad, stuck on the door. I'm not sure what the wattage is, but I'd think that might work better if it were attached to one of the inside walls instead - they are probably better insulated. Even the floor would probably be better, as you'd have direct contact with the carboy then.
I'm pretty happy with my 150W heat cable (also intended for reptile cage use). Its ugly, but its had no trouble maintaining a 30-degree differential (55-85F, who says you can't make a saison in the winter?). I attached it with gorilla tape, which mostly is holding up against the heat, but some sections loosen up periodically and need to be re-taped.
I'm pretty happy with my 150W heat cable (also intended for reptile cage use). Its ugly, but its had no trouble maintaining a 30-degree differential (55-85F, who says you can't make a saison in the winter?). I attached it with gorilla tape, which mostly is holding up against the heat, but some sections loosen up periodically and need to be re-taped.
very nice. I built one of these into some cabinets when I remodeled my kithen/dinning room, it isn't the wine cooler but the beverage cooler with shelves in it. I only use it for cans and bottles of beer but it works great. was planning on installing my keezer next to it but it's a little taller than my countertop so looks like I will just be putting it in the three season room when finished.
Great build.
Great build.
Lumpyyyyy
Well-Known Member
yeah it's only 25 watts. It's only supposed to attach to glass. Don't know what to do
Buy a more powerful one would be my advice.


$53.24
1pc Hose Barb/MFL 1.5" Tri Clamp to Ball Lock Post Liquid Gas Homebrew Kegging Fermentation Parts Brewer Hardware SUS304(Gas MFL)
Guangshui Weilu You Trading Co., Ltd

$10.99 ($31.16 / Ounce)
Hornindal Kveik Yeast for Homebrewing - Mead, Cider, Wine, Beer - 10g Packet - Saccharomyces Cerevisiae - Sold by Shadowhive.com
Shadowhive


$33.95
Five Star - 6022b_ - Star San - 32 Ounce - High Foaming Sanitizer
Bridgeview Beer and Wine Supply


$33.99 ($17.00 / Count)
$41.99 ($21.00 / Count)
2 Pack 1 Gallon Large Fermentation Jars with 3 Airlocks and 2 SCREW Lids(100% Airtight Heavy Duty Lid w Silicone) - Wide Mouth Glass Jars w Scale Mark - Pickle Jars for Sauerkraut, Sourdough Starter
Qianfenie Direct


$20.94
$29.99
The Brew Your Own Big Book of Clone Recipes: Featuring 300 Homebrew Recipes from Your Favorite Breweries
Amazon.com


$53.24
1pc Hose Barb/MFL 1.5" Tri Clamp to Ball Lock Post Liquid Gas Homebrew Kegging Fermentation Parts Brewer Hardware SUS304(Liquid Hose Barb)
yunchengshiyanhuqucuichendianzishangwuyouxiangongsi


$22.00 ($623.23 / Ounce)
AMZLMPKNTW Ball Lock Sample Faucet 30cm Reinforced Silicone Hose Secondary Fermentation Homebrew Kegging joyful
无为中南商贸有限公司

$58.16
HUIZHUGS Brewing Equipment Keg Ball Lock Faucet 30cm Reinforced Silicone Hose Secondary Fermentation Homebrew Kegging Brewing Equipment
xiangshuizhenzhanglingfengshop


$39.22 ($39.22 / Count)
Brewer's Best Home Brew Beer Ingredient Kit - 5 Gallon (Mexican Cerveza)
Amazon.com


$7.79 ($7.79 / Count)
Craft A Brew - LalBrew Voss™ - Kveik Ale Yeast - For Craft Lagers - Ingredients for Home Brewing - Beer Making Supplies - (1 Pack)
Craft a Brew


$176.97
1pc Commercial Keg Manifold 2" Tri Clamp,Ball Lock Tapping Head,Pressure Gauge/Adjustable PRV for Kegging,Fermentation Control
hanhanbaihuoxiaoshoudian


![Craft A Brew - Safale BE-256 Yeast - Fermentis - Belgian Ale Dry Yeast - For Belgian & Strong Ales - Ingredients for Home Brewing - Beer Making Supplies - [3 Pack]](https://m.media-amazon.com/images/I/51bcKEwQmWL._SL500_.jpg)


Carlscan26
Well-Known Member
Daver77 said:yeah it's only 25 watts. It's only supposed to attach to glass. Don't know what to do
At 25 watts on a plastic fermenter full of liquid it should be fine. I have a 45 watt warmer and have had no problems. It wraps around 80% of the carboy and is about 10 or 12" wide so it's also very low heat per sq inch.
Lumpyyyyy
Well-Known Member
At 25 watts on a plastic fermenter full of liquid it should be fine. I have a 45 watt warmer and have had no problems. It wraps around 80% of the carboy and is about 10 or 12" wide so it's also very low heat per sq inch.
He doesn't have it attached to the carboy, it's on the door of the refrigerator.
Carlscan26
Well-Known Member
Lumpyyyyy said:He doesn't have it attached to the carboy, it's on the door of the refrigerator.
Right. I was trying to reference his comment that it says to mount on glass and I was trying to say that it could be put on the carboy directly. Sorry that wasn't clear.
I also agree with you that he should get a bigger warmer too.
OP
OP
ingchr1
Well-Known Member
yeah it's only 25 watts. It's only supposed to attach to glass. Don't know what to do
The one I'm using is about double that wattage. It's attached to the wall of the fridge and I have not had problems maintaining temps.
divrguy
Well-Known Member
- Joined
- Dec 19, 2011
- Messages
- 1,250
- Reaction score
- 99
ingchr1 said:The one I'm using is about double that wattage. It's attached to the wall of the fridge and I have not had problems maintaining temps.
You should wrap it around the Carboy with electrical tape. I have flexwatt heat tape and that's the best bang for your buck
OP
OP
ingchr1
Well-Known Member
That's what I have, the flexwatt, and with it being on the wall I never have to move it from fermenter to fermenter. Never had a problem maintaining temps in my 45F garage.You should wrap it around the Carboy with electrical tape. I have flexwatt heat tape and that's the best bang for your buck
Smiling-Poodle-Brewery
Member
- Joined
- Nov 23, 2012
- Messages
- 13
- Reaction score
- 0
For a heat source I have used wet/dry heating pads wrapped around the carboy and held in place with elastic bands for years. Like this. My shop gets below freezing in winter and I find that set on low, the heating pads have no trouble keeping wort at ale temps in the cooler.
Also one thing it took me a while to figure out is that when you direct wire the compressor to be controlled by an external controller, you are disableing the internal thermostat. So there is no need to put it on any setting because it doesn't work anymore.
If you want the light to be functional, you can splice the power wire into the compressor power wire and the light circuit. Just be sure to cap the wire that is left that you cut to the compressor to make the splice because it will be hot when the internal thermostat calls for cooling. Of course the light will work only when the compressor is on. I have three different wine coolers and the wiring colors are different for all three, so you will have to look at the wiring diagram on the back of the cooler to decide where your wires need to be cut/spliced.
Last edited by a moderator:
Loodachris
12th man loud and proud!
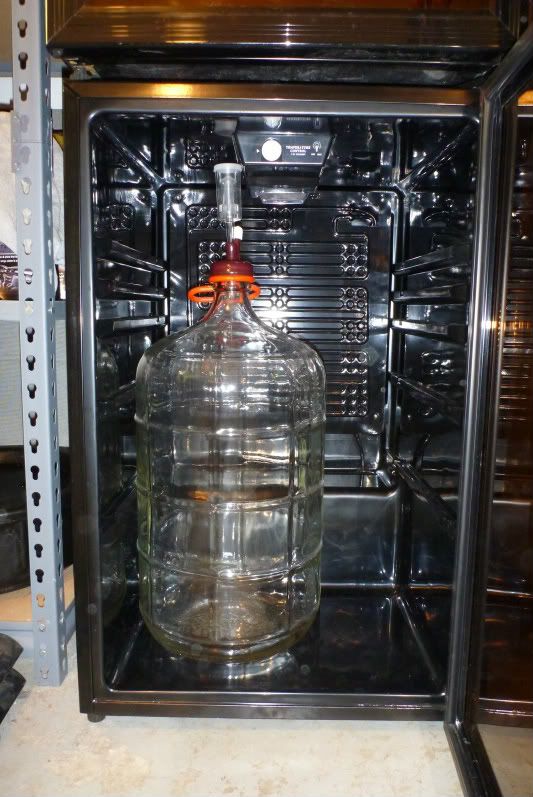
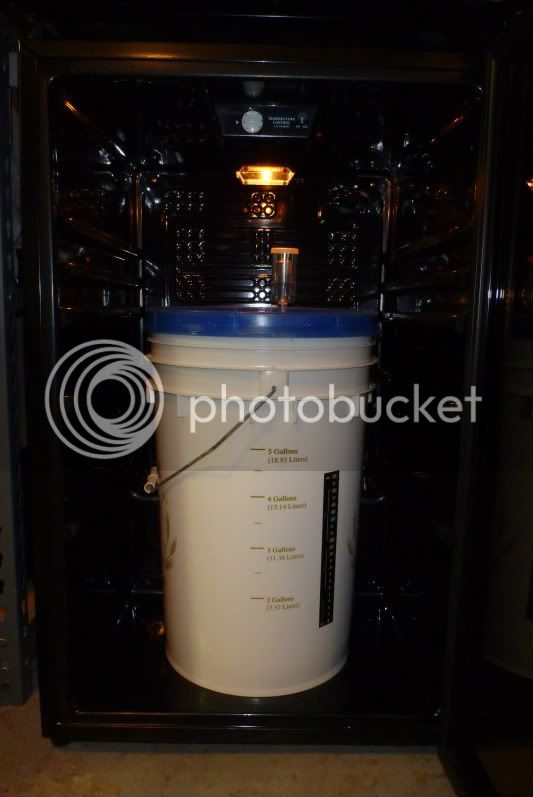
So this fridge will hold a 6.5 gallon glass carboy with a 3 piece air lock on it? Looking into either this or a 4.3cf mini fridge for a build real soon
OP
OP
ingchr1
Well-Known Member
It should, here is a 6 gallon carboy:So this fridge will hold a 6.5 gallon glass carboy with a 3 piece air lock on it? Looking into either this or a 4.3cf mini fridge for a build real soon
and bucket:
Loodachris
12th man loud and proud!
I'll keep looking for a used one on craigslist. Has anyone looked at the Danby cooler like this one here to see if it would work?
http://seattle.craigslist.org/tac/app/3559720539.html
It's the only thing I could find used that comes close.
http://seattle.craigslist.org/tac/app/3559720539.html
It's the only thing I could find used that comes close.
kluge9
Well-Known Member
Just picked one of these up today. Still at $118 like everyone recently has posted (and like others, said sold out online and not sold in my store but stopped in anyway). Got another 10% off for military. $112 out the door
BobTheFourth
Well-Known Member
$118? Can you link that on Home Depot's site? I'm still seeing $199, which is the typical price. I'd pick up a second one for $118, no question.
kluge9
Well-Known Member
Neg. The sticker on mine says they reduced to $147 back in October and its now 20% off clearance appliances. HD's website says they're not sold near me but just stop in at your local store and check clearance area
Loodachris
12th man loud and proud!
Stopped by my Home Depot a little bit ago and it's still at $199.99 Figured I would get lucky but guess not.
Saw this thread and checked my HD while I was there buying some blow off tubing, they had one left for $118. Never been so excited to purchase an appliance before... Thanks for posting!!!
FYI---no plans to mod since I'm in FL and don't need to heat, just gonna test what temps each setting the thermostat will cool it to. If anybody has this info already, could you please post? Thanks!
FYI---no plans to mod since I'm in FL and don't need to heat, just gonna test what temps each setting the thermostat will cool it to. If anybody has this info already, could you please post? Thanks!
Picked one up today for 149 in St Louis Park MN. They have 2 left.
I just successfully adjusted the thermostat on this fridge. I didnt really want to cut any wires to bypass the thermostat so I went this route. Now I can lager and crash cool with no problem. Please note that I'm also using an external temp controller to achieve exact temps. I only did this so I could get the fridge to lower temps. I've never tried to attach pics so I apologize if this doenst come out.
The first pic shows a small hole that contains the only screw you need to remove to open the thermostat.
once the screw is removed, carefully swing the front of the unit down and it will open up.
once you have the thermostat open you can get to the temp adjustment screw (4th pic) on the left side you can see the head of the screw and in the little window you can see the tension spring. This part took a little trial and error but I found that the more you compress the spring the colder your fridge will get. I just used a small needle nose pliers to adjust the screw.
In the last pic (which isnt very clear) you can see my thermometer. Its sitting in a glass of water and it read 36F. at this point the fridges manual temp control dial was set at "6". I realize this is colder than I will need to go but with my dual stage temp control this should work out just fine.

kluge9
Well-Known Member
Finally got around to plugging mine in (still waiting on STC-1000 and figuring out what I'm going to be doing for heat) but I did the temperature screw adjustment laid out above. You need to twist the screw counter-clockwise to tighten the spring and just sticking in both a dial and mercury thermometer (no water bottle) they read 18*. And that was only after being turned on for about 45 minutes at level 7. Good tip jborgy!!
") it's missing the front feet but otherwise in good condition.
it's missing the front feet but otherwise in good condition. 
Finally got around to plugging mine in (still waiting on STC-1000 and figuring out what I'm going to be doing for heat) but I did the temperature screw adjustment laid out above. You need to twist the screw counter-clockwise to tighten the spring and just sticking in both a dial and mercury thermometer (no water bottle) they read 18*. And that was only after being turned on for about 45 minutes at level 7. Good tip jborgy!!
Thanks but I cant take all the credit. I "borrowed" the idea from another thread about chest freezers.
Is anyone using a 10amp inline fuse on their main power coming into the box? When the Vissani kicks on it blows the 10amp fuse every time. I used this wiring diagram,http://www.bootknockerbrewing.com/, putting the fuse exactly where it is in the diagram even though the site says he ended up putting it somewhere else.
I have read that the stc-1000 can take up to 15amps but before I go up to a 15amp inline fuse I thought i would check what others are doing.
Any ideas?
I have read that the stc-1000 can take up to 15amps but before I go up to a 15amp inline fuse I thought i would check what others are doing.
Any ideas?
OP
OP
ingchr1
Well-Known Member
I am not using any additional circuit protection in my setup.
The startup current of the compressor is causing your fuse to blow. I doubt the running current of the fridge is anywhere near 10A, it's probably only a couple of amps and should be indicated on the lable on the back of the unit. You just need to find a 10A fuse that is coordinated with the startup current of the compressor. Fuses are designed with different characteristics depending upon the application you want to us it in. Some will open right away and some will open after a delay.
The startup current of the compressor is causing your fuse to blow. I doubt the running current of the fridge is anywhere near 10A, it's probably only a couple of amps and should be indicated on the lable on the back of the unit. You just need to find a 10A fuse that is coordinated with the startup current of the compressor. Fuses are designed with different characteristics depending upon the application you want to us it in. Some will open right away and some will open after a delay.
Similar threads
- Replies
- 17
- Views
- 1K
