[Version 2 Release] RaspberryPints - Digital Taplist Solution

Homebrew Talk - Beer, Wine, Mead, & Cider Brewing Discussion Forum

Help Support Homebrew Talk - Beer, Wine, Mead, & Cider Brewing Discussion Forum:

This site may earn a commission from merchant affiliate links, including eBay, Amazon, and others.
Sounds like you have the solenoid wired up to the nc side of the relay. or you have one of those solenoids that need voltage to turn in both directions

I sent captain the email but wondering why I get this error when it tried to send the signal


self._sock.sendall(view[write_offset:write_offset+buffer_size])
error: [Errno 32] Broken pipe

RPINTS: received server update, sending 'RPU:VALVE:21=1' to ('127.0.0.1', 37918)
RPINTS: got WS connection from ('127.0.0.1', 37926)
RPINTS: reconfigure trigger: valve
RPINTS: updating valve status from db
RPINTS: update pin 21 from 1 to 0
RPINTS: broadcast update: RPU:VALVE:21=0
RPINTS: received server update, sending 'RPU:VALVE:21=0' to ('127.0.0.1', 37926)
RPINTS: received server update, sending 'RPU:VALVE:21=0' to ('127.0.0.1', 37918)
RPINTS: received server update, sending 'RPU:VALVE:21=0' to ('127.0.0.1', 37915)
RPINTS: closing WS connection to ('127.0.0.1', 37915)
[2016-02-07 12:57:38,863] [ERROR] mod_pywebsocket.standalone.WebSocketServer: Exception in processing request from: ('127.0.0.1', 37915)
Traceback (most recent call last):
File "/usr/lib/python2.7/SocketServer.py", line 593, in process_request_thread
self.finish_request(request, client_address)
File "/usr/lib/python2.7/SocketServer.py", line 334, in finish_request
self.RequestHandlerClass(request, client_address, self)
File "/usr/local/lib/python2.7/dist-packages/mod_pywebsocket/standalone.py", line 695, in __init__
self, request, client_address, server)
File "/usr/lib/python2.7/SocketServer.py", line 651, in __init__
self.finish()
File "/usr/lib/python2.7/SocketServer.py", line 704, in finish
self.wfile.flush()
File "/usr/lib/python2.7/socket.py", line 303, in flush
self._sock.sendall(view[write_offset:write_offset+buffer_size])
error: [Errno 32] Broken pipe
 
Is there an updated walk through? I've been trying to get this to work for a month now. I've got the 1gb Rpi, alamode board, and the Swiss flow meter. All seems to work except the flow monitoring. I've tried hooking the meter up to the Vin and 5v with no change.
 
Is there an updated walk through? I've been trying to get this to work for a month now. I've got the 1gb Rpi, alamode board, and the Swiss flow meter. All seems to work except the flow monitoring. I've tried hooking the meter up to the Vin and 5v with no change.

Afaik the only installation procedure is the one on the web site.
And it should still work, as long as you start with the right kit (v2.0.1).

A few questions:

- which OS version did you install?
- you successfully uploaded the R'Pints sketch to the Alamode?
- What do you get when you check the flowmon service status?

Code:
$ sudo /etc/init.d/flowmon status

- check the meter wiring. The colored lead (black or red) is ground.
DSCF1271.jpg


Cheers!
 
the latest rpi os
alamode got updated

$ sudo /etc/init.d/flowmon status
● flowmon.service - LSB: Put a short description of the service here
Loaded: loaded (/etc/init.d/flowmon)
Active: active (exited) since Mon 2016-02-08 22:59:30 UTC; 4s ago
Process: 3560 ExecStop=/etc/init.d/flowmon stop (code=exited, status=0/SUCCESS)
Process: 21375 ExecStart=/etc/init.d/flowmon start (code=exited, status=0/SUCCESS)

Feb 08 22:59:30 raspberrypi flowmon[21375]: Starting system RPFlowMon daemon:.
Feb 08 22:59:30 raspberrypi systemd[1]: Started LSB: Put a short description....
Hint: Some lines were ellipsized, use -l to show in full.

kinda hard to type on this mini keyboard
 
Ok, try this:

- stop the flowmon service

Code:
$ sudo /etc/init.d/flowmon stop

- run the flow_monitor listener in a terminal:

Code:
$ sudo python /var/www/python/flow_monitor.py

- If the meter is plumbed, pour a couple of ounces, else blow moderately through it in the right direction.
If the meter is detected by the AlaMode it should post a terse (3 line) message up to the listener script, which include the pin and pour value.

If you don't get any response, make sure the sketch was set up to use the same pin you're trying to use.
fwiw, pins known to work are 2 and 5 through 11. 3 and 4 will not work, 12 should work, 13 may be problematic.

Cheers!
 
I know when I tried that before, I got something like unknown command @@@@@@, or nothing at all. Formating and starting over at the moment.
 
Ouch. If you have a card reader, get a copy of Win32diskimager and make incremental images.

fwiw, I'm still running Wheezy on all of my RPi's (Bs and 2s).
Jessie puts you on a bit of an island, although I think there may be some folks running R'Pints on it...

Cheers!

[edit] And I just remembered that one issue with Jessie is it changes the default folder for inbound port 80 requests to /var/www/html.
 
I know when I tried that before, I got something like unknown command @@@@@@, or nothing at all. Formating and starting over at the moment.

Question for you on your alamode? Did you order it from makershed.com directly?

As I had the same problem and went through 3 from them. Switched to an uno and got it working 45 seconds after hooking it up.
 
Yes, I did get it from them. Hmmm... that's strange.

I honestly thought it was something I was doing. Hooked up the damn uno that I paid $10 for at micro center and it worked like a charm. Just had to make one change within a file so that it points to the uno serial interface.

I mailed one of the alamodes to captain delta for him to look at. It could be a problem with the boot loader on the card. He is checking that.
 
I have been working through installing Raspberry Pints using the step by step instructions. I can use a computer, install software and follow directions but I am by no means adept at working with Linux.
I have worked through the installation process and started over reformatting my memory card 3 times now. I thought that I was missing something or doing something wrong along the way but the third time I made sure that everything was followed to the "T". I get to the Chromium installation part and I can't get past that. I tried just using the browser that came with the OS but there are some commands that I think I need to enter differently because of the different browser. This is where I am getting lost.
I have been reading post on here and have run across the question of "what operating system did you install" I just followed the directions and what ever OS I have is what was installed through the directions.
Do I need to have a specific OS to make Raspberry Pints work?
If so, can you tell me how I find out what OS I have and what OS do I need.
I am not doing the flow meters at this time. Just looking to get the menu display up and running.
Thanks in advance for your help. This has been a very frustrating project but I am determined to get it up and running.
Tom

Tom, the biggest problem that people have had with chromium is that noobs has changed the version of raspbian (operating system) that it is using. The Raspian Wheezy has a chromium package available while the version that noobs contains now has Raspian Jessie.

Try the following. Download just Rasbian Wheezy build from https://www.raspberrypi.org/downloads/raspbian/ instead of the full NOOBS package and try the steps. Chromium should install properly for you.


Thanks so much! You have given me hope!
I will go through the process you have given me and let you know how it goes.
 
Hi Matt,

sorry for the late reply, went to superbowl on sunday, a party afterwards, and had to catch up on some sleep yesterday...

I sent captain the email but wondering why I get this error when it tried to send the signal


self._sock.sendall(view[write_offset:write_offset+buffer_size])
error: [Errno 32] Broken pipe

RPINTS: received server update, sending 'RPU:VALVE:21=1' to ('127.0.0.1', 37918)
RPINTS: got WS connection from ('127.0.0.1', 37926)
RPINTS: reconfigure trigger: valve
RPINTS: updating valve status from db
RPINTS: update pin 21 from 1 to 0
RPINTS: broadcast update: RPU:VALVE:21=0
RPINTS: received server update, sending 'RPU:VALVE:21=0' to ('127.0.0.1', 37926)
RPINTS: received server update, sending 'RPU:VALVE:21=0' to ('127.0.0.1', 37918)
RPINTS: received server update, sending 'RPU:VALVE:21=0' to ('127.0.0.1', 37915)
RPINTS: closing WS connection to ('127.0.0.1', 37915)
[2016-02-07 12:57:38,863] [ERROR] mod_pywebsocket.standalone.WebSocketServer: Exception in processing request from: ('127.0.0.1', 37915)
Traceback (most recent call last):
File "/usr/lib/python2.7/SocketServer.py", line 593, in process_request_thread
self.finish_request(request, client_address)
File "/usr/lib/python2.7/SocketServer.py", line 334, in finish_request
self.RequestHandlerClass(request, client_address, self)
File "/usr/local/lib/python2.7/dist-packages/mod_pywebsocket/standalone.py", line 695, in __init__
self, request, client_address, server)
File "/usr/lib/python2.7/SocketServer.py", line 651, in __init__
self.finish()
File "/usr/lib/python2.7/SocketServer.py", line 704, in finish
self.wfile.flush()
File "/usr/lib/python2.7/socket.py", line 303, in flush
self._sock.sendall(view[write_offset:write_offset+buffer_size])
error: [Errno 32] Broken pipe

This trace/error is benign, it just means that some browser didn't disconnect the web socket connection ('pipe') correctly. You may see that quite a few times, it's nothing to worry about.

What I see in your log file is the follwoing:

Code:
RPINTS: update pin 16 from 0 to 1
RPINTS: broadcast update: RPU:VALVE:16=1
...

which means that GPIO pin 16 enables the solenoid that is connected to it.
Right after I see alot of updates on flow pin 5

Code:
RPINTS: too long a pour, shutting down tap with flow pin 5, count: 801
, shut off: 600
RPINTS: broadcast update: RPU:VALVE:23=0
RPINTS: got a update: U;0;5;1602
RPINTS: too long a pour, shutting down tap with flow pin 5, count: 1602
, shut off: 600
RPINTS: broadcast update: RPU:VALVE:23=0
RPINTS: got a update: U;0;5;2403
RPINTS: too long a pour, shutting down tap with flow pin 5, count: 2403
, shut off: 600
RPINTS: broadcast update: RPU:VALVE:23=0
RPINTS: got a update: U;0;5;3204
RPINTS: too long a pour, shutting down tap with flow pin 5, count: 3204
, shut off: 600
RPINTS: broadcast update: RPU:VALVE:23=0
RPINTS: got a update: U;0;5;4005
RPINTS: too long a pour, shutting down tap with flow pin 5, count: 4005
, shut off: 600
RPINTS: broadcast update: RPU:VALVE:23=0
RPINTS: got a update: U;0;5;4806
RPINTS: too long a pour, shutting down tap with flow pin 5, count: 4806
, shut off: 600
RPINTS: broadcast update: RPU:VALVE:23=0
RPINTS: got a update: U;0;5;5607
RPINTS: too long a pour, shutting down tap with flow pin 5, count: 5607
, shut off: 600
RPINTS: broadcast update: RPU:VALVE:23=0
which makes me wonder if you got "phantom pours" from the swissflo meters, caused by electrical interference (the wire from the meter to flow pin 5 acts like an antenna, and it counts random interference as flow)

After another reset of the alamode (not sure what caused by, most likely clicking on a 'save config' button in the tap config screen w/o making a change) there is a pour on flow pin 7

Code:
RPINTS: reconfigure trigger: flow
RPINTS: updating flow meter config from db
RPINTS: reconfigure trigger: flow
RPINTS: updating flow meter config from db
RPINTS: got a pour: P;0;7;84
pours.php: pour on pin: 7, count: 84
, conversion: 1680
RPINTS: broadcast update: RPU:FLOW:7=84

shortly afterwards the solenoid on GPIO pin 16 is closed:
Code:
RPINTS: reconfigure trigger: valve
RPINTS: updating valve status from db
RPINTS: update pin 16 from 1 to 0
RPINTS: broadcast update: RPU:VALVE:16=0

So can see a few more pours on the other flow meter pins afterwards, but valve pin 16 is not opened again.

One thing that makes the log file confusing is that you have two or three flow counters going off together at times, which leads me to believe that there is electrical interference in play here somewhere. So, to move forward, lets reduce the number of variables.

(1) Configure only one tap, the one with the sainsmart/arduino flow meter. Those flow meters seem to be less affected by interference. We'll figure the other flow meters and what needs to be done later.

(2) Now, when you turn on/off the solenoid, do you see the LED for that channel on the relay board change?
(2a) If yes, the wiring on the relay side is probably wrong somewhere, or the relays are stuck in one position.
(2b) If not, something on the input side of the relay board is not right. This could be the breakout board, or wiring. If you remove the GPIO pin, and put it on a 3.3V RPi GPIO header, does it turn on/off at that point?

(3)If your solenoid comes one right when you apply power, do you see the relay board LED lit up too?

Lets take this one step at a time, and eliminate variables.

Cheers,
-Th
 
Is there an updated walk through? I've been trying to get this to work for a month now. I've got the 1gb Rpi, alamode board, and the Swiss flow meter. All seems to work except the flow monitoring. I've tried hooking the meter up to the Vin and 5v with no change.

I am sorry that I have not published my full install yet as I was in the same boat at the beginning of January. The following is a brief but complete run down of what worked for me using CaptnDelta's version. He has refined the original package and added some nice features.

Step #1:Wheezy is the correct image to use per DrunkleJon's post above. Some of the gurus know how to tweak the controls to run Jessie but I started down that path and doubled back. Download to your computer either with a torrent or the zip file. Format your card and copy the wheezy .img file to it. Install any usb dongles (wifi and keyboard in my case); attach your HDMI cable, and add power.

After installing Wheezy, the very first boot up will be into raspi_config.

Step#2: EXPAND THE FILE SYSTEM. It is the very first option in the menu. You can change some other local settings here too. I did location and timezone. Never figured out what keyboard to use but that can be edited later. I also changed the boot sequence to display GUI vs the command line.

If at anytime during the boot sequence or while running, you get a rainbow like square in the upper right corner it means your Pi is complaining about it's power source and you need better/cleaner voltage to the board.

Step #3: configure wifi and any other local settings you would like. I am not going into a whole lot of detail here, because there is a boat load of youtubes and other sites to help with this. The one thing that got me was the keyboard layout so edit it:
Code:
sudo leafpad /etc/defaults/keyboard
replace the 'gb' with 'us' and save/quit. Reboot now if you would like to have the changes take affect.

Step #4: Follow the Rpints setup for what you are doing. With or w/o flow meters. I did WITH so this is geared for that. This starts at Step 4 on their page. Update and Upgrade are first. You will NEED to pay attention to make sure they complete. I had problems a few times here.

Continuning Rpints Step 4, you install the services you need. This is the LAMP stack where you are installing many things with the same command from the command line. I had several instances where this did not complete. I was using copy and paste to avoid keystroke errors but not all of the services came down for some reason. To get around this I installed them individually and watched for each to ensure no error messages:
Code:
sudo apt-get -y install

The six services are: apache2, php5, mysql-client, mysql-server, php5-mysql, and phpmyadmin

You should be able to install them with the same command as listed in Rpints but unless you can quickly read the install logs as it shoots past on the screen this is the only way to be sure they install completely. Sometimes it worked for me but I did it this way to ensure this was not a problem.

Continue Step 4 and install the rest of the things listed. Again, I installed each individually to ensure their success. You could use the "-y" modifier right before "install" each time. This answers yes for you anytime disk space is needed.

You can go onto Step 5 now but this is a good time to burn an image if you are confident of a clean install so far. Archiving images is a good idea unless you like unpacking wheezy and setting the basics each time (I think I did it at least five times before I dummied up).

Continue with Steps 5 and 6 of Rpints. After you reboot at the end of #5, your Pi will come back and be running Chromium full screen (kiosk mode). You can alt-F11/F11 to jump back and forth. The Chromium screen will have some sort of acknowledgement of it's default screen.

Step #7:
Code:
sudo rm /var/www/index.html

Then, download and unpack CaptnDelta's version from his github repository:
https://github.com/HentschelT/RaspberryPints/releases/tag/th-2.1.1

Move/copy all files/folders of 2.1.1 to /var/www/ You cannot do this from the GUI file manager - it needs to be from the unix command line. Change the permissions in that folder:

Code:
sudo chmod -R 777 /var/www

Now would be another good time to burn an image if you are happy so far.

Step #8: install the pyWebSocket library. From the command line:

Code:
cd ~
sudo apt-get install git
git clone https://github.com/google/pywebsocket.git
cd pywebsocket
python setup.py build
sudo python setup.py install

git may already be installed so ignore that if it warns (happened to me once or twice).

Reboot.

Follow the rest of the prompts for Step 8. enter the passwords that were created earlier.

Note, when setting up the user "admin" for Rpints I left the password fields blank.

Do not install the sample files. Captn is not sure whether they are still valid with some of the tweaks he has made.

You also need your arduino board installed at this point. You will be powering the pi with your alamode board.

Step #9: from the command line:
Code:
cd /var/www/python
sudo cp flowmon /etc/init.d
sudo chmod a+x /etc/init.d/flowmon

sudo /etc/init.d/flowmon start 
ps aux | grep PintDispatch.py

sudo update-rc.d flowmon defaults

You should be good to go. Here is a link to essentially the above (and more) that I kept as my install notes. All the credit for the coding work belongs to CaptnDelta - I was able to follow along the install and tell him where I broke it so he could fix it.

https://drive.google.com/open?id=0B1jZ8P9yVbHQbTFrbXVXVEJaYVE
 
Hi Matt,

sorry for the late reply, went to superbowl on sunday, a party afterwards, and had to catch up on some sleep yesterday...


This trace/error is benign, it just means that some browser didn't disconnect the web socket connection ('pipe') correctly. You may see that quite a few times, it's nothing to worry about.

What I see in your log file is the follwoing:

Code:
RPINTS: update pin 16 from 0 to 1
RPINTS: broadcast update: RPU:VALVE:16=1
...

which means that GPIO pin 16 enables the solenoid that is connected to it.
Right after I see alot of updates on flow pin 5

Code:
RPINTS: too long a pour, shutting down tap with flow pin 5, count: 801
, shut off: 600
RPINTS: broadcast update: RPU:VALVE:23=0
RPINTS: got a update: U;0;5;1602
RPINTS: too long a pour, shutting down tap with flow pin 5, count: 1602
, shut off: 600
RPINTS: broadcast update: RPU:VALVE:23=0
RPINTS: got a update: U;0;5;2403
RPINTS: too long a pour, shutting down tap with flow pin 5, count: 2403
, shut off: 600
RPINTS: broadcast update: RPU:VALVE:23=0
RPINTS: got a update: U;0;5;3204
RPINTS: too long a pour, shutting down tap with flow pin 5, count: 3204
, shut off: 600
RPINTS: broadcast update: RPU:VALVE:23=0
RPINTS: got a update: U;0;5;4005
RPINTS: too long a pour, shutting down tap with flow pin 5, count: 4005
, shut off: 600
RPINTS: broadcast update: RPU:VALVE:23=0
RPINTS: got a update: U;0;5;4806
RPINTS: too long a pour, shutting down tap with flow pin 5, count: 4806
, shut off: 600
RPINTS: broadcast update: RPU:VALVE:23=0
RPINTS: got a update: U;0;5;5607
RPINTS: too long a pour, shutting down tap with flow pin 5, count: 5607
, shut off: 600
RPINTS: broadcast update: RPU:VALVE:23=0
which makes me wonder if you got "phantom pours" from the swissflo meters, caused by electrical interference (the wire from the meter to flow pin 5 acts like an antenna, and it counts random interference as flow)

After another reset of the alamode (not sure what caused by, most likely clicking on a 'save config' button in the tap config screen w/o making a change) there is a pour on flow pin 7

Code:
RPINTS: reconfigure trigger: flow
RPINTS: updating flow meter config from db
RPINTS: reconfigure trigger: flow
RPINTS: updating flow meter config from db
RPINTS: got a pour: P;0;7;84
pours.php: pour on pin: 7, count: 84
, conversion: 1680
RPINTS: broadcast update: RPU:FLOW:7=84

shortly afterwards the solenoid on GPIO pin 16 is closed:
Code:
RPINTS: reconfigure trigger: valve
RPINTS: updating valve status from db
RPINTS: update pin 16 from 1 to 0
RPINTS: broadcast update: RPU:VALVE:16=0

So can see a few more pours on the other flow meter pins afterwards, but valve pin 16 is not opened again.

One thing that makes the log file confusing is that you have two or three flow counters going off together at times, which leads me to believe that there is electrical interference in play here somewhere. So, to move forward, lets reduce the number of variables.

(1) Configure only one tap, the one with the sainsmart/arduino flow meter. Those flow meters seem to be less affected by interference. We'll figure the other flow meters and what needs to be done later.

(2) Now, when you turn on/off the solenoid, do you see the LED for that channel on the relay board change?
(2a) If yes, the wiring on the relay side is probably wrong somewhere, or the relays are stuck in one position.
(2b) If not, something on the input side of the relay board is not right. This could be the breakout board, or wiring. If you remove the GPIO pin, and put it on a 3.3V RPi GPIO header, does it turn on/off at that point?

(3)If your solenoid comes one right when you apply power, do you see the relay board LED lit up too?

Lets take this one step at a time, and eliminate variables.

Cheers,
-Th

Hope you had fun. Two thinks on my bucket list. Go to a Super Bowl and go to a Bridgestone winter classic. Talk here in St. Louis the last few days is that we might be hosting the 2016 winter classic at Busch stadium verse the Blackhawks. So one thing off the bucket list possibly.

If I click on let it flow or stop this I do not see any changes what so ever on the relay board.

No testing has been done with my swissflow meters but yes I am getting phantom pours and kegs kicked. As I am testing I am not using that gpio-t adapter yet. I am going straight from the breadboard to only 1 pin on the gpio for example pin 40 which is gpio pin 21. I have been using pin 36, 38 and 40 to test.

My 10v 10amp power break is plugged into the same surge protector and laying close to the relay, pi, and uno. I am going to try to move that and plug into a different outlet to see if the phantom pours go away.

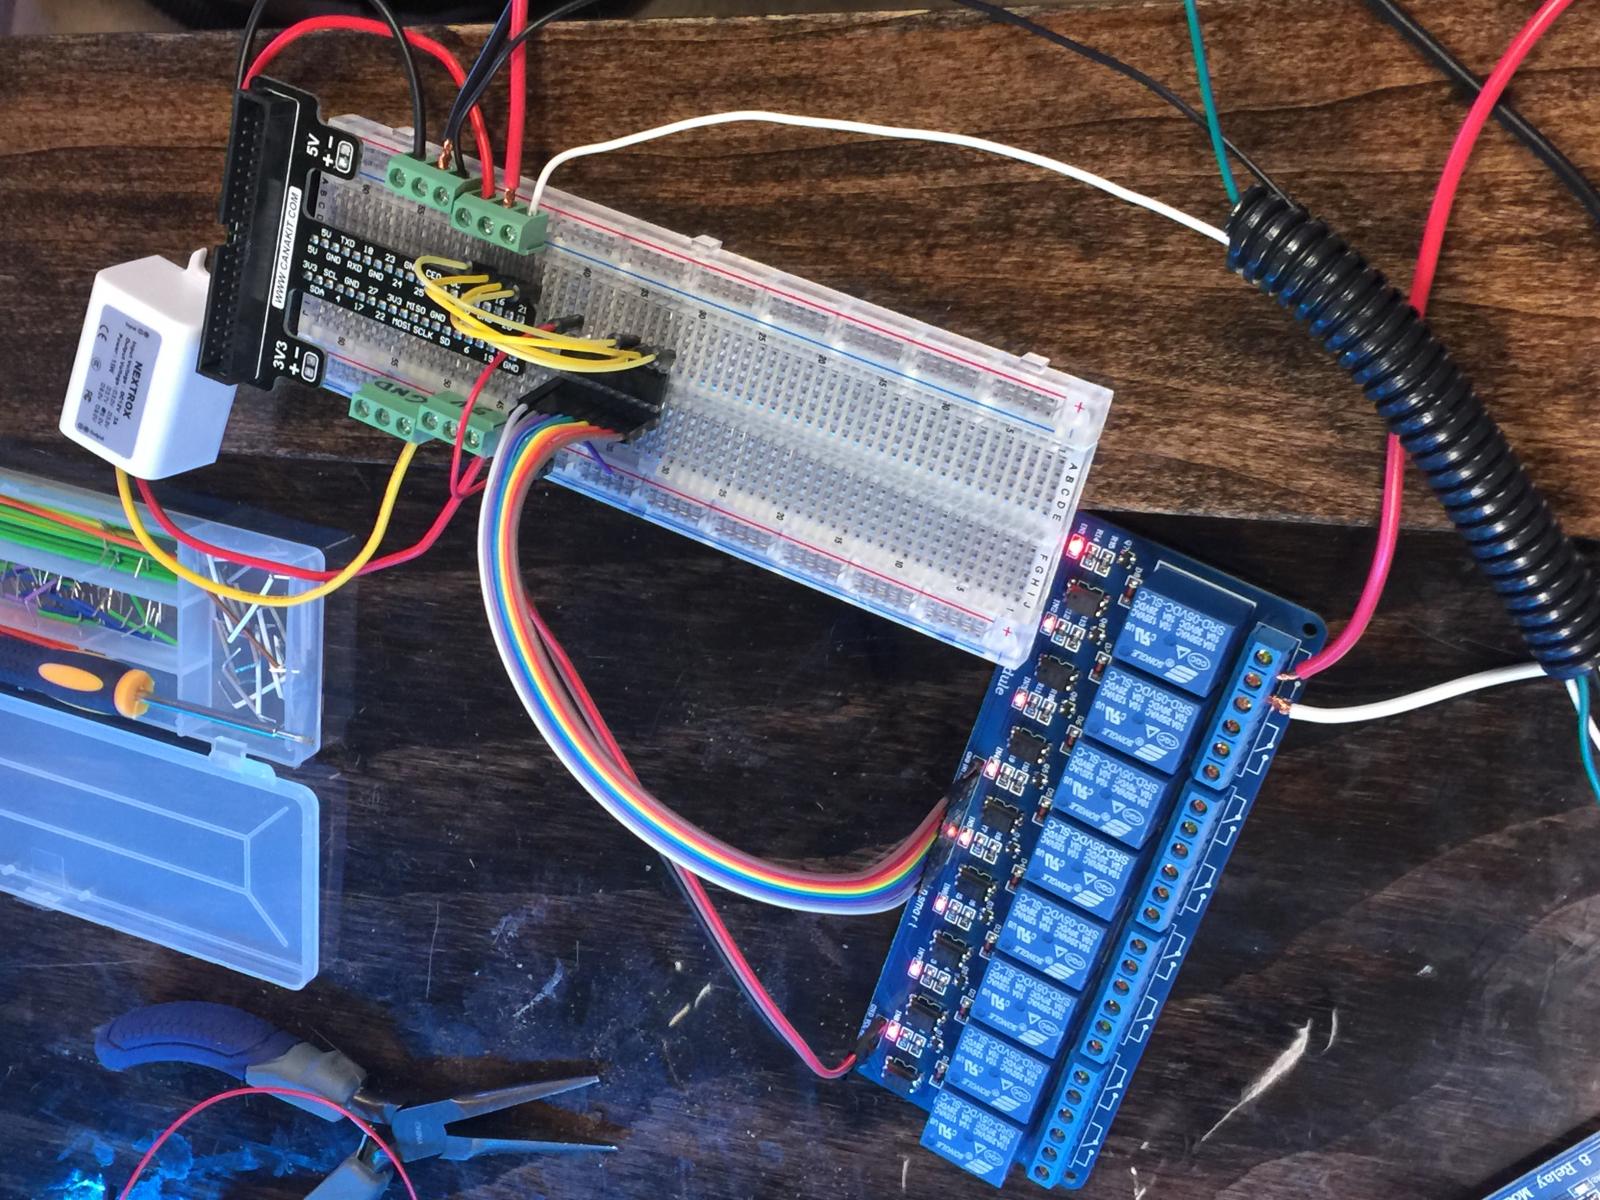
So for test you are saying to take the breadboard wire out of gpio port 21 and hook it up to port 1 which is the 3.3v power and it should turn off the solenoid? As of right now if I hook up power to the relay the valve opens and stays open until I kill power to the relay. Using the diagram I have a breadboard wire coming out of 32c that plugs directly into gpio port 21.

image.jpg
 
Last edited:
Using the diagram I have a breadboard wire coming out of 32c that plugs directly into gpio port 21.

Yea, something on your relay input/level converter wiring is wrong. As given in that picture, no relays should be on altogether (RPi GPIO isn't even connected, and they're all on). They should be all off.
Either your level converter (ULN2803) is burned up, you got ground and +5V reversed, or something like that, but can't really make it out from that picture.

Cheers,
-Th
 
I am sorry that I have not published my full install yet as I was in the same boat at the beginning of January. The following is a brief but complete run down of what worked for me using CaptnDelta's version. He has refined the original package and added some nice features.

Step #1:Wheezy is the correct image to use per DrunkleJon's post above. Some of the gurus know how to tweak the controls to run Jessie but I started down that path and doubled back. Download to your computer either with a torrent or the zip file. Format your card and copy the wheezy .img file to it. Install any usb dongles (wifi and keyboard in my case); attach your HDMI cable, and add power.

After installing Wheezy, the very first boot up will be into raspi_config.

Step#2: EXPAND THE FILE SYSTEM. It is the very first option in the menu. You can change some other local settings here too. I did location and timezone. Never figured out what keyboard to use but that can be edited later. I also changed the boot sequence to display GUI vs the command line.

If at anytime during the boot sequence or while running, you get a rainbow like square in the upper right corner it means your Pi is complaining about it's power source and you need better/cleaner voltage to the board.

Step #3: configure wifi and any other local settings you would like. I am not going into a whole lot of detail here, because there is a boat load of youtubes and other sites to help with this. The one thing that got me was the keyboard layout so edit it:
Code:
sudo leafpad /etc/defaults/keyboard
replace the 'gb' with 'us' and save/quit. Reboot now if you would like to have the changes take affect.

Step #4: Follow the Rpints setup for what you are doing. With or w/o flow meters. I did WITH so this is geared for that. This starts at Step 4 on their page. Update and Upgrade are first. You will NEED to pay attention to make sure they complete. I had problems a few times here.

Continuning Rpints Step 4, you install the services you need. This is the LAMP stack where you are installing many things with the same command from the command line. I had several instances where this did not complete. I was using copy and paste to avoid keystroke errors but not all of the services came down for some reason. To get around this I installed them individually and watched for each to ensure no error messages:
Code:
sudo apt-get -y install

The six services are: apache2, php5, mysql-client, mysql-server, php5-mysql, and phpmyadmin

You should be able to install them with the same command as listed in Rpints but unless you can quickly read the install logs as it shoots past on the screen this is the only way to be sure they install completely. Sometimes it worked for me but I did it this way to ensure this was not a problem.

Continue Step 4 and install the rest of the things listed. Again, I installed each individually to ensure their success. You could use the "-y" modifier right before "install" each time. This answers yes for you anytime disk space is needed.

You can go onto Step 5 now but this is a good time to burn an image if you are confident of a clean install so far. Archiving images is a good idea unless you like unpacking wheezy and setting the basics each time (I think I did it at least five times before I dummied up).

Continue with Steps 5 and 6 of Rpints. After you reboot at the end of #5, your Pi will come back and be running Chromium full screen (kiosk mode). You can alt-F11/F11 to jump back and forth. The Chromium screen will have some sort of acknowledgement of it's default screen.

Step #7:
Code:
sudo rm /var/www/index.html

Then, download and unpack CaptnDelta's version from his github repository:
https://github.com/HentschelT/RaspberryPints/releases/tag/th-2.1.1

Move/copy all files/folders of 2.1.1 to /var/www/ You cannot do this from the GUI file manager - it needs to be from the unix command line. Change the permissions in that folder:

Code:
sudo chmod -R 777 /var/www

Now would be another good time to burn an image if you are happy so far.

Step #8: install the pyWebSocket library. From the command line:

Code:
cd ~
sudo apt-get install git
git clone https://github.com/google/pywebsocket.git
cd pywebsocket
python setup.py build
sudo python setup.py install

git may already be installed so ignore that if it warns (happened to me once or twice).

Reboot.

Follow the rest of the prompts for Step 8. enter the passwords that were created earlier.

Note, when setting up the user "admin" for Rpints I left the password fields blank.

Do not install the sample files. Captn is not sure whether they are still valid with some of the tweaks he has made.

You also need your arduino board installed at this point. You will be powering the pi with your alamode board.

Step #9: from the command line:
Code:
cd /var/www/python
sudo cp flowmon /etc/init.d
sudo chmod a+x /etc/init.d/flowmon

sudo /etc/init.d/flowmon start 
ps aux | grep PintDispatch.py

sudo update-rc.d flowmon defaults

You should be good to go. Here is a link to essentially the above (and more) that I kept as my install notes. All the credit for the coding work belongs to CaptnDelta - I was able to follow along the install and tell him where I broke it so he could fix it.

https://drive.google.com/open?id=0B1jZ8P9yVbHQbTFrbXVXVEJaYVE

Cool!

Got a github account? You could post that on the wiki there:
https://github.com/HentschelT/RaspberryPints/wiki

This way it's in one place...
Chhers,
-Th
 
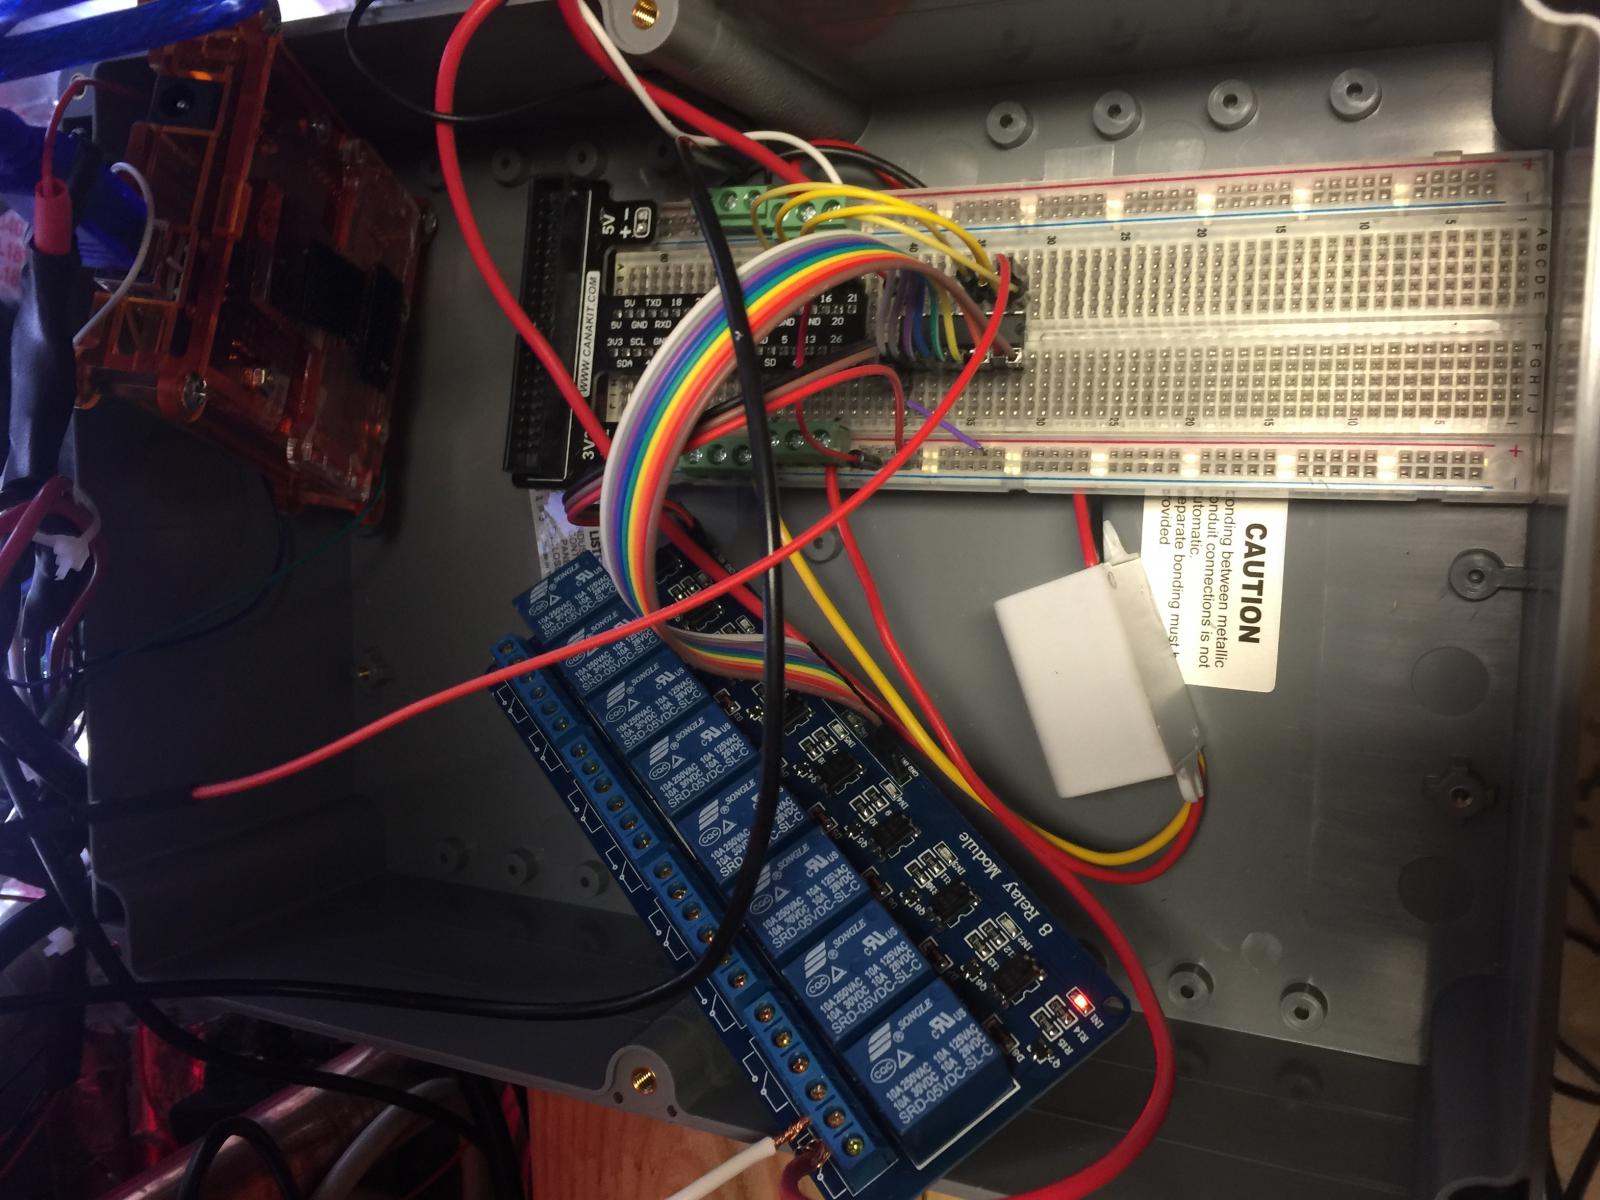
Ok. So I switched the level converter upside down. Now only port 1 on the relay is on. It makes a high pitched noise Now and did not before. I have 5v on the incoming side of the relay port 9 and on port 9 other side that goes to gpio is ground. Using the rpint tool does not switch it off or on. I am getting closer.

Edit: I did hook it up the breadboard wire to gpio pin 1 which is 3.3v. The red light did go on the relay. Humming noise was louder.

image.jpg
 
Last edited:
I mailed one of the alamodes to captain delta for him to look at. It could be a problem with the boot loader on the card. He is checking that.

Just checked your alamode, and was able to program it by timely application of the reset button. Turns out pin 18 of your connector wasn't soldered (which resets the board just before, so the programmer can do its thing). I re-soldered the header, it's working...

Cheers,
-Th
 
Ok. So I switched the level converter upside down. Now only port 1 on the relay is on. It makes a high pitched noise Now and did not before. I have 5v on the incoming side of the relay port 9 and on port 9 other side that goes to gpio is ground. Using the rpint tool does not switch it off or on. I am getting closer.

Edit: I did hook it up the breadboard wire to gpio pin 1 which is 3.3v. The red light did go on the relay. Humming noise was louder.[/QUOTE

Edit edit edit. Got it working


1. Reversed the level converter.

2. 5v from gpio to level converter and not 5v from X1.

3. Ground from gpio to level converter and not from x4

This works like a champ.

Thank you thank you thank you
 
CaptnDelta:

First and foremost, I love this!! I installed 2.0. I have the swissflow meters and all is working. The only thing I'm trying to figure out is when a pour is added to the db, the tapid, pin, pour, pulse are logged but the createdDate and modified are zeroed whereas srmRgb has . Basically I want to chart out pours and what days I'm better than others :p Any idea where I would modify that or would I need to recreate the table?
 
Ok. So I switched the level converter upside down. Now only port 1 on the relay is on. It makes a high pitched noise Now and did not before. I have 5v on the incoming side of the relay port 9 and on port 9 other side that goes to gpio is ground. Using the rpint tool does not switch it off or on. I am getting closer.

Edit: I did hook it up the breadboard wire to gpio pin 1 which is 3.3v. The red light did go on the relay. Humming noise was louder.[/QUOTE

Edit edit edit. Got it working


1. Reversed the level converter.

2. 5v from gpio to level converter and not 5v from X1.

3. Ground from gpio to level converter and not from x4

This works like a champ.

Thank you thank you thank you

Captain,

From rpints I can shut off and on the solenoid valve. Within the tool I set up the shut off valve set point to 10 just so that I could test.

I poured several pours and the valve will not shut off. I had rebooted everything and tried again.

Like I said from the tool it turns off and on manually just fine.

Emailed you the rpints.log when you have a chance to check.

Matt
 
[...]The only thing I'm trying to figure out is when a pour is added to the db, the tapid, pin, pour, pulse are logged but the createdDate and modified are zeroed whereas srmRgb has . Basically I want to chart out pours and what days I'm better than others :p Any idea where I would modify that or would I need to recreate the table?

You have to open the database (I use phpMyAdmin), then:

- select the Pours table
- click on the Structure tab
- find the createdDate row, click on its Change
- change the Default setting to CURRENT_TIMESTAMP

Click Save and all future pour records will include the time...

Cheers!
 
Captain,

From rpints I can shut off and on the solenoid valve. Within the tool I set up the shut off valve set point to 10 just so that I could test.

I poured several pours and the valve will not shut off. I had rebooted everything and tried again.

Like I said from the tool it turns off and on manually just fine.

Emailed you the rpints.log when you have a chance to check.

Matt

Yea, you got the update trigger count set to 800 (which amounts to more than 1/2 a gallon with your flow meters) - and that's just to get an update. For the arduino flow meters, set that to around 200, and set the pour shutoff count to 400 (it makes sense to set that to a multiple of the update count), this should shut the tap off at around 34 ounces for the arduino meters.

Cheers,
-Th
 
For the folks using my version:

I noticed a bug in the tap config, in which when you set up a tap for the first time (basically adding a tap), the flow conversion value doesn't get set and reverts back to 0. I found the problem, and I'm about ready to commit this to the master branch on github.
This bug has a workaround: once you do it a second time, the flow conversion value will be set correctly. So just set that value again, and things will be ok.

Since there is a relatively simple work-around, I'm not going to cut a new release just for that. It will be fixed in the next release.

Cheers,
-Th
 
Yea, you got the update trigger count set to 800 (which amounts to more than 1/2 a gallon with your flow meters) - and that's just to get an update. For the arduino flow meters, set that to around 200, and set the pour shutoff count to 400 (it makes sense to set that to a multiple of the update count), this should shut the tap off at around 34 ounces for the arduino meters.

Cheers,
-Th

I have drank a lot of beer tonight testing I set the update trigger count to 100 and the pour shutoff count to 200.

The solenoid shut off at around 23 oz.

So I have read one of your post and emails a million times and finally I think the light bulb went off. The update trigger count and pour shutoff count work together. For example, if I set the update trigger count at 25 and the pour shut off at 100 the flow meter count will report updates 4 times before shutting off the solenoid????

So honestly you must have all of the same type of solenoids in order to get this to work properly?

using the adafruit as an example around 200 for the pour shutoff count gave me 23 oz. If I raised that to maybe 220 I possibly would be dead on for my 24 oz max pour? If I set the update trigger count to 40 it will report back to the arduino every 40 and shutoff at 220? Would that overload rpints?

EDIT: I now understand the line in the log alamode says: C:3:5:6:7 and so on. That was helpful learning that.
 
In order to test as I have drank a lot of beer tonight testing I set the update trigger count to 100 and the pour shutoff count to 200.

The solenoid shut off at around 23 oz.

So I have heard one of your post and emails a million times and now I think the light bulb went off. The update trigger count and pour shutoff count work together. For example, if I set the update trigger count at 25 and the pour shut off at 100 the flow meter count will report updates 4 times before shutting off the solenoid????
Yes, thats' essentially correct. The update count governs how often the alamode/arduino reports. The pour shut off is what the service will compare the update value against. The reason for the update count seperate from the shut off count is that I eventually wanted to update the display as a pour happens (not just at the end). However, there are limits to how many updates the arduino can deliver, and that rate is governed by the flow meter used

So honestly you must have all of the same type of solenoids in order to get this to work properly?
Well, true, at least they can't be off by an order of magnitude. The reason for me to implement this was that I had to replace some of the arduino meters, and the flow count of the 2nd batch was about 20% off from the 1st batch I bought. For me that still works for the tap shutoff, I don't care that it is that precise a value, but rather that the whole keg doesn't run into the pool when the cat jumps up and opens a tap

The real way to implement this would be to allow the user to create flow device profiles, which hold all the different parameters for the different types of flow meters. Once created, you would just be able to select the proper flow meter for the tap from a drop down list in the tap config.

using the adafruit as an example around 200 for the pour shutoff count gave me 23 oz. If I raised that to maybe 220 I possibly would be dead on for my 24 oz max pour? If I set the update trigger count to 40 it will report back to the arduino every 40 and shutoff at 220? Would that overload rpints?
40 should be ok for the arduino meters, but I think it would be too much for the swissflo. It also depends a bit on the flow rate. For the swissflo, a count of 40 would be a report every 2.8 oz. It may work, I'm just not sure.

EDIT: I now understand the line in the log alamode says: C:3:5:6:7 and so on. That was helpful learning that.

Yes, that's the config message send to the alamode/arduino, which tells the arduino what it has to deal with. It goes like:
* 'C': is for configuration message
* first number is the number of taps
* the next set of numbers, as indicated by the first number, are the pins to monitor. So, 'C:3:5:6:7' means: There is 3 taps, monitor pins 5, 6, and 7.
* next number is the pour message delay
* next number is the pour trigger count (minimum count until it is considered a pour)
* next number is the kick trigger count (count per millisecond, if reached, we consider that pour a kick)
* next number is the update trigger count

Cheers,
-Th
 
I was wondering where along the beer line people have placed the flow meter?

I am getting 3/4 pours of foam on all pours but if I switch the same keg over to the other tap without a flow meter it pours fine. I have 10 foot 3/16th beer lines with the flow meter installed about 3 foot from where line connects to faucet shank. The beer line from the flow meter to faucet has no coils etc. just straight to the faucet.

I am using this flow meter:
http://www.amazon.com/dp/B00QC6LI6Q/?tag=skimlinks_replacement-20

Any ideas?
 
Last edited by a moderator:
Thanks. Did that and it still was giving me all zeros. Ended up modifying pours.php also. The single quotes around the NOW() was keeping it from using the mysql function properly. No clue if that is addressed in the latest 2.1.0, I was tarded and installed before I saw the update. Now I need some valving :p

My change:

# diff pours.php pours.php.orig
53c53
< $qry = "INSERT INTO pours(tapId, pinId, amountPoured, pulses, createdDate, modifiedDate) values ('".$taps[0]."','".$PIN."','".$amount."','".$PULSE_COUNT."', NOW(), NOW() )";
---
> $qry = "INSERT INTO pours(tapId, pinId, amountPoured, pulses, createdDate, modifiedDate) values ('".$taps[0]."','".$PIN."','".$amount."','".$PULSE_COUNT."', 'NOW()', 'NOW()' )";

And now we have logging, just had to fix the timezone.

mysql> select * from pours where id=17;
+----+-------+-------+--------------+--------+---------------------+---------------------+
| id | tapId | pinId | amountPoured | pulses | createdDate | modifiedDate |
+----+-------+-------+--------------+--------+---------------------+---------------------+
| 17 | 12 | 8 | 0.013 | 293 | 2016-02-10 18:04:07 | 2016-02-10 18:04:07 |
+----+-------+-------+--------------+--------+---------------------+---------------------+


There may have been some beer being pours.. for science.. of course! :mug:

You have to open the database (I use phpMyAdmin), then:

- select the Pours table
- click on the Structure tab
- find the createdDate row, click on its Change
- change the Default setting to CURRENT_TIMESTAMP

Click Save and all future pour records will include the time...

Cheers!
 
Back
Top