[Version 2 Release] RaspberryPints - Digital Taplist Solution

Homebrew Talk - Beer, Wine, Mead, & Cider Brewing Discussion Forum

Help Support Homebrew Talk - Beer, Wine, Mead, & Cider Brewing Discussion Forum:

This site may earn a commission from merchant affiliate links, including eBay, Amazon, and others.
For those who have been running RaspberryPints v1.0.3 (or earlier even) that are also running BrewPi and that are planning on doing an upgrade to V2, be aware that Step 11 of the current upgrade instructions has the user delete the entire contents of /var/www.


That happens to be the same place that BrewPi builds fully half its footprint.


[I posted a Github request that the 'Pints folks consider an alternative to using a tactical nuclear weapon during a package install, but it looks like that post vaporized overnight]


Cheers!


I will write a second option for that. Not a problem


Sent from my iPhone using Home Brew
 
I will write a second option for that. Not a problem

That would be A Good Thing, thank you! I don't know what happened to what I thought I posted on Github - most likely I was still in the editor when I thought I'd already completed the post (hey - it was late, I'd been drinking... ;))

It was a great post, too. I pointed out the irony that the 'Pints "Upgrate" procedure (yeah, there's a typo on the BYO page) calls for nuking /var/www which would wipe out BrewPi - while the automagic BrewPi installation script also nukes /var/www which would wipe out RaspberryPints! (Brewing-related package fratricide is apparently a thing).

Anyway...There's another typo in Step 10 ('cd /vaw/www') while you're in there...

Cheers - and thanks!
 
Just got my RPi yesterday and most of the install went well except:
Msfonts failed to install. Easy workaround? Common problem?
 
Got my meters installed today. Cleaned and rinsed the lines, cut them in the middle, installed the 3/8" OD - 1/4" barb adapters on all the cut ends with worm clamps, connected the meters and did the best I could to neaten up the coils. Took so long and warmed the tubing and tower up so much that it totally pissed off the keezer to the point I hit one of the pipeline kegs to avoid the foamy pours. It's chillin' back down and should be serviceable in an hour or so.

I'll hook up the electrical side tomorrow, burn a backup image of what's running on the keezer 'Pi, clone that to a backup SD card, and be ready to give V2 a shot.

Yeah, this definitely looked a lot neater without the meters.
Totally worth it, though! :D

Cheers!

flow_meter_install_08.jpg
 
So I'm wondering if it would be beneficial to put the meters closer to the keg, or the taps, or not make a difference at all?
 
No idea, I figured I'd stick them in the dead center of my 12 footers and hope for the best.

Now that the keezer has chilled back down I just pulled a pint and we're back to perfect pours - with the meters - so I think I'm in good shape...

Cheers!
 
So I'm wondering if it would be beneficial to put the meters closer to the keg, or the taps, or not make a difference at all?

I've got some both ways and it does not seem to make a difference.

I may buy new tubing and rework it all anyways so that it's all neater and out of the way.
 
I've got some both ways and it does not seem to make a difference.

I may buy new tubing and rework it all anyways so that it's all neater and out of the way.

That's what I was hoping, opens us up to put them wherever is convenient in our keezer.
 
I would recommend not putting the meters where they may be subject to the effects of temperature stratification - ie: CO2 pockets in the warmer beer line - as that could cause a false keg kick. A decent air mover to keep things well-stirred can make that a non-issue...

Cheers!
 
I would think that putting them right off the taps, or right off the keg can both be problematic if they register any bubbles as flow. Near the tap could register flow or have problems if they get too warm/gain gas pockets near the tap, while too close to the keg could cause problems if you are not balanced and get the bubbles coming out of the keg.
Where does everyone plan on putting them? Do you plan on mounting them to something (the lid, maybe the inside of the collar)?
I am thinking maybe I should put them a little off the keg, and then maybe, since the wire are so long, attach the wires to follow the lines (maybe electrical taping them to it every few inches for cleanliness and then route them out through the collar and to the Pi. Or otherwise, attach the collar to the top of the lid so it swings up on the hinge and mount them to the inside of the collar.
 
Figured I better get subscribed to this thread as well - my neighbor got all the stuff ordered so we should be ready to go soon after the release. :ban:
 
Hmm. My post disappeared or I forget to hit submit :) Can one of you that have it set up post a picture of how you have multiple meters plugged in to your alamode, please? Thanks! Just seeing if I need to modify the plugs.
 
That would be A Good Thing, thank you! I don't know what happened to what I thought I posted on Github - most likely I was still in the editor when I thought I'd already completed the post (hey - it was late, I'd been drinking... ;))

It was a great post, too. I pointed out the irony that the 'Pints "Upgrate" procedure (yeah, there's a typo on the BYO page) calls for nuking /var/www which would wipe out BrewPi - while the automagic BrewPi installation script also nukes /var/www which would wipe out RaspberryPints! (Brewing-related package fratricide is apparently a thing).

Anyway...There's another typo in Step 10 ('cd /vaw/www') while you're in there...

Cheers - and thanks!

hey - it was late, I'd been drinking... ;) Fixed
 
Im looking at building a brewpi. Will i be able to use the same PI for both systems for is it best to have separate PIs?

There is no reason you could not run both, you will just need to be careful on the brewpi install as it has you wipe out your /var/www dir. maybe install that first then install raspberrypints into a taplist folder?? Thats what I would suggest
 
It also depends on what you are wanting to do with Raspberry Pints. I've switched up my setup (yet again) and installed Brewpi on an old PC instead of buying a second pi. The reason was because I want to use flow meters and a temp logger so I need my pi close to my keezer. If you don't care about any extras with the Raspberry Pints system and you will only use it as a tap list, then my suggestion is to keep the pi with your fermentation chamber running Brewpi, and use something wireless(old PC, tablet, Etc) to display your tap list through wifi


Sent from my iPhone using Home Brew

My setup actually works out really well for doing both off the same PI be i have my keezers in a back room in my basement. The keezers back up to a common wall and i have my taps drilled thru the wall into the other room (my man cave). So nothing have far to travel to get to each other.
 
Im looking at building a brewpi. Will i be able to use the same PI for both systems for is it best to have separate PIs?

I've been running RaspberryPints on a Rev B RPi along with two fully functional instances of BrewPi (on a pair of Unos) since May. Rock solid, too. Piece o' cake...

Cheers!
 
Can one of you that have it set up post a picture of how you have multiple meters plugged in to your alamode, please? Thanks! Just seeing if I need to modify the plugs.

^This.

Could someone possibly put together a photo step by step or at least pis of both sides of the alamode setup, for ppl like me that aren't very knowledgeable in this type of thing. I got my alamode today and while I am still waiting for the rPi to show I did notice that it came with nothing but the physical hardware and pin headers. I have no idea where to start beyond the gpio header attachment.

Also, I have seen others talk about the potential of shorts between the alamode and rPi, and that a rubber separator comes with to be put between them. is this right, that it is supposed to come with one, or not. mine did not so?
 
Also, I have seen others talk about the potential of shorts between the alamode and rPi, and that a rubber separator comes with to be put between them. is this right, that it is supposed to come with one, or not. mine did not so?

Yes the Alamode kit should come with a few headers to solder and a small ~1cm square rubber pad. I mounted my pad on top of the Pi's USB ports and the Alamode plugs in snuggly this way (instead of the pad on top of the Ethernet port).

The idea is that you don't want anything on the Alamode to short out on the Pi. You can use anything non-conductive, like electrical tape, or pickup some small rubber pads from the hardware store. It's nothing special, just a generic rubber pad with one sticky side.
 
I figured I'd ask as I'm drawing up the schematics for the kegerator now to replace Kegbot with RasPints...

Are there any plans for RasPints to support temp sensors off the Raspi or Alamode? I've got an extra data wire in there already, and with DS18B20 sensors (very cheap [$5 prewired], easy to use) the +5v and GND will already be in there for the flow meters.

Also, is there no need for 2.2kOhm resistors on these flow sensors?

Cheers and thanks again for such a great project! I'd love to see a "Buy us a beer!" button on your website :) :mug:

No need for the resistors.

Also, there is currently a "hack" out there that adds a temp sensor to the rpints install. I think it was Day_Trippr that did it.

It *may* be added as part of a future release, however we're looking at several other features that would come first... :)

The nice thing is that rPints is open source, if you have something you want to change or see, there isn't any reason why it cannot be done...
 
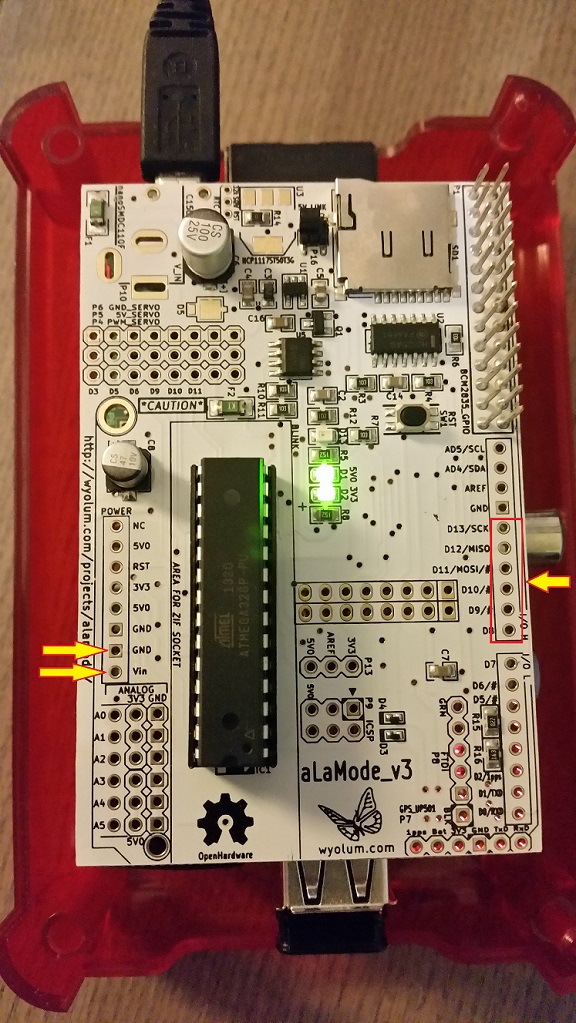
Vin(+5v), GND, and the 6 easiest pins for Digital (8-13) highlighted here (yes you can also use 2-7 below them for Digital):

All flow meters goto GND, and VIN, the data wire for each meter goes to a separate digital pin on the Alamode. There are other places to pickup +5v and GND as well, but you can tie all meters to the same GND and +5v pins without issues.

Enjoy!

raspints_alamode_1.jpg
 
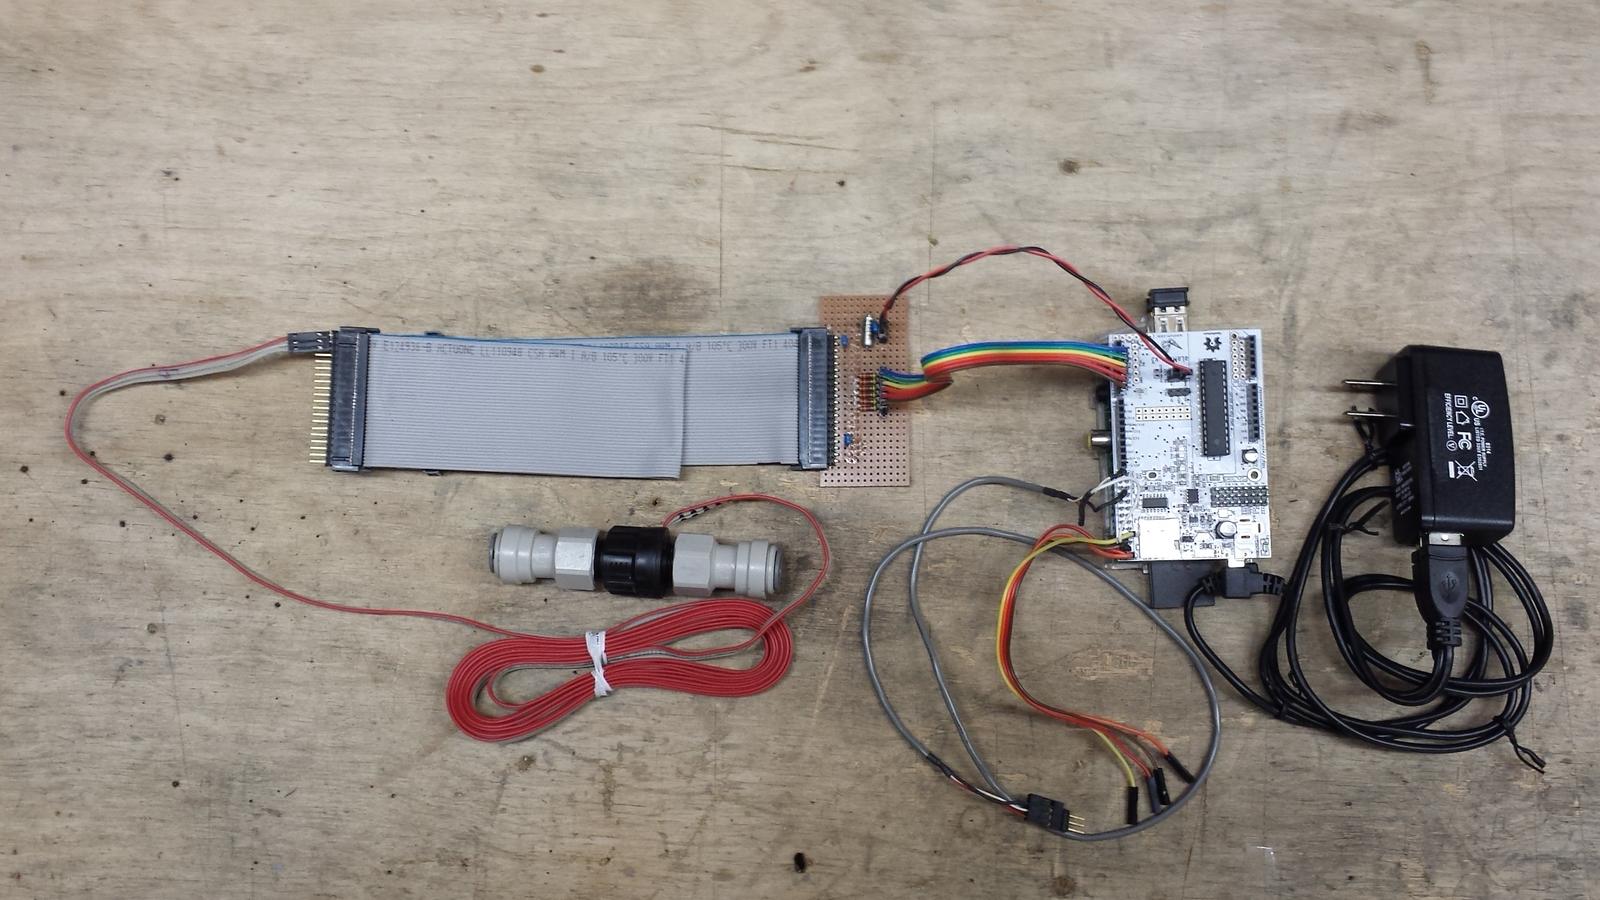
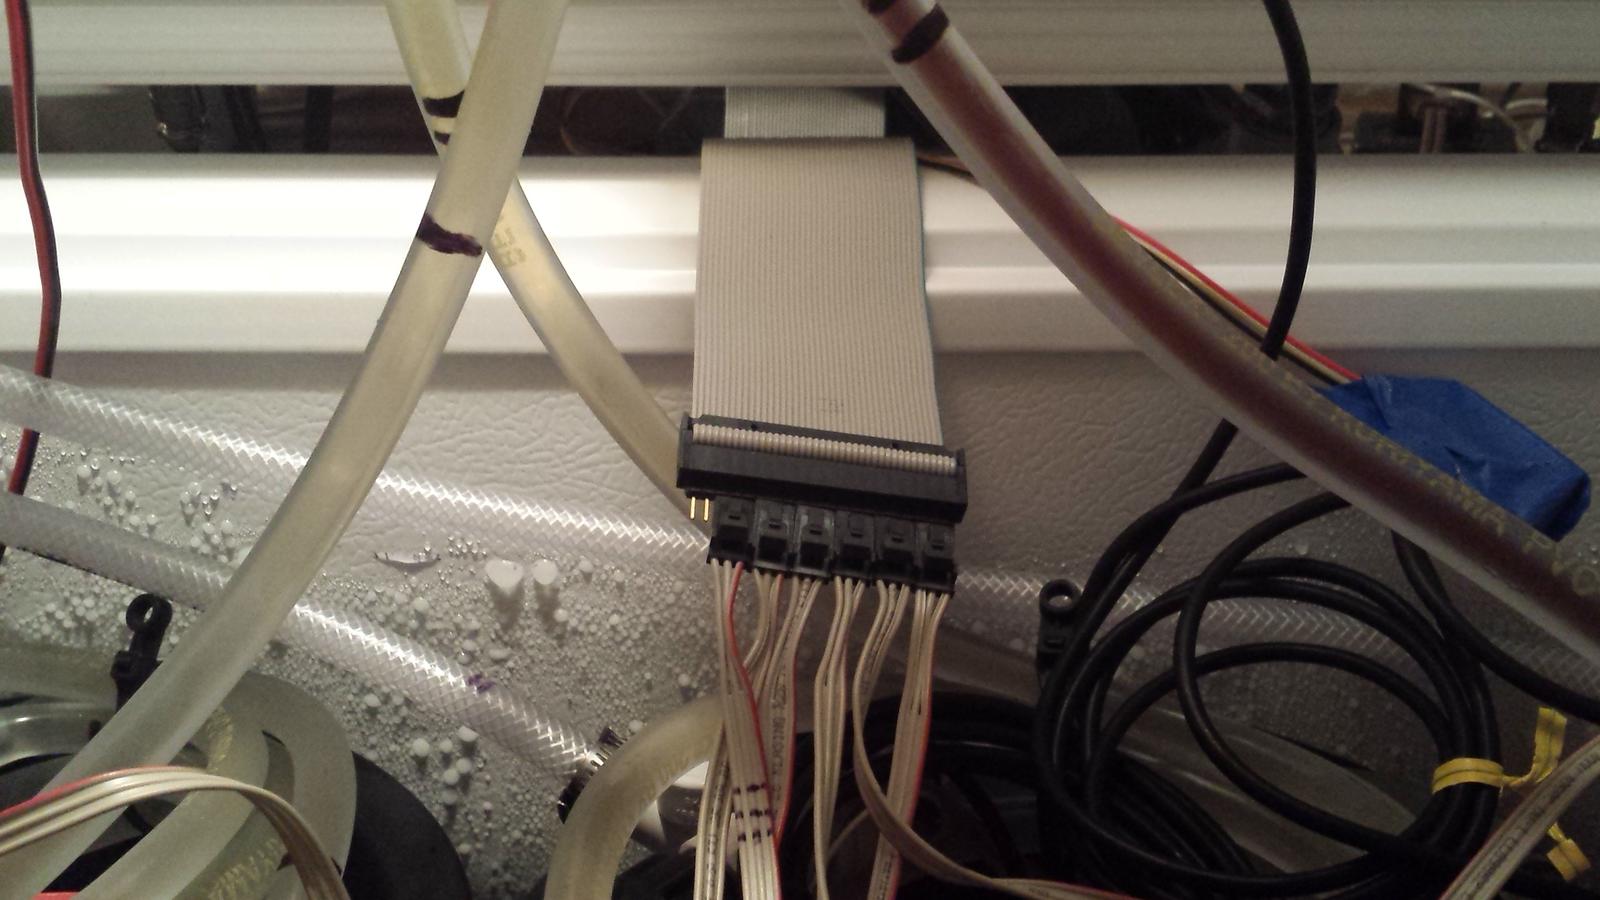
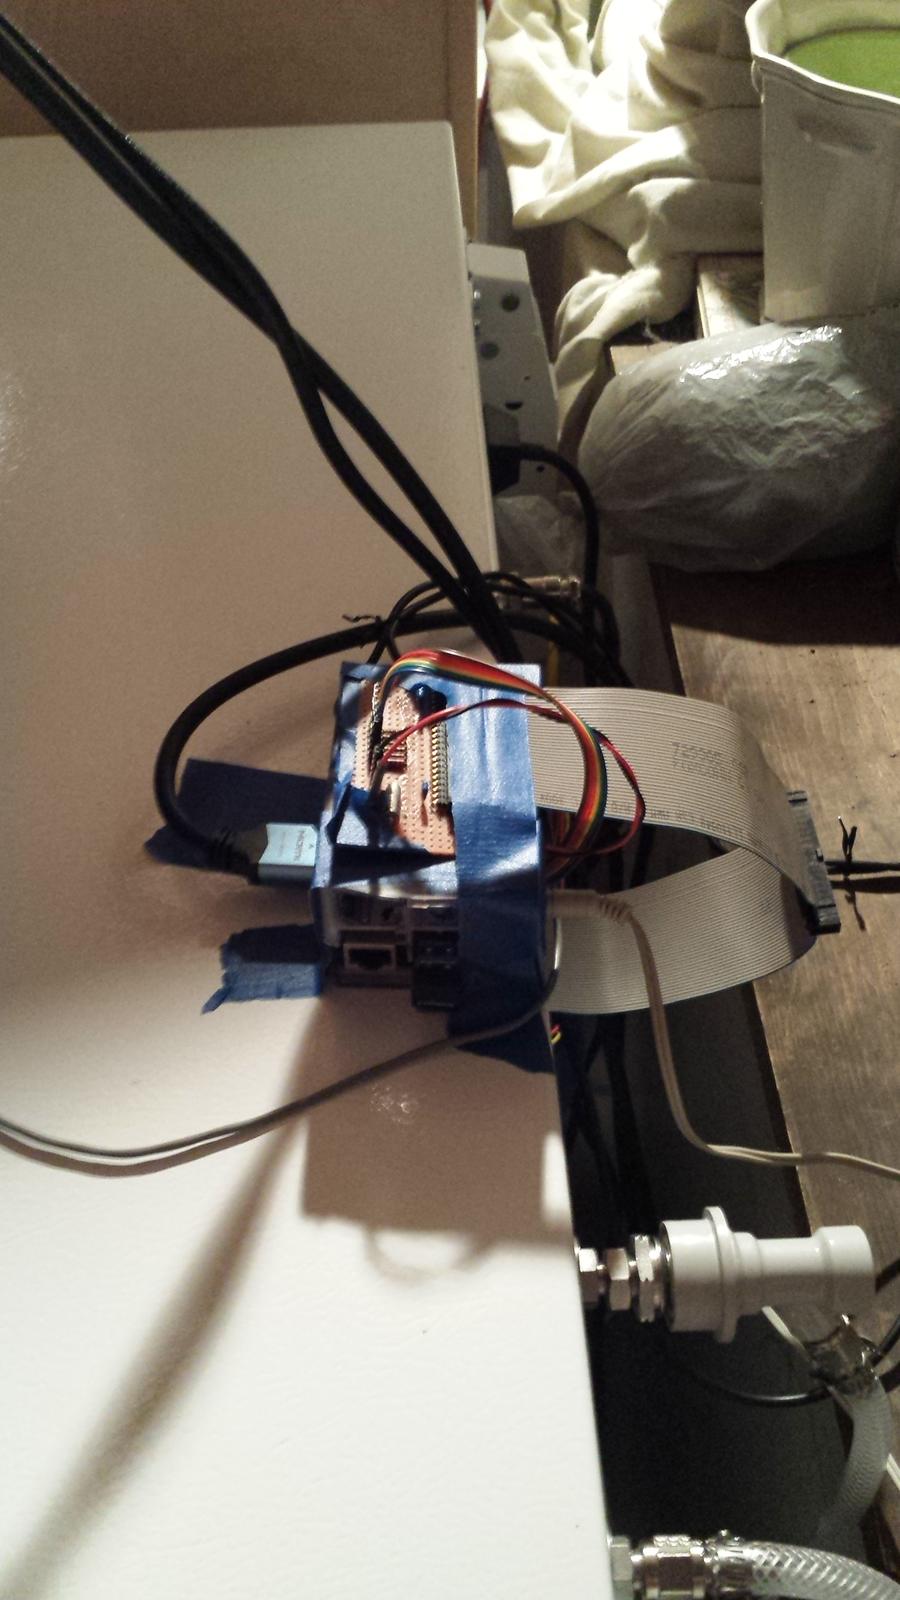
Got my meters wired up to the AlaMode (fwiw, I'm using digital io pins 2-7) and got through the "upgrade from 1.0.3" to where I'm ready for the new 'Pints package. There were some issues that I've forwarded to the 'Pints gang, but on the whole it went pretty well.

So far the best thing is the meters have zero evident effect on my pours. I have to say I'm particularly proud of my beer dispensing appliance's performance and would literally bag the whole flow meter thing if it effed with my pints. I just drew a nitro chocolate RIS (like, a full ass-kicking pint - I'll be saying "G'Nite" soon ;)) and it's like nothing ever happened wrt to the plumbing.

Two pints up! :mug:

ps: The last picture just shows a plumbing schematic when using the barbed 3/8" OD - 1/4" barb adapters. Taken for the 'Pints folks.

pps: Yes, there's a lot of "temporary" stuff going on. Once the system is fully operational the internal wiring will be integrated into the lid with an imperial crap ton of min-XLRs (already enroute from China) leading to a DB-50 bulkhead connector at the rear edge of the lid, the 'Pi and AlaMode will go in the dolly, and the wiring inside the keezer will be dressed.

In the meantime, it's definitely gettin' crazy all up in there! :eek:

flow_meter_wiring_01.jpg


flow_meter_wiring_02.jpg


flow_meter_wiring_03.jpg


flow_meter_wiring_04.jpg


flow_meter_plumbing.jpg
 
Things to do before upgrading:

o if you've made any customization changes to any of the 'Pints files (style.css, index.php, any of the images or icons, etc) clone the /var/www folder to something like /var/www_save before you get to Step 11.

o if your 'Pi has been running awhile - like since 'Pints v1.0.3 release - don't even start before doing an $ apt-get update && apt-get upgrade as unless you've been keeping your 'Pi current there's a good chance the apt-get at Step 8 will fail with a bunch of 404s. If that happens, do the update/upgrade then re-run the original get command and it should work fine.

o in Step 2: if you know you've already installed phpmyadmin at some point, but trying to get to it through a browser (eg urls: localhost/phpmyadmin, 127.0.0.1/phpmyadmin, etc) ends with no joy, try this:

- verify you have a folder at /usr/share/phpmyadmin. If so, creating a symbolic link in /var/www to the phpmyadmin root folder should fix you up.

$ cd /var/www
$ ln -s /usr/share/phpmyadmin [<= corrected typo for posterity sake - the 'ln' was 'ls', and that ain't gonna work ;)]

Cheers!
 
^This.

Could someone possibly put together a photo step by step or at least pis of both sides of the alamode setup, for ppl like me that aren't very knowledgeable in this type of thing. I got my alamode today and while I am still waiting for the rPi to show I did notice that it came with nothing but the physical hardware and pin headers. I have no idea where to start beyond the gpio header attachment.

Also, I have seen others talk about the potential of shorts between the alamode and rPi, and that a rubber separator comes with to be put between them. is this right, that it is supposed to come with one, or not. mine did not so?

We are working on a better section for the how to wire up RPints section stay tuned. and as stated, yes the rubber piece should have came with but find anything non conductive
 
Vin(+5v), GND, and the 6 easiest pins for Digital (8-13) highlighted here (yes you can also use 2-7 below them for Digital):

All flow meters goto GND, and VIN, the data wire for each meter goes to a separate digital pin on the Alamode. There are other places to pickup +5v and GND as well, but you can tie all meters to the same GND and +5v pins without issues.

Enjoy!

GREAT image, Do you mind if we maybe use this image on our Official website in the how-to section?
 
Got my meters wired up to the AlaMode (fwiw, I'm using digital io pins 2-7) and got through the "upgrade from 1.0.3" to where I'm ready for the new 'Pints package. There were some issues that I've forwarded to the 'Pints gang, but on the whole it went pretty well.

So far the best thing is the meters have zero evident effect on my pours. I have to say I'm particularly proud of my beer dispensing appliance's performance and would literally bag the whole flow meter thing if it effed with my pints. I just drew a nitro chocolate RIS (like, a full ass-kicking pint - I'll be saying "G'Nite" soon ;)) and it's like nothing ever happened wrt to the plumbing.

Two pints up! :mug:

ps: The last picture just shows a plumbing schematic when using the barbed 3/8" OD - 1/4" barb adapters. Taken for the 'Pints folks.

pps: Yes, there's a lot of "temporary" stuff going on. Once the system is fully operational the internal wiring will be integrated into the lid with an imperial crap ton of min-XLRs (already enroute from China) leading to a DB-50 bulkhead connector at the rear edge of the lid, the 'Pi and AlaMode will go in the dolly, and the wiring inside the keezer will be dressed.

In the meantime, it's definitely gettin' crazy all up in there! :eek:

LOVE LOVE LOVE the plumbing schematic you can see this now being used in our how-to section!! I will also add a note/warning about backing up any custom changes
 
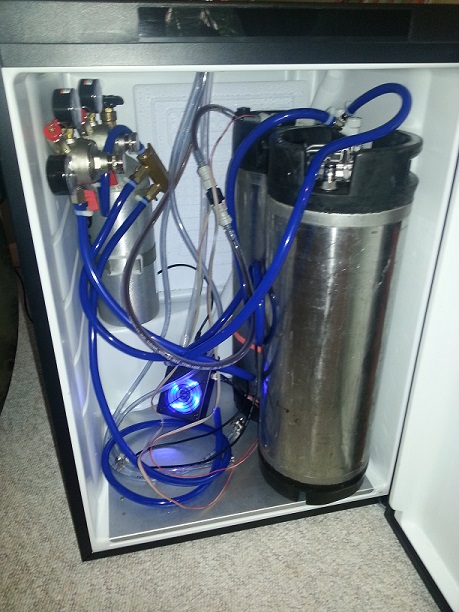
ProTip: Most chest freezers and mini-fridge kegerators have a drain port you can push a wire through. I used a piece of Cat5 cable to get 8 low-voltage conductors into mine. No new holes, nice and neat.

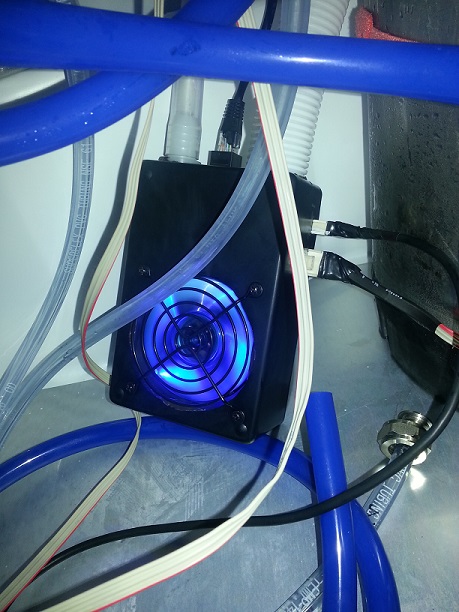
I also installed a fan in a project box to help circulate air inside the kegerator and up into the draft tower. I used this same box to connect the Cat5 cable to, and added connectors for flow meters and temp sensors. Just need to tidy it up and it'll all be consolidated into one box, with just a single cable going through the drain hole (no additional drilling required).

The Cat5 cable is shown going behind the CO2 tank (black cable) down into the drain hole. I use a small rechargeable dehumidifier so there's no condensation, even so there is still plenty of room for any water to go down into the drip tray.

kegerator_big1.jpg


kegerator_inside1.jpg
 
ProTip: Most chest freezers and mini-fridge kegerators have a drain port you can push a wire through. I used a piece of Cat5 cable to get 8 low-voltage conductors into mine. No new holes, nice and neat.

I also installed a fan in a project box to help circulate air inside the kegerator and up into the draft tower. I used this same box to connect the Cat5 cable to, and added connectors for flow meters and temp sensors. Just need to tidy it up and it'll all be consolidated into one box, with just a single cable going through the drain hole (no additional drilling required).

The Cat5 cable is shown going behind the CO2 tank (black cable) down into the drain hole. I use a small rechargeable dehumidifier so there's no condensation, even so there is still plenty of room for any water to go down into the drip tray.

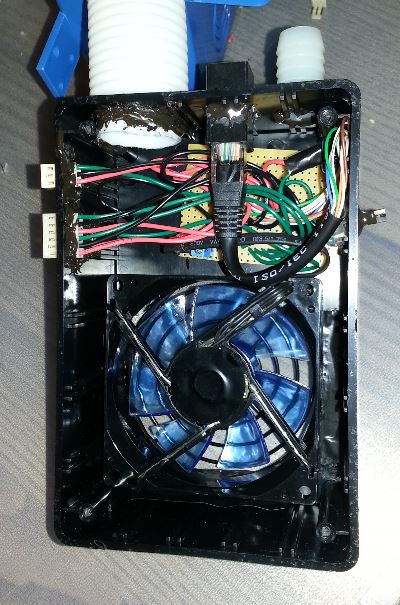
Anyway you could send a picture of the inside of the fan box. Ive got a similar one in my keezer and like your idea of integrating the two.
 
GIzPlAi.jpg


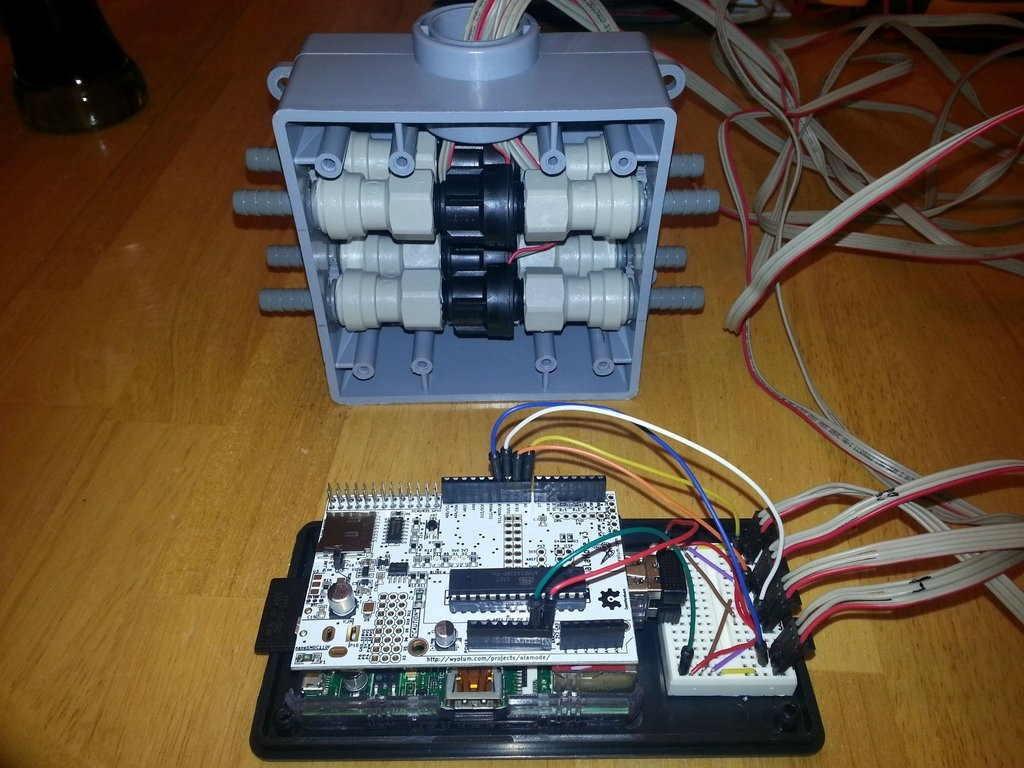
i made a nifty enclosure from a conduit box from lowes. Now it'll be easy to mount the meters in my keezer.

hardware is done, tomorrow i'll tackle the software.
just put a new keg in tonight, not gonna tap it until this is up and running so i can test accuracy.

cant wait!!
 
Anyway you could send a picture of the inside of the fan box. Ive got a similar one in my keezer and like your idea of integrating the two.

Inside of the box. Liberal with the JBWeld (great stuff). The circuit board under the wires hosted the connection points, fan terminals, and resistors for the flow meters and temp sensors (originally part of a Kegbot setup).

The box is just your standard Radio Shack project box. I'll be using a similar (smaller) one for the outside components... RasPi, Alamode, 12v feed (fan) and RJ45 connector to connect the Cat5 cable in the kegerator.

box_inside1.JPG
 
GIzPlAi.jpg


i made a nifty enclosure from a conduit box from lowes. Now it'll be easy to mount the meters in my keezer.

hardware is done, tomorrow i'll tackle the software.
just put a new keg in tonight, not gonna tap it until this is up and running so i can test accuracy.

cant wait!!

That is a very sweet idea! Im going to steal this from you. Are the circuit boards attached to the inside of the lid to the box?
 
Inside of the box. Liberal with the JBWeld (great stuff). The circuit board under the wires hosted the connection points, fan terminals, and resistors for the flow meters and temp sensors (originally part of a Kegbot setup).

The box is just your standard Radio Shack project box. I'll be using a similar (smaller) one for the outside components... RasPi, Alamode, 12v feed (fan) and RJ45 connector to connect the Cat5 cable in the kegerator.

How well does it move air?
 
How well does it move air?
It works well. You'll see the white flex tubing coming out of the top in one picture, that goes up to the top of the kegerator and circulates air from the bottom, creates a small air current.

There is another white connector on the top, which when inside the kegerator is connected to a clear 3/4" tube that goes up into the draft tower to circulate cold air through it. I also added additional insulation to the draft tower.

When packed with 3 kegs, they all read the same temp (insulated probe attached to the sides of each one), so there aren't any 'warmer' spots within the kegerator.
 
GIzPlAi.jpg


i made a nifty enclosure from a conduit box from lowes. Now it'll be easy to mount the meters in my keezer.

hardware is done, tomorrow i'll tackle the software.
just put a new keg in tonight, not gonna tap it until this is up and running so i can test accuracy.

cant wait!!

Great work, It is so rewarding and fun to see what people are doing with RPints!!
 
I've been dreaming of V2 for months now. I've got all the parts on hand or in the mail - can't wait to start hacking it together!
 
Back
Top