You are using an out of date browser. It may not display this or other websites correctly.
You should upgrade or use an alternative browser.
You should upgrade or use an alternative browser.
Unveiling my brewery & garage build
- Thread starter fall-line
- Start date

Help Support Homebrew Talk:
This site may earn a commission from merchant affiliate
links, including eBay, Amazon, and others.
user 125772
Well-Known Member
- Joined
- Jul 18, 2012
- Messages
- 941
- Reaction score
- 272
Very impressive!, now get to work on the interior paint !
")
CousinsCraft
Member
Fall-line,
Thanks for answering my questions.
Thanks for answering my questions.
OP
OP
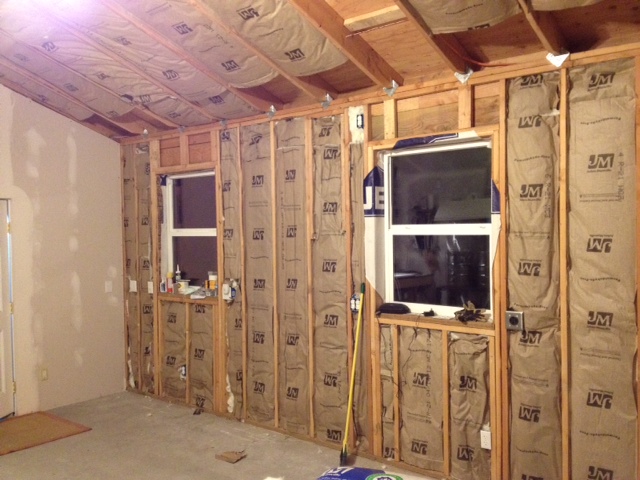
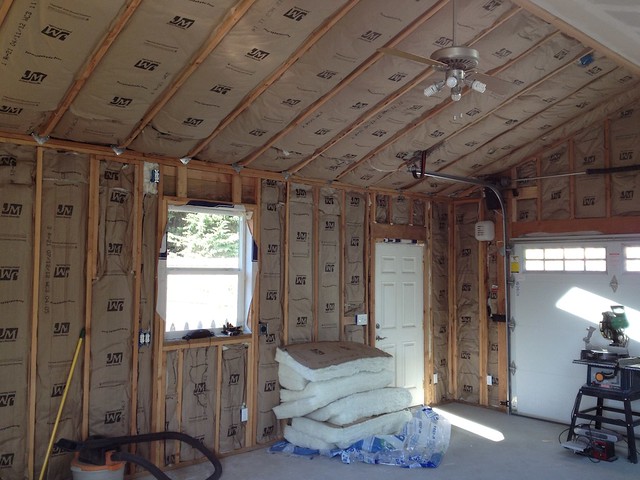
Minor updates over the weekend, I only had part of one day to get any work done. Getting motivated to get the 'real' work done and out of the way now, so I spent the better part of Sunday putting in insulation in the unfinished half of the building.
I made quite a bit more progress after this was taken. I just need a few more batts and I'll be ready for drywall.
And a little progress on the brewing setup. The MLT is cut, and 'polished'. I did a silly thing and used a course grit flapper wheel on my angle grinder to remove the paint and labels from the keg, before polishing via this method. This made it really tough to get a good polish on the keg, and left some interesting texture to the metal. I'll definitely be staying away from the flapper wheel next time. Oh well, it still looks better than it did.
OP
OP
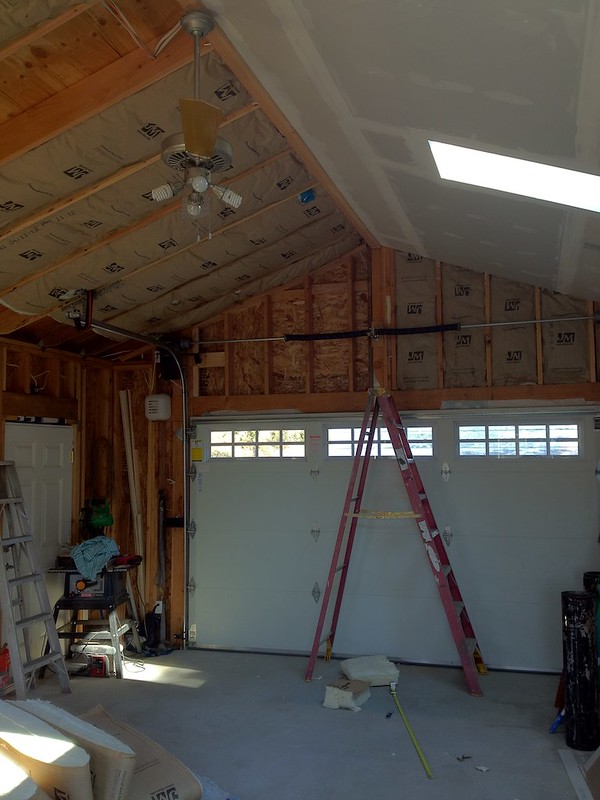
Incidentally, I wanted to make a recommendation for the 'high lift' garage door design I choose here to anyone considering building a garage or replacing their door. With my ridge pole design, I have ~11ft of clearance at the outer edges of the door (15' in the middle), so I went with a door design that rolls up 3 ft before making the turn and rolling back horizontally. This means I have over 10' of clearance between the floor and the tracks, and the door when it is open. The opener is 'jack shaft' variety that sits on the wall next to the door, rather than overhead as well. You can barely see it at the top left in the photo above (small black box, above the white light fixture).
This design costs a bit more (about $75 more for the track, and $200 more for the motor) than a standard garage door would, but it is absolutely worth it in my opinion if you have the ceiling height to work with.
This design costs a bit more (about $75 more for the track, and $200 more for the motor) than a standard garage door would, but it is absolutely worth it in my opinion if you have the ceiling height to work with.


$53.24
1pc Hose Barb/MFL 1.5" Tri Clamp to Ball Lock Post Liquid Gas Homebrew Kegging Fermentation Parts Brewer Hardware SUS304(Liquid Hose Barb)
yunchengshiyanhuqucuichendianzishangwuyouxiangongsi


$20.94
$29.99
The Brew Your Own Big Book of Clone Recipes: Featuring 300 Homebrew Recipes from Your Favorite Breweries
Amazon.com


$58.16
HUIZHUGS Brewing Equipment Keg Ball Lock Faucet 30cm Reinforced Silicone Hose Secondary Fermentation Homebrew Kegging Brewing Equipment
xiangshuizhenzhanglingfengshop


$176.97
1pc Commercial Keg Manifold 2" Tri Clamp,Ball Lock Tapping Head,Pressure Gauge/Adjustable PRV for Kegging,Fermentation Control
hanhanbaihuoxiaoshoudian


$33.99 ($17.00 / Count)
$41.99 ($21.00 / Count)
2 Pack 1 Gallon Large Fermentation Jars with 3 Airlocks and 2 SCREW Lids(100% Airtight Heavy Duty Lid w Silicone) - Wide Mouth Glass Jars w Scale Mark - Pickle Jars for Sauerkraut, Sourdough Starter
Qianfenie Direct


$22.00 ($623.23 / Ounce)
AMZLMPKNTW Ball Lock Sample Faucet 30cm Reinforced Silicone Hose Secondary Fermentation Homebrew Kegging joyful
无为中南商贸有限公司


![Craft A Brew - Safale BE-256 Yeast - Fermentis - Belgian Ale Dry Yeast - For Belgian & Strong Ales - Ingredients for Home Brewing - Beer Making Supplies - [3 Pack]](https://m.media-amazon.com/images/I/51bcKEwQmWL._SL500_.jpg)


$479.00
$559.00
EdgeStar KC1000SS Craft Brew Kegerator for 1/6 Barrel and Cornelius Kegs
Amazon.com

$719.00
$799.00
EdgeStar KC2000TWIN Full Size Dual Tap Kegerator & Draft Beer Dispenser - Black
Amazon.com


$7.79 ($7.79 / Count)
Craft A Brew - LalBrew Voss™ - Kveik Ale Yeast - For Craft Lagers - Ingredients for Home Brewing - Beer Making Supplies - (1 Pack)
Craft a Brew

$10.99 ($31.16 / Ounce)
Hornindal Kveik Yeast for Homebrewing - Mead, Cider, Wine, Beer - 10g Packet - Saccharomyces Cerevisiae - Sold by Shadowhive.com
Shadowhive


$53.24
1pc Hose Barb/MFL 1.5" Tri Clamp to Ball Lock Post Liquid Gas Homebrew Kegging Fermentation Parts Brewer Hardware SUS304(Liquid Hose Barb)
Guangshui Weilu You Trading Co., Ltd


Very nice work! I have been wanting to add a separate building in the back of my property so I could have a workshop and a brewery someday for when I retire. Now I am so inspired to get moving on planning it out further and get serious about building it. Thanks for posting, keep the pics coming.
Your a lucky man!
John
Your a lucky man!
John
kosmokramer
Well-Known Member
Great build man,,, JonW's work helped me out alot as well. The stand is perfect for my keggle setup
FuzzeWuzze
I Love DIY
Amazing post
This is what imagine when i think of the OP and his build lol, so badass. I hope some day to have a plot of land big enough to do something like this...right now your little shed is probably half or more of my entire back yard...

This is what imagine when i think of the OP and his build lol, so badass. I hope some day to have a plot of land big enough to do something like this...right now your little shed is probably half or more of my entire back yard...
OP
OP
Thanks, all.
Fuzze, I can assure you that is not what life feels like, especially after spending each evening after work up on a ladder with drywall and insulation dust covering my body. Oh, and then having the contractor stopping by asking for yet another check.
Still, I do feel pretty fortunate to be able to build something like this. It's a lot of hard work, but a really rewarding process.
Speaking of progress, here is the product of last night's work. I've got the guys coming over on the weekend to help me finish the drywall.
TheOnionKnight
Active Member
Congrats on this amazing build!
Looks fantastic - worth the hard work for sure.
PleasantValleyHops
Well-Known Member
Didnt know if u already mentioned or not. How do u like the pex tubing for plumbing. My brother and i just did all the homeruns at his house. And a friend whos a plumber hates it. But dont really see how. I love how this garage is coming out. Kinda what im thinking for my brewery upgrade!!!
OP
OP
dcarroll, I have to say I am a fan of PEX. The ease of installation and flexibility that it allows is outstanding. Just in this simple building it probably saved 8 hours of work over using copper pipe, not to mention the expense. The downside is that you need a special tool to make the fittings, which we had to rent for a few bucks a day. Even with the added hassle of buying or renting the tool, it was a big savings.
OP
OP
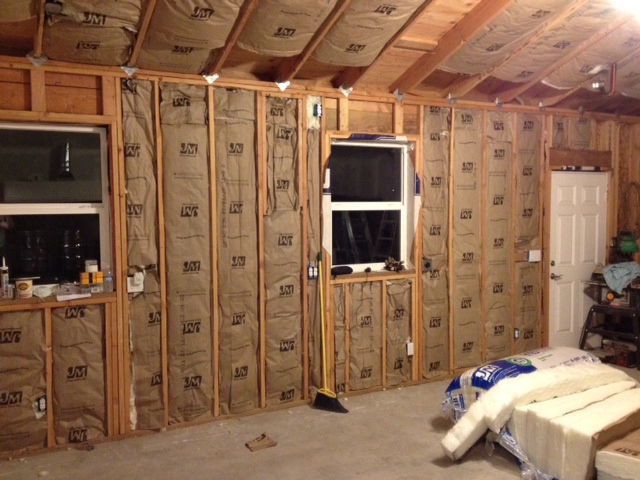
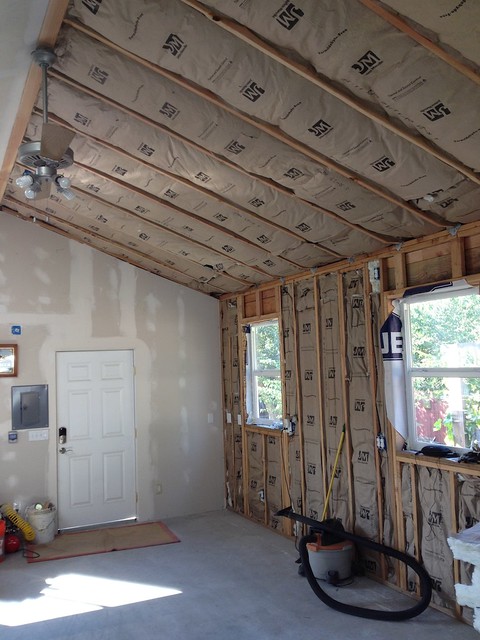
Finally, insulation is DONE. This half of the building will be much easier to drywall than the brewery section, since there are fewer outlets, and no plumbing to work around.
OP
OP
Too many photos of boring insulation these past couple of days, so here is some good stuff I worked on last night.
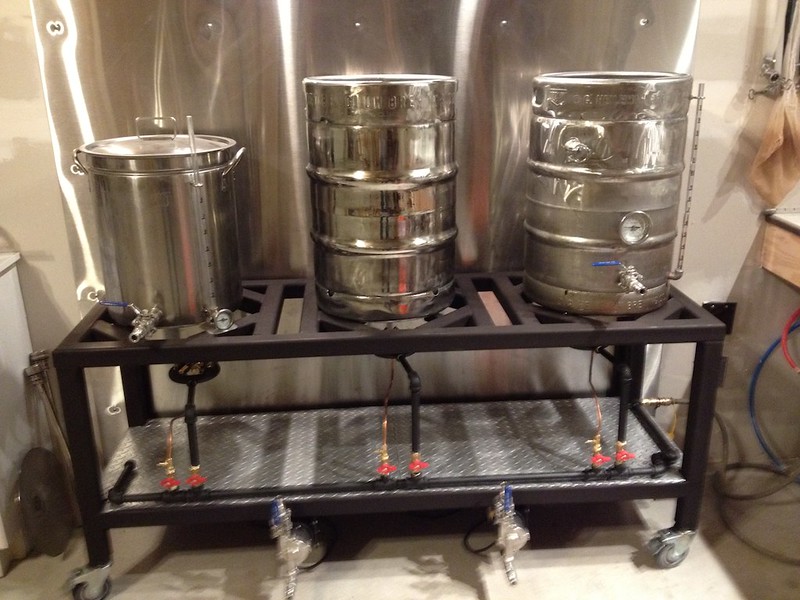
Drilling the new MLT (existing BK is on the right)
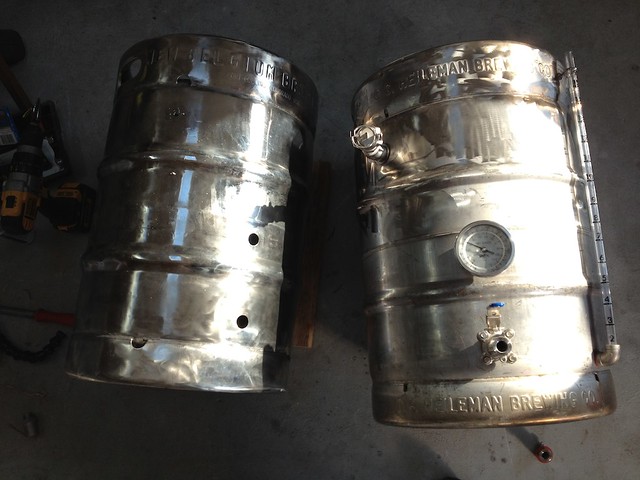
Running PBW through the new MLT to clean after drilling
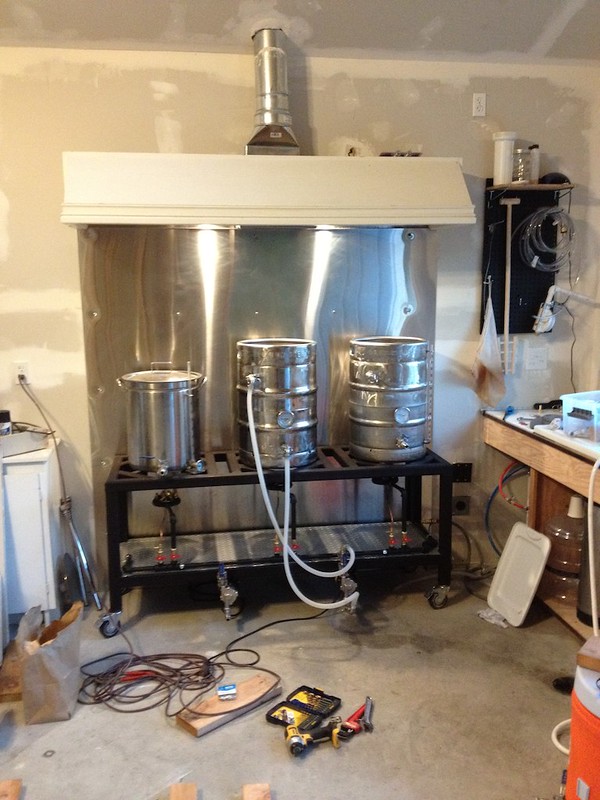
Detail on the shiny stainless steel underside of the hood. I still can't believe my luck to find this thing.
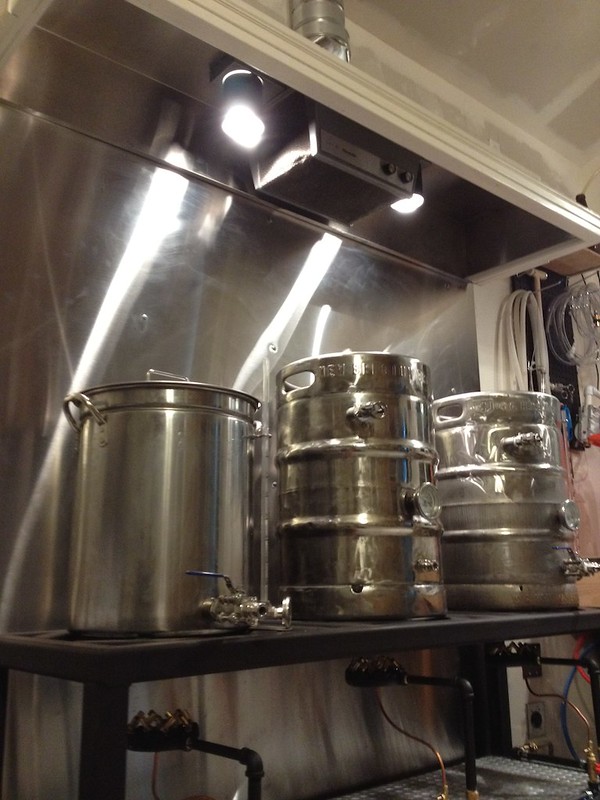
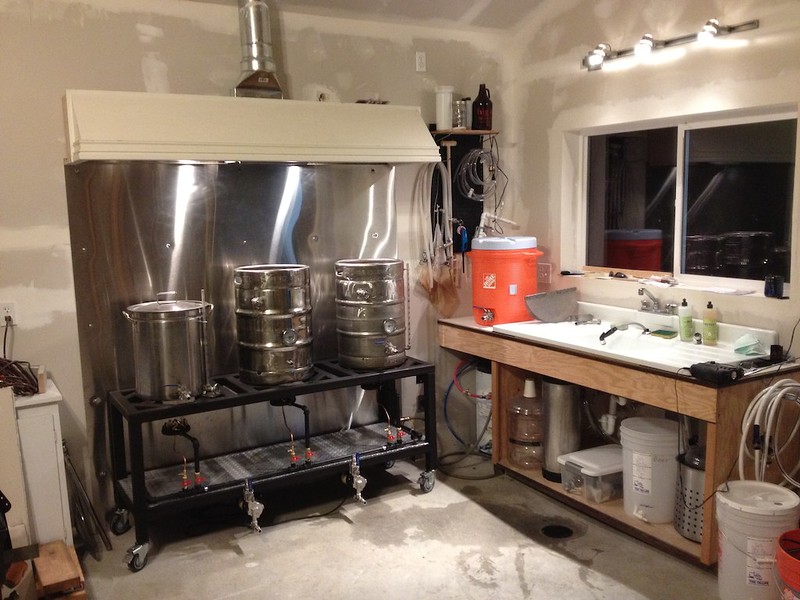
The brewery, ready for action! I'm just waiting for the drywall to be finished on the other side of the building before I'll allow myself to brew. It should be done by Saturday afternoon.
Also addressing a previous question, the gas manifold is now fully secured with those 1 hole conduit straps. They work great. You can find them in the electrical (not plumbing) section of your box store.
Drilling the new MLT (existing BK is on the right)
Running PBW through the new MLT to clean after drilling
Detail on the shiny stainless steel underside of the hood. I still can't believe my luck to find this thing.
The brewery, ready for action! I'm just waiting for the drywall to be finished on the other side of the building before I'll allow myself to brew. It should be done by Saturday afternoon.
Also addressing a previous question, the gas manifold is now fully secured with those 1 hole conduit straps. They work great. You can find them in the electrical (not plumbing) section of your box store.
OP
OP
A question for anyone reading that might have input: I'm fairly confident that the stainless steel backing (on the wall) will provide sufficient heat shielding to protect the wall, but I'm cautious about taking this for granted. The steel on the wall gets quite hot when the burners are running flat out. I could slide the stand out from the wall a bit, but then I'd loose the effectiveness of my hood. In my experience the reflective characteristics of the steel will protect the wall from most of the radiant heat, but there is still quite a bit of heat transfered via its conductive qualities. I'm a little concerned about what's going in inside the wall. I'm also struggling to figure out how to test it.. I've thought about going outside the building an drilling a small hole in the wall to insert a thermometer.
The contractor I've been working with doesn't think it'll be a problem at all. Maybe I'm just over-thinking it.
Thoughts?
The contractor I've been working with doesn't think it'll be a problem at all. Maybe I'm just over-thinking it.
Thoughts?
To be safe, why not put some backer board on there.
OP
OP
Good point. Some ceramic spacers, backerboard and then the stainless sheeting is probably the way to go. I do have "X type" drywall on the wall behind the stainless, but without an air gap there isn't much I can do to prevent the conduction of heat to the wood studs.
Hmm... I really don't want to redo that wall
Hmm... I really don't want to redo that wall
I don't see where you'd need to put spacers in there. I'd just put a layer of backer board over the existing sheetrock and put the SS back on top of that. You could then either get an SS edging or just fill the edge of the backer board with plaster and paint the elevated edge. It looks like your hood already has an inside lip on the back wall, so that would just bring the back SS panel out even or close to the hood edge.
MuddyCreek
Well-Known Member
Amazing setup. Really impressive.
OP
OP
Thanks, Muddy (and others), it's rewarding to hear this feedback after all the hard work.
OP
OP
Regarding the backing board, I've seen a lot of mixed information about whether or not it needs a spacer. I believe you two are probably right that I don't really *need* the gap, but it does make sense that it should be there. I believe code requires a wood stove to have a 1" spacer between the wall and the backer board, and then a non flammable surface material.
Currently the stainless backing on the wall underlaps the hood by a few inches, but to Jon's point, I could cut the height down so it sits flush with the bottom of the hood, and bump it out a bit for the backer.
Thanks for the info guys. I'm planning to do another round of taping and mudding the drywall next week in preperation for painting, so I'll look to address this then. I'll pickup the backing board and do a hand heat test with it next to the burner after a while to answer the gap/no gap question.
PleasantValleyHops
Well-Known Member
I see no reason to worry about redoing the drywall. I work in construction and have done a few restaurants. The one thing that would happen is double layer 5/8" drywall. Which does create a 1 hour rated wall. But that was also bc they were not standalone places so needed the break between the different stores. But this stainless would be applied straight to the drywall!! I know y risk it is a big deal. But also radiant heat has to be through the roof to penetrate the stainless and drywall to combust the wood framing behind it. And u said u used type x. Id say dont sweat it and enjoy u sweet setup!! Planning my next house build i def have a brewery in thought as a built in!!!
Cheers!
Cheers!
earlchagnon
New Member
Wow! That about sums it up!
OP
OP
dcarroll86, I'll admit you are telling me what I want to hear. You are probably right, but I can't help but consider the risks. The wall here is a 1hr rated firewall (per code as it is 3ft from our property line) with two layers of type X, but only one of those layers is on the inside. If I recall my wall from the inside out is: 26gauge Stainless Steel, 5/8" TypeX, Studs and R21 insulation, 5/8" TypeX, plywood, and then siding.
My concern is the impact the heat will have on the in-wall materials, which include quite a bit of plumbing and electrical right there. I'm leaning towards slapping some backing board up there as JonW suggested. I figure for a couple of hours work, I may save myself years of uncertainty. My contractor will be coming by for a visit tomorrow though, so I'll fire up the burners for a bit and get his opinion on things.
Thanks again for all your thoughts! I should have started this thread and been picking your brains earlier.
Im_Lars
Well-Known Member
I helped a friend build a small cabin and behind the wood stove we put hardy backer and a sheet of stainless. The next day the wood stove was cookin and we had to pull some siding off to repair a pluming leak for the outside faucet. The back side of the sheetrock was maybe ten degrees warmed that sheetrock down the wall away from the wood stove and the stainless behind the stove was so hot you couldn't keep your hand on it. If you added backer under the stainless you are going to be more than good to go
OP
OP
Thanks, earlchagnon, and welcome to the forums!
i'm not jealous. i'm not angry. i'm... i don't know what i am. what is beyond awe? yeah, that's what i'm feeling.
beyond sweet. amazing work. wow!
beyond sweet. amazing work. wow!
Similar threads
- Replies
- 3
- Views
- 974
- Replies
- 6
- Views
- 912
- Replies
- 1
- Views
- 863

Latest posts
-
Spike Conical Heater fails again--second in 3 years--ideas?
- Latest: Indian_villager
-

-

-
-
