Yes please...
You are using an out of date browser. It may not display this or other websites correctly.
You should upgrade or use an alternative browser.
You should upgrade or use an alternative browser.
Unveiling my brewery & garage build
- Thread starter fall-line
- Start date

Help Support Homebrew Talk:
This site may earn a commission from merchant affiliate
links, including eBay, Amazon, and others.
OP
OP
I spent a few hours putting the brewery to be back together after painting the stand last night. I'm getting very close to the first real brew day on the full setup now. Never mind the remaining insulation and drywall that needs to be done in the garage.. that can wait!
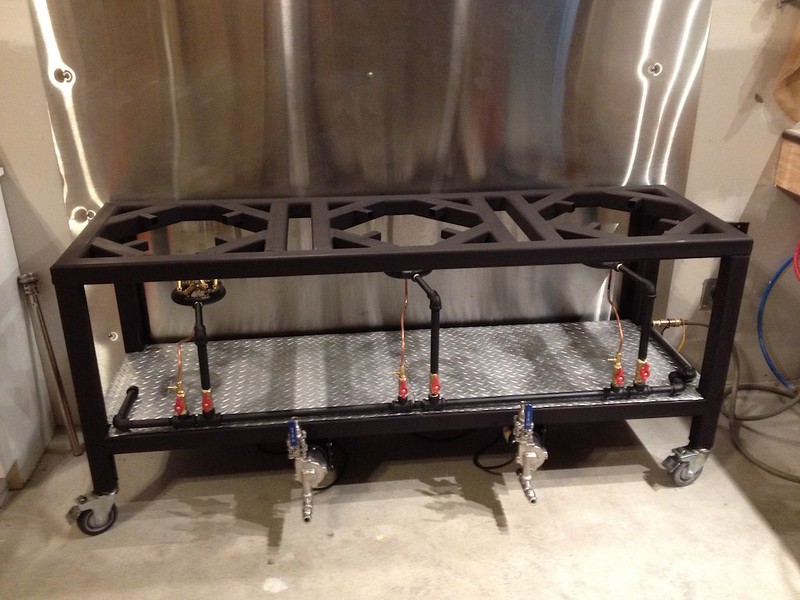
Fully painted stand, in position and ready for action.
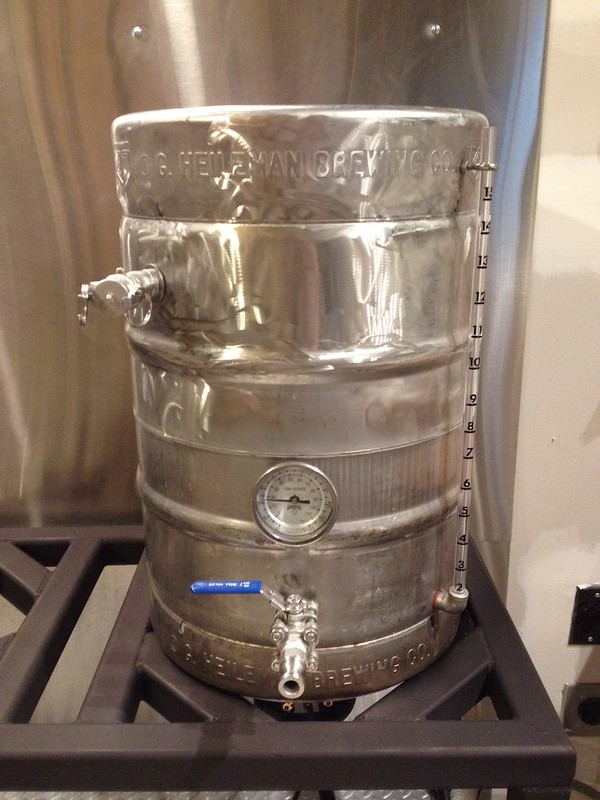
New boil kettle ready for its first brew. Once I get the new MLT cut and drilled, I'll remove these fittings and polish this one at the same time. The return port uses a 45º elbow to create a 'straight out' cam lock connection off to the side. This is another idea I pilfered from JonW (though others have done it). I really like the way the hoses connect in this configuration, and the kettle has a balanced look to it with the sight glass at the opposing 45º position.
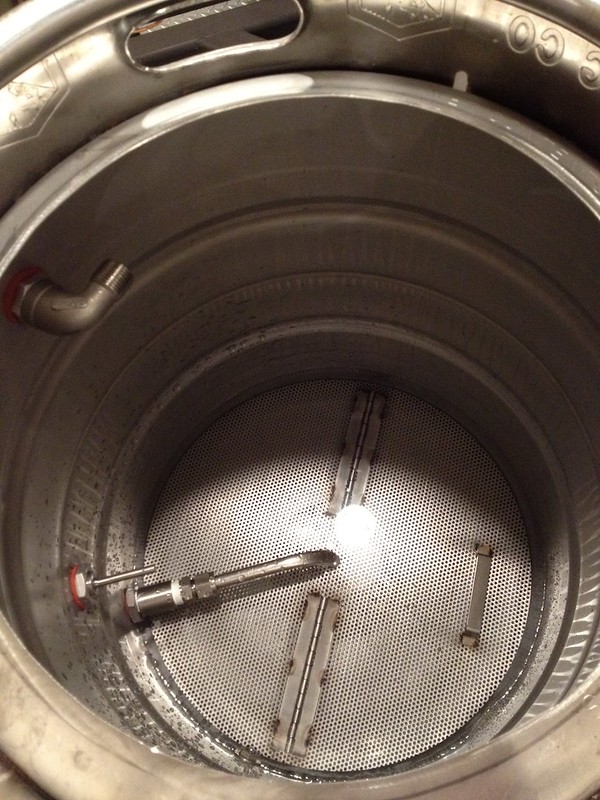
Inside the boil kettle. I went with Jaybird's excellent false bottom and stand in here, so that I can use free range hops. Looking forward to trying this out and ditching the hop bag/spider, though I will likely still use them for pellet hopps when I use them (I prefer whole leaf if have the option).
Curing the paint (round 2.) I put a few inches of water in each pot and cranked up the heat to cure the paint as described above (see the heat gun picture.) The flat bottom kettle worked well for this, but the keggle seemed to have concentrated the heat too much on the 'ring' where it contacts the stand, causing some paint to scratch and burn off. Only a few very small spots and not a big deal, but I was a little disappointed to have lost some paint already before even brewing on it. It looks like I'll need to keep a can of this stuff handy for touch ups.
That's it for now. More updates to come! Thanks for your kind words and questions.
Fully painted stand, in position and ready for action.
New boil kettle ready for its first brew. Once I get the new MLT cut and drilled, I'll remove these fittings and polish this one at the same time. The return port uses a 45º elbow to create a 'straight out' cam lock connection off to the side. This is another idea I pilfered from JonW (though others have done it). I really like the way the hoses connect in this configuration, and the kettle has a balanced look to it with the sight glass at the opposing 45º position.
Inside the boil kettle. I went with Jaybird's excellent false bottom and stand in here, so that I can use free range hops. Looking forward to trying this out and ditching the hop bag/spider, though I will likely still use them for pellet hopps when I use them (I prefer whole leaf if have the option).
Curing the paint (round 2.) I put a few inches of water in each pot and cranked up the heat to cure the paint as described above (see the heat gun picture.) The flat bottom kettle worked well for this, but the keggle seemed to have concentrated the heat too much on the 'ring' where it contacts the stand, causing some paint to scratch and burn off. Only a few very small spots and not a big deal, but I was a little disappointed to have lost some paint already before even brewing on it. It looks like I'll need to keep a can of this stuff handy for touch ups.
That's it for now. More updates to come! Thanks for your kind words and questions.
barhoc11
Well-Known Member
So are you planning to grow hops in that trellis area or is that for something else? I gotta give you major credit, you seem to have covered all angles and I am super jealous.
OP
OP
Wow, I'm kind of stunned, barhoc11. I had never considered growing hops there. We haven't decided what to grow on it yet, but hops hadn't even entered the conversation. I have a small hop trellis on the south wall of my house, but this new spot would be perfect for it. The only challenge would be keeping the different varieties separated. I should be able to grow at least 3 varieties on this trellis though. And with that, I proclaim that Hops will be grown on this trellis. I owe you a beer.
barhoc11
Well-Known Member
Wow, I'm kind of stunned, barhoc11. I had never considered growing hops there. We haven't decided what to grow on it yet, but hops hadn't even entered the conversation. I have a small hop trellis on the south wall of my house, but this new spot would be perfect for it. The only challenge would be keeping the different varieties separated. I should be able to grow at least 3 varieties on this trellis though. And with that, I proclaim that Hops will be grown on this trellis. I owe you a beer.
No problem, I just thought even if its one variety it would look good and serve a real purpose as well. Good luck with everything
lehr
Well-Known Member
It's a valid question. I went back and forth with my contractor on this. It's only 19' wide, and we get very little snow here. We ended up going with a ridge pole design to open up the ceiling instead of using trusses. The rafters do have rafter ties where they meet the ridge pole.
Code (at least here) requires anything over 32' wide to use trusses. I'm not an architect or an engineer, but I feel pretty confident in the integrity of this design.
Hey if it's code it should work...It looks very nice !
Pat


$58.16
HUIZHUGS Brewing Equipment Keg Ball Lock Faucet 30cm Reinforced Silicone Hose Secondary Fermentation Homebrew Kegging Brewing Equipment
xiangshuizhenzhanglingfengshop


$44.99
$49.95
Craft A Brew - Mead Making Kit – Reusable Make Your Own Mead Kit – Yields 1 Gallon of Mead
Craft a Brew

$7.79 ($7.79 / Count)
Craft A Brew - LalBrew Voss™ - Kveik Ale Yeast - For Craft Lagers - Ingredients for Home Brewing - Beer Making Supplies - (1 Pack)
Craft a Brew


$22.00 ($623.23 / Ounce)
AMZLMPKNTW Ball Lock Sample Faucet 30cm Reinforced Silicone Hose Secondary Fermentation Homebrew Kegging joyful
无为中南商贸有限公司


![Craft A Brew - Safale S-04 Dry Yeast - Fermentis - English Ale Dry Yeast - For English and American Ales and Hard Apple Ciders - Ingredients for Home Brewing - Beer Making Supplies - [1 Pack]](https://m.media-amazon.com/images/I/41fVGNh6JfL._SL500_.jpg)
$6.95 ($17.38 / Ounce)
$7.47 ($18.68 / Ounce)
Craft A Brew - Safale S-04 Dry Yeast - Fermentis - English Ale Dry Yeast - For English and American Ales and Hard Apple Ciders - Ingredients for Home Brewing - Beer Making Supplies - [1 Pack]
Hobby Homebrew


$53.24
1pc Hose Barb/MFL 1.5" Tri Clamp to Ball Lock Post Liquid Gas Homebrew Kegging Fermentation Parts Brewer Hardware SUS304(Liquid Hose Barb)
Guangshui Weilu You Trading Co., Ltd


$20.94
$29.99
The Brew Your Own Big Book of Clone Recipes: Featuring 300 Homebrew Recipes from Your Favorite Breweries
Amazon.com


$33.99 ($17.00 / Count)
$41.99 ($21.00 / Count)
2 Pack 1 Gallon Large Fermentation Jars with 3 Airlocks and 2 SCREW Lids(100% Airtight Heavy Duty Lid w Silicone) - Wide Mouth Glass Jars w Scale Mark - Pickle Jars for Sauerkraut, Sourdough Starter
Qianfenie Direct


$10.99 ($31.16 / Ounce)
Hornindal Kveik Yeast for Homebrewing - Mead, Cider, Wine, Beer - 10g Packet - Saccharomyces Cerevisiae - Sold by Shadowhive.com
Shadowhive


$176.97
1pc Commercial Keg Manifold 2" Tri Clamp,Ball Lock Tapping Head,Pressure Gauge/Adjustable PRV for Kegging,Fermentation Control
hanhanbaihuoxiaoshoudian


$53.24
1pc Hose Barb/MFL 1.5" Tri Clamp to Ball Lock Post Liquid Gas Homebrew Kegging Fermentation Parts Brewer Hardware SUS304(Liquid Hose Barb)
yunchengshiyanhuqucuichendianzishangwuyouxiangongsi

OP
OP
Thanks, Lehr. I just checked out your rig (and other fabrication work) - inspirational!!
Pearlsnappro
Active Member
- Joined
- Jan 16, 2011
- Messages
- 32
- Reaction score
- 0
subscribed. One day I will have my own.
Ramitt
Well-Known Member
Very cool, great work. Love the hop trellis idea.
lehr
Well-Known Member
Thanks, Lehr. I just checked out your rig (and other fabrication work) - inspirational!!
Thanks ... here is a picture of my trellis in the spring before it is covered over the top with hops, it should provide great shade in the summer for you and hops to use in the fall !
Pat

OP
OP
A little about the stand. It's a pretty standard Brutus inspired design, that will do direct fired RIMS in the long run. I'm upgrading from an 11 gallon BIAB setup, so I've made the conscious decision to skip the automation for now and just control the burners manually. I'd like to force myself to focus on the basics of brewing on this setup before distracting myself with the automation portion, or using it as a crutch. That being said, it has been designed entirely with automation in mind, and I expect to add it within the first year. There are very few parts on this stand today that will be redundant when automation is added, I think I'll only be about about $8 worth of gas piping. Speaking of that piping, the gas manifold is simply 1/2" ID black iron pipe with brass gas rated ball valves.
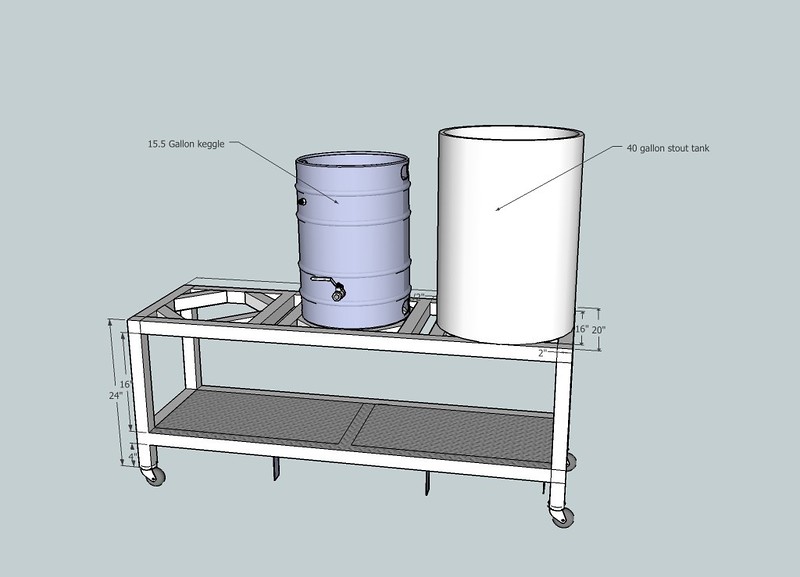
You may note that I added some additional 1" square tube supports on the sides of each burner area. These were a late design addition and are not reflected on the drawings. This is because I designed the stand to be large enough for a potential future upgrade to a 1bbl batch size, using Stout tanks kettles. This decision made using keggles a little bit sketchy (there was a tip factor of they were not positioned correctly), so we added the extra supports to accomodate any size of kettle. I fully recognize that this upgrade may never happen, but it's nice knowing that I have the option to go bigger just by switching my kettles at any point (ok, I'd probably need to upgrade my gas manifold pipe size and add bigger burners too.)
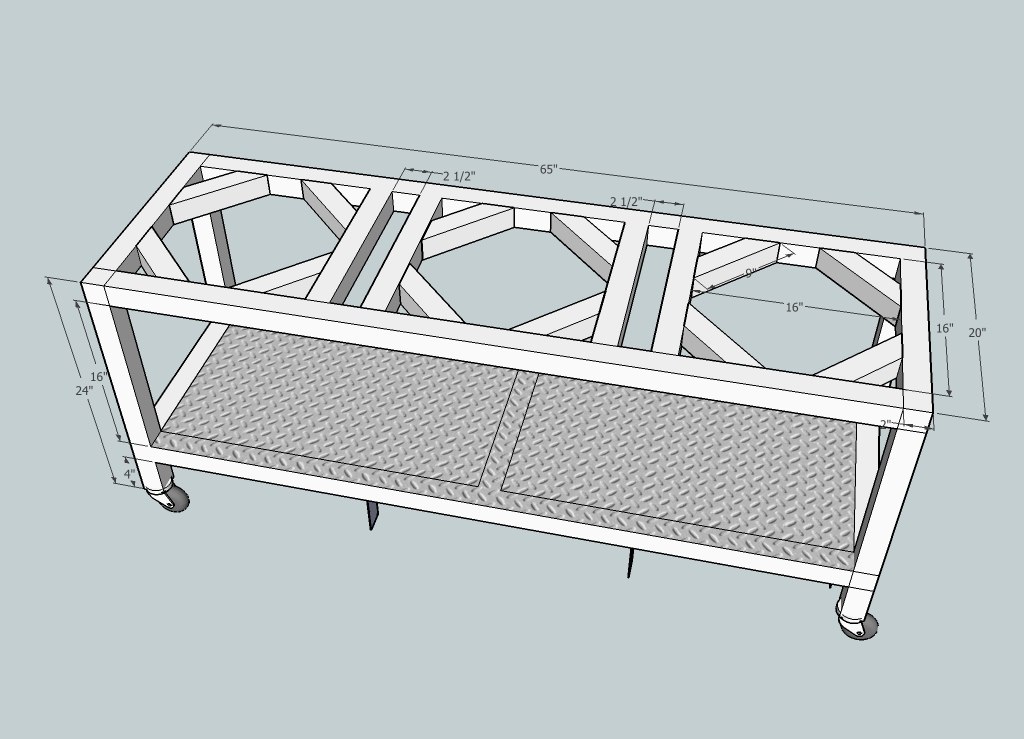
Here are the sketchup drawings. If anyone likes the design and would like the original sketchup file, just ask. I'd be happy to send it along to you. For me, this is the perfect size for both kettle options. At 2" square tubing it is over built for the 15 gallon kegs, but again it is designed 3x 40 gallon kettles (actually 2x 40 and 1x 45). I'd have to check my notes for the gauge steel we used, but the long horizontal beams are a thicker gauge and the uprights and cross bars are thinner to save cost and weight. Bottom line, we put a lot of thought into the potential max load requirements and then built accordingly. And yes, it's overbuilt.")
Stand dimensions
Stand with keggle and stout tank mockup
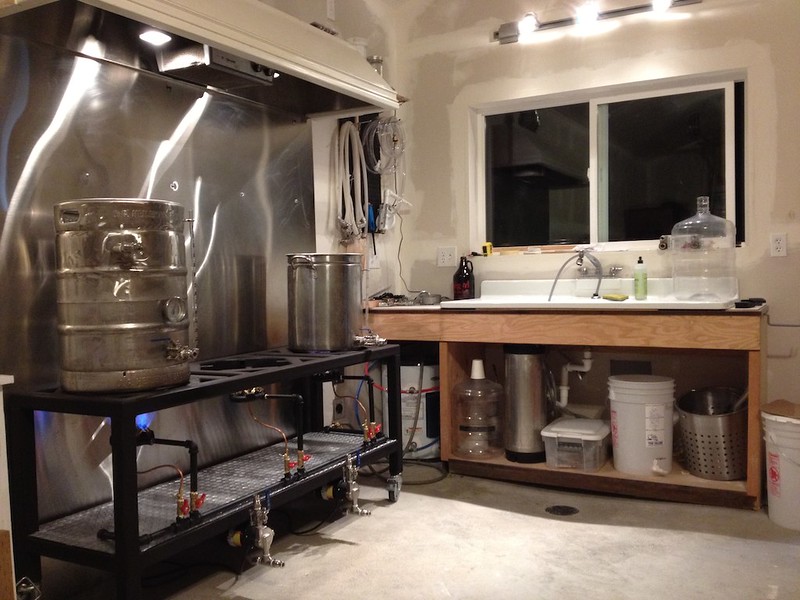
Re-posting the 'done' image from before for those not scrolling the thread
I have a few iPhone pictures of the stand build process I can share if there is any interest.
You may note that I added some additional 1" square tube supports on the sides of each burner area. These were a late design addition and are not reflected on the drawings. This is because I designed the stand to be large enough for a potential future upgrade to a 1bbl batch size, using Stout tanks kettles. This decision made using keggles a little bit sketchy (there was a tip factor of they were not positioned correctly), so we added the extra supports to accomodate any size of kettle. I fully recognize that this upgrade may never happen, but it's nice knowing that I have the option to go bigger just by switching my kettles at any point (ok, I'd probably need to upgrade my gas manifold pipe size and add bigger burners too.)
Here are the sketchup drawings. If anyone likes the design and would like the original sketchup file, just ask. I'd be happy to send it along to you. For me, this is the perfect size for both kettle options. At 2" square tubing it is over built for the 15 gallon kegs, but again it is designed 3x 40 gallon kettles (actually 2x 40 and 1x 45). I'd have to check my notes for the gauge steel we used, but the long horizontal beams are a thicker gauge and the uprights and cross bars are thinner to save cost and weight. Bottom line, we put a lot of thought into the potential max load requirements and then built accordingly. And yes, it's overbuilt.
Stand dimensions
Stand with keggle and stout tank mockup
Re-posting the 'done' image from before for those not scrolling the thread
I have a few iPhone pictures of the stand build process I can share if there is any interest.
OP
OP
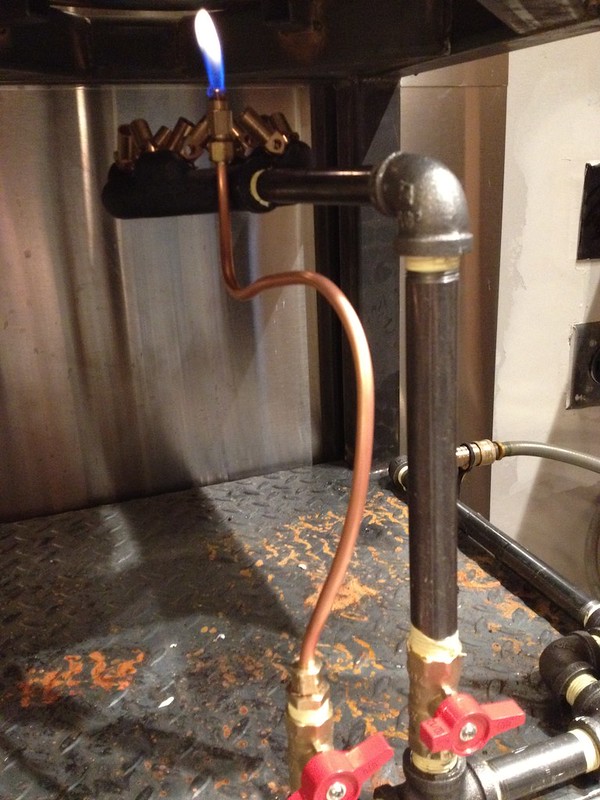
The 10 tip natural gas jet burners are designed to be supported by a 3/8" feeder pipe, so I just have a 1/2" to 3/8" reducing elbow at the top of each 'burner stand'.
Some detail on the gas manifold & burners
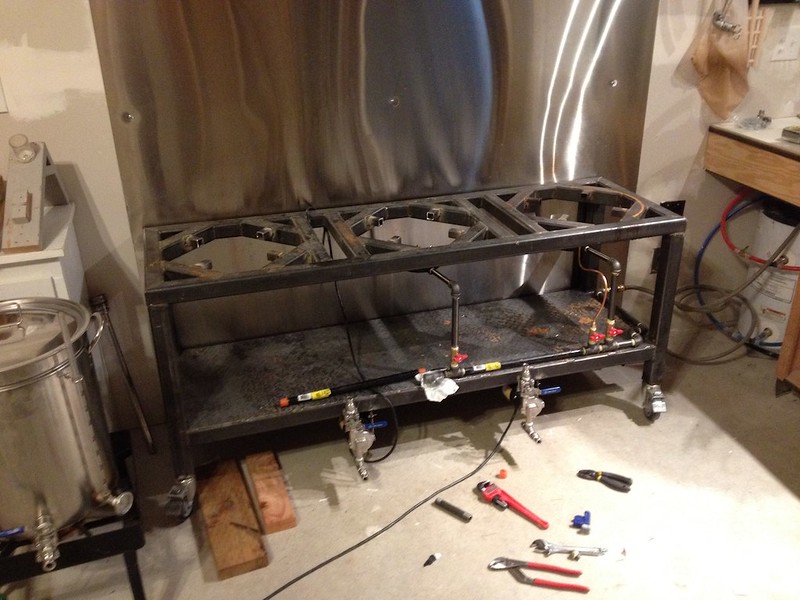
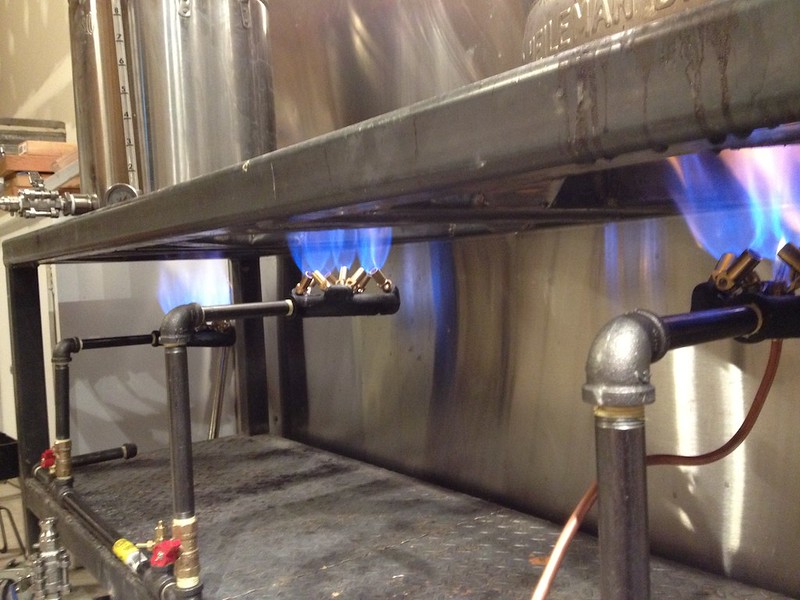
For the pilots I just used 1/4" copper tubing and compression fittings.The 'pilot burner' is the DIY variety that many others have used here, just a 1/8" brass plug with a couple of small holes drilled in it. Since I brew indoors with good ventilation above, wind isn't a big factor. These pilots will blow out if you have too much of a breeze, if you brew outdoors or with a strong cross breeze, I definitely suggest a proper pilot burner. Part of the reason I chose to go with 1/4" copper tubing is so that I can easily swap the compression fittings and install this burner if pilot reliability becomes an issue.
(since this was taken I've added a non gas rated needle valve above the ball valve, for more precise control. This way I can just turn the ball valve for 'on and off' and use the needle valve to adjust the flame.
DIY pilot parts list, from the top down:
http://www.lowes.com/pd_34797-104-A-710_0__?productId=3435856
http://www.lowes.com/ProductDisplay?partNumber=22877-104-A-15&langId=-1&storeId=10151&productId=3371498&catalogId=10051&cmRelshp=req&rel=nofollow&cId=PDIO1
http://www.lowes.com/ProductDisplay?partNumber=23050-76063-6363804755406&langId=-1&storeId=10151&productId=3132683&catalogId=10051&cmRelshp=req&rel=nofollow&cId=PDIO1
http://www.lowes.com/ProductDisplay?partNumber=25622-104-A-40&langId=-1&storeId=10151&productId=3371698&catalogId=10051&cmRelshp=req&rel=nofollow&cId=PDIO1
http://www.lowes.com/pd_34949-104-A-776_0__?productId=3435896&Ntt=3%2F8+1%2F8+brass&pl=1¤tURL=%3FNtt%3D3%252F8%2B1%252F8%2Bbrass&facetInfo=
http://www.lowes.com/pd_23152-33599-M88C+3/8_0__?Ntt=3%2F8%22+gas+ball+valve&UserSearch=3%2F8%22+gas+ball+valve&productId=3353924&rpp=16
And I cant find the part number on their site, but I used a 1/2" to 3/8" reducing tee fitting at the bottom of each pilot burner, instead of the standard 1/2" tee. I could have just as easily used a 1/2" ball valve and then a 1/2 to 1/8 reducer bushing instead, but this option saved a couple of bucks on each pilot. I also like that there is a visual size difference in the valve for the burner and it's pilot.
Some detail on the gas manifold & burners
For the pilots I just used 1/4" copper tubing and compression fittings.The 'pilot burner' is the DIY variety that many others have used here, just a 1/8" brass plug with a couple of small holes drilled in it. Since I brew indoors with good ventilation above, wind isn't a big factor. These pilots will blow out if you have too much of a breeze, if you brew outdoors or with a strong cross breeze, I definitely suggest a proper pilot burner. Part of the reason I chose to go with 1/4" copper tubing is so that I can easily swap the compression fittings and install this burner if pilot reliability becomes an issue.
(since this was taken I've added a non gas rated needle valve above the ball valve, for more precise control. This way I can just turn the ball valve for 'on and off' and use the needle valve to adjust the flame.
DIY pilot parts list, from the top down:
http://www.lowes.com/pd_34797-104-A-710_0__?productId=3435856
http://www.lowes.com/ProductDisplay?partNumber=22877-104-A-15&langId=-1&storeId=10151&productId=3371498&catalogId=10051&cmRelshp=req&rel=nofollow&cId=PDIO1
http://www.lowes.com/ProductDisplay?partNumber=23050-76063-6363804755406&langId=-1&storeId=10151&productId=3132683&catalogId=10051&cmRelshp=req&rel=nofollow&cId=PDIO1
http://www.lowes.com/ProductDisplay?partNumber=25622-104-A-40&langId=-1&storeId=10151&productId=3371698&catalogId=10051&cmRelshp=req&rel=nofollow&cId=PDIO1
http://www.lowes.com/pd_34949-104-A-776_0__?productId=3435896&Ntt=3%2F8+1%2F8+brass&pl=1¤tURL=%3FNtt%3D3%252F8%2B1%252F8%2Bbrass&facetInfo=
http://www.lowes.com/pd_23152-33599-M88C+3/8_0__?Ntt=3%2F8%22+gas+ball+valve&UserSearch=3%2F8%22+gas+ball+valve&productId=3353924&rpp=16
And I cant find the part number on their site, but I used a 1/2" to 3/8" reducing tee fitting at the bottom of each pilot burner, instead of the standard 1/2" tee. I could have just as easily used a 1/2" ball valve and then a 1/2 to 1/8 reducer bushing instead, but this option saved a couple of bucks on each pilot. I also like that there is a visual size difference in the valve for the burner and it's pilot.
smellie_hippie
Junior Member
Jealous and Inspired do not even BEGIN to describe....
I.... but look... is that?...
Yeah, I thought I was at least a somewhat seasoned brewer, but this shows me just how far this hobby can go! My hats off to you good sir!
I.... but look... is that?...
Yeah, I thought I was at least a somewhat seasoned brewer, but this shows me just how far this hobby can go! My hats off to you good sir!
OP
OP
Well thank you! I'm just following in the footsteps of so many others on here.
lorglath
Well-Known Member
Everything looks fantastic, great work!
CousinsCraft
Member
What kind of fitting did you use at the top of the pilot for the flame?
I was also wondering how you secured the black pipe to the stand? Kinda looks like its just floating there.
I was also wondering how you secured the black pipe to the stand? Kinda looks like its just floating there.
jwitt
Well-Known Member
This is great! What a setup!
Heileman brews Stag Beer...the *ahem* tastiest *cough* lager around!
Anyway, Stag used to be brewed in Belleville Illinois (just across the river from St Louis). Legend has it that I'm related to the old German fellow who started one of Belleville's first breweries, that after changing ownership and expanding, became the Stag Brewery. Rumor also has it that he "brought over the recipe that became Stag." Of course I won't knock his long-gone recipe, because we all know what 150 years has done to American lager. When Stag closed, Heileman got production rolling up in WI.
Anyway, that keggle has, at one time, delivered hundreds of gallons of the stuff. It's still hugely popular cheap beer in this area.
OP
OP
Awesome, thanks jwitt for the background. Of the three kegs I got, the G. Heileman was the only one I didn't know the possible background on at first. I did some research and determined that the company was part of a consolidation towards the end of it's life, that also included a couple of big Northwest names, Rainier and Olympia. Both of these big boys of the northwest macro brew scene were bought out in the 80s/90s and consolidated. The brands are both still available in the northwest and retain some of their once huge cult following, but they are brewed in California.
From Wiki pedia about Rainier Brewing Co:
So my best guess is the last thing this keg contained, was a batch of Rainier beer. Even though it's not a locally made beer, it's still pretty popular in these parts. I'll admit I've sucked down a few cans of 'vitamin R' while playing softball or watching football. Of course, the beer I will make in this kettle will be much, much better.
Some nostalgia for any northwesterners. This commercial came out in the late 70s before I was born, but was so well known and liked in the area, it was occasionally used even into the 90s.
[ame="http://www.youtube.com/watch?v=iz-WuLQz_ns"][YOUTUBE]iz-WuLQz_ns[/YOUTUBE][/ame]
From Wiki pedia about Rainier Brewing Co:
In 1977 the brewery was sold to G. Heileman Brewing Company, and passed through several more hands before finally winding up owned by Pabst, which closed it in 1999. The Rainier brand was sold to General Brewing Company, which moved production to the Olympia brewery in nearby Tumwater, Washington. The Olympia Brewing Company closed in 2003. Rainier Beer is now brewed under contract in Irwindale, California.
So my best guess is the last thing this keg contained, was a batch of Rainier beer. Even though it's not a locally made beer, it's still pretty popular in these parts. I'll admit I've sucked down a few cans of 'vitamin R' while playing softball or watching football. Of course, the beer I will make in this kettle will be much, much better.
Some nostalgia for any northwesterners. This commercial came out in the late 70s before I was born, but was so well known and liked in the area, it was occasionally used even into the 90s.
[ame="http://www.youtube.com/watch?v=iz-WuLQz_ns"][YOUTUBE]iz-WuLQz_ns[/YOUTUBE][/ame]
Cruzn4aBrewzn
Well-Known Member
look'n great! I can see a happy brewing future, rock'n some killer lunch on your outdoor kitchen while making a tasty brew!:fro:
Wow, like many others said, jealousy doesn't begin to describe the feeling that I feel right now. I'm only a 22 year old brewer and really hope to have something like this in my distant future. Great job!
Another couple things I was curious about, why didn't you use green board for the dry wall around the brewstand/sink? I guess it may be overkill since you have that metal sheet on the back, but I'd imagine things could get ugly if that did wet behind there.
Another thing, what are you using for dispensing? I'm hoping you've got one killer keezer in your future as well.
jwitt
Well-Known Member
Wow. I didn't know that Heileman extended its reach so far. I had a can of local Chicago schwill the last time I was up there, brewed by Heileman. They were big players in picking up regional brands back a couple decades ago. I must say that I can tell quality control isn't 100% - I've had some actually really crisp and refreshing Stag, and some that I really had to choke down (I can't take malty-sweet light beer!) My dad said modern Stag is a shadow of its former self, for what it's worth (I can't imagine it was exactly great back in the day).
After looking at your pictures, then seeing the commercial, I once again feel the need to head to the NW. A buddy is a winemaker and did some WOOFing at a winery in the Williamette. He's convinced he will someday relocate us all to WA/OR. Since I just got a job at the LHBS here (gonna have to get the shop on here as a sponsor!) I don't think I'll move for a while yet, but I do love forests, mountains, fly fishing, and cloudy weather with all my heart. Maybe in a few years once he finds a vineyard of his own up there (He just got back from NZ and checked on his demijohns of reserve, started malolactic, and added some raisins he made last season- I can't wait for a bottle of that stuff!)
After looking at your pictures, then seeing the commercial, I once again feel the need to head to the NW. A buddy is a winemaker and did some WOOFing at a winery in the Williamette. He's convinced he will someday relocate us all to WA/OR. Since I just got a job at the LHBS here (gonna have to get the shop on here as a sponsor!) I don't think I'll move for a while yet, but I do love forests, mountains, fly fishing, and cloudy weather with all my heart. Maybe in a few years once he finds a vineyard of his own up there
(He just got back from NZ and checked on his demijohns of reserve, started malolactic, and added some raisins he made last season- I can't wait for a bottle of that stuff!)
OP
OP
Another couple things I was curious about, why didn't you use green board for the dry wall around the brewstand/sink? I guess it may be overkill since you have that metal sheet on the back, but I'd imagine things could get ugly if that did wet behind there.
Another thing, what are you using for dispensing? I'm hoping you've got one killer keezer in your future as well.
Good question. We didn't use the green board because this wall (behind the stand) is 3ft from a property line and requires "Type X" fire resistant drywall to satisfy code. We could have used it around the sink, and that would have been a good idea. I just didn't think of it. I'll be adding some tile or other moisture proof backing on the wall/window sill there.
OP
OP
Oh, and my current dispensing setup is a 2 tap kegerator (Frigidaire mini fridge conversion) in the basement. This is going to get built into a bar in our rec room and will serve the house. One of the motivations for building the garage was to empty out my 'shop room' down stairs in the house to turn it into a bar/tv room. I'll also be building 4 tap keezer in the garage this fall/winter, after the rest of the project is wrapped up. The plan (we'll see if I follow through on this part) is to have 3 taps indoors, and one tap through the wall, hiding in an insulated 'birdhouse' that will be just behind the outdoor kitchen area.
OP
OP
No progress on the building or stand these last couple of days. Life.
I am happy to report that the first few beers brewed in the brewhouse (though not on the final brew setup, see above) are through the pipeline and very, very tasty. So far the garage has hosted a session of EdWort's Haus Pale Ale, Moose Drool Clone (my personal favorite batch ever), Bohemian Pilsner, and a Yooper's DFH 60 Minute IPA clone.
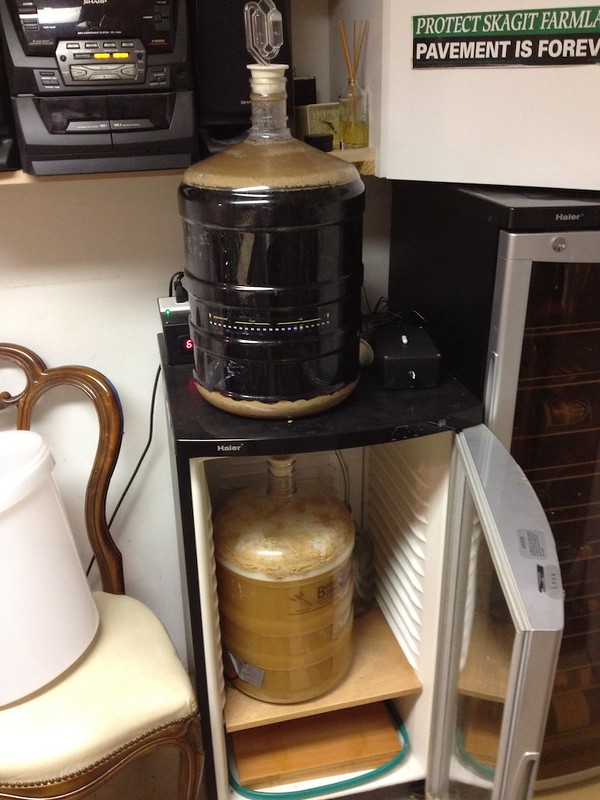
Pale ale vigorously fermenting in the chamber after the Moose Drool made way for it. The ambient temp in the basement is just about right for it to continue its fermentation.
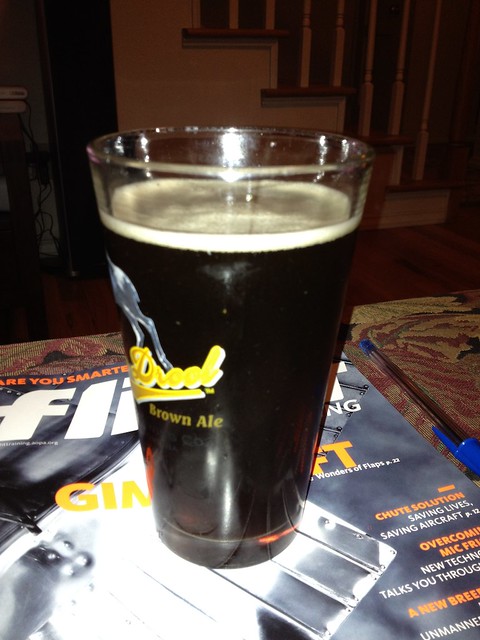
Moose Drool in the glass - I even had the right glass for it. Seriously tasty stuff, especially after a long day of drywalling.
I'm planning for the first batch using the full capabilities of the stand this Sunday. I'm a little behind timing wise, but going for my own pumpkin ale recipe.
I am happy to report that the first few beers brewed in the brewhouse (though not on the final brew setup, see above) are through the pipeline and very, very tasty. So far the garage has hosted a session of EdWort's Haus Pale Ale, Moose Drool Clone (my personal favorite batch ever), Bohemian Pilsner, and a Yooper's DFH 60 Minute IPA clone.
Pale ale vigorously fermenting in the chamber after the Moose Drool made way for it. The ambient temp in the basement is just about right for it to continue its fermentation.
Moose Drool in the glass - I even had the right glass for it. Seriously tasty stuff, especially after a long day of drywalling.
I'm planning for the first batch using the full capabilities of the stand this Sunday. I'm a little behind timing wise, but going for my own pumpkin ale recipe.
OP
OP
What kind of fitting did you use at the top of the pilot for the flame?
I was also wondering how you secured the black pipe to the stand? Kinda looks like its just floating there.
Sorry, I missed your second question before. Your observation is astute, the manifold is just sitting there right now. I have some zinc plated 3/4" one hole conduit straps that I've dry fitted on there that work really well, but I haven't installed them yet because a local electrical supply store carries them in stainless steel.

- Joined
- Dec 21, 2011
- Messages
- 277
- Reaction score
- 38
Looks great....Please tell me you are going to finish/paint the drywall!!!!
OP
OP
Looks great....Please tell me you are going to finish/paint the drywall!!!!
What you don't like the raw drywall look? Heh, Definitely. I haven't been showing it off in here, but the other side of the garage (the shop side) is still without insulation and drywall as I had been dragging my feet about finishing some wiring over there.. exactly where do I want that welder, etc. I find that I go back and fourth between putting energy into the building, and energy into the brewing stuff and this last week or so it's been all about the stand.
I plan to get the rest of the insulating and drywall done next week, at which point we'll do another round of tape & mud all around and prep for painting. Oh great, that means I need to pickout another set of colors.

Similar threads
- Replies
- 3
- Views
- 943
- Replies
- 6
- Views
- 896
- Replies
- 1
- Views
- 807
