Turning your Fermonster into a complete closed transfer system for cheap!

Homebrew Talk - Beer, Wine, Mead, & Cider Brewing Discussion Forum

Help Support Homebrew Talk - Beer, Wine, Mead, & Cider Brewing Discussion Forum:

This site may earn a commission from merchant affiliate links, including eBay, Amazon, and others.
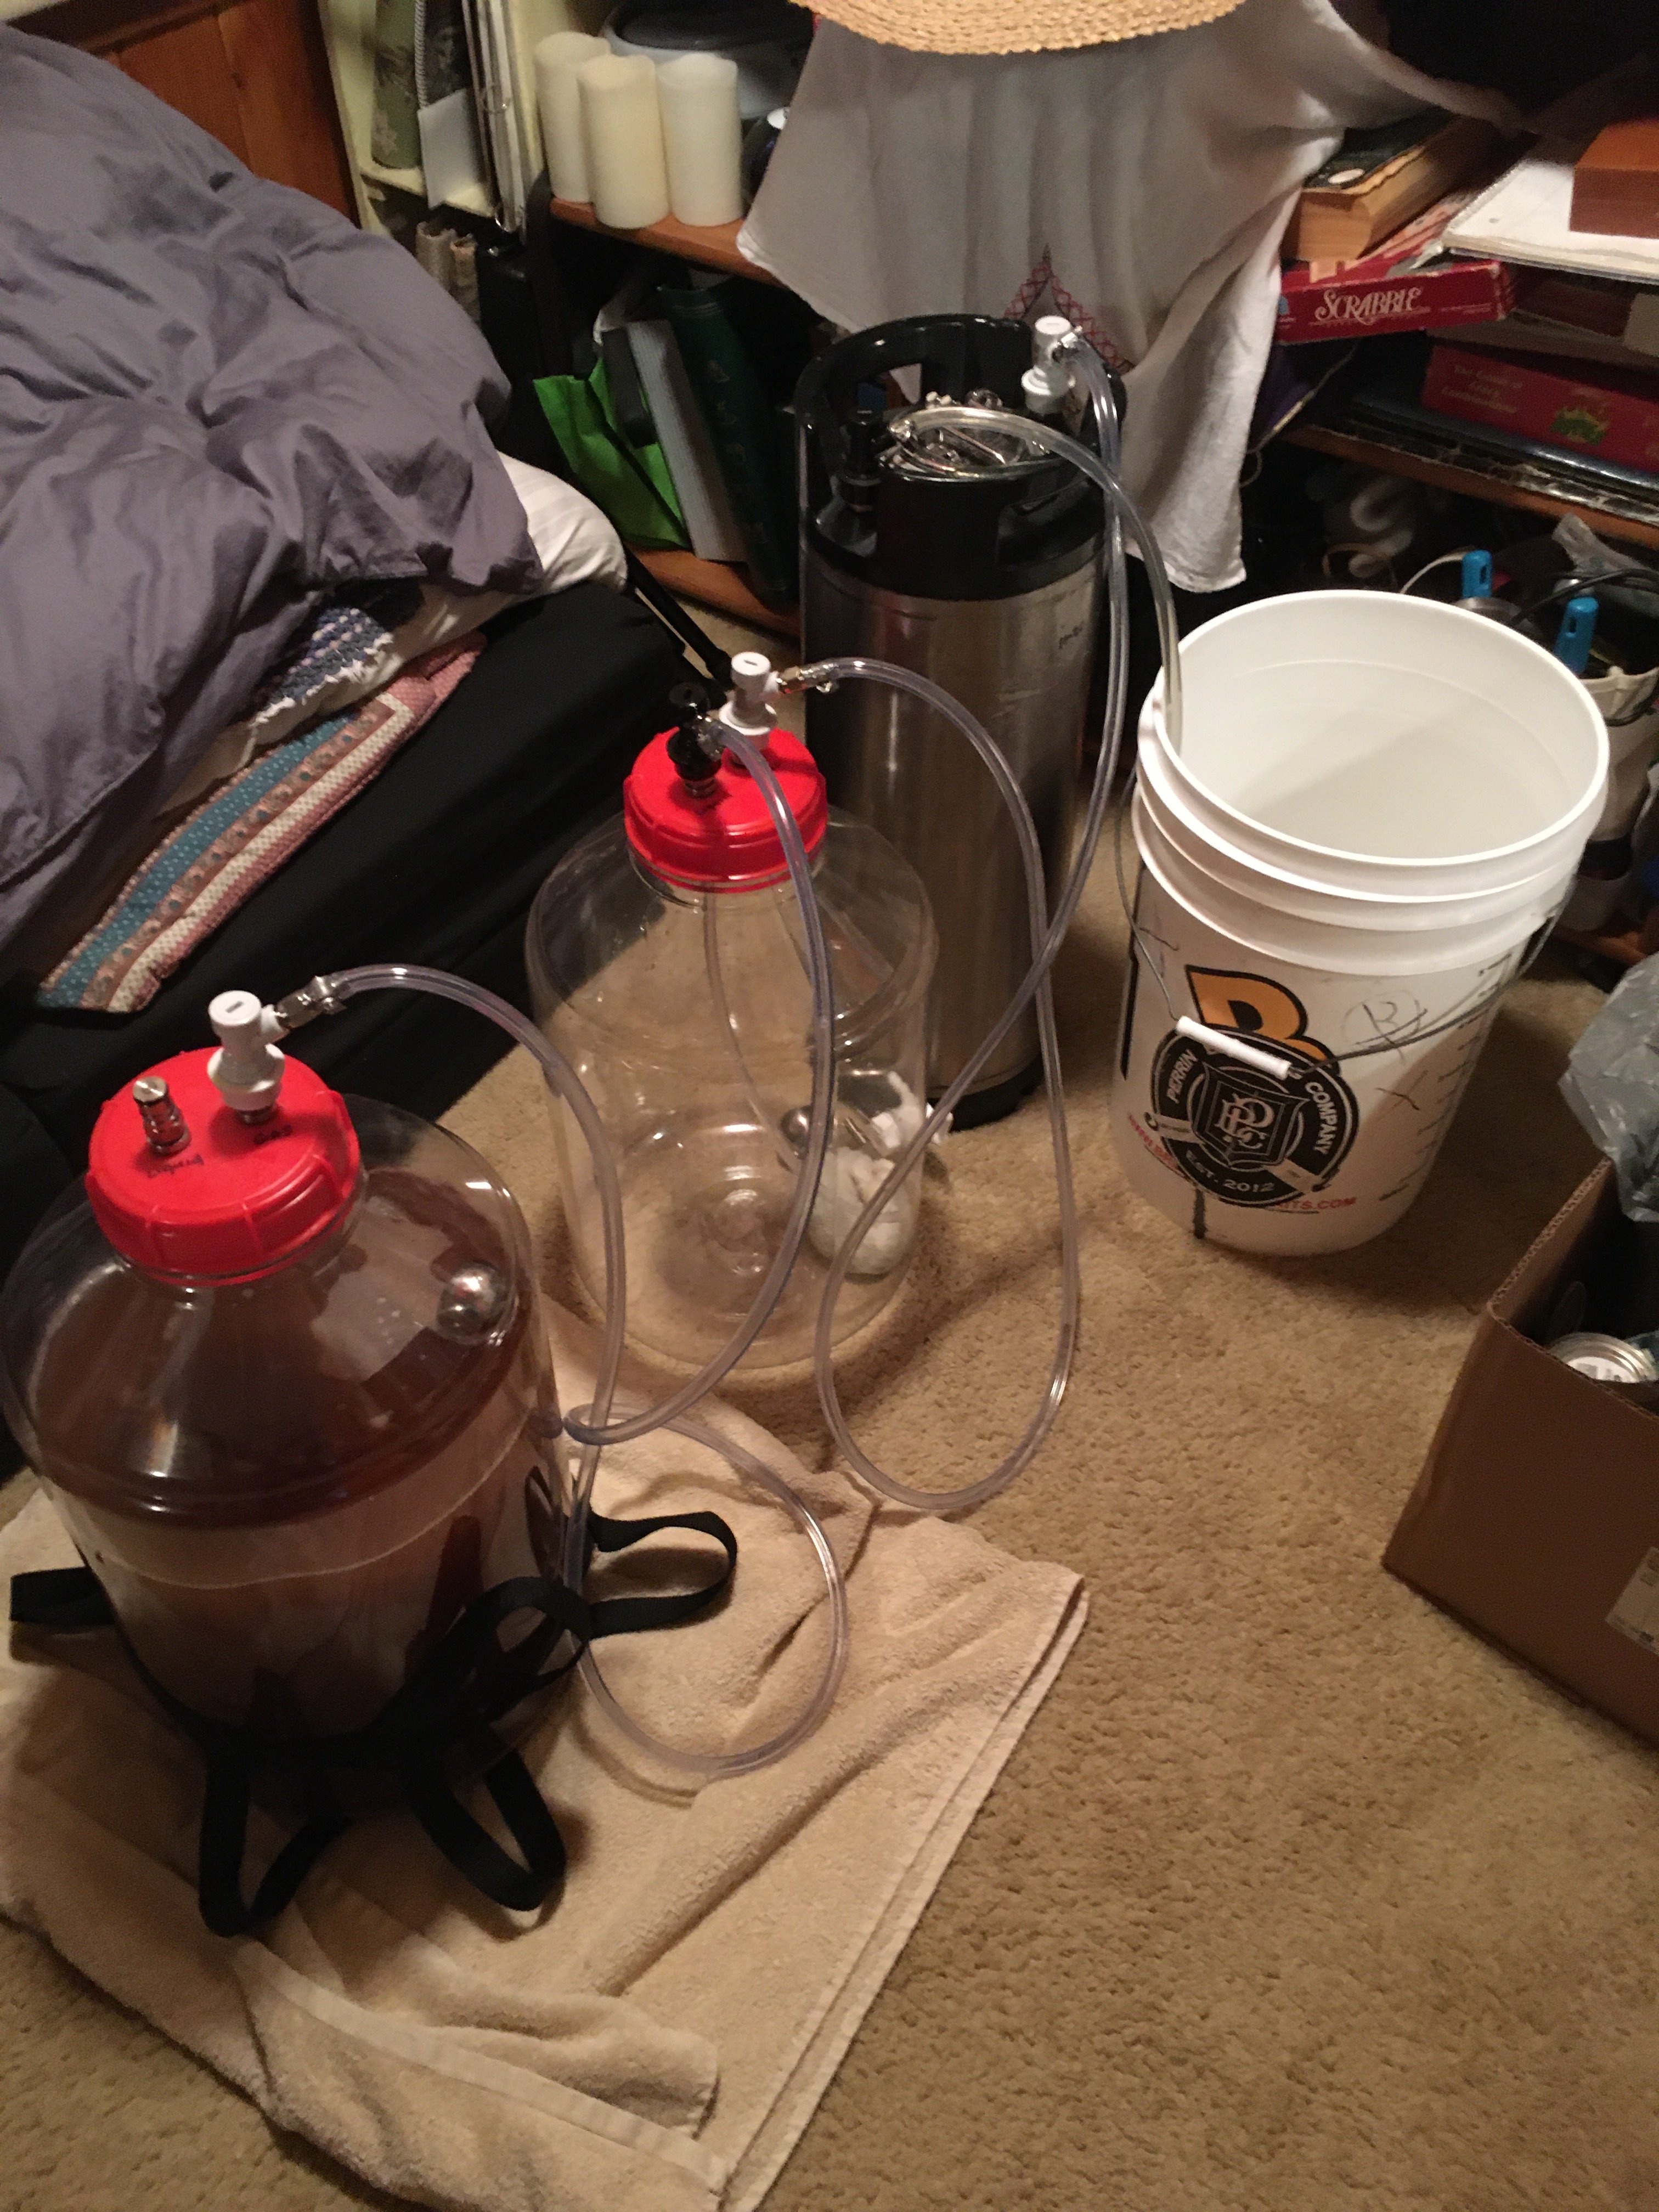
I’m pulling the trigger tonight on the 3 gal system. I’m not seeking to pressurize ferment now. I do plan to dry hop and also do clued transfer to a keg.
I can’t fit a keg in my mini fridge, so am I correct .....

1) connect an open ended line to the gas side and put said open end into a jar of star San to serve a# my bow off tube
2) connect to CO2 and dry hop as per @Dgallo
3) cold crash low CO2 level (I have a cartridge CO2 with regulator I use on my kegs while aging and cold crashing)
4) on keg day, fill keg with star San. Purge with CO2 then put CO2 on the FV, jump FV liquid to liquid (dip tube) side keg and pressure transfer with pressure release valve on keg loosened.

Comments?
 
Thought I would put this here since we are modifying and perhaps pushing the limits of these fermenters.
I had 2 fermonsters fail within days of each other a couple weeks back. Neither failure was catastrophic but could have been if I didn't notice the wet towel under one or that the other had less PBW mix then it did the day before. Both were about a year old and developed cracks along the bottom. Each maybe 15 batches.
It might be a good idea to inspect closely after each batch.

What might have caused this?

After pitching yeast I routinely tilt the bottle back and give it a good swirl/shake.
They routinely saw a pound or two of pressure pushing starsan out of a 5 gallon corny.
I cold crash to 40f in the fermonster
During the cold crash I add a bit of co2 pressure to make up for the negative pressure created. Once mistakenly enough pressure to blow the bung out but just in one of them.

This didn't stop me from buying a new one. In fact the new one is next to me bubbling away but with a seltzer and a standard airlock.
20210318_082811.jpg
 
What psi do you typically allow it to get to? That a strange place for them to crack, curves take psi much better than flat surfaces, typically the cap will crack first being a less flexible plastic and flat. That said it happened to two of them, so definitely something to look out for
 
Both were about a year old and developed cracks along the bottom. Each maybe 15 batches.
That's pretty darn alarming. Glad you noticed.

In the picture I see some deeper scuff marks on the right one, lighter marks on the left one. Are they used and moved on a hard rough (cement) floor? Could that have something to do with it? Are you tilting them to pick them up or agitate?

A few years ago, at the very end of Big Brew Day, one guy in a group of brewers did an overhead Hulk-move in the parking lot with a Fermonster, halfway filled with Starsan. He lost grip and the thing landed on the tarmac, bounced a few times, then rolled. There was no visible damage, cracks, dents, just some scratches. The lid didn't even come off or cracked. Lucky for them.
 
I have lost a couple lids to those cracks. They are difficult to see.
I don't know how much pressure it takes to push starsan out of the keg. Can't be more than a few pounds. I get some negative pressure during cold crash. Not enough to pull the sanitizer back out of the bucket into the keg.
Intially I thought the act of tipping it back to get a swirl going caused the damage but the cracks are not opposite the spigot. That was always on a folded towel on my cooler top. Looking again... One has a crack at about 4:30(upside down spigot facing me) the other is cracked at 1 and 6. It would never had seen the full weight at the spigot side.
I brew in my basement and yes it is a cement floor. Never slide on the floor when full. The scratches are likely from the cement and moving around empty though.
I'm sure I'm 50/50 picking it up by both hands on the lip near the lid and tilting it back to get a hand under it.

I probably should have started a new thread instead of derailing yours. Just a friendly reminder to check once in a while for any damage.
I don’t consider this derailing, your sharing your experience. It’s definitely something to look out for.
 
I'm sure I'm 50/50 picking it up by both hands on the lip near the lid and tilting it back to get a hand under it.
That could be one of the causes forming those cracks, compressing the flat, non-recessed part of the bottom.

I have some old, 6 gallon Better Bottles. They've not been abused, but have had many years of good use on them, also on a cement floor. They have no signs of cracking anywhere. Maybe it's a tougher, not as brittle form of PET. Definitely a bit thicker than Fermonsters, if I had to guess.
 
Just checked, my order should arrive Friday. I’m kegging the Pilsner tomorrow to continue aging in the mini fridge but I believe my basement is 60~65 which I think will be good for a NEIPA not under pressure. So I’m planning on a Monday NEIPA brew and taking a shot at low O2 closed transfer after the primary fermentation and dry hopping schedule.
 
I'm going to try this concept and have everything on the way. I'm a total newbie and have been absorbing all I can and have built a keezer with eva barrier tubing which I'm out of. I have some 1/4 inch vinyl tubing that is new and wanted to know if it can be used to transfer the beer from FV to the keg. TIA.
 
Thanks @Dgallo for the thread.

so two things. The ball lock connections that came are a problem. I have to go through them when I’m done to mix and match to make sure I have connections than go on and off properly. I’m pretty sure the regular one is off sized.

secondly what ever hop debris that was floating at the last two inches above the trub clogged the connection to 5be point I had to take it apart. Or it could have also been the bad connection. I never had to struggle with content keg connections like this before (I have 4 kegs).

I have the keg in the mini fridge and the FerMonster is resting as I hope to be able to transfer that final 2 inches of beer. I’m also considering calling it a day with the maybe 2 gallons in the keg and then focusing on making sure I have good connections, as I dint know how much oxygen got into the fermentor.
on any case. I wasted a lot of CO2 and will need to refill soon.
 
I've done several closed transfers and haven't had any issues with hop debris clogging the lines. I usually wait for 3 weeks before I keg which allows a lot of time for the yeast to drop out. If you're dry hopping, try using a mesh bag to contain the hops. I've used this method and it works well. If you prefer to dry hop loose, then cold crash for a few days to get the hop debris to settle. If you still have trouble, use a fining agent such as gelatin to aid in clearing things up before you keg.
 
I've done several closed transfers and haven't had any issues with hop debris clogging the lines. I usually wait for 3 weeks before I keg which allows a lot of time for the yeast to drop out. If you're dry hopping, try using a mesh bag to contain the hops. I've used this method and it works well. If you prefer to dry hop loose, then cold crash for a few days to get the hop debris to settle. If you still have trouble, use a fining agent such as gelatin to aid in clearing things up before you keg.
I agree. I wonder what caused the hop debris to not settle. I usually do large 8-10 oz dryhops in my NEIPAS and after cold crashing, I never have clogged it. The only time I transfer any hop debris is if I accidentally rock the fermenter to hard and the hops re suspend when I get close to the bottom. I will say that I do purposely leave 1.5 - 2 inches of beer in the fv to only transfer clean beer. I plan for this in my recipe
 
It could be the connecting posts. 85% of the transfer went fine. It/was that last 2” above the trub. The clogs didn’t occurs in the flex tube.

I do prefer using a hop spider and mesh bags. For this brew I went bare back. I did cold crash before doing the transfer.
 
I just purchased a 7 gallon fermonster setup and was gifted a 6 gallon setup from my Mrs. I plan on using the smaller fermonster as a dry hop/secondary daisy chained to my primary and my keg. I sanitized everything thoroughly and placed my hops in a hop sack in the 6 gallon. Hopefully I can get a low oxygen transfer through both vessels and ending up in my keg with the proper volume (just a tad over 5 gallons). Any input on this variation of the fermonster abyss?
 
I just ordered a lid and post set from MoreBeer so I can join in the fun! There is a few more hours left on their 15% off storewide sale. I have been pretty happy with doing closed transfers using the spigot, but I can see the benefit of this method. It should also make it easier/possible to run a line over to a keg to purge with fermentation CO2.

Hopefully I can get a low oxygen transfer through both vessels and ending up in my keg with the proper volume (just a tad over 5 gallons). Any input on this variation of the fermonster abyss?

What types of connections do you have setup? Got a picture to share? It seems like it should work.
 
I just ordered a lid and post set from MoreBeer so I can join in the fun! There is a few more hours left on their 15% off storewide sale. I have been pretty happy with doing closed transfers using the spigot, but I can see the benefit of this method. It should also make it easier/possible to run a line over to a keg to purge with fermentation CO2.


What types of connections do you have setup? Got a picture to share? It seems like it should work.
Gas line in 7 gallon to liquid line of 6 gallon. Gas line from 6 gallon to gas post keg. Liquid line from starsan filled keg to bucket of starsan. 6 gallon fermenter was purged and filled with CO2
 

Attachments

  • A2B778F9-5C51-467F-8532-729AB4A829C9.jpeg
    A2B778F9-5C51-467F-8532-729AB4A829C9.jpeg
    1.7 MB · Views: 81
Gas line in 7 gallon to liquid line of 6 gallon. Gas line from 6 gallon to gas post keg. Liquid line from starsan filled keg to bucket of starsan. 6 gallon fermenter was purged and filled with CO2
Was the 6gallon fermenter liquid purged?
 
Filled with starsan and drained into the 7 gallon fermonster. Tipped upside down, placed starsan treated hopsack with hops in 6 gallon, sealed up with sanitized lid, gasket and floating dip tube. Purged several times with CO2 at 12 psi. In theory, should work I hope. Just finished brewing about 3 hours ago.
 
Filled with starsan and drained into the 7 gallon fermonster. Tipped upside down, placed starsan treated hopsack with hops in 6 gallon, sealed up with sanitized lid, gasket and floating dip tube. Purged several times with CO2 at 12 psi. In theory, should work I hope. Just finished brewing about 3 hours ago.
I don’t know if that will eliminate allo2 from the 6 gallon fermenter but it’s def will minimize it. There are a few things I would suggest to you that will better you purging.

1) make two caps. This way you have one for the fermenter and then you dryhop fermenter. That’s way you can maintain a closed system.

2) then fill your dryhop keg with starsan solution(fill to the brim) and then put your modified lid on. Then hook up that to your primary fermenter and the liquid post to your bucket. Once fermentation has pushed all the liquid into the bucket , disconnect the secondary completely and set aside. Use the solution from the bucket to fill the keg and the. Connect it to the primary so that you can use fermentation to purge that too and keep it on for the remainder of ferm.

3) now that you know your secondary is 100% purged of o2 you can preload it with hops. Since you have a floating dip tube, there is no need to bag the hops as the floating dip tube was designed for this, to leave the trub and hops behind. You can hook your the secondary’s liquid post to your regulator.As you unscrew the cap to put the hops in turn your regulator up so co2 starts flowing. This will help prevent any o2 from entering your secondary as you load the hops. Once you’ve done that disconnect it. Now when fermentation is complete, you can just close transfer to a pre loaded and purged secondary.

4) when dryhoping is complete, cold crash and then close transfer to your purged serving keg.

this will be your best option for minimizing o2 to the best of this setups ability
 
Last edited:
Great suggestions on the dry hopping vessel. One question, once the dry hopped vessel is filled, can I cold crash the fermonster without venting, or will this cause the vessel to contract and possibly crack? I guess I could always use the mylar balloon method to prevent O2 ingress.
 
Great suggestions on the dry hopping vessel. One question, once the dry hopped vessel is filled, can I cold crash the fermonster without venting, or will this cause the vessel to contract and possibly crack? I guess I could always use the mylar balloon method to prevent O2 ingress.
Are you kegging? If so you can just connect the co2 post to your tank. If you don’t have that ability then yes the Mylar bag will be needed.
 
Does anyone have a photo of the posts while detached? Or the underside of the fermonster cap with posts attached?

I ordered the wrong set (fermzilla instead of fermentasaurus (doh!)) and am wondering what the correct posts look like once removed.

Also probably now buying a fermzilla on sale somewhere to salvage that mistake. =c)

Thanks!
 
Does anyone have a photo of the posts while detached? Or the underside of the fermonster cap with posts attached?

Does this show what you need? I just got my kit in the mail the other day, but have not modified the lid.

20210607_212226.jpg

I did not notice that the solid lid did not come with the gasket. Not a big deal since I now have 4 Fermonsters (7-gal + 2 x 3-gal + 1-gal) so I have plenty of lids and gaskets. I do wonder if there is a way to seal up the hole on the standard lid.

The PRV valve in the kit is a bonus for me as I needed to replace one of the PRVs in a keg. It is only 35 PSI, but that is fine for me.
 
Does this show what you need? I just got my kit in the mail the other day, but have not modified the lid.

View attachment 731563

I did not notice that the solid lid did not come with the gasket. Not a big deal since I now have 4 Fermonsters (7-gal + 2 x 3-gal + 1-gal) so I have plenty of lids and gaskets. I do wonder if there is a way to seal up the hole on the standard lid.

The PRV valve in the kit is a bonus for me as I needed to replace one of the PRVs in a keg. It is only 35 PSI, but that is fine for me.

Thank you!

That is indeed what I wanted to see.
 
Okay, finally got around to this (after taking a detour into the all-rounder Fermzilla, which I absolutely LOVE (and for less cost than this DIY - but no spigot)).

Two quick tips:

1. Not sure if all fermonster solid lids are the same (from photos in this thread, they don't all appear to be the same), but my two lids have an inner circle on the bottom and two small dots along the outer section on top (that I assume were injection points for the mold). Those two dots work really well as spots to drill the holes because they leave just enough room on the bottom to screw on the nuts just outside the raised inner circle.
2BAB60F5-8929-4953-B027-E11A150D4806.jpeg

F6239D50-244C-45B6-87B0-308C5BB34F34.jpeg


2. As others have shown, a step drill bit works really well to drill a smooth hole and only as wide as minimally needed to thread the posts through.
DDC99310-F0DE-457C-9B1A-EF582CE3AEFC.jpeg


Not as excited about this after discovering how much I like the all-rounder fermzilla, but I'm sure I'll find away to make use of both.

Thanks for thread!!

EE7C3627-1807-4EC1-8145-345688929A10.jpeg
 
I am curious, what are people using the floating liquid line for?

I have several Fermonster fermenters, all with spigots. I got the kit and one solid lid a month or so ago, but have not installed it yet. I am pretty happy doing closed transfers using the spigots with help from gravity. I am thinking of just adding one of the posts to the lid and adding the other post to another lid. Then maybe using the floating dip tube on a keg. I recall seeing a pic from @Dgallo recently where he was filling a keg with the spigot.

One advantage I could see is for taking a gravity reading. I can do this out the spigot, but I need to lift the fermenter out of my chest freezer chamber.
 
Anyone have any thoughts on how to incorporate a thermowell along with this setup? I.e some sort of fitting that would be air tight. I’m currently using the dual port ridged #10 stopper with airlock and thermowell but looking to do this mod. Might just install one ball lock fitting (gas only) since I plan to use the spigot with a filter for transfers anyway.
 
Anyone have any thoughts on how to incorporate a thermowell along with this setup? I.e some sort of fitting that would be air tight. I’m currently using the dual port ridged #10 stopper with airlock and thermowell but looking to do this mod. Might just install one ball lock fitting (gas only) since I plan to use the spigot with a filter for transfers anyway.

You could try this option from a different thread using the parts I listed in a subsequent post. (quoted below)

I am assuming that it is an 18" Thermowell and Weldless fitting that is sold @ brewhardware. You can also get a similar, single piece unit from Brewer's Hardware but the longest one they make is 12" and $24
 
I am curious, what are people using the floating liquid line for?

I have several Fermonster fermenters, all with spigots. I got the kit and one solid lid a month or so ago, but have not installed it yet. I am pretty happy doing closed transfers using the spigots with help from gravity. I am thinking of just adding one of the posts to the lid and adding the other post to another lid. Then maybe using the floating dip tube on a keg. I recall seeing a pic from @Dgallo recently where he was filling a keg with the spigot.

One advantage I could see is for taking a gravity reading. I can do this out the spigot, but I need to lift the fermenter out of my chest freezer chamber.

Yeah I tried something different this time. I used a second purged fermonster as a dryhop “keg” so that I could agitate while dryhoping. The reason I specifically transferred through the spigot this time was because the hops were below it and my son was having a rough day so I needed a quick transfer since i knew he’d be up soon lol
 

Latest posts

Back
Top