These conical's are are but impossible to find here in Europe. Does anyone know of a supplier on this side of the world that makes these? All we have so far that I know is SS conical's and they start in price at Euro 1000.
You are using an out of date browser. It may not display this or other websites correctly.
You should upgrade or use an alternative browser.
You should upgrade or use an alternative browser.
Super Simple 15G Plastic Conical
- Thread starter Squeeky
- Start date

Help Support Homebrew Talk:
This site may earn a commission from merchant affiliate
links, including eBay, Amazon, and others.
anonymousbrew
Well-Known Member
ordered mine a week ago today - havent been able to get any update via the order page on the status. figured it was just 'cause its dropshipped from the manufacturer. emailed customer service at ruralking today and got this response -
Hello,
This item is shipped directly from Ace Roto Mold. The estimated shipping date we have received from our Representative is April 10th, 2012
thats 18 days from order to ship?
hmmmmmm. I've been holding off on brewing till this gets in, might have to go ahead and brew.
Hello,
This item is shipped directly from Ace Roto Mold. The estimated shipping date we have received from our Representative is April 10th, 2012
thats 18 days from order to ship?
hmmmmmm. I've been holding off on brewing till this gets in, might have to go ahead and brew.
wfowlks
Well-Known Member
laizure said:These conical's are are but impossible to find here in Europe. Does anyone know of a supplier on this side of the world that makes these? All we have so far that I know is SS conical's and they start in price at Euro 1000.
I'm sure if you called the company they would ship to Europe granted you may pay more for shipping
anonymousbrew
Well-Known Member
FYI - email from Ruralking RE leadtime on conical orders.
With Ace Roto Mold tanks it can take a 2-3 Week Lead Time.
With Ace Roto Mold tanks it can take a 2-3 Week Lead Time.


$20.94
$29.99
The Brew Your Own Big Book of Clone Recipes: Featuring 300 Homebrew Recipes from Your Favorite Breweries
Amazon.com


$7.79 ($7.79 / Count)
Craft A Brew - LalBrew Voss™ - Kveik Ale Yeast - For Craft Lagers - Ingredients for Home Brewing - Beer Making Supplies - (1 Pack)
Craft a Brew


$53.24
1pc Hose Barb/MFL 1.5" Tri Clamp to Ball Lock Post Liquid Gas Homebrew Kegging Fermentation Parts Brewer Hardware SUS304(Liquid Hose Barb)
Guangshui Weilu You Trading Co., Ltd


$176.97
1pc Commercial Keg Manifold 2" Tri Clamp,Ball Lock Tapping Head,Pressure Gauge/Adjustable PRV for Kegging,Fermentation Control
hanhanbaihuoxiaoshoudian

$10.99 ($31.16 / Ounce)
Hornindal Kveik Yeast for Homebrewing - Mead, Cider, Wine, Beer - 10g Packet - Saccharomyces Cerevisiae - Sold by Shadowhive.com
Shadowhive


![Craft A Brew - Safale BE-256 Yeast - Fermentis - Belgian Ale Dry Yeast - For Belgian & Strong Ales - Ingredients for Home Brewing - Beer Making Supplies - [3 Pack]](https://m.media-amazon.com/images/I/51bcKEwQmWL._SL500_.jpg)


$22.00 ($623.23 / Ounce)
AMZLMPKNTW Ball Lock Sample Faucet 30cm Reinforced Silicone Hose Secondary Fermentation Homebrew Kegging joyful
无为中南商贸有限公司


$58.16
HUIZHUGS Brewing Equipment Keg Ball Lock Faucet 30cm Reinforced Silicone Hose Secondary Fermentation Homebrew Kegging Brewing Equipment
xiangshuizhenzhanglingfengshop

$33.99 ($17.00 / Count)
$41.99 ($21.00 / Count)
2 Pack 1 Gallon Large Fermentation Jars with 3 Airlocks and 2 SCREW Lids(100% Airtight Heavy Duty Lid w Silicone) - Wide Mouth Glass Jars w Scale Mark - Pickle Jars for Sauerkraut, Sourdough Starter
Qianfenie Direct


$53.24
1pc Hose Barb/MFL 1.5" Tri Clamp to Ball Lock Post Liquid Gas Homebrew Kegging Fermentation Parts Brewer Hardware SUS304(Liquid MFL)
yunchengshiyanhuqucuichendianzishangwuyouxiangongsi


$479.00
$559.00
EdgeStar KC1000SS Craft Brew Kegerator for 1/6 Barrel and Cornelius Kegs
Amazon.com


whis121surfing
Well-Known Member
Thanks everyone. I love this thing. I also like to whirlpool my wort prior to putting in the fermenter but this time I wasn't so picky about getting some trub in the fermenter since I figured it would just fall into the sightglass to dump within the first 24 hours to reconnect the sightglass. Once I reconnected the sight glass and let the air bubble go up through the hardware and conical it actually knocked some more trub down that I guess was too thick to go through the hardware. It was minimal so on the next brew I am going to be a little more thorough with leaving behind the trub. I am mainly using the conical to collect the yeast.
whis121surfing
Well-Known Member
I like the yeast catcher but what I don't like about it is the beer (what little is in there) is getting light struck and skunking.
The conical fits right in the corner of the closet so the doors are always closed. I also keep all of my carboys in there uncovered and never had a problem. It's basically dark all the time until I work with the beer. I am submitting the Zythos IPA to a contest on Saturday. We will see how the first conical batch does. Can't wait. :rockin:
EarthBound
Well-Known Member
First brew, Zythos IPA, in Conical! THANK YOU to all that have helped along the way. I LOVE this thing.:rockin:
That thing is so cool! Good job!
anonymousbrew
Well-Known Member
whis121 - can you give us a measurement from the lowest plastic point to the lowest point of your yeast catcher?
I'm using a different stand, and I'm interested if it would fit as is.
granted the yeast catcher is more than 2x the cost of the tank itself - but dangit, that thing is just too damn cool to not at least think about it!
great job!
I'm using a different stand, and I'm interested if it would fit as is.
granted the yeast catcher is more than 2x the cost of the tank itself - but dangit, that thing is just too damn cool to not at least think about it!
great job!
sebring96hbg
Well-Known Member
whis121 - can you give us a measurement from the lowest plastic point to the lowest point of your yeast catcher?
I'm using a different stand, and I'm interested if it would fit as is.
granted the yeast catcher is more than 2x the cost of the tank itself - but dangit, that thing is just too damn cool to not at least think about it!
great job!
I made a yeast catcher out of PVC as shown in this thread. It fits to the conical via an NPT to triclover adapter and has a volume of one quart.
I do 11.25 gallon batches to fill a firkin. Using S-04 yeast, I collect about 1.75 quarts per batch. I save the middle layer which is collected from the droppings of the butterfly valve and from the neck of the yeast catcher from the first yeast dump.
If the sight glass form factor is a must, it would be cheaper to copy this....
https://www.homebrewtalk.com/f51/new-conical-set-up-what-do-you-think-279614/index2.html#post3480471
A 16.5" length of 1.5" diameter tubing would have a volume of 16 ounces.
anonymousbrew
Well-Known Member
yeah, i've made the PVC thats right at a qt - but i really like the TC approach. think it could give a lot of flexibility and a lot less worry about sanitation.
PVC for now - conical should arrive today - big brew night on friday.
If it works, i'll post up picks of the stand i found/made.
PVC for now - conical should arrive today - big brew night on friday.
If it works, i'll post up picks of the stand i found/made.
anonymousbrew
Well-Known Member
Conical arrived last night - squeezed it into the gutted fridge.
Had an old fridge that used to be my kegerator and part time fermentation chamber. It's been replaced with a keezer. So I gutted it to see if I could fit the conical in. With some mods (removed freezer/fridge divider, coil shroud and moved the stat and fan) I can squeeze the conical in.
The stand is a patio table from garden ridge for $20 and I needed to extend the legs for my fittings - 1in sch40 and we're in business. Popped the glass out of the table and it is the perfect size for the tank.
I'll pretty it up a bit later, but tomorrow it'll have it's first brew in it!
sebring96hbg
Well-Known Member
Conical arrived last night - squeezed it into the gutted fridge.
Had an old fridge that used to be my kegerator and part time fermentation chamber. It's been replaced with a keezer. So I gutted it to see if I could fit the conical in. With some mods (removed freezer/fridge divider, coil shroud and moved the stat and fan) I can squeeze the conical in.
The stand is a patio table from garden ridge for $20 and I needed to extend the legs for my fittings - 1in sch40 and we're in business. Popped the glass out of the table and it is the perfect size for the tank.
I'll pretty it up a bit later, but tomorrow it'll have it's first brew in it!
Nice idea!
I found a link for what appears to be the same table.
http://www.wayfair.com/Atlantic-Outdoor-18-Glass-End-Table-50102-TNR1231.html?refid=FR49-TNR1231
richbrew99
Well-Known Member
Just recieved my conical yesterday, using it for Friday brewday 
JerseyBrewer
Well-Known Member
Brewing our 4th batch using this conical this weekend. My process is to ferment, rinse with hot water, soak with PBW for at least 24 hours, rinse again and fill with Starsans to sanitize (I reuse the PBW and Starsans for kegs and other brew days as much as possible). Scrubby never touches the tank...
I bought the plastic conical largely for economic reasons - by my calculations I can buy ~2 1/2 replacements before I spent the same thing on stainless! Based on the my process, how long do you think I'll be able to use the same fermenter until my first infection(I'm assuming that the probability increases as the plastic ages and cracks appear creating new bug condos)? Any suggestions for improving my process?
I bought the plastic conical largely for economic reasons - by my calculations I can buy ~2 1/2 replacements before I spent the same thing on stainless! Based on the my process, how long do you think I'll be able to use the same fermenter until my first infection(I'm assuming that the probability increases as the plastic ages and cracks appear creating new bug condos)? Any suggestions for improving my process?
whis121surfing
Well-Known Member
whis121 - can you give us a measurement from the lowest plastic point to the lowest point of your yeast catcher?
I'm using a different stand, and I'm interested if it would fit as is.
granted the yeast catcher is more than 2x the cost of the tank itself - but dangit, that thing is just too damn cool to not at least think about it!
great job!
Sorry I have been away a while, had training at work so haven't signed on. Haha. I'll take the measurements tonight and post it. I also recently put casters on it and the only heavy thing I have had to pick up lately is the keg or a carboy to cold crash, if needed.
BTW I have to say good find on table, anonymousbrew. I searched for a while and just said screw it and went with the stand from RuralKing.
anonymousbrew
Well-Known Member
just bought a CIP spray ball and a long thermowell from brewershardware. I'm planning on sealing the lid with weather stripping as shown in this thread as soon as the Kolsch is racked to keg.
looking forward to running some hot oxy through the spray ball and being able to control based on the internal liquid temp vs extrapolating off of ambient inside the fridge. I'll post up pics of the sealed lid with thermowell and sprayball when done.
looking forward to running some hot oxy through the spray ball and being able to control based on the internal liquid temp vs extrapolating off of ambient inside the fridge. I'll post up pics of the sealed lid with thermowell and sprayball when done.
whis121surfing
Well-Known Member
whis121 - can you give us a measurement from the lowest plastic point to the lowest point of your yeast catcher?
I'm using a different stand, and I'm interested if it would fit as is.
granted the yeast catcher is more than 2x the cost of the tank itself - but dangit, that thing is just too damn cool to not at least think about it!
great job!
Sorry the picture isn't that great but I took it as I was leaving to go to work and didn't check it after I took it. At a glance it looked ok so I left. From the ground up to the bottom of the sight glass is 7" then it is another 10" to the bottom plastic of the conical. Total space from the ground to the bottom plastic is 17". You can see one of the casters in the picture which is something I would suggest to anyone who has a conical to get if your setup allows mobility.
P.S. I absolutely love the TriClover fittings. They make everything soooo easy.

Tzarmek
Member
Hey everybody,
I just got the conical and I am trying to figure out how to set it up. I planned on getting SS fittings for the bottom as there were concerns about byproducts from the conical before it was determined to be safe. I notice however, that quite a few of you use PVC instead. Do you notice anything "off" from using pvc?
Also how do you run your ferments? After a lot of digging through the threads I have noticed someone say to just leave the valve open during fermentation(makes sense that the trub would just collect in the catch) and other people say they do a dump at such and such times.
So is it best to let the valve stay open and then close it after X amount of time or to leave it closed then dump and air bubble?
richbrew99
Well-Known Member
Just filled mine for the first time today, 10 gal Blonde Ale, i just left my valve open to collect in the pvc catcher. Used harvested Bell's Oberon yeast, can't wait to try it!
whis121surfing
Well-Known Member
Hey everybody,
I just got the conical and I am trying to figure out how to set it up. I planned on getting SS fittings for the bottom as there were concerns about byproducts from the conical before it was determined to be safe. I notice however, that quite a few of you use PVC instead. Do you notice anything "off" from using pvc?
Also how do you run your ferments? After a lot of digging through the threads I have noticed someone say to just leave the valve open during fermentation(makes sense that the trub would just collect in the catch) and other people say they do a dump at such and such times.
So is it best to let the valve stay open and then close it after X amount of time or to leave it closed then dump and air bubble?
If you close it then you would be creating a lot of pressure in it and I have a sight glass which would probably bust. Mine stays open. I allow the trub to collect till the next morning (I do night brews) then close the valve, dump the trub, Clean, sanitize, connect sight glass, open valve which lets a bubble go through but doesn't bother the fermentation since this all happens within the first 12-18 hours. The yeast collects nicely in the sight glass. Be sure there are no hops in the conical from the kettle bc it will clog the path through the valve. I whirlpool then strain the last part if I am low on wort during the transfer from the kettle to conical.
Tzarmek
Member
Thanks whis. That is exactly what I was looking for.
HIGHLIGHTED POSTS
from this very thread....
Interesting Links...
- http://www.northchautauquahomebrewers.com/ferment/ferment.htm
- http://www.norwesco.com/page.cfm?menu=63
- http://newstore.vvessel.com/proddetail.php?prod=VVS001
from this very thread....
Hey guys, just wanted to update my yeast catcher build. My parts for the quick disconnect came in today so no more threading issues.

The designs of my conical stand and my fermentation chamber went hand-in-hand. Because the stand is fairly short, I can't fit so much of a "vertical" yeast catcher as everyone else has, so I designed a more "horizontal" one.
The ball valve is 1". Below the ball valve, the diameter goes from 1" to 2", then to a 2"x3"x3" tee with cleanout adapters on both sides and cleanout plugs screwed into the adapters.
I welcome any questions, comments, suggestions, criticism, etc.
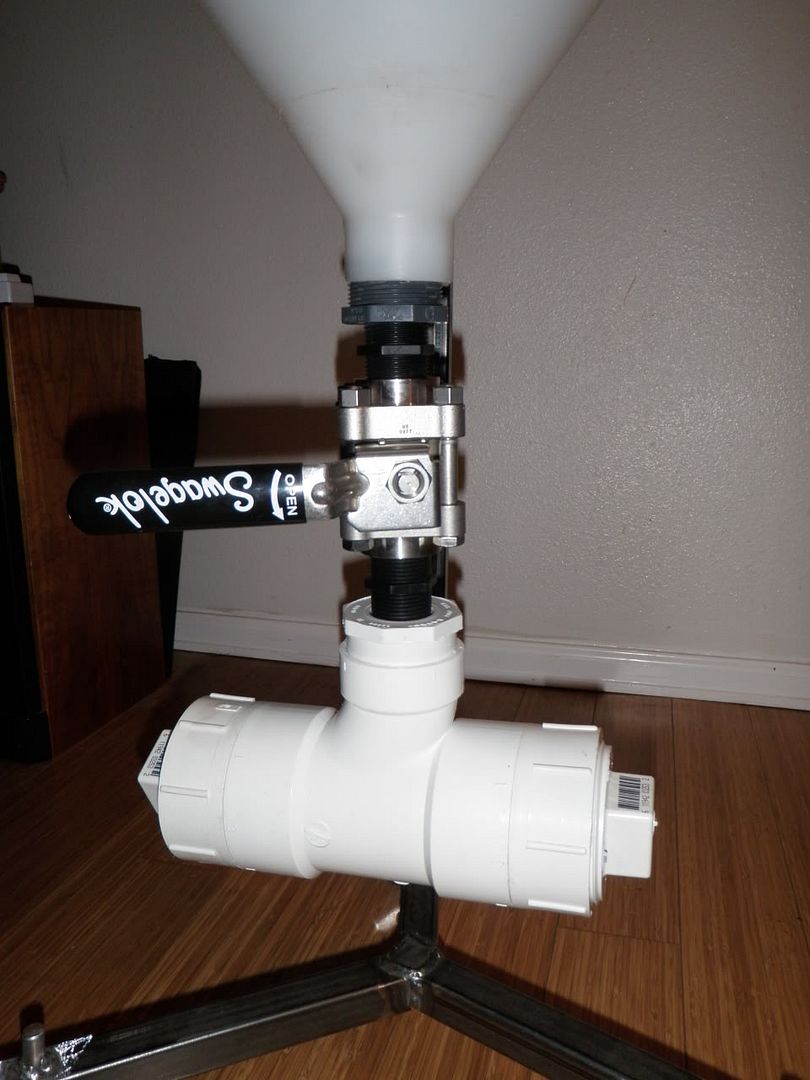
1) I plan to fill it after it's moved into the ferm chamber and drain it while it's in there, as well; so, it won't be moved around much while it's full. Maybe I should weld some handles near the top of the stand.
2)Yep!
3) I agree with you - all you need is a quart jar. However, after reading all of spottedog's posts in both this thread and his thread, I decided to emulate his technique. Building and implementing this yeast catcher is, as you say, Easy Peasy... and it's an interesting concept that is worth trying, IMO. If I don't like it, maybe I can turn it into a bong or a planter or something...
I guess I should've mentioned those first two things already. Cheers!
Here ya go.
I'll be sealing it like that guy... silicone for the ring and weatherstripping to seal the lid. I plan to add a bulkhead fitting on top, as well, for not just blowoff and CO2 but also for filling it with wort. This way I won't move it when it's full.
I like the yeast catchermy main reason for creating a catcher at the bottom was to catch all the junk that collects at the bottom of a fermenter after fermentation and secondary!! The more junk that stays out of the fermenter gives you more beer in the end, at least what I believe! My process is:
1) attach catcher to bottom of ballvalve with ballvalve open!
2) poor cooled wort into fermenter and add yeast
3) after 5-7 days or after fermentation is done close ballvalve and remove catcher. Harvest what u want if you like. Clean and sanitize and reattach catcher for the secondary fermentation process!
4) during secondary fermentation some more junk will collect in catcher!
5) keg or bottle your beer
Your design looks great, easy to clean!
I'd get a nipple that goes from bottom of fermenter to ballvalve! idea is good!
Enjoy the new fermenter
Sent from my iPhone using HB Talk
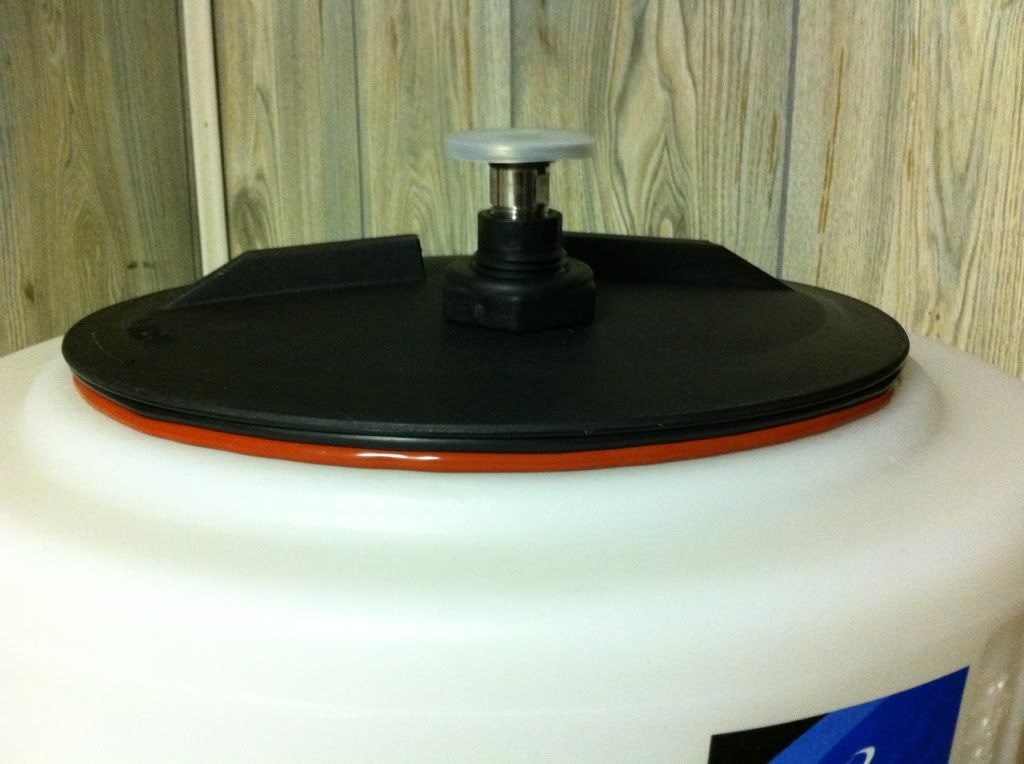
Simple really took some rubber "D" weather strip took screws out put the weather strip on the inner edge of ring and ran a bead of silicone around outer edge next to weather strip and reinstalled with scews. Then used same weather strip on lid edge to seal when closed. Since its rubber and non porous no worries with cleaning it. Then installed valve on lid for air lock hose that goes into bucket or to the c02 tank. Took about an hour to put whole thing together including racking port ect. I plan on putting casters on stand so i can role it around.
I bought a 13 1/2" inside diameter (-456) red 70 euro FDA silicone o-ring from orings-online.com to fit on the lid assembly. It costs $9.87 each plus shipping. No nasty airborne particles - flying, crawling or otherwise - are going to get inside!. The lid itself seems to tighten on the assembly well enough on its own.
Well, today I received everything. Booo. The Tank I got with the 2" drain had way too many nooks and crannies to use. I remember other people on here saying the same thing but couldn't find it. I'm hoping the full drain version, which I just reordered, has a lot less places for things to hide at the drain. The other unfortunate thing is that all the hardware I ordered has to also be sent back as it's for the 2" drain. Too bad it took me 10 days to find all this out. I've got some honey brown ingredients that are screaming to be cooked up!
Got my stand done tonight. I also need to test it for leaks. I have not added the racking port yet since I am not sure where I want it to go.

Ok guys i broke cardenal rule and opened my conical for a pic so here you go.
1. Remove screws by hand that hold the lid ring on.
2. Put a ring of the rubber "D" shaped weatherstrip around flat surface as close to inner wall as posible. If you did this right you should still see part of the holes for the screws.
3. Use silicone and run a descent bead around lip next to weatherstrip covering screw holes with it.
4. Set ring into place and hand screw your screws back in. Do not use screw gun you will strip the holes out.
5. Use finger and smooth off acess around outside that squished out from the lip.
6. Put 2 seperate rings of weatherstrip around contact surface of lid be sure to put seams 180 degrees out from each other for better seal


7. screw lid on as tight as you can and let sit for a day to compress it a bit. I used a long screwdriver between lid handles to tighten it with
8. Attach your hardware to your conical for racking and air lock etc. I use a bucket with water and a hose from the top for airlock
See pics for parts etc.


Here are sku from ace for supplies
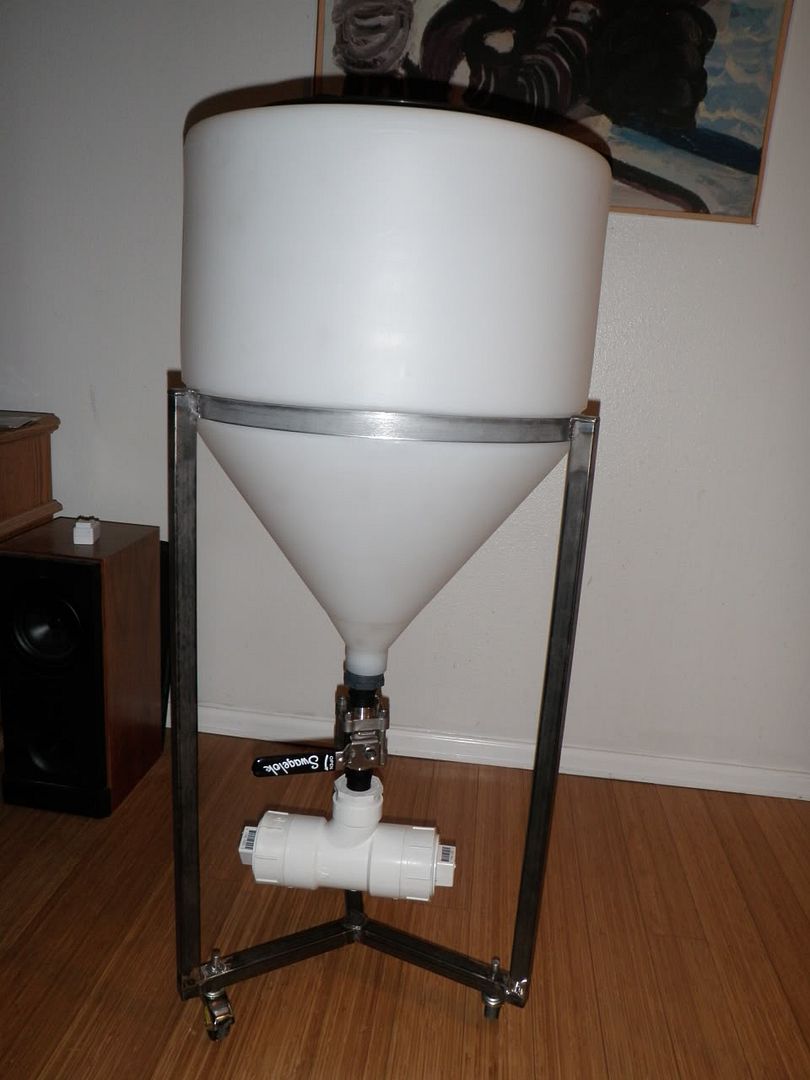
Tri Clover connections on my 15 gal conical fermenter.
This is prob a little more expensive using the TriClover connections but I chose them for 3 reasons.
1. THEY LOOK SWEET!
2. Super easy to work with and clean.
3. Very sanitary.
Derrin from BrewersHardware.com was great helping me out with my order. Below is the list of items I got.
Induction tank I bought: http://www.ruralking.com/15-gal-full-drain-inductor.html
• Fitting on tank- 1 1/2" FPT BOSS $61.00 with FREESHIP
Brewershardware.com items
SKU / Product Item / price / Quantity / Total
TC15M15 1"/1.5" Tri Clover X 1.5" Male NPT $19.00 2 =$38.00
TC15CAP 1"/1.5" Tri Clover Cap $3.00 2 =$6.00
TC15CLAMP 1"/1.5" Tri Clover Clamp $6.00 4 =$24.00
TC15VBFVPT 1.5" Tri Clover Butterfly Valve - Pull Trigger $51.00 1 =$51.00
TC15GASSIL 1.5" Tri Clover Gasket Silicone $1.25 5 =$6.25
TC15SG 1.5" Tri Clover Sight Glass $54.00 1 =$54.00
Subtotal: $179.25
Shipping cost: $14.95
Total: $194.20 + $61(for induction tank)= $255.20
Racking Arm is next once I get some more fun money.
OK... per a request from a fellow HBT member “Apoxbrew” and since no one has yet to explain their racking arm solution, I will show what we did to install a rotating racking arm to the 30 gallon fermenters. I won’t address the Tri-clover fitting setup.This has been done ad nauseam, and I duplicated exactly what others have done before me.

The center of the hole was drilled 6-1/2” up from the where the angle begins at the 1-1/2” FPT extension. When drilling the hole, we used a step drill bit. When we got close to the final size, we removed the bit from the drill and finished the hole by hand (using the bit). The plastic was soft enough to allow quick work. We slightly undersized the hole to allow the threads on the fitting to cut threads into the plastic. BE CAREFUL! Could easily be an oops! The seal is really on the o-ring. We just wanted the secondary protection.

I used fittings from BargainFittings.com:
1. the "new" Keg Weldless Bulkhead with the standard coupling, SS 2-piece ball valve, and the 1/2" Male NPT to 1/2" barb.
http://www.bargainfittings.com/index.php?route=product/product&product_id=178
and
2. the Side Pickup weldless version Drain/Dip Tube SS kit with the standard compression fitting option.
http://www.bargainfittings.com/index.php?route=product/product&path=46&product_id=157
and
3. 6ft. of 1/2" I.D. silicone tube.
http://www.bargainfittings.com/index.php?route=product/product&path=52&product_id=122
Total cost was in the neighborhood of $70.00 plus shipping.

Racking Arm horizontal, with slight tip upward to allow air to escape, when filling

Racking arm rotated 90 deg downward, leaves a measured amount of a little less than a quart when vacuum breaks on the siphon.
Depending on the wall thickness of your specific conical you may have to Dremel and fine tune the area at the hole, as this weldless fitting only permits about 2 threads to extend into the interior of the conical, which was plenty for the fitting to fasten to on one of ours. Also this is why we decided to use the Silicone O-ring in lieu of the silicone flatwasher that the fitting came with. So far we have done several runs on each conical and no leaks, racking works beautifully as it only needs to rotate once and 90 degrees. Cleanup and disassembly is a breeze, I only tighten as tight as I can with my hands, no tools required.
I am happy to answer any specific questions and edit this thread should this not be clear, or if I have left something out.
Well after seeing that the trub flowed out like drywall mud when draining it off (but when it breaks it flows), I figured that using the sightglass would let me make a little less of a mess when I purge the trub.
So my process is once I get to my target gravity and plan to rack it off.
I purge the trub, close the valve when I see the buttery colored yeast start into the glass.
Remove, dump, clean, sanitize, reassemble and install end cap loosely to purge air out rather than into your tank.
Open butterfly and collect one cylinder of "Middle Layer" yeast, and pour into a flask for washing/harvesting.
Reassemble and drain the rest of the yeast off for dumping (this is at least a quart or more of yeast and trub on 20+ gal).
(This is the hard part it requires...P..A..T..I..E..N..C..E..)
Clean and reassemble and let it rest for a couple more days to continue floccing and allow what may have stirred up to settle again before moving the process to to racking arm alone.
You have a little less moving parts, its all about what works for you and your process. The above takes me about 15-20 Minutes on a Wed night for a Sat racking.
Hope that helps! Sorry if its overly wordy.
Amazon, it is 18 x 24 with a basket, handle and casters I dont recall the brand but there was only a couple options that were reasonable about $80. Very convenient to move 200lbs of liquid around and for cleaning, different ferm-temps etc...next project is to figure out an exterior pex tubing jacket or internal SS coil for isolated temp control.

Sir, you are very welcome!
I owe a big thanks goes to all those who worked, innovated and shared ideas from the beginning of the thread.
It is truely amazing how well an open source of idea sharing can work to the benefit of many .. now if only our congress would quit throwing sand and crapping in the sandbox and cooperate...I know wishful thinking...
In Beer We Trust!
I recommend a 1.5 to 2qt yeast catcher. Mine is 2qt and it is the perfect size for the yeast and trub I get.
First brew, Zythos IPA, in Conical! THANK YOU to all that have helped along the way. I LOVE this thing.


I made a yeast catcher out of PVC as shown in this thread. It fits to the conical via an NPT to triclover adapter and has a volume of one quart.
I do 11.25 gallon batches to fill a firkin. Using S-04 yeast, I collect about 1.75 quarts per batch. I save the middle layer which is collected from the droppings of the butterfly valve and from the neck of the yeast catcher from the first yeast dump.
If the sight glass form factor is a must, it would be cheaper to copy this....
https://www.homebrewtalk.com/f51/new-conical-set-up-what-do-you-think-279614/index2.html#post3480471
A 16.5" length of 1.5" diameter tubing would have a volume of 16 ounces.
Conical arrived last night - squeezed it into the gutted fridge.
Had an old fridge that used to be my kegerator and part time fermentation chamber. It's been replaced with a keezer. So I gutted it to see if I could fit the conical in. With some mods (removed freezer/fridge divider, coil shroud and moved the stat and fan) I can squeeze the conical in.
The stand is a patio table from garden ridge for $20 and I needed to extend the legs for my fittings - 1in sch40 and we're in business. Popped the glass out of the table and it is the perfect size for the tank.
I'll pretty it up a bit later, but tomorrow it'll have it's first brew in it!


Interesting Links...
- http://www.northchautauquahomebrewers.com/ferment/ferment.htm
- http://www.norwesco.com/page.cfm?menu=63
- http://newstore.vvessel.com/proddetail.php?prod=VVS001
PCFloyd
Member
Fantastic thread. Subscribed!
Great thread! I'm just getting back to brewing and will be doing 22 gal batches. I'll be making one of these fermenters in the future. Walk in cooler build must come first though. That'll get done sometime this summer.
I ordered two 60 gallon inductors. I requested the model with full drain and a 1.5 inch fpt connection at the bottom. I ended up receiving the version with the 2 inch mpt. I wanted to send them back but they told me to keep them since shipping was so high. Anyway, I'll see what I can do with these, even if they are not ideal (they are also 30 inches in diameter instead of 24). I had purchased fittings for the 1.5 inch fpt (1.5 inch mpt to 1.5 inch tri-clamp). Any ideas of fittings I could use to attach to the tank's 2 inch mpt to get me to 1.5 inch tri-clamp?
WPStrassburg
Well-Known Member
2" FPT x 1.5" FPT reducing coupling
or 2" coupling and a 2" MPT x 1.5" FPT bushing
http://www.grainger.com/Grainger/Reducing-Coupling-1LTU4
or
http://www.grainger.com/Grainger/Coupling-1LRZ4
and
http://www.grainger.com/Grainger/Hex-Bushing-1LTH1
Similar threads
- Replies
- 105
- Views
- 4K
- Replies
- 1
- Views
- 438
