Spike Conical- observations and best practices

Homebrew Talk - Beer, Wine, Mead, & Cider Brewing Discussion Forum

Help Support Homebrew Talk - Beer, Wine, Mead, & Cider Brewing Discussion Forum:

This site may earn a commission from merchant affiliate links, including eBay, Amazon, and others.
What fitting are you using here? I’m starting to brew more NEIPA’s and the clogs are killing me. I purchased their closed transfer kit but it appears folks are only using one keg connect. I have the 1.5” TC but not sure how to connect to it without using a keg connect with the spring and valve removed.

View attachment 659879
Can you describe your process in full detail. I transfer using the keg connector with the spring etc installed and have literally NEVER had even close to a clog or even any noticeable sediment in the connector. Your process must be missing something as it's definitely easily doable. I'm assuming you have the racking arm and it's facing down, have cold crashed and dropped all the sediment prior to transfer and are under pressure while transfering and not attempting to do the transfer with gravity? Cheers
 
Last edited:
When you guys dump the yeast are you getting a thick yeast cake or runny yeast cake? I cant seem to get a solid tube of yeast . The only thing I can think of is the position that my valve is may be the culprit. When I dump I pull my lever towards the ground which makes the opening at the top . Should I position it so the valve arm goes up which would open the bottom half of the port ? Hope I'm making since .
 
What fitting are you using here? I’m starting to brew more NEIPA’s and the clogs are killing me. I purchased their closed transfer kit but it appears folks are only using one keg connect. I have the 1.5” TC but not sure how to connect to it without using a keg connect with the spring and valve removed.

View attachment 659879
Are you getting clogged on the fermenter side or keg side? I use the 1.5" TC/flare fitting at the fermenter, and typical liquid ball lock QD at the keg. Never had a problem with clogs, even with some very large IPAs, although I may have just been lucky so far.
 
I don’t think the connector to the racking port matters that much. If you are pulling through stuff that will clog it will clog the connection at the keg. If that happens you have to disassemble the post and clean out the spring in the post and you have screwed up your intended O2 free transfer.

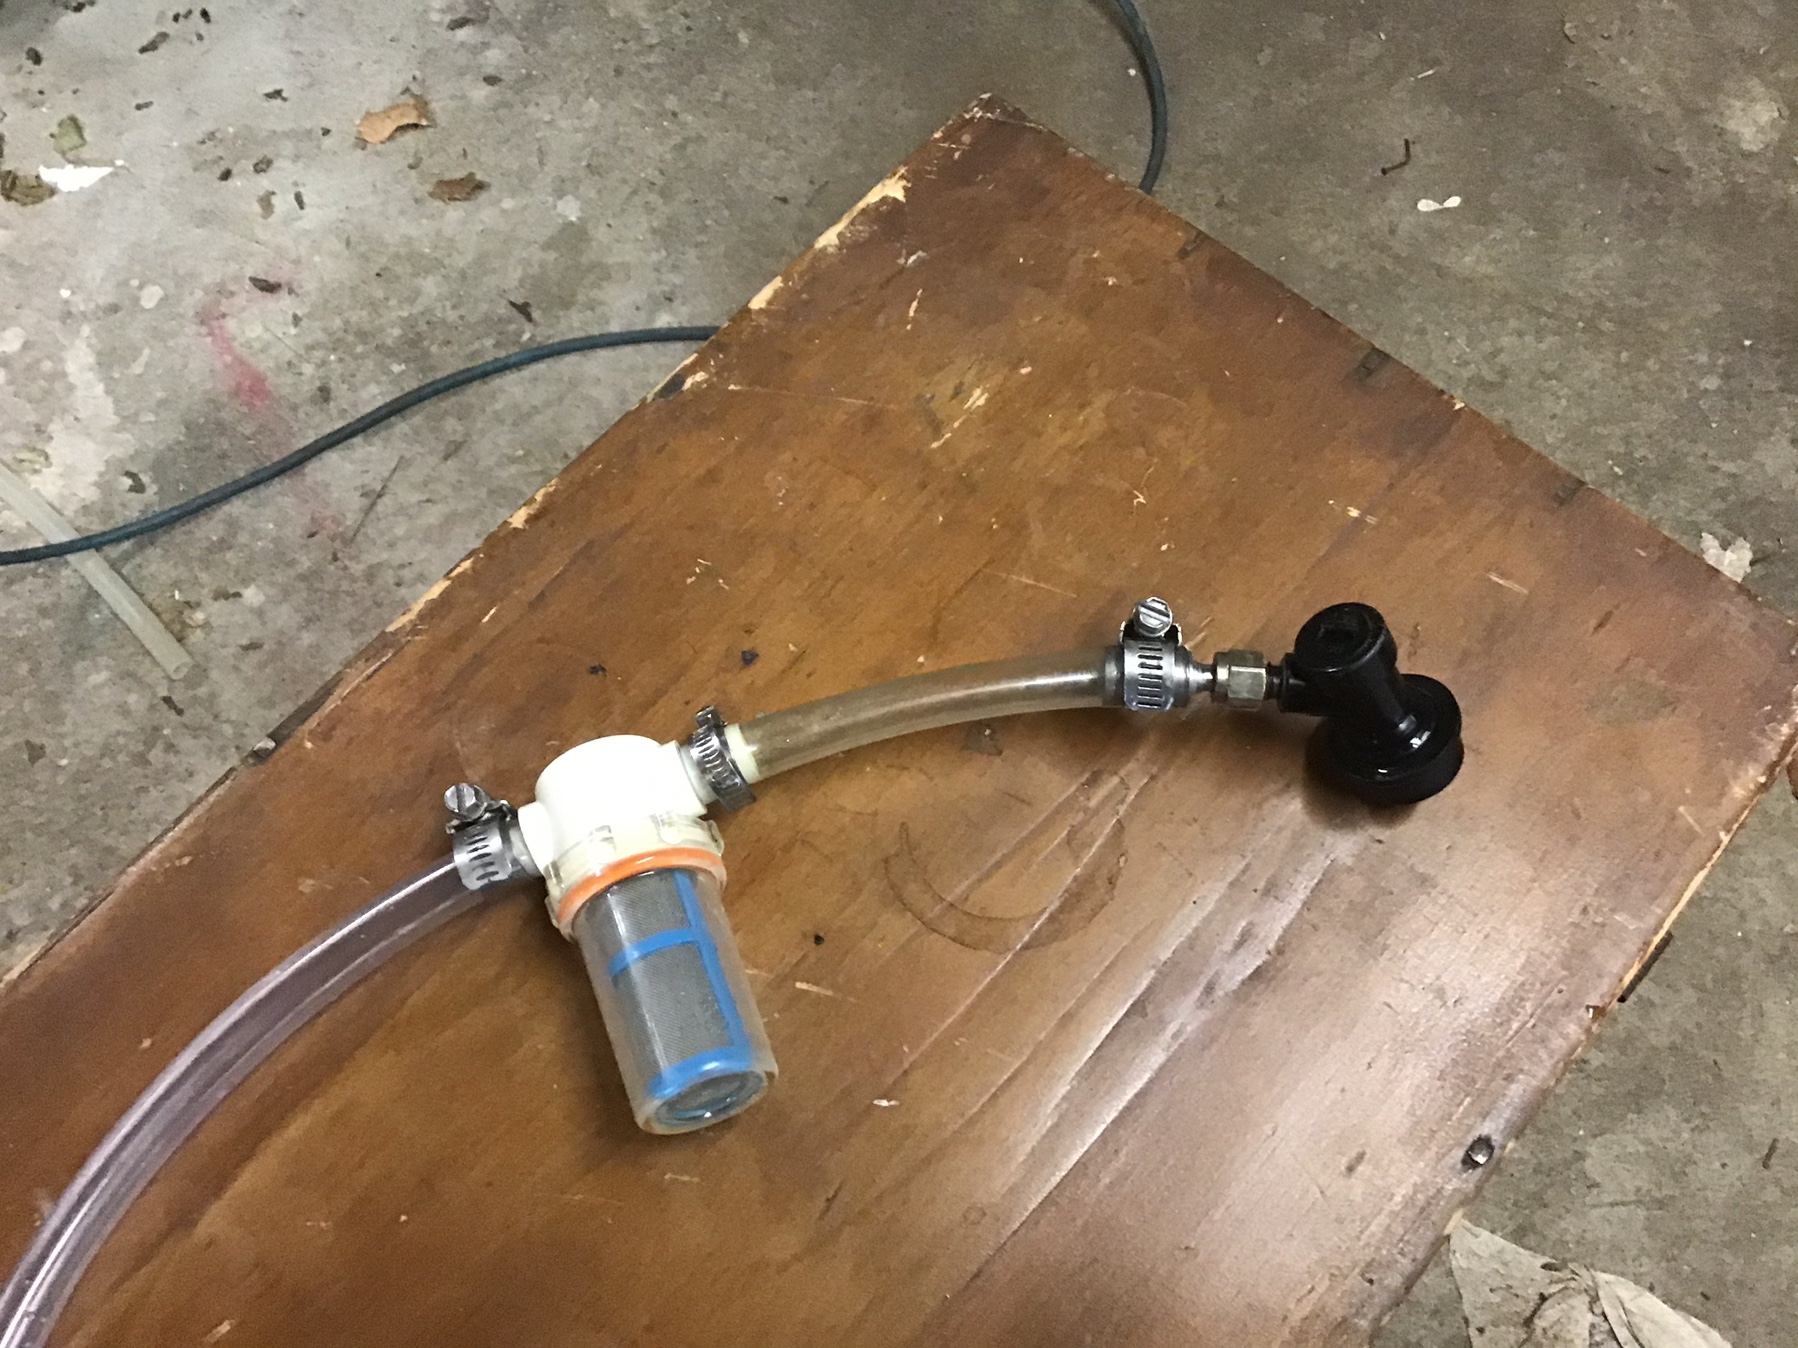
Like Mongoose I’m using a fat connection at the racking port...I use a barb but works out the same. However I’m still pulling material that would easily clog a post. I’m dealing with that material using this inline filter.
IMG_0062.JPG


I kegged today and the filter immediately clogged. I removed its jar, rinsed, sanitized, and started pushing beer again. Cleaned it out 4 times on first quarter of a keg the filled three kegs with no more clogs.

Unlike last batch I did not dump my dry hops very much. And I got 3 full kegs with beer to spare. It’s only my third batch but gets easier every time.


Edited to add...

By removed it’s jar I mean unscrewed the clear plastic jar from the white plastic part of the filter. Obviously shut the racking valve first... when you remove the jar you can remove the filter screen from the jar. It’s about 1” diameter cylinder of SS mesh. First 2 clogs it was completely full of compacted hops. Second two clogs a little looser. At end of kegging there was almost nothing in the filter.
 
Last edited:
When you guys dump the yeast are you getting a thick yeast cake or runny yeast cake? I cant seem to get a solid tube of yeast . The only thing I can think of is the position that my valve is may be the culprit. When I dump I pull my lever towards the ground which makes the opening at the top . Should I position it so the valve arm goes up which would open the bottom half of the port ? Hope I'm making since .

I find technique and top pressure are most important - never paid attention to valve orientation TBH since it is a butterfly valve, so symmetric.

When dropping the cone, key is to crack valve slowly so the yeast is pushed down evenly down the cone. If opening is quick and wide open, fluid will punch through the cone and not give a thick plug. Second tip is appropriate downstream sizing of hardware from the valve. Having a significant constriction also helps to slow the flow.
 
I use a short piece of silicone tubing . I pressure up to about 10 psi when dumping. I crack the valve slowly , at first the yeast is thick but as it gets about halfway it gets more runny. I never open all the way , half at the most.
 
I use a short piece of silicone tubing . I pressure up to about 10 psi when dumping. I crack the valve slowly , at first the yeast is thick but as it gets about halfway it gets more runny. I never open all the way , half at the most.
That's your problem. You can't open it anywhere near half way. the first click or lock position past closed on my dump valve is too much typically. You only get one shot so you have to do it as slowly as possible. Otherwise you have to wait a day and try again.
 
That's your problem. You can't open it anywhere near half way. the first click or lock position past closed on my dump valve is too much typically. You only get one shot so you have to do it as slowly as possible. Otherwise you have to wait a day and try again.


Ahh ok that's gotta be it then ! Thanks man. Next time I'll just start to open it but stop before the first stopping point. :rock:
 
What fitting are you using here? I’m starting to brew more NEIPA’s and the clogs are killing me. I purchased their closed transfer kit but it appears folks are only using one keg connect. I have the 1.5” TC but not sure how to connect to it without using a keg connect with the spring and valve removed.

View attachment 659879
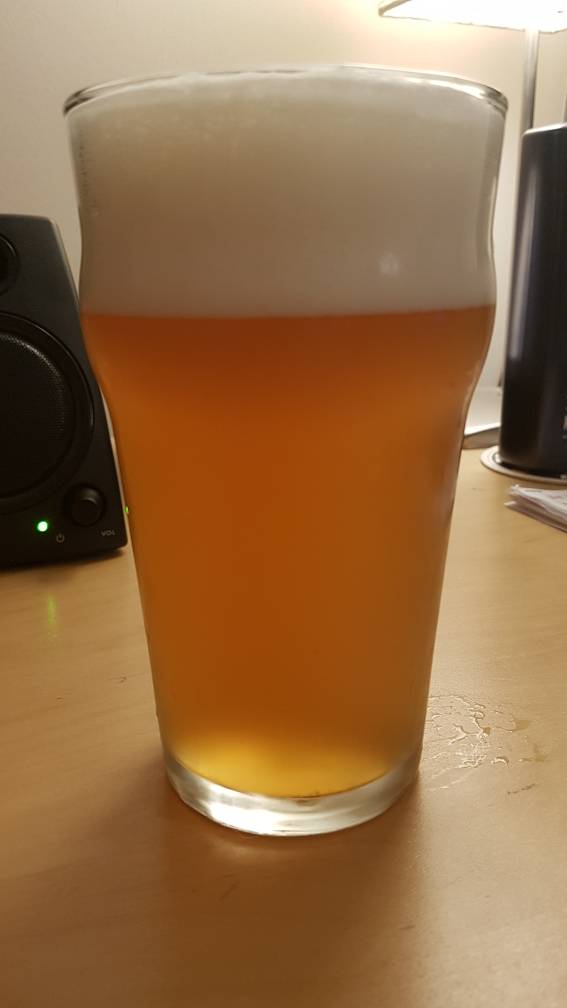
I attach the sample valve to the racking Port as ive been experimenting with using the carb stone in the sample port location. Here is a 15 day old heavily hopped pale ale that I did not use gelitine etc in. Hopefully you can see while it's still hazy there is zero sediment in this beer that would clog the connector. Cheers
20200101_201917.jpeg
 
Ahh ok that's gotta be it then ! Thanks man. Next time I'll just start to open it but stop before the first stopping point. :rock:
As soon as you hear the flow stop and keep it there and be ready to close it more when it starts to speed up. As another mentioned a longer hose might help too. Mines about 40inches long. Cheers
 
@jturman35 , there are many TC connectors on this page at brewhardware, some end in camlocks (which is what I use on my system), some are barbed. Something here should get you set up to draw beer from the conical without having clogging issues at least there.

https://www.brewhardware.com/category_s/1841.htm

I used to use the TC fitting with the QD post on it, but it tended to clog. I switched to the camlock fitting and not only did things speed up quite a bit, but the clogs virtually disappeared.

Typically I'll flush the racking arm prior to racking to clear anything that settled in it.

Here's what I use:

View attachment 659883

That's a great idea on using camlocks. I can't believe I never thought of it before. My worst clog ever was on my last brew: a Winter Warmer (5 gallon) with 8 ounces of dry hop pellets. I needed all the hops to balance out the malts and the HIGH %ABV. Flow was slow, and stalled completely with about 2-3 quarts remaining in the conical. Unfortunately the clog was in the black quick disconnect. It took me forever to figure it out. The beer itself was absolutely amazing. It had dropped very clear and yet had little suspended bits of hop pellets floating freely in the glass. Not only could you smell and taste the hops, but you could see and chew on them as well. It was as fresh as any Randalized beer I've ever had. Hope I can replicate it.

Brooo Brother

The reason I went with camlock is that the rest of my system uses them. I fill the fermenter pushing the beer through that same fitting, using hoses from the counterflow chiller. So it was pretty easy to use the same fitting for filling the fermenter and for filling a keg. (Racking for all those who prefer strict adherence to brewing parlance....)

But a barb on a TC fitting would work as well.

Which sized camlock fittings are you using? It looks like "Big E" on the catalogue page might be best, with ½" silicon tubing. The restriction stills looks to be the black beverage "in" keg post fitting, however. The inline mini-filter looks like it might be a solution for heavily dry-hopped beers as well.

Brooo Brother
 
I don’t think the connector to the racking port matters that much. If you are pulling through stuff that will clog it will clog the connection at the keg. If that happens you have to disassemble the post and clean out the spring in the post and you have screwed up your intended O2 free transfer.

Like Mongoose I’m using a fat connection at the racking port...I use a barb but works out the same. However I’m still pulling material that would easily clog a post. I’m dealing with that material using this inline filter. View attachment 659911

I kegged today and the filter immediately clogged. I removed its jar, rinsed, sanitized, and started pushing beer again. Cleaned it out 4 times on first quarter of a keg the filled three kegs with no more clogs.

Unlike last batch I did not dump my dry hops very much. And I got 3 full kegs with beer to spare. It’s only my third batch but gets easier every time.


Edited to add...

By removed it’s jar I mean unscrewed the clear plastic jar from the white plastic part of the filter. Obviously shut the racking valve first... when you remove the jar you can remove the filter screen from the jar. It’s about 1” diameter cylinder of SS mesh. First 2 clogs it was completely full of compacted hops. Second two clogs a little looser. At end of kegging there was almost nothing in the filter.

Have you got a link to the filter and housing? Thanks.

Brooo Brother
 
Which sized camlock fittings are you using? It looks like "Big E" on the catalogue page might be best, with ½" silicon tubing. The restriction stills looks to be the black beverage "in" keg post fitting, however. The inline mini-filter looks like it might be a solution for heavily dry-hopped beers as well.

Brooo Brother

I had the camlock fitting and added the barb to it, parts I had lying around. I'm using this:

https://www.brewhardware.com/product_p/camd.htm

and this:

https://www.brewhardware.com/product_p/hosebarb12mx38.htm


You can't use the "E" fitting because it's a male camlock, not female camlock.


If your tubing is large enough, this https://www.brewhardware.com/product_p/camc.htm would work well; if you need to control the barb size, what I've referenced above for my setup would be better.


OK, I see now. You used a (M)NPT barb fitting on the end of the camlock with standard ⅜" ID tubing. Looks like I'll try that along with an inline filter like @eric91312 did. Cleaning out an inline filter (if it clogs) sure would beat a blocked keg post QD. The larger diameter bore of a camlock fitting at the fermenter end should take care of any upstream blockages. So I'll just have to add a 1.5" TC x camlock (M) to the butterfly valve on the transfer port along with a (FM) camlock with barb fitting to my transfer line. Thanks for the tip.

Brooo Brother

You might try a couple other things too. I'm pretty nuts about trying to avoid oxygen post-fermentation, so having to clean a fliter and then restart sounds like a source of O2. I wouldn't use that unless nothing else worked.

A few things you can do to avoid the clogging problem:

1. Purge your lines. If you have a MFL fitting on your QD, you can unscrew that, attach to the fermenter, and then let fly for a few ounces, at pressure. This will flush the racking arm. I do this into a plastic pitcher, and use the beer in that pitcher for a final hydrometer reading.

1a. Usually, though, I use one of these from brewhardware attached in the end of the QD; it opens up the poppet and allows beer to flow right through the QD (again, right into the pitcher). https://www.brewhardware.com/product_p/ball_lock_jumperpost.htm Once the line is clear, I just remove it, leaving me a line full of beer and no air, which I can then connect right to the keg.

2. You already know about dumping trub to move the level of trub below the racking arm.

3. Crash to a cold temp and settle stuff out of the beer.

4. Overbuild your recipe a bit. I have my racking arm (CF10) pointed straight down; I've never drawn trub into the lines except before I started flushing the racking arm. I overbuild my recipes a bit to account for losses in the trub, mash tun, whirlpool cone, pump and lines, but even so, I'm not sticking that racking arm down into the trub--and I never have ever dumped trub out of the bottom.

I did a beer 2 weeks ago with 1 ounce in the whirlpool and 3 ounces dropped in as a dry hop. No problems racking without drawing hop material into the lines. Now, if I had 10 ounces, maybe that would be a possibility, but if that were an issue, I'd just turn the racking arm a bit sideways until I didn't have any trub.

If you use gaskets like these: https://www.amazon.com/gp/product/B01MQPH9WW/ref=ppx_yo_dt_b_search_asin_title?ie=UTF8&psc=1 you can loosen the clamp and actually turn the racking arm. (Lube the outsides of the TC fittings and inside the clamp).

But the trick I think is to just overbuild the recipe enough to allow you to get above the trub; then you're not fooling around with any of these other things (other than flushing the racking arm, which you'll have to do regardless).


Anyway, good luck with it.
 
All great ideas but if your crashing and dumping sufficiently you shouldn't be having a problem regardless of how many dryhops etc you have. I would get that sorted before buying different connectors and filters etc. Cheers
 
When dumping yeast, what ID of silicone tubing is best? 1/2"? Bigger? Smaller? I haven't had a chance to brew with my Spike yet (hoping this weekend) and want to have any equipment ready to go when I need it. All my TC barbs are for 1/2" ID tubing. Just wondering if a 3/8" ID would be better for dumping yeast since it might reduce the agitation inside the conical bottom?
 
I’m dry hopping with 12-16 oz hops.

I have racking arm pointing at 3pm. Probably at that level I don’t need the arm.

I don’t agree with concern regarding oxygen exposure due to dumping the filter. I re flush the line with a few ounces beer each time I clean it out.

Will try dumping hops again next time but like I said I did get 15 gallons to kegs by weight and believe without oxygen exposure so believe I’m going in right direction.
 
When dumping yeast, what ID of silicone tubing is best? 1/2"? Bigger? Smaller? I haven't had a chance to brew with my Spike yet (hoping this weekend) and want to have any equipment ready to go when I need it. All my TC barbs are for 1/2" ID tubing. Just wondering if a 3/8" ID would be better for dumping yeast since it might reduce the agitation inside the conical bottom?
If you're dumping under pressure than 1/4" is best and use the longest piece you have at hand for greatest possible braking effect.
 
Thanks for all the replies! Looks like I kicked a hornets nest. My last 5g batch I had 6oz dry hops, I blame my clogs for not cold crashing long enough and getting the trub layer below the racking arm.

How long are you guys cold crashing IPA’s?
 
Thanks for all the replies! Looks like I kicked a hornets nest. My last 5g batch I had 6oz dry hops, I blame my clogs for not cold crashing long enough and getting the trub layer below the racking arm.

How long are you guys cold crashing IPA’s?
I find 48 hours at 28-30f works well enough. Then extremely slowly dump the sediment completely prior to racking. If you rush the dump you will blow thru the yeast and end up with sediment clogging up your connectors. Cheers
 
Last edited:
Suspended solids will keep settling faster the warmer the beer is despite everybody saying the opposite. Just saying...

Was there anything else in that post you liked, or are you just looking for things with which to disagree?

Even so, I think there's credible evidence that your statement above is incorrect. Here's a quote (omitting the equivalent temps in Celsius) from page 110 in "Yeast: The practical guide to Beer Fermenation" authored by Chris White and Jamil Zainasheff.

You might be familiar with Chris White; he's the guy who started White Labs. I attended a workshop put on by him last spring; he seems to know his stuff.

Anyway, here's the quote:

Regardless of a strain's flocculation level, lower beer temperatures result in a higher flocculation rate. More yeast drop out of solution at 40*F as compare to 70*F, and more yeast drop out at 32*F compared to 40*F. Some yeast strains require two weeks or more at 40*F to clear completely.
 
Last edited:
Any concerns of clogging with 1/4" ID? Or will the added pressure from CO2 be enough to move any blockage?
Your concern will be rather with not having to shower and repaint the room every time you dump trub. I'm not kidding. ;)
 
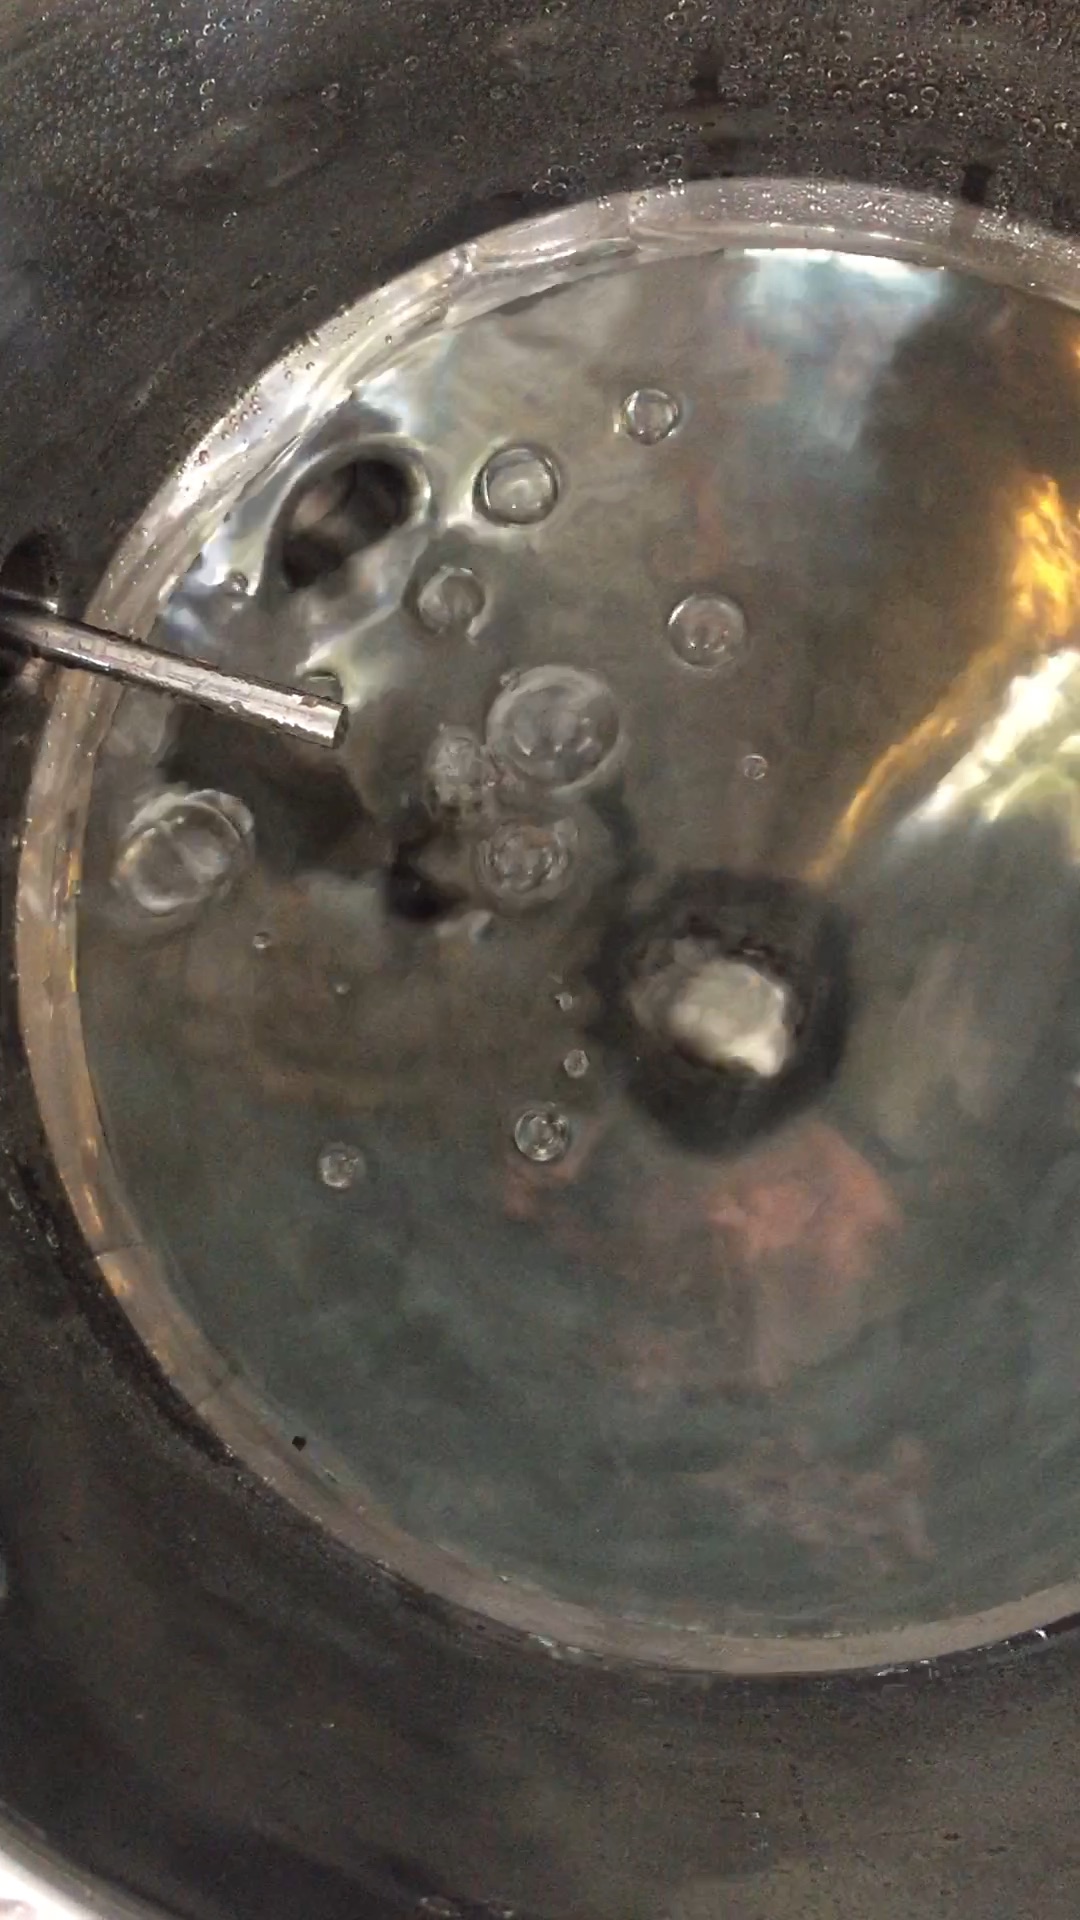
Looking for thoughts on using the carb stone for wort oxygenation (not carbonating). Here is a photo displaying the output while sending o2 through the racking port/racking arm (note that I also tried it without the racking ARM attached and experienced the same results). Due to the angle of the installed carb stone, the o2 comes into contact with the shroud around the carb stone and converts the micro bubbles to these large ones before they reach the tank. Is it possible that these nickel/quarter size bubbles are effective in oxygenating the wort? I have my doubts and was looking for other opinions.
Carb Stone.jpg
 
Was there anything else in that post you liked, or are you just looking for things with which to disagree?

Even so, I think there's credible evidence that your statement above is incorrect. Here's a quote (omitting the equivalent temps in Celsius) from page 110 in "Yeast: The practical guide to Beer Fermenation" authored by Chris White and Jamil Zainasheff.

You might be familiar with Chris White; he's the guy who started White Labs. I attended a workshop put on by him last spring; he seems to know his stuff.

Anyway, here's the quote:

Regardless of a strain's flocculation level, lower beer temperatures result in a higher flocculation rate. More yeast drop out of solution at 40*F as compare to 70*F, and more yeast drop out at 32*F compared to 40*F. Some yeast strains require two weeks or more at 40*F to clear completely.

Yeah, pity that no peer-reviewed study exists that proves any clear correlation between temperature and yeast flocculation. Meaning that there are studies that attempted to prove it but they all invariably failed to prove correlation, much less any type of causal relationship. Mr. White can write whatever he wants in his book but since the authority principle has zero value in science as of today there is still no reason to think that yeast will settle out faster if the beer is cooled.

BTW, we were specifically discussing clogging issues caused by dry hopping and suspended hop particles. Those are obviously inert and will never "flocculate" or coalesce in any way but will only settle out by gravity. The speed at which this will happen is regulated by Stokes' Law which clearly states that sedimentation speed is inversely proportional to the viscosity of the liquid the particles fall through. Since water's (and consequently beer's) viscosity more than doubles dropping from 25°C to 0°C it follows that at 0°C it takes twice as long for the beer to clear of hop material than at 25°C. To claim that the opposite is actually true is just absurd and yet people keep repeating it ad nauseam for some reason, which still does not make it true BTW.
 
I am also new to cold crashing to such low levels and have been a little surprised by the results. I also read the yeast book and remember the part about floccing out faster with cold crashing. But now that I am crashing at 28F instead of 38F my beers seem to take longer to crash to clarity. I get to 28F much faster with this freezer so maybe my perception of time has changed...im now reaching 28F in less than 24 hours now while with the fridge i'd be in the mid 40s at 24 hours and take 2-3 more days to bottom out at about 36F.

But reading your debate above I can see the issue may be that yeast and other particles in suspension may react differently to the cold crash. While active the yeast are producing CO2 which sticks to the yeast cells and keeps floating them up. With cold the yeast stop producing this CO2 and also any CO2 that is stuck to the yeast will be less buoyant due to natural gas law. So colder yeast may in fact floc out faster in seeming contradiction to Stokes law. But I can tell you that the rest of the stuff in there moves pretty slowly to the bottom at 28.
 
You said:

Suspended solids will keep settling faster the warmer the beer is despite everybody saying the opposite. Just saying...

I posted something from an individual who is an expert in his field, someone who's written a book on yeast, and who definitively said (from the above quote on page 110 of his book):

Regardless of a strain's flocculation level, lower beer temperatures result in a higher flocculation rate. More yeast drop out of solution at 40*F as compare to 70*F, and more yeast drop out at 32*F compared to 40*F. Some yeast strains require two weeks or more at 40*F to clear completely.

Now, below, you want to rely on peer-reviewed articles (odd that you cite none buttressing your case, isn't it?), when an expert in the field has noted that at least some of the suspended solids (yeast) DO fall out as the temp is crashed.

Assuming you'd like to refute this, feel free--I might learn something. But since you've tried below to switch from what I did to refute your comment to something you can distract us with, I rather doubt you have anything.

If you did, you'd have reported it. I'm starting to wonder if a lot of your other declarative statements, made in other posts and other threads, are equally without merit.

I think I'm less inclined to believe anything you say now. Unlike Chris White, who has a PhD and is a hugely successful owner of a Yeast business, you have no credentials with which we might judge the veracity of your statements.

I'll leave it up to others to decide whether your comments have value. As for me, I'm inclined to ignore them as you back them up with nothing but bombast. That, by the way, is what happens when you deride someone for not using peer-reviewed studies, but then provide none yourself. There's a word for people like that. It starts with an "H" and ends with "ypocrite."


Yeah, pity that no peer-reviewed study exists that proves any clear correlation between temperature and yeast flocculation. Meaning that there are studies that attempted to prove it but they all invariably failed to prove correlation, much less any type of causal relationship. Mr. White can write whatever he wants in his book but since the authority principle has zero value in science as of today there is still no reason to think that yeast will settle out faster if the beer is cooled.

BTW, we were specifically discussing clogging issues caused by dry hopping and suspended hop particles. Those are obviously inert and will never "flocculate" or coalesce in any way but will only settle out by gravity. The speed at which this will happen is regulated by Stokes' Law which clearly states that sedimentation speed is inversely proportional to the viscosity of the liquid the particles fall through. Since water's (and consequently beer's) viscosity more than doubles dropping from 25°C to 0°C it follows that at 0°C it takes twice as long for the beer to clear of hop material than at 25°C. To claim that the opposite is actually true is just absurd and yet people keep repeating it ad nauseam for some reason, which still does not make it true BTW.
 
Looking for thoughts on using the carb stone for wort oxygenation (not carbonating). Here is a photo displaying the output while sending o2 through the racking port/racking arm (note that I also tried it without the racking ARM attached and experienced the same results). Due to the angle of the installed carb stone, the o2 comes into contact with the shroud around the carb stone and converts the micro bubbles to these large ones before they reach the tank. Is it possible that these nickel/quarter size bubbles are effective in oxygenating the wort? I have my doubts and was looking for other opinions.View attachment 660077


You need surface area to transfer oxygen to the wort, and you're right in identifying that the larger bubbles are going to be less effective in oxygenating the wort.

FWIW, I have a carb stone for my CF10 and I've never used it, not for carbing, not for oxygenating. I have an oxygenation wand, a long one, with a stone on the end. I sanitize the whole thing and stick it in through the 4" port on top to oxgenate. I turn it down to where the bubbles barely break the surface and oxygenate for 2 minutes (5-gallon batch). I stir around with it to ensure that the O2 is more mixed up into solution than the one location of the carb stone would provide.

BTW, I was talking w/ a pro brewer about oxygenating, and he said that one should pitch the yeast in while oxygenating. I don't know if that was to ensure the yeast was well-mixed (with the bubbles creating turbulence) or what, exactly, but that's actually counter to what a LODO practitioner said, which was to pitch the yeast before oxygenating.

I decided the 2-minute difference was likely imperceptible, so I start oxygenating and then pitch the yeast into the bubble stream.
 
[QUOTE="mongoose33, post: 8751247, member: 218809
"I was talking w/ a pro brewer about oxygenating, and he said that one should pitch the yeast in while oxygenating. I don't know if that was to ensure the yeast was well-mixed (with the bubbles creating turbulence) or what, exactly, but that's actually counter to what a LODO practitioner said, which was to pitch the yeast before oxygenating.
[/QUOTE]

Just to further confuse the issue, John Palmer in "How to Brew" fourth edition, p.98 sez "...oxygenation should only be done before pitching, because pure oxygen is toxic to the yeast."o_O

I've done it both ways (by mistake), and haven't noticed a difference. Both made great beer.
 
Assuming you'd like to refute this, feel free--I might learn something. But since you've tried below to switch from what I did to refute your comment to something you can distract us with, I rather doubt you have anything.

What about this document from Wyeast?

https://wyeastlab.com/clarificationflocculation

Let me just cite this short excerpt:

  • Flocculation for one lager strain increased from 41 °F (5 °C) to 77 °F (25 °C)
  • One trial showed flocculation of lager strains was optimal at 50°F (10 °C) and decreased significantly below 41 °F (5 °C)
  • In other strains tested, flocculation was repressed at 77 °F (25 °C) and optimal at 41 °F (5 °C)

Do you manage to see any consistent correlation that would support your statement that "cold beer will always clear faster" even if amended by "at least as far as yeast is concerned"?

FYI even if you did have a measurable increase in average cluster sizes at lower temperatures this would still be offset by the increase in viscosity, so it could still be possible to have increased flocculation but with no significant improvement in sedimentation rates, the latter being all that would matter in a practical setting (i.e. in a brewery and not some research lab).
 
What about this document from Wyest?

https://wyeastlab.com/clarificationflocculation

Let me just cite this short excerpt:

  • Flocculation for one lager strain increased from 41 °F (5 °C) to 77 °F (25 °C)
  • One trial showed flocculation of lager strains was optimal at 50°F (10 °C) and decreased significantly below 41 °F (5 °C)
  • In other strains tested, flocculation was repressed at 77 °F (25 °C) and optimal at 41 °F (5 °C)

Do you manage to see any consistent correlation that would support your statement that "cold beer will always clear faster" even if amended by "at least as far as yeast is concerned"?

FYI even if you did have a measurable increase in average cluster sizes at lower temperatures this would still be offset by the increase in viscosity, so it could still be possible to have increased flocculation but with no significant improvement in sedimentation rates, the latter being all that would matter in a practical setting (i.e. in a brewery and not some research lab).

While viscosity plays a role, the governing behavior is driven by the density difference between the flocculating yeast and the surrounding fluid.

Stokes Law is only helpful in so far as modeling the fluid dynamics, though misses much of the complicating elements of particle size (which is not spherical by the way) and gas dynamics.

I would summarize generalities cannot be made as to temperature since yeast flocculation behavior (the driving factor) is different based on strain. White has made a general claim, which is probably more correct than not based on his experience, but is not an immutable law by far, as you rightly point out with contradicting exception cases.

In any case, might be more valuable to take this debate over to the brew science forum if you truly want to reach a conclusion, pissing contest aside [emoji6]
 
What about this document from Wyeast?

https://wyeastlab.com/clarificationflocculation

Let me just cite this short excerpt:

  • Flocculation for one lager strain increased from 41 °F (5 °C) to 77 °F (25 °C)
  • One trial showed flocculation of lager strains was optimal at 50°F (10 °C) and decreased significantly below 41 °F (5 °C)
  • In other strains tested, flocculation was repressed at 77 °F (25 °C) and optimal at 41 °F (5 °C)

Do you manage to see any consistent correlation that would support your statement that "cold beer will always clear faster" even if amended by "at least as far as yeast is concerned"?

FYI even if you did have a measurable increase in average cluster sizes at lower temperatures this would still be offset by the increase in viscosity, so it could still be possible to have increased flocculation but with no significant improvement in sedimentation rates, the latter being all that would matter in a practical setting (i.e. in a brewery and not some research lab).

Really? You're going to deride my use of White's information and then use Wyeasts, which part above also refutes your earlier comment? Seriously?

In other strains tested, flocculation was repressed at 77 °F (25 °C) and optimal at 41 °F (5 °C)

Do you even think about what you post before you post it?

Tell you what--I'll do my best to ignore anything you post as it's clear that your goal here is something other than helping brewers brew better beer. I haven't learned much (can't recall anything, in fact) from your posts, so maybe that's the best thing.

Thinking at this point you must be a troll, because it sure isn't going well for you otherwise.
 
You need surface area to transfer oxygen to the wort, and you're right in identifying that the larger bubbles are going to be less effective in oxygenating the wort.

FWIW, I have a carb stone for my CF10 and I've never used it, not for carbing, not for oxygenating. I have an oxygenation wand, a long one, with a stone on the end. I sanitize the whole thing and stick it in through the 4" port on top to oxgenate. I turn it down to where the bubbles barely break the surface and oxygenate for 2 minutes (5-gallon batch). I stir around with it to ensure that the O2 is more mixed up into solution than the one location of the carb stone would provide.

BTW, I was talking w/ a pro brewer about oxygenating, and he said that one should pitch the yeast in while oxygenating. I don't know if that was to ensure the yeast was well-mixed (with the bubbles creating turbulence) or what, exactly, but that's actually counter to what a LODO practitioner said, which was to pitch the yeast before oxygenating.

I decided the 2-minute difference was likely imperceptible, so I start oxygenating and then pitch the yeast into the bubble stream.
That's exactly what I do (oxy-wand through the 4" port) as I can't imagine the o2 is doing anything other than harmlessly percolating to the surface... therefore it's stowed away until further notice. I did mention this issue to Spike and sent a short video. Their response was that the carb stone IS effective based on their testing using a DO meter. I still think it's essentially an ineffective tool for oxygenation and was a bit surprised with their response. If it was effective, why would anyone use a carb stone to oxygenate. Thanks for your thoughts on this.
 
You might try a couple other things too. I'm pretty nuts about trying to avoid oxygen post-fermentation, so having to clean a fliter and then restart sounds like a source of O2. I wouldn't use that unless nothing else worked.

A few things you can do to avoid the clogging problem:

1. Purge your lines. If you have a MFL fitting on your QD, you can unscrew that, attach to the fermenter, and then let fly for a few ounces, at pressure. This will flush the racking arm. I do this into a plastic pitcher, and use the beer in that pitcher for a final hydrometer reading.

1a. Usually, though, I use one of these from brewhardware attached in the end of the QD; it opens up the poppet and allows beer to flow right through the QD (again, right into the pitcher). https://www.brewhardware.com/product_p/ball_lock_jumperpost.htm Once the line is clear, I just remove it, leaving me a line full of beer and no air, which I can then connect right to the keg.

2. You already know about dumping trub to move the level of trub below the racking arm.

3. Crash to a cold temp and settle stuff out of the beer.

4. Overbuild your recipe a bit. I have my racking arm (CF10) pointed straight down; I've never drawn trub into the lines except before I started flushing the racking arm. I overbuild my recipes a bit to account for losses in the trub, mash tun, whirlpool cone, pump and lines, but even so, I'm not sticking that racking arm down into the trub--and I never have ever dumped trub out of the bottom.

I did a beer 2 weeks ago with 1 ounce in the whirlpool and 3 ounces dropped in as a dry hop. No problems racking without drawing hop material into the lines. Now, if I had 10 ounces, maybe that would be a possibility, but if that were an issue, I'd just turn the racking arm a bit sideways until I didn't have any trub.

If you use gaskets like these: https://www.amazon.com/gp/product/B01MQPH9WW/ref=ppx_yo_dt_b_search_asin_title?ie=UTF8&psc=1 you can loosen the clamp and actually turn the racking arm. (Lube the outsides of the TC fittings and inside the clamp).

But the trick I think is to just overbuild the recipe enough to allow you to get above the trub; then you're not fooling around with any of these other things (other than flushing the racking arm, which you'll have to do regardless).


Anyway, good luck with it.

You're right about flushing the racking arm first (something I didn't do). In the past, with batches containing fewer dry hops, I'd never had problems. During active fermentation I'd simply rotate the racking arm to the "3 o'clock" or "9 o'clock" position and had never gotten it buried in trub or hops. When I transferred I'd rotate the racking arm to vertical and gradually reposition it downward as the transfer progressed. This time I must have drawn in hops at the beginning which slowed the transfer, and later caused a transfer-ending clog when the arm was rotated through horizontal. An overbuild of wort will take care of that.

The "double barreled" QD post looks like a neat tool, and has been added to my order. I agree with the risk of O2 uptake if a filter gets clogged and needs cleaning mid-transfer. I'll probably give filtering a try at least once anyway since I bought one to protect the diaphragm jump I got for Christmas to transfer my wines.

In the final analysis I think I made a few errors that led to my woes on this batch: too many dry hops (is that POSSIBLE!??!!), not clearing the racking arm, and trying to extract that last little liter from the fermenter. But the beer itself (at least what I was finally able to get into the keg) certainly was good and kicked quite quickly. Life is a learning curve.

Brooo Brother
 
Back
Top