Smaller Son of Fermentation Chiller

Homebrew Talk - Beer, Wine, Mead, & Cider Brewing Discussion Forum

Help Support Homebrew Talk - Beer, Wine, Mead, & Cider Brewing Discussion Forum:

This site may earn a commission from merchant affiliate links, including eBay, Amazon, and others.

steelerguy

Well-Known Member
Joined
Apr 7, 2008
Messages
482
Reaction score
14
Location
Stony Brook, NY
As summer came on my basement was getting too hot to control fermentation temps. I had to go from warming my carboys up to needing to chill them, it was time to build something! I originally was going to fashion something with an old dorm refrigerator I had, but having to operate it without the door and trying to come up with something to seal decently but allow easy access seemed a bit difficult. I found the plans for the Son of Fermenation Chiller and decided that was the way to go.

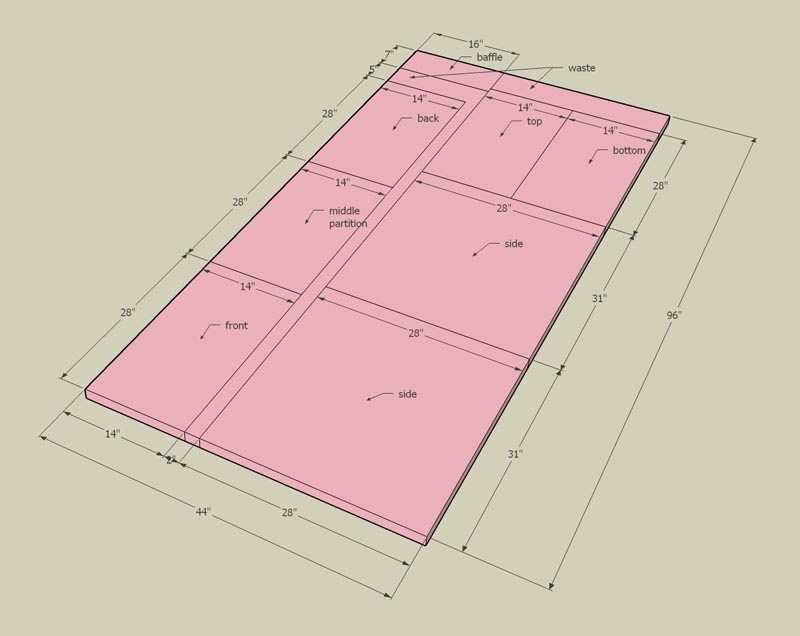
I went to Home Depot and Lowes and neither had the 96" x 48" x 2" sheets. In fact the closest I could come was 96" x 24" x 1.5" and it was the tongue in groove type. I bought a couple sheets and some liquid nails to glue them together. Once I did this I measured and realized that once I cut the extra tongue material off each end I would be left with a 96" x 44" x 1.5" sheet. This completely threw off the measurements in the construction directions since both the width and thickness were different.

I sketched up some plans, but was afraid I was going to miss something and because I was cutting the dimensions so close I wanted a proof of concept. So in came Google SketchUp. Really cool program and pretty easy to learn, I put it all in there and came up with some plans and it all worked like a charm. I figured I would share the plans in case anyone else gets stuck in the same situation as me and needs to use the narrower and thinner insulation from HD.

Sheet with cutting lines and dimensions:
sheet_with_lines.jpg


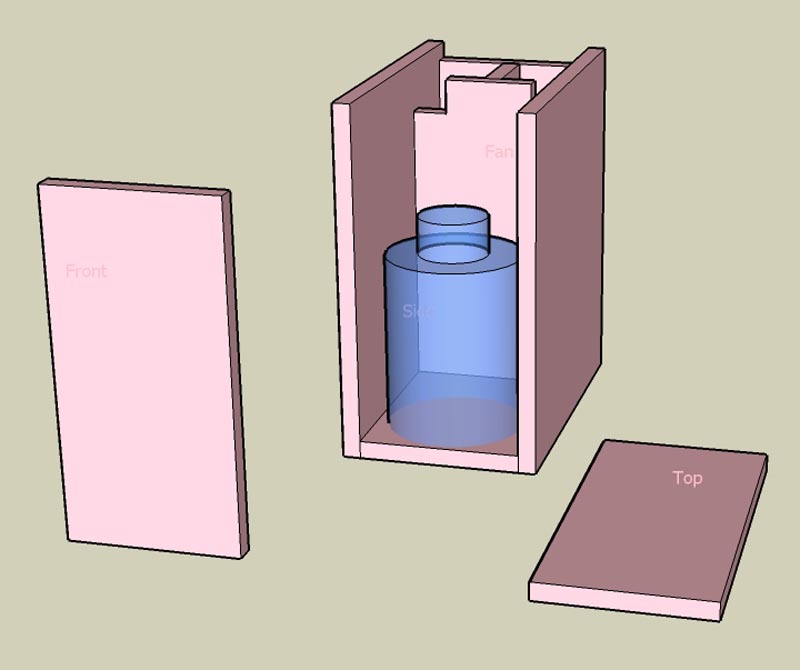
Put together in SketchUP: (carboy width and height matches 6.5 gallon)
together.jpg


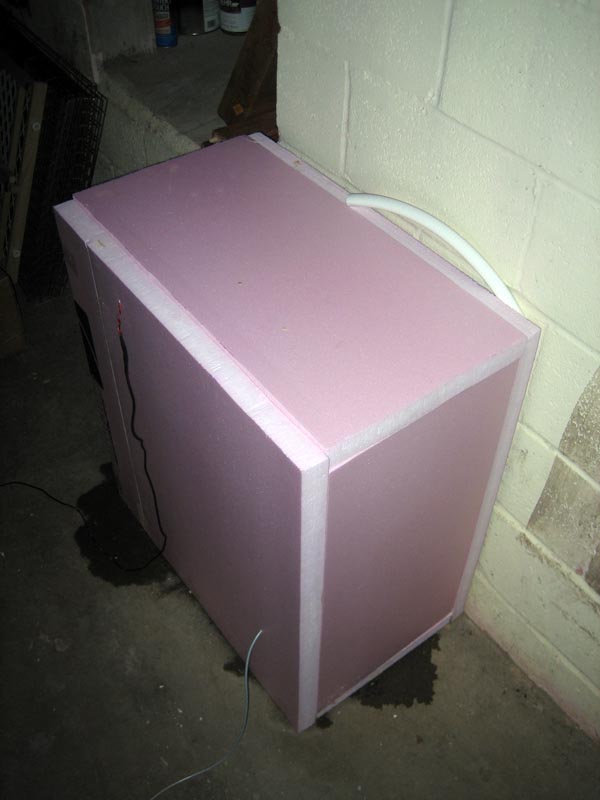
Chiller in basement keeping a carboy cool:
closed.jpg


Pale Ale fermenting at 67 degrees:
open.jpg


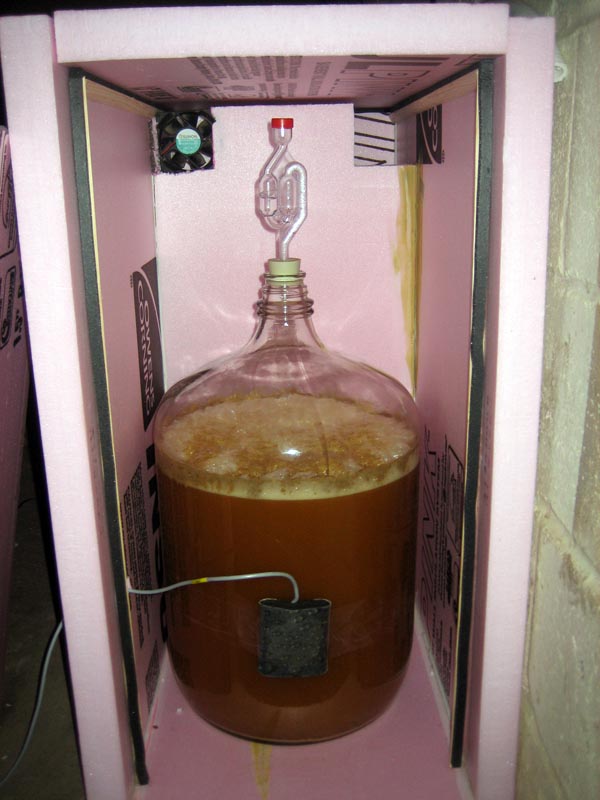
I didn't put in the fan and intake squares I cut out in the main sheet since someone may want to use a different size fan. I also cut some quarter round with some foam insulation as per the original directions but modified for my new dimensions. I caulked the seems (ran out and used liquid glue to make that nasty streak on the middle partition.

Hopefully these plans can help someone else out there! I have been very pleased with it's operation and the back can still hold 4 1-gallon milk jugs (Although I don't like to stack them so I only use 2, plus 2 liter bottles are better and last longer) If anyone wants the SketchUp files just let shoot me a PM.
 
You put froozen water bottles in the back compartment, the fan blows cold air into the front compartment containing the carboy. The fan is controlled by a thermostat.

I built one, custom design, same concept. It works really well, mine has a few air leaks so it goes through ice very fast, but once i seal those up i should get at least a day with my small water bottles.
 
what kind of thermostat do you use? I was thinking about using an old school mercury filled thermostat like a home heating system. I assume I will need to calobrate it using a thermometer, but that is easy enough. (I need to do this on the cheap) I have access to computer fans, and several 5-12v power suplies from old cell phones and other electronics.
 
this is a good Idea. I have a nice spot in my food closet that I would like to ferment in. I could line the area with the plink pad insulation. I also have a couple mini fridges I would like to GUT and steal the cooling system from. I could then run the cooling lines throughout the fermentor chamber. All I would need to do is rig up a temp controll unit...

hhmm yes this sounds like what I would want to do :)
 
For a thermostat, I used a battery operated electronic one. It does not have a LCD display or anything, but is driven by electronics. What is nice about this is it was the cheapest at Home Depot, and you can unsolder the thermistor and tape it onto the carboy so that you are actually controlling the fermentation temperature, not the air temperature.
 
What did the electronics and material run you on this? I have an extra fridge and am wondering if one of those $60 temperature control units from morebeer is more economical.
 
just wondering if you couldnt improve the efficiency by turning the fan around so it pulls the warm air from the top of the fermenting chamber. Then you would seal up the vent at the other top corner of the chamber and create a new one at the bottom so the coldest air from the bottom of the ice chamber enters the fermenting chamber.

I love your design I'm thinking about building two this weekend, one for me and one for my brother's birthday.
 
Any alternatives to gallon jugs for the SOF chiller (mine will be done in a few days)? I really don't have the freezer space.

Thanks!
 
Intended to pick up a 4'x8'x2" slab at the local lumber yard when I was advised by an employee to go with P-2000 instead. It's a relatively new form of insulation that is flexible, but at only 3/8" thickness has an R-value of 14.68. Compare that to polystyrene's 2" R-value of about 10. I'll keep everyone posted.
 
Any alternatives to gallon jugs for the SOF chiller (mine will be done in a few days)? I really don't have the freezer space.

Thanks!

I don't have one of these chillers built, but I use frozen spring water bottles for chilling my cooler. I find they are much easier to find freezer space for than big gallon jugs.

Intended to pick up a 4'x8'x2" slab at the local lumber yard when I was advised by an employee to go with P-2000 instead. It's a relatively new form of insulation that is flexible, but at only 3/8" thickness has an R-value of 14.68. Compare that to polystyrene's 2" R-value of about 10. I'll keep everyone posted.

What's the price of the P-2000?
 
just wondering if you couldnt improve the efficiency by turning the fan around so it pulls the warm air from the top of the fermenting chamber. Then you would seal up the vent at the other top corner of the chamber and create a new one at the bottom so the coldest air from the bottom of the ice chamber enters the fermenting chamber.

I didnt cut the holes as you suggest, but flipping the fan around makes mine run about 30% more efficient.
 
This is really cool. Not sure if steelerguy is still around, but in the picture, it looks like this puts of some dripping. Is this avoidable?

if you live in a dryer climate (ie arizona) it wont be much of a problem at all. If you live in the southeast (like me) it is a problem. i say freeze a bottle of water and then place it out on the counter and see if it sweats.
 
Intended to pick up a 4'x8'x2" slab at the local lumber yard when I was advised by an employee to go with P-2000 instead. It's a relatively new form of insulation that is flexible, but at only 3/8" thickness has an R-value of 14.68. Compare that to polystyrene's 2" R-value of about 10. I'll keep everyone posted.

According to the company's website, this insulation has an r-value of 4.1 per inch. That means that 2" of p-2000 insulation would only be 8.2, which is actually less. You can check it out here under Physical/Chemical properties.
 
Good point. I read up on this also, but the R-value is only that of the foam core of P2000, and not the foil barrier, so in this case, R-value is not the be-all end-all. I've read up on this after purchasing and still feel good about it.

Thanks for the heads up
 
I'm curious as to the cost of building this. I tried looking on Home Depot's website, but couldn't find this particular product.
 
I actually found p2000 at a local lumber yard. I've tested for a few days with 2x 3-quart water jugs, and only maintained a temp of about 72F with the thermostat set to 65F. I'm trying to double-up on ice, will keep everyone updated.
 
So I tried stacking 2 jugs in the ice chamber right next to the fan. Temp quickly dropped to 65 degrees, but only lasted about 6-8 hours. At the end of 12 hours, temp was pretty close to ambient. There is some leakage in the chiller (3/8" beadboard makes for a messy cut), but not that much, so I guess I have to chalk it up to an (admittedly) ****tier R-value than polystyrene. Back to the drawing board... time to buy some EPS.

What did you guys use to cut the foam? I've never worked with EPS before but am told that any mechanical saw blade would melt the foam, but I'm trying to get a reasonably square cut to avoid any leakage issues.

Thanks!
 
I just use a straight edge and a razor blade. Cut about half-way thru and snap it backwards on itself. The cut will straight if you can keep the blade against the straight edge with isn't easy if you rush things. When you snap it the cut is not perfectly even but its nothing that a little caulk can't take care of.
 
Wow, didn't realize this thread had come to life a couple times. I will try to answer some of the questions asked that have not already been answered.

I am using a Johnson Controls digital thermostat, it was $90 but you don't need to use one this expensive...I just liked the digital aspect of it. Easy to see what I have it set at, set up a 1 degree differential, and easy to see what the current temp is.

I honestly don't remember the material cost other than the temp controller, but it was pretty cheap...along the lines of $20 I think. The time investment was much more, but that was kind of fun actually.

I much prefer 2 liter soda bottles (and 46 oz. V8 juice containers) to 1 gallon milk jugs. The milk jugs only last a couple freezes before they start to leak...hence all that water on the ground. The 2 liter bottles seem to hold up much longer.

As far as the condensation, there is some, but it usually doesn't make it out of the chamber...in fact I am not sure if it ever has. But when a 1 gallon had a leak (when frozen I could not tell) and .5 to .66 gallons leaked...it made it out.

The reason I had to redesign this from the original is because HD and Lowes only carried the 2x8 tongue and groove sheets. So I think you can easily find this at either place, but if you can find a 4x8 sheet you can follow the original plans.

For the first day or two I may have to change a couple 2 liter bottles at 12 hours intervals. They are never completely unfrozen, but it works out to do this for me. Fresh ones at the start of fermentation on Sunday night, new ones on Monday morning, sometimes Monday night the ones I took out have refrozen and I swap again. This only lasts the first couple days and then the temp in the fermenter starts to drop and 24 hours is fine the rest of the way.

I used a jigsaw to cut the insulation, the cuts were pretty nice and the caulk really sealed it up. The top and door have the quarter round with weather striping to seal as good as it can. I usually set someone on top of the fermenter (5 lb. weight plate) to seal the top and door up even better.

Finally, I had been receiving numerous requests of the Sketchup plans lately, so I should have realized that the thread had come alive. Unfortunately, my HD took a dump and I lost them. So if you have a clean room and data recovery skills and want them, let me know...you can have my HD and get all my data back. :)
 
Well, not being one to waste any more money on new insulation, I re-purposed the chiller I made from P2000. Namely, I took it apart, sandwiched all of the insulation and made a lid for my large (horizontal) marine cooler from my roof deck.

I had to cut holes to accommodate the fermenter as it's taller than the cooler, but when all is said and done, only about 1/4" of the bucket is exposed, and it maintains temp for 24hrs+ with a frozen 2-liter bottle. Seems low-tech worked out in this case!
 
Are there any problems with CO2 pressure buildup in the chamber coming from the airlock, or are you opening it up to refresh the ice often enough to keep the pressure down?
 
Ok, I know I am reviving this old thread, but I have a suggestions.

I am building this currently and I am going to put the two holes vertical instead of side by side on the top. I figure that since hot air rises and cool air falls, I can get the air flow with cool out towards beer, warmer in towards ice bottles. I'll let you all know how it works.
 
Just do not put it TOO low or the cold air around the ice jugs will fill both chambers.

Edit: I just noticed he is offline. I hope he reads this before he does any cutting.
 
Just do not put it TOO low or the cold air around the ice jugs will fill both chambers.

Edit: I just noticed he is offline. I hope he reads this before he does any cutting.

I agree with Beer_Guy. Having the hole in the bottom may spill the cold air into both chambers. IMHO, that will make the temperature controlling difficult since you will not have a good way to contain the colder air from flowing in to the main chamber. Having the holes on the top keep the colder air separate from the main chamber. It acts like a weir.

You are right about the hot air rising and cold air sinking. That's what creates the thermal current and air movement in a "natural convection system". In this case you have a fan (you are installing a fan right?). That makes this a forced convection system. Once the fan starts pulling the hot air from the top, cold air will start replacing that air. Since the returning air is colder that the surroundings it will tend to sink.

Yet again, I may be full of "malarkey"...

Good Luck and I hope this helps.

Cheers!:tank:
 
I thought I'd add my thoughts to this updated thread, after just building one of these from Ken Schwartz' plans.

I should first state that I'm a PhD engineer, so I like to mess with things - usually with disastrous, but informative, results. Secondly, I've only been homebrewing for a little over a year, so I'm still learning stuff all the time - but I tend to research things to death before I jump in.

I also thought about rearranging the cooler chamber and baffle geometry a bit. But the more I looked at the problem, the more (grudgingly) I came back to the original plan as being optimum. The cooling chambers hold on to their cold air when the fan is not running, so when it kicks in, there's a nice reservoir of cool air ready to go. As others have mentioned, hot air will naturally accumulate towards the top of the cooler.

I was going to change the dimensions a bit to make the overall size smaller, but I'm glad I didn't. Mostly out of laziness, I used Ken's cut lines (which don't account for material loss from the cutting if you use a thick blade device instead of a thin utility knife). There is just enough room for the fermenter with a nice air space around it, and perhaps a small blow-off container of some sort in the corner. The 7-in cooling chambers make a nice, tight fit for the gallon jugs - and a tight fit makes for more efficient cooling.

I also thought about a 'fresh air intake' design instead of a closed recirculating system. This would avoid having to cool down warm air from the fermenter. But this only makes sense if the ambient air is cooler than the warmest temperature generated around the fermenter - a situation which obviously shouldn't occur if the cooler is insulated properly.

Ken Schwartz made some comments about the directionality of the fan - blowing vs. sucking. I am certain that the fan should blow from the cooling chambers into the fermenter chamber, since the more turbulent downstream flow is going to help convection around the fermenter. The tortuosity of the cooling chambers and baffle ensure good convection on the cold side, regardless of fan orientation.

I do, though, think my fan velocity is too high. When it kicks on, the temperature drops incredibly fast, so I think a slower speed would make for more gentle cooling, longer ice life and even longer cycles. So I think I'll look into installing a resistor.

Thermostat placement is something not many people have talked about, but which I think is critical. I'm surprised to see several pics where people placed the thermostat on the same side of the chamber as the fan. Clearly this is not a good idea, since the system will be over-cycling as cold air hits the thermostat and turns it off prematurely. Likewise, vertical placement is important due to the natural convective gradient that will form once the fan is turned off - cooler towards the bottom, warmer towards the top. So my thermostat is placed in the opposite corner from the fan, half-way up the height of the fermenter chamber. I haven't seen any short-cycling yet.

Gallon milk jug breakage seems to be a problem with several folks. I found one guy using 1 gallon apple juice containers that were made from a much sturdier plastic and also had a nice handle on the top. But I've also been using a collection of those reusable cold packs that have been collecting in our freezer, and they seem to work just OK - they melt much faster that the larger frozen milk jugs. So I'm reserving them for emergency/backup use only. But I found some large, rectangular cooler packs (Blue Ice) at Target that work very well, and can be stacked in various configurations. They are 7 inches on their long side, so they fit perfectly.

Concerning the optional LED indicator light, Radio Shack sells an "LED Assembly" that has a resistor (850 mOhm, I think) built-in so it is ready to use with 12V, and it's only a couple dollars. If your LED is on dimly all the time, then brighter when the fan turns on, then you need to reverse the poles.

I also tried several cutting methods for the foam and was surprised that making a ~3/4-in cut with a utility knife along a straight edge, then just snapping/breaking the rest of the way through, worked best. The table saw was just OK - the foam tends to float around a lot, and my table and fence are not big enough to make 29 in wide cuts.

Finally, I found the final project cost to be quite a bit higher than the ~$70 estimates. I couldn't find any of these $10-$15 fans, thermostats, power supplies at Radio Shack, Lowe's or Home Depot. Here, some advanced planning and searching would probably have worked, but I just bought what they had available which was more in the range of $18-$20 for each component plus $25 for the foam. I went through 3 tubes of Liquid Nails, and every inch of an 8 ft length of weatherstripping! So, in the end, I was closer to $90-$100, which takes some of the fun out of it and makes other options more viable.

That being said, I had a blast making mine and it works like a charm. It's 76F in my basement right now, and I can control at 60F or 65F in the chamber no problem. i went through a full load of ice during the first night, but I think that was just the first-time start-up and warm fermenter loading. The ice jugs are lasting 1-2 days now.

I can brew in the summer now! Maple Brown Ale in the cooler now and a Black IPA coming next!
:mug:

Cheers,

Dave
 
what is the consensus when it comes to lagering in colder climates (i.e. Maine) during the winter? Do you just us a chiller and keep it indoors, or are their other options? Thanks.

Dan
 
I don't think you could maintain lagering temps indoors with one of these types of chillers, because the cooling source (ice @ 32F) are too close to your target lagering temps.

The consensus seems to be an old refrigerator with an external power control to regulator the temperature (such as the Johnson Controls Penn unit).

Or a wine refrigerator if cost is not a main concern:

https://www.homebrewtalk.com/f11/lagering-refrigerator-1987/
 
I'm going to build one of these into a closet or pantry. I don't have nearby outlets so I think I'm going to make it completely wireless - using a battery powered thermostat as mentioned in the OP, and wiring the 12V fan to a 9V battery. If it drains the battery too fast I might switch to a stack of AAA rechargables.
 
Back
Top