Small apartment brewing ideas needed?

Homebrew Talk - Beer, Wine, Mead, & Cider Brewing Discussion Forum

Help Support Homebrew Talk - Beer, Wine, Mead, & Cider Brewing Discussion Forum:

This site may earn a commission from merchant affiliate links, including eBay, Amazon, and others.

bennihana

Well-Known Member
Joined
Aug 29, 2012
Messages
64
Reaction score
1
I have just moved into a small apartment and I am looking for ideas on storage, brewing configurations and procedures, beer dispensing ideas from keg, wort chilling techniques, grain milling, anything that saves on space that could be used in a small area.

I have already converted from my cooler mash-tun and propane heater setup in the garage to a single vessel E-BIAB system.

I am in desperate need of some homebrew and must satisfy my urge to brew.

If you have any ideas, or heard of something or have pictures or videos of small space brewery, let me know.

I'm even open to getting equipment for 3 gallon batches.

Please HELP!!
 
2.5-3 gallon can be done on the stove top quite easily with two $12 Walmart SS 16 quart pots. You can even split boil in two pots if heating is limited on your stove. Isn't your eBIAB setup still ok?

Dispensing? A small bar fridge and 2.5 gallon kegs work great. You can get two in one tall bar fridge.

These could be a good option if you are willing to use some space in your main fridge:
http://www.brewingtools.com/
 
My boil kettle is brand new I built it specifically for a small apartment. I was just curious to see if anyone had any pics of their setup. All ideas are welcome since I now live on a third floor apartment.
 
Do you have a porch/ stair deck in front? I have been using a darkstar and 10 gal kettle on a >20sq ft deck at my 2 bdrm apt. with no problems. Size doesn't matter that much, regardless of what you've heard ;}
 
One thing I did while in a small apartment a couple years ago was to use the kitchen stove, but also pick up a cheap 1000 watt heat stick. They're usually used to keep water from freezing in the winter for horses and stuff. I can get 4 or 5 gallons up to 175 F in about an hour with this thing. The only potential issue is you'll need to have the water reach the minimum line on the heat stick or it'll burn up. So you would have to adjust the hop bill for utilization.

Here's the one I have: 1000 Watt Heat Stick
 
To everyone who can't read: he has the brew kettle figured out. No need to suggest porches or stove tops. :)

1. Brew buddy: Got a friend with a bigger place, basement, garage where you could do fermentation and store things?

2. For temp control, I think a dorm fridge with a temp controller would be your best bet to keep it in the apartment. To do multiple batches, you could keep the most recent in the fridge and move the previous to relatively temp stable closet. The first few days of fermentation are the most important.

3. I store my grain in 5gal paint buckets (food grade). Can you raise a bed up and put grain under it? They also stack vertically very well.

4. Frankly, I think you should stick to bottles. At least, that's the decision I made for my 700sq ft place (though I do have a garage for storing bottles and other equipment).

5. Any general small space organization website (apartment therapy used to be this, my sense is it just fashion now) would be useful. Think about organizing and downsizing your other possessions, and you'll have more room for brewing.

Good luck.
 
Small apartment brewing.....

I have BIG 3 gallon pots that my stove can handle. If it couldn't I would use 2 gallon.

I brew super concentrated and dump on Ice to chill and dilute.

Works great, I recommend Partial Mash, since 10 lbs of grain is nearly impopssible to mash in one pot.
 
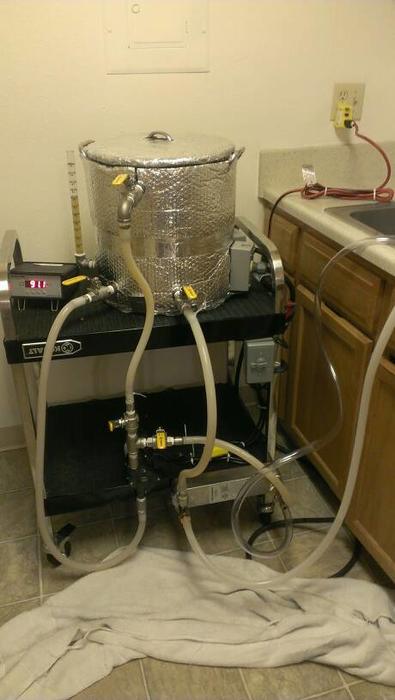
I am a former small batch small apartment brewer. I think e-biab is very well suited for apartments. Here is a picture of my former setup mounted on a rolling stand. The majority of my set up would fit on the stand allowing me to roll the setup into the closet after brewing.

I also had a 7 cu ft chest freezer in my living next to my tv that doubled as a temp control for fermentation and a kegerator. My fiancee did not love it but tolerated it.

I gave up buying in bulk and started buying grain that is milled at the LHBS as needed due to space constraints. It costs more but i had to do what i had to do to make it fit.

1405026321626.jpg
 
As far as chilling, look into those reusable plastic ice packs they make for coolers. I would (carefully) carry the boil kettle to a cool water bath in the tub and toss a couple of sanitized frozen blocks into the wort once it got below 140. I also tried to save on the water by using it to clean equipment, etc. after pitching.


Sent from my iPad using Home Brew

Or just use the no chill method.
 
You should probably look at the 5 litre mini-kegs as an option for dispensing, either from one of the commercially available dispensers or in the fridge with 16g CO2 cartridges or a paintball type CO2 cylinder (naturally carb to save CO2). The BeerBox linked above looks like a good option as well. I've had bad luck with my Tap-a-Draft system leaking beer all over the fridge.

I have brewed full 5 gallon batches in my apartment kitchen (neither of the apartments I've had had particularly small kitchens though). Chilling can be done easily enough with a small IC attached to the kitchen sink via a faucet/garden hose adaptor. A 1000W heat stick was necessary with even a fairly modern gas stove for 6.5 gal preboil volume. A 2-3 gallon batch would be fine though.

Fermenting space is probably the biggest challenge. A mini-fridge would be fine for one carboy/bucket at a time (5 gal for a 3 gal batch), and not too obtrusive.
 
Some good suggestions from everyone!

Just to update ya, I have bought a 30ct plate chiller that I will be using. it is small and compact and it looks like it will be a good space saving option. I will actually have a similar setup to brad2287's picture.

I don't know why but I had never thought of actually using the 5 gallon buckets for storing my bulk grain. Just one of those things that was right in front of my face that I never noticed.

Does anybody have any more pics of their setups?
 
Quick question looking at Brad's setup (which is really cool BTW for a single cart solution!)

I see there's two ball valves at the bottom of the pot, and a manifold of the pump outlet side. I can see where the recirc is, and the turn to send the wort into the chiller and out, but what's the second ball valve a the bottom of the pot for? It looks like it's coming off the output of the chiller water, but I don't see anything on the pot that would suggest it's for a HERM's coil.

Is if for filling/cleaning with an incoming water source?
 
Looks to me like it's for whirlpooling/recirculation during chilling - the one on the front nearest the camera is for returning wort to the kettle from the chiller. It looks like the pump can either route the wort to the top of the kettle for recirculation during the mash or to the chiller.
 
Looks to me like it's for whirlpooling/recirculation during chilling - the one on the front nearest the camera is for returning wort to the kettle from the chiller. It looks like the pump can either route the wort to the top of the kettle for recirculation during the mash or to the chiller.

Correct. The top fitting is for mash recirculation and the bottom right fitting for whirlpooling/sanitizing the plate chiller. In order to make less of a mess I designed it so hose reconfiguration was not necessary while brewing.
 
I do EBIAB on my stove top. I've got a lower watt camco element that gives me that extra boost. Immersion chiller has worked pretty well for me but my tap water is way cold. Do you have space for a minifridge? Temperture control has been my main focus in apartment brewing, it can double as a Kegerator when not fermenting too!


Sent from my iPhone using Home Brew
 
Correct. The top fitting is for mash recirculation and the bottom right fitting for whirlpooling/sanitizing the plate chiller. In order to make less of a mess I designed it so hose reconfiguration was not necessary while brewing.

Gotcha. Really nice setup you've got there. :mug:
 

Latest posts

Back
Top