• Please visit and share your knowledge at our sister communities:
  • If you have not, please join our official Homebrewing Facebook Group!

    Homebrewing Facebook Group

Simple SSVR-controlled e-BIAB rig

Homebrew Talk

Help Support Homebrew Talk:

This site may earn a commission from merchant affiliate links, including eBay, Amazon, and others.
Lots of guys find it easier to turn a knob than fiddle with the PID controls to set manual mode. It's just easier. Nothing wrong with it.
 
One of the most important things to me was simplicity. PIDs are great, once tuned properly, at reaching and maintaining a setpoint. But I wanted to build a BIAB setup (simple), and wanted to avoid, if possible, having to re-apply heat once the kettle reached strike temperature. There were several reasons for this:
  1. To avoid scorching the bag (yeah, I know - most people say it isn't a problem, but I wanted to avoid the possibility), and to avoid using additional apparatus like a steamer basket or element shield or prevent bag scorching (simple, easier cleanup, less crap to store)
  2. To avoid needing to recirculate due to temperature stratification (simple).

By insulating the keggle with a KegSkin (and a big folded up towel on the lid), I hoped that the mash would not lose more than a degree or two. During a "wet run" I realized that the this was unlikely, but I found that by turning the element on very low (drawing ~1 to 2 amps) I was able to keep the temperature (of plain water, with no bag) relatively constant. I'll post separately a description of my first brew day, which had completely different results.
 
You can't base heat loss off a keggle full of water. . . There's just no comparison in thermal mass once you add several pounds of grain.

I plan to recirculate just for consistency in my beer but the ones I've done by just heating to temp and then leaving alone have had very low losses.
 
Nice simple eBIAB setup.

If you want PID control during mash you can use a relay output PID to turn the contactor ON/OFF as required. If the OP uses enough insulation he wont need to add heat or could simply remove the lid and stir while heating the mash a couple degrees every 20-30 minutes. My "insurance" against burning the bad is a sheet of silicon material over the element.

I use hop bags and everything else in the kettle goes through the pump and into the fermentor. Don't think you will have trouble with clogging if you filter most of the hops.
 
There are two aspects of my new rig that concerned me. First was maintaining a relatively constant mash temperature without heating/recirculating and without using a basket insert. Second was trub management. I've discussed both briefly in this thread, but if I'm being honest they are the two areas that seemed likely to cause me some trouble.

So, here's how things shook out on my first brew day.

Based on dry grain temperature of 72F and aiming for a mash temperature of 152F, I heated 8.5gal of strike water to 158F. I then killed the element, added the bag and doughed-in, stirring well. When I was satisfied that there were no more clumps, I put the lid on and only then glanced at the thermometer, which now read 144F!

I pulled the top of the bag down around the outside of the kettle (to raise the bottom of the bag inside). I then turned the element on about halfway (~11A) and stirred every few minutes while the temp came back up. Within 15 minutes, I was back at 152F. I left the element on very low (about 2.0A), and settled back to enjoy a Kiltlifter clone (thanks, Scottland) for the remainder of the 60-minute mash.

The temperature remained constant for the next 58 minutes or so. As I was rummaging around on the other side of the garage for a suitable container for my spent grains, the alarm on my thermometer (which was still set at 158F) went off. By the time I got back to the kettle it was in the mid 160's and climbing rapidly. WTF?

I killed the element, opened the lid, and everything looked okay. I removed the temperature probe (I'm using one of those remote oven/BBQ thermometers with a wired probe) gave it a quick stir, and then reinserted the probe ... 240F! Obviously a problem with the thermometer. I checked with my Thermapen and the temp was actually 150F.

As all of this nonsense occurred at the very end of my planned 60 minute mash, I raised the bag and took a refractometer reading (9.0 Brix, 1.036 SG). That seemed a bit low, and while I had not planned to do a mash out (in theory, it shouldn't be necessary), I thought maybe it would help me recover a bit more fermentable sugar.

So I turned the heat on high and stirred frequently until the temperature reached 170F, killed the heat and lowered the bag back in. I stirred a few times over the next 10 minutes. I then raised it again and let it drain while applying full heat for the boil. I squeezed the bag well. At this point, I measured 8 gal in the boil kettle at 10.6 Brix (1.043 SG), which made me feel a little better.

Fifteen minutes after applying full heat, boil started. I wanted to end up with around 5.5 gal of usable wort at the end of the boil: 5 gal or a bit more into the no-chill corny, plus a good liter for the yeast starter. That meant I needed to boil off about 2 gal during the 90 minute boil. During my "wet run" with plain water, I measured my boil-off rate at around 1 gal per hour, so I set the heat for a somewhat aggressive rolling boil (13.0A).

Everything went well during the boil. A total of 3oz of pellet hops were added in several additions, with a half-tab Whirlfloc 5 minutes before flameout. After killing the heat, I covered the kettle and let it stand for 15 minutes to settle.

I drained the first 8-12oz or so into a separate container to be discarded (this includes 5oz that was trapped in the bottom drain plumbing). I then fitted a piece of silicone tubing to the drain valve and started draining into a sanitized corny keg through a paint strainer. This went reasonably well, but slowly (about 45 minutes to drain 5 gal). When the corny was as full as I wanted (right to the top seam), I removed the tubing and strainer back to a sanitized 1 gallon container to collect the starter wort. Surprisingly, the bag was completely empty, which meant that the improvised stainless steel mesh strainer I had fashioned and inserted into the drain opening (in the bottom of the kettle) did its job well.

Too well, in fact ... by this time, the flow from the kettle was basically stopped. I reached into the bottom of the kettle with a sanitized rubber glove and dislodged the filter screen. I was then able to easily drain the kettle completely, and collected a good liter and a half of starter wort (and ball of hop and break material the size of a nerf football in the strainer bag).

I let the starter wort settle a bit more while I cleaned up, then poured off the top liter into my starter flask. When it reached 75F, I pitched a vial of WLP001 and let it stir overnight.

Start to finish, I little over 4.5 hours. Lessons learned, and things to do differently:
  • As the strike water reaches the target temperature, I'll give it a good stir, which I neglected to do this time. It will be interesting to see of the temperature swings a lot, or if it's relatively uniform due to convection.
  • Depending on the results of the previous step, I may add an extra 1-2F to my strike temp.
  • Take care to keep my thermometer probe from being submerged in wort beyond the end of its shroud. I'm pretty sure this is what caused the thing to go nuts at the end of the mash.
  • Get a better thermometer, and maybe add a long thermowell to my kettle lid.
  • Consider a much shorter mash period (like, 20-30 minutes, or even less). I've read several posts lately that seem to indicate that conversion is essentially complete after the first 10 minutes or so. This could be huge as it would greatly help with my goal of not messing with heat during the mash.
  • Learn about, and get whatever is needed to do an iodine test (to determine whether conversion is complete).
  • Determine my refractometer's "Wort Correction Factor" according to the procedure recommended by Brewer's Friend.
  • Rethink my approach to trub management. My little trub screen worked okay, but definitely got plugged up at the end. I think I'll try HawkATP's inverted kitchen strainer idea first as I like the idea of letting the hops float free in the boil. If that doesn't work well enough, I'll try adding the hops to a paint strainer. I really need to keep as much of the hops/trub/spooge as I can out of the fermenter (a slim quarter Sanke), but that's another post.
  • Consider collecting the starter wort first so that it can start cooling and be ready for pitching sooner.

Just for completeness, here are a couple of pics of my rather inadequate attempt at fabricating a trub filter out of some 30-mesh stainless fabric. It's surprising sturdy and very simple, but ... didn't work as well as it needed to.

trub_screen_1-61634.jpg

trub_screen_2-61635.jpg

trub_screen_installed-61636.jpg
 
Why not use your trub screen but increase to a size more like a Hop Stopper. Just a bottom drain instead of a dip tube version. That is currently my plan. 6 or 8 inches across with something to tie it into the bottom drain. Should work well with the increase in surface area?

In regards to starters, I have a friend that does a basic 2 row mash, then just puts everything in jars and cans the wort. Then he has sanitary starter for his whole brew season.

Maybe just make a DME starter the day before and save some time?
 
You can't base heat loss off a keggle full of water. . . There's just no comparison in thermal mass once you add several pounds of grain.

That makes sense, but I wanted *some* idea of what the heat loss might be. Would you expect the thermal mass of 8.5 gal of water + 1.5 lbs of grain to be greater or less than 8.5 gal of plain water? Without putting any thought (or research) into it, I assumed that the thermal mass of the water+grain would be greater (or at least similar) and therefore no more difficult to keep stable, but maybe I need to revisit high school chemistry and thermodynamics.
 
Why not use your trub screen but increase to a size more like a Hop Stopper. Just a bottom drain instead of a dip tube version. That is currently my plan. 6 or 8 inches across with something to tie it into the bottom drain. Should work well with the increase in surface area?

In regards to starters, I have a friend that does a basic 2 row mash, then just puts everything in jars and cans the wort. Then he has sanitary starter for his whole brew season.

Maybe just make a DME starter the day before and save some time?

I've thought of a hop-stopper-shaped thing, but the right way to fit it to the bottom drain hasn't revealed itself to me yet. I guess I could make a square pillow-shaped thing out of one or two pieces of mesh seamed together. The bottom side would have a ~2" OD tube of some sort (ideally, stainless) somehow punched through and then soldered/clamped into place. The thing is, the 30-mesh SS fabric isn't very flexible/stretchable. I suppose the thing to try would be to cut the hole smaller than 2", then "dimple" it by pushing through some sort of cone-shaped thing until it expands to the right diameter. Heck, it might even be possible to just use the dimpled/extruded lip of the hole as the attachment - just insert it into the drain opening. Hmmm ...

Regarding starters, I've made canned wort before. It works great - in fact, I recently used up the last of a batch I made TEN YEARS ago, and it worked fine. But there's an appealing symmetry to using the same wort that I'm going to be fermenting as the starter wort.
 
If you choose the correct PID, i.e. one with manual control, placing a SSVR w/ knob after it would be redundant.

There are many PIDs that support manual mode.

I understand how a manual mode on a PID works. I just like the idea of a knob as opposed to buttons. To each their own
 
I really like the design of your build and am planning on a set up similar to yours. Is there anything you would do differently if you were to start over besides the 40 amp SSVR?
I was also thinking of using reflectix instead of the keg skin.
 
I really like the design of your build and am planning on a set up similar to yours. Is there anything you would do differently if you were to start over besides the 40 amp SSVR?
I was also thinking of using reflectix instead of the keg skin.

I've only got two brews under my belt on this system, and while it all works, there are a few things that could be improved upon.

I *really* like the contoller - it's simple, compact, and it works well. The only minor thing is the non-linearity of the response to the potentiometer - it's really sensitive at the low end, making it a bit fiddly to dial in a specific output. Not a big deal at all, but worth noting.

One other thing about my controller - when I built it, I hadn't yet figured out how to mount it, and I guess I was thinking it would probably just lay on the brew stand next to the keggle. I oriented the heat sink with the fins front-to-back; now that I have the controller mounted upright, the orientation of the heatsink fins is suboptimal. And it does get hot when running at full power - not enough to burn on contact, but hot enough to where I can't just leave my hand on it indefinitely. Maybe a 40A SSVR wouldn't have to work as hard and would give off less heat?

The KegSkin looks cool and it must help, but I'd be lying if I said that the keggle will hold mash temp without any additional insulation. Today I brewed a Stone Levitation clone. BIABacus said that I should strike 163.4F to mash at 157F. I doughed in at 165F (after carefully stirring and making damned sure the temperature of the strike water was consistent throughout) and by the time I was done stirring, it settled at 158F. During the 30 minute mash, the temperature dropped 4 degrees, and as it went from 157 to 156 I applied a little heat (2 amps) for the duration (probably the last 15 minutes or so). The temperature bottomed out at 154, then rose back to 155 right before the end of the mash. I'm hoping I can find a low heat setting that just replaces the heat that is dissipating through the KegSkin, but I'm not there yet. Next time, I'll try to hit my mash temp exactly, then immediately set the heat to 2 or 2.5A and see how it works.

I may add (or switch to) Reflectix at some point, but I really like being able to remove the KegSkin for cleaning/storage.

Finally, I still need to work out a better trub filter. I used a hop bag today and that helped A LOT, but by the time I had run 5gal of hot wort into my no-chill corny keg it was running pretty slow. I still needed to collect some wort for my yeast starter; what I should have done was just let it trickle into my starter flask, but I got impatient and dislodged the filter (as I did last time) and was rewarded with 2 liters of trub. I let it settle and eventually was able to pour off 500ml of relatively clean wort for the starter, but it would have been much nicer to have a trub filter that could handle the load.

On the positive side: it works, it heats liquid very quickly, dialing in a rolling boil takes about a second, cleanup is a breeze, and pretty much everything can be stored in the keggle (I don't store the controller that way, but bet I could).
 
Awesome controller setup I live by the K.I.S.S. theory. I would like to use a similar setup to control boil rate only my question is does the rheostat turn the element off at it's lowest setting or is that why you used a contactor?
 
Awesome controller setup I live by the K.I.S.S. theory. I would like to use a similar setup to control boil rate only my question is does the rheostat turn the element off at it's lowest setting or is that why you used a contactor?

I used a contactor because when the power is off (i.e., the button is in its normally open position) I wanted there to be no power to the rest of the system. I've read that SSRs can sometimes fail "on", and assume the same is true of SSVRs.

Interesting question, though, about whether the element is really 100% "off" with the rheostat at its lowest setting. I'll check next time I brew, probably in the next few days - the ammeter should provide the answer, though I guess a better measurement would be to use a multimeter on the output cable connector.
 
I may add (or switch to) Reflectix at some point, but I really like being able to remove the KegSkin for cleaning/storage.

Reflectix has worked very well for my 15-gal EBIAB kettle. I use two layers around my kettle and secure them with a small tab of duct-tape so that they are easy to remove and rinse. Reflectix is rated to 180 F if I remember correctly, but I have had no issues leaving it on during the boil. I have a pad of Reflectix under my kettle and also made a cover for the pot lid. I lose about 2 deg F during a 1 hr mash without having the element on.
 
Reflectix has worked very well for my 15-gal EBIAB kettle. I use two layers around my kettle and secure them with a small tab of duct-tape so that they are easy to remove and rinse. Reflectix is rated to 180 F if I remember correctly, but I have had no issues leaving it on during the boil. I have a pad of Reflectix under my kettle and also made a cover for the pot lid. I lose about 2 deg F during a 1 hr mash without having the element on.

Does your Reflectix wrap tightly around your kettle or did you somehow fashion it so that there is an air gap between the kettle and the Reflectix? I'm asking because the Reflectix web site seems to indicate that an air gap is necessary.

To insulate a water heater, for example, they recommend making three narrow (2in wide?) bands of double-wrapped Reflectix and positioning them at the top, bottom, and middle of the tank and then wrapping the main layer of Reflectix around those bands. Did you do anything like that?
 
I'm guessing most guys don't use an air gap but if they did I'd be willing to bet the heat loss is even less.

I might have to do it. Maybe. ..
 
It's easier to simply make two tight wraps around your kettle than to try to fashion an air gap with a tight seal at the top that doesn't let the hot air out. The outside of the double-wrapped reflectix is warm to the touch but not hot during a vigorous boil. I can boil 12 gal with my 5,500W element at 70% power with the insulation.

I've also been using Reflectix jackets on my fermenters to keep in heat from the lizzard heating pad they sit on during fermentations in my cold basement. The stuff is incredibly useful and easy to work with.
 
Following this thread, and me and a friend of mine are both building similar rigs. I plan on using engine compartment insulation recommended on some other threads instead of the Reflectix.

I just got the remaining components from the parts list for Xmas, I'll have to see if I can take some pics along the way, I plan on incorporating Pogden's lessons learned (40a, heatsink orientation, etc.).

Thanks so much for a great thread!

I'm glad it has been useful - please don't hesitate to post (or PM) any questions you might have along the way.

One thing that worked out really well was the way I mounted the controller box to the brew stand. I wanted it to be upright (and out of the way of any spilled liquid), but it took me a while to figure out how to accomplish that in a simple, inexpensive, and easy-to-disassemble way. I ended up using a cheap 24" aluminum bar clamp ($9 from HF) and a couple of sliding door locks from HD ($3 each). I removed the pins and spring retainers from the door locks and attached them to the back of the Cantex enclosure using nuts and bolts I had laying around. I then drilled holes through the end of the bar clamp to accept the lock pins. To set it up, I just tighten the bar clamp upside down on my brew stand, then hold the controller in place against the bar, align the holes and insert the pins. It's perfect - here's a pic.
controller_mount-61377.jpg
 
Funny I was just at HD looking for those bracket / door locks - couldn't find them. I already had the HF bar clamp for other projects. What are they called exactly?

One other thing I did have to get was a slightly larger junction box (8 x 8 x 4) at HD ($23). The heatsink for the 40a SSVR from Auber is just an inch too long for the Centex box on the parts list. I might add something with the extra room.

I'll definitely PM with questions - I'll start crimping tonight!
 
Funny I was just at HD looking for those bracket / door locks - couldn't find them. I already had the HF bar clamp for other projects. What are they called exactly?

At my HD they are in one of the hardware isles, where they have all of the parts to repair patio doors. You can find them on Amazon as well - search for "sliding door lock push/pull". I've seen them branded by Slide-co, Prime-Line and CR Laurence.

One other thing I did have to get was a slightly larger junction box (8 x 8 x 4) at HD ($23). The heatsink for the 40a SSVR from Auber is just an inch too long for the Centex box on the parts list. I might add something with the extra room.

Extra space is not a bad thing. Even with a pretty darned simple build the 6 x 6 box is a bit crowded inside. You could add a PID, in case you want to try that, but that would require another SSR and an input receptacle for the temperature probe - might not fit. How about a switched 120V receptacle? It would be handy if you ever decided you wanted a pump of some sort or better yet, a mash stirrer (something I've thought about but would REALLY like to avoid as it somewhat violates my prime directive of simplicity).

I'll definitely PM with questions - I'll start crimping tonight!

Excellent - have fun!
 
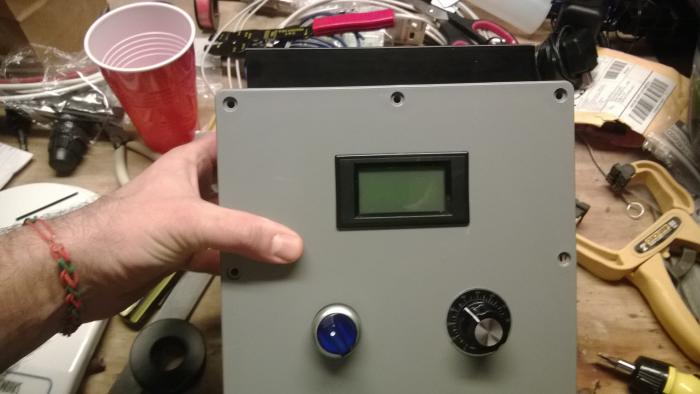
Ok, crimping away - filing down the pvc control box cutouts took me longer than I anticipated, but looks good so far (see attached).

Following the diagram, did you use 14 gauge wire for the connections between the potentiometer and the ssvr? The diagram indicates a medium gauge, but the photos look more like 10 gauge all around. Since I have solder that connection to the dial, it would be easier to use the lighter gauge, but it doesn't look like you went that route?

WP_20140101_001.jpg
 
Ok, crimping away - filing down the pvc control box cutouts took me longer than I anticipated, but looks good so far (see attached).

Following the diagram, did you use 14 gauge wire for the connections between the potentiometer and the ssvr? The diagram indicates a medium gauge, but the photos look more like 10 gauge all around. Since I have solder that connection to the dial, it would be easier to use the lighter gauge, but it doesn't look like you went that route?

Hey, that's coming along nicely! Well done on the meter cutout.

All three wires from the pot are 14 gauge. I see what you mean about it looking like heavier gauge in the photos (probably just distortion due to cell phone camera), but it's not.
 
Back in posts 5, 7 and 9 Passedpawn and I discussed briefly the non-linearity of the response of the SSVR to the position of the potentiometer. Last brew day I took some pictures of the controller with the pot set at increasing positions (0, 10, 20, ... 80) so I could see the relationship with SSVR output as registered on the amp meter. Google was nice enough to stitch those together into a little animation:

ssvr_response_animated-61785.gif


I plotted the dial position (0..80) against volts and amps, below. As you can see, the response of the SSVR is actually very linear *except* at the very low (0-10) and high (70-80) ends of the dial.

ssvr_response_charted-61787.jpg
 
I've purchased the above ssrv for a similar build and have yet to install it. I will report back when I do
 
Back
Top