• Please visit and share your knowledge at our sister communities:
  • If you have not, please join our official Homebrewing Facebook Group!

    Homebrewing Facebook Group

Show us your sculpture or brew rig

Homebrew Talk

Help Support Homebrew Talk:

This site may earn a commission from merchant affiliate links, including eBay, Amazon, and others.
That is one of the more remarkable combinations of art and function I have seen in a while - very nicely done!
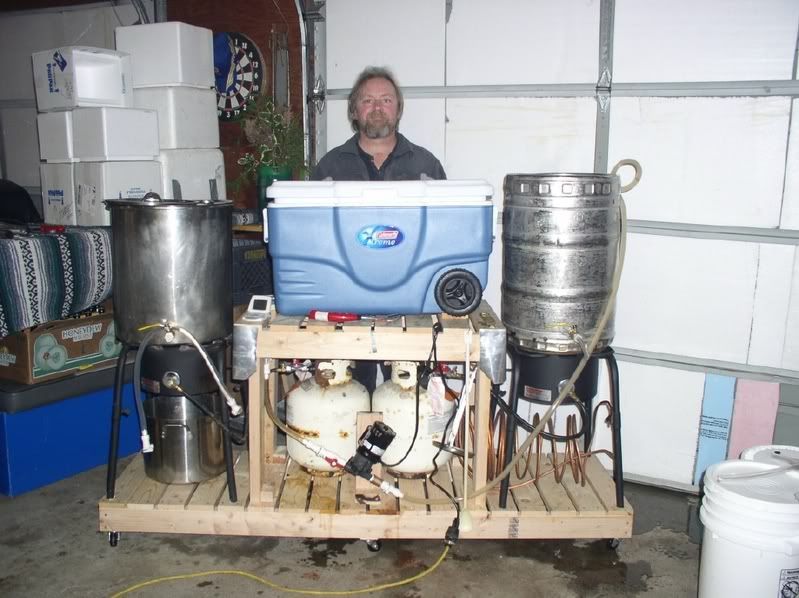
Thank you! that what happens when you put a crazy artist on a project ;) it has taken few years :) I am still working on it and making improvements. On one side for example I have quite interesting bottle capping machine currently able to handle 1 bottle, but in future maybe 3 at time. Will post some video about it on my channel and maybe some pics here also.
 
That is a thing of steampunk beauty!
easy to see I like steampunk style? :) It was interesting project to create all those parts. The control panels I draw with Inkscape and then used laser cutter. They are actually made of mdf that I just painted copper & some stains :)
 
easy to see I like steampunk style? :) It was interesting project to create all those parts. The control panels I draw with Inkscape and then used laser cutter. They are actually made of mdf that I just painted copper & some stains :)
I watched your video, love the simplicity of the mash stirrer! And really curious about your BBQ, smoker stuff...you should join us over here
https://www.homebrewtalk.com/forum/index.php?threads/637254/


My third rig. This one is a Brutus style 11 Gallon post boil rig. I fully plan on replacing the plastic cooler, just havent decided on a bottom drain MT yet.

As of now all manual with dual pumps and camlock QDs. Obviously I cant commit to a brand either
XC6u37N
 
Last edited:
@pinchegil
Can you tell us about the gas line connectors or post a link? I'm particularly curious about the burner end.
The are Tejas Smokers CVO250 . they are for high pressure propane I have two for my mash and boil kettle, my mlt is controlled using a honeywell so I have a two stage regulator to drop 35lbs to 11 inches of water because of this I called them and they opened the orifice for me. These are all connected to Bayou Classic BG14s. They are a really nice feature
https://tejassmokers.com/Brass-Fittings-Valves/22#brass9

They replace your orifices
 
Last edited:
Thanks for the link. I use the BG14s as well. Q: on a normal propane tank am I at low pressure?
"Low Pressure" is 11" WC which is roughly .4 psi - most propane gas grills run that low. But the typical brew burner will come with a 10 psi or greater regulator, so the answer is most likely No...

Cheers!
 
"Low Pressure" is 11" WC which is roughly .4 psi - most propane gas grills run that low. But the typical brew burner will come with a 10 psi or greater regulator, so the answer is most likely No...

Cheers!
the BG14s come with a high pressure orifice which is what you use for a normal propane regulator and tank so you are good to go!! You would only run low pressure if you were connecting it to NG from your house, or if you were adding automation using a furnace valve. In which case you would need to ream out the orifices.
 
The are Tejas Smokers CVO250 . they are for high pressure propane I have two for my mash and boil kettle, my mlt is controlled using a honeywell so I have a two stage regulator to drop 35lbs to 11 inches of water because of this I called them and they opened the orifice for me. These are all connected to Bayou Classic BG14s. They are a really nice feature
https://tejassmokers.com/Brass-Fittings-Valves/22#brass9

They replace your orifices

How many turns do you have from full closed to full open? Do they fall back a little when you adjust them or do they stay exactly where you put them(if that makes sense)?
 
How many turns do you have from full closed to full open? Do they fall back a little when you adjust them or do they stay exactly where you put them(if that makes sense)?
I would have to check, when setting up I shut them, the I turned the regulator full up, then I cracked the needle valve till i could light burner, then I turned an eighth, then messed with the air, then did this again till I found the sweet spot. Since then, I just nudge them either way when i turn it on. Not sure you would have to do this at sea level but at 6400 feet and the type of day you will always have a little nudging. They will stay exactly in place if you do not touch them
 
4396D565-54F1-4315-8BDB-4F5526D17C20.jpeg
Here is an image of our ever evolving brewery. Brutus inspired single tier, E-herms with KAL style 50A panel, propane boil and back up burner under hlt, 30gal pots = 20gal typical batch size. Therminator with inline O2 stone. Double batch yields 40-42 gal fermented in plastic Conicals. Oh and an instant H2O heater facilitates instant dough ins :) In this image we are boiling batch #1 while recirculating/holding mash #2.
E07F4D61-1597-4978-8270-2C2813B93F10.jpeg
Yeast starter at left, recipe notebook, hop additions, hydrometer etc. lower right
 
Here’s my E-HERMS setup, with extra goodies. Brewpi and chamber to the right.
 

Attachments

  • EF556CA0-A213-41C1-9D73-377506A0E0F8.jpeg
    EF556CA0-A213-41C1-9D73-377506A0E0F8.jpeg
    805.1 KB
  • 3A006EEA-AE68-40DA-9112-26F3A342FFE4.jpeg
    3A006EEA-AE68-40DA-9112-26F3A342FFE4.jpeg
    804.3 KB
20180515_095919.jpg
This has evolved over the last couple of years. It runs like a champ now.
There are a lot of photos scattered over many threads of brewing set-ups.I looked all over the web for pics and ideas for a simple sculpture.Maybe it'll help someone to see a bunch in one place.


This was a fairly simple project.
11-247.jpg


Cheers:mug:
20180515_095919.jpg
 
View attachment 570418 This has evolved over the last couple of years. It runs like a champ now.

View attachment 570418

holy huge a$$ counterflow chiller batman!

is the smaller coil in the pot under the stand a HERMS/temp control thing? I notice you have a temp probe directly on the output side of it going back into the mashtun (I assume it's a mashtun).. how do you modulate the temperature in that? (is there a coil/heat stick in there I can't see?)

how much heat-loss do you get from recirculating through all that copper?
 
It’s actual brewers and vintners hose, only half inch id. Probably should have gone 3/4, but the flow rate is way more than adequate with our little giant pumps. I recall it being really difficult to get onto the barbed fittings. It was $7 per foot from McMaster. Here’s the link: https://www.mcmaster.com/#catalog/53715K41
It’s really durable stuff, never kinks, and our 3 original hoses are approaching 10y old and still going strong!
We used that fittings from Pro flow dynamics. No regrets other than ordering from pro flow twice, over a year apart. They switched suppliers so the fittings from the second order are compatible but slightly different. It bothers me a tiny bit but no leaks though!
 
holy huge a$$ counterflow chiller batman!

is the smaller coil in the pot under the stand a HERMS/temp control thing? I notice you have a temp probe directly on the output side of it going back into the mashtun (I assume it's a mashtun).. how do you modulate the temperature in that? (is there a coil/heat stick in there I can't see?)

how much heat-loss do you get from recirculating through all that copper?
The smaller coil is my original herms coil set up from back when I had 2-10 gallon coolers( mash tun , hot liquor tank) . There is a 4500 watt element in that 5 gallon pot and the controller on the left controlled that. The heat loss is about 10 degrees from one end to the other if you were not reheating it back up at the herms coil. I still use it as I like only heating 5 gallons of water to control temp, and my 20 gallon HLT is heating sparge water independently. HLT and BK both have 5500 watt ripple elements. The counter flow chiller takes you from boiling to whatever temp you incoming water is in one pass with Chugger pumps running full blast, in winter I have to slow the flow of incoming water or you will end up with wort in the high 40's or low 50's.
 
IMG_2219.jpg
IMG_2201.jpg
IMG_2202.jpg
Finally completed my electric mini brewery. Controller built, all small leaks corrected, thermometer and probe calibrated and Monster Mill up & running thanks to the very powerful American Aleworks motor. I customized the Autosparge in the hopes of avoiding channeling during the recirculation. Time now to brew. My cost per pint just went way up but what the heck.
 
Last edited:
That’s a schweeet setup.

Can you roll your mill outside to crush grain? I’ve read you should mill and brew in the same space.
 
Last edited:
[[...]I customized the Autosparge in the hopes of avoiding channeling during the recirculation. [...]

Neat looking system.
fwiw, I've been using the same Blichmann autosparge valve for a couple of years in a 20g mlt and ime if you use the product the way it was designed there will be no channeling, and no need for all that copper in your mash...

Cheers!
 

Latest posts

Back
Top